

What is bias? Strictly, it’s the diagonal direction on a woven fabric.
As commonly used, the stretchiest direction of fabric.
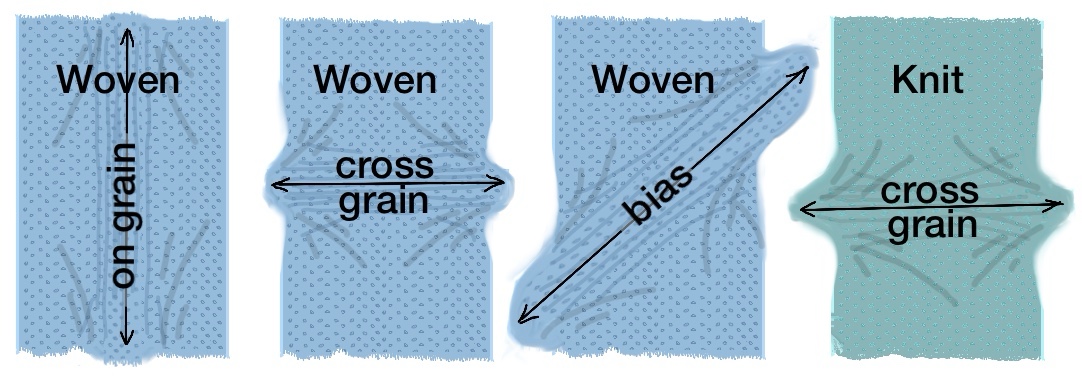
On grain, a firmly-woven fabric will stretch slightly; cross grain a little extra. Bias has considerably more give, comparable to cross-grain on most knits (you gain nothing by cutting a knit diagonally). “For bias strips from a knit, cut them crossgrain” is technically incorrect but a common direction.
For the rabbit hole of designing garments cut on the bias for fluid drape, start with the couture designer Vionnet (Wikipedia link).
This tutorial is about binding edges with bias. They do not fray, either in woven or knit, so can be used in very narrow strips.
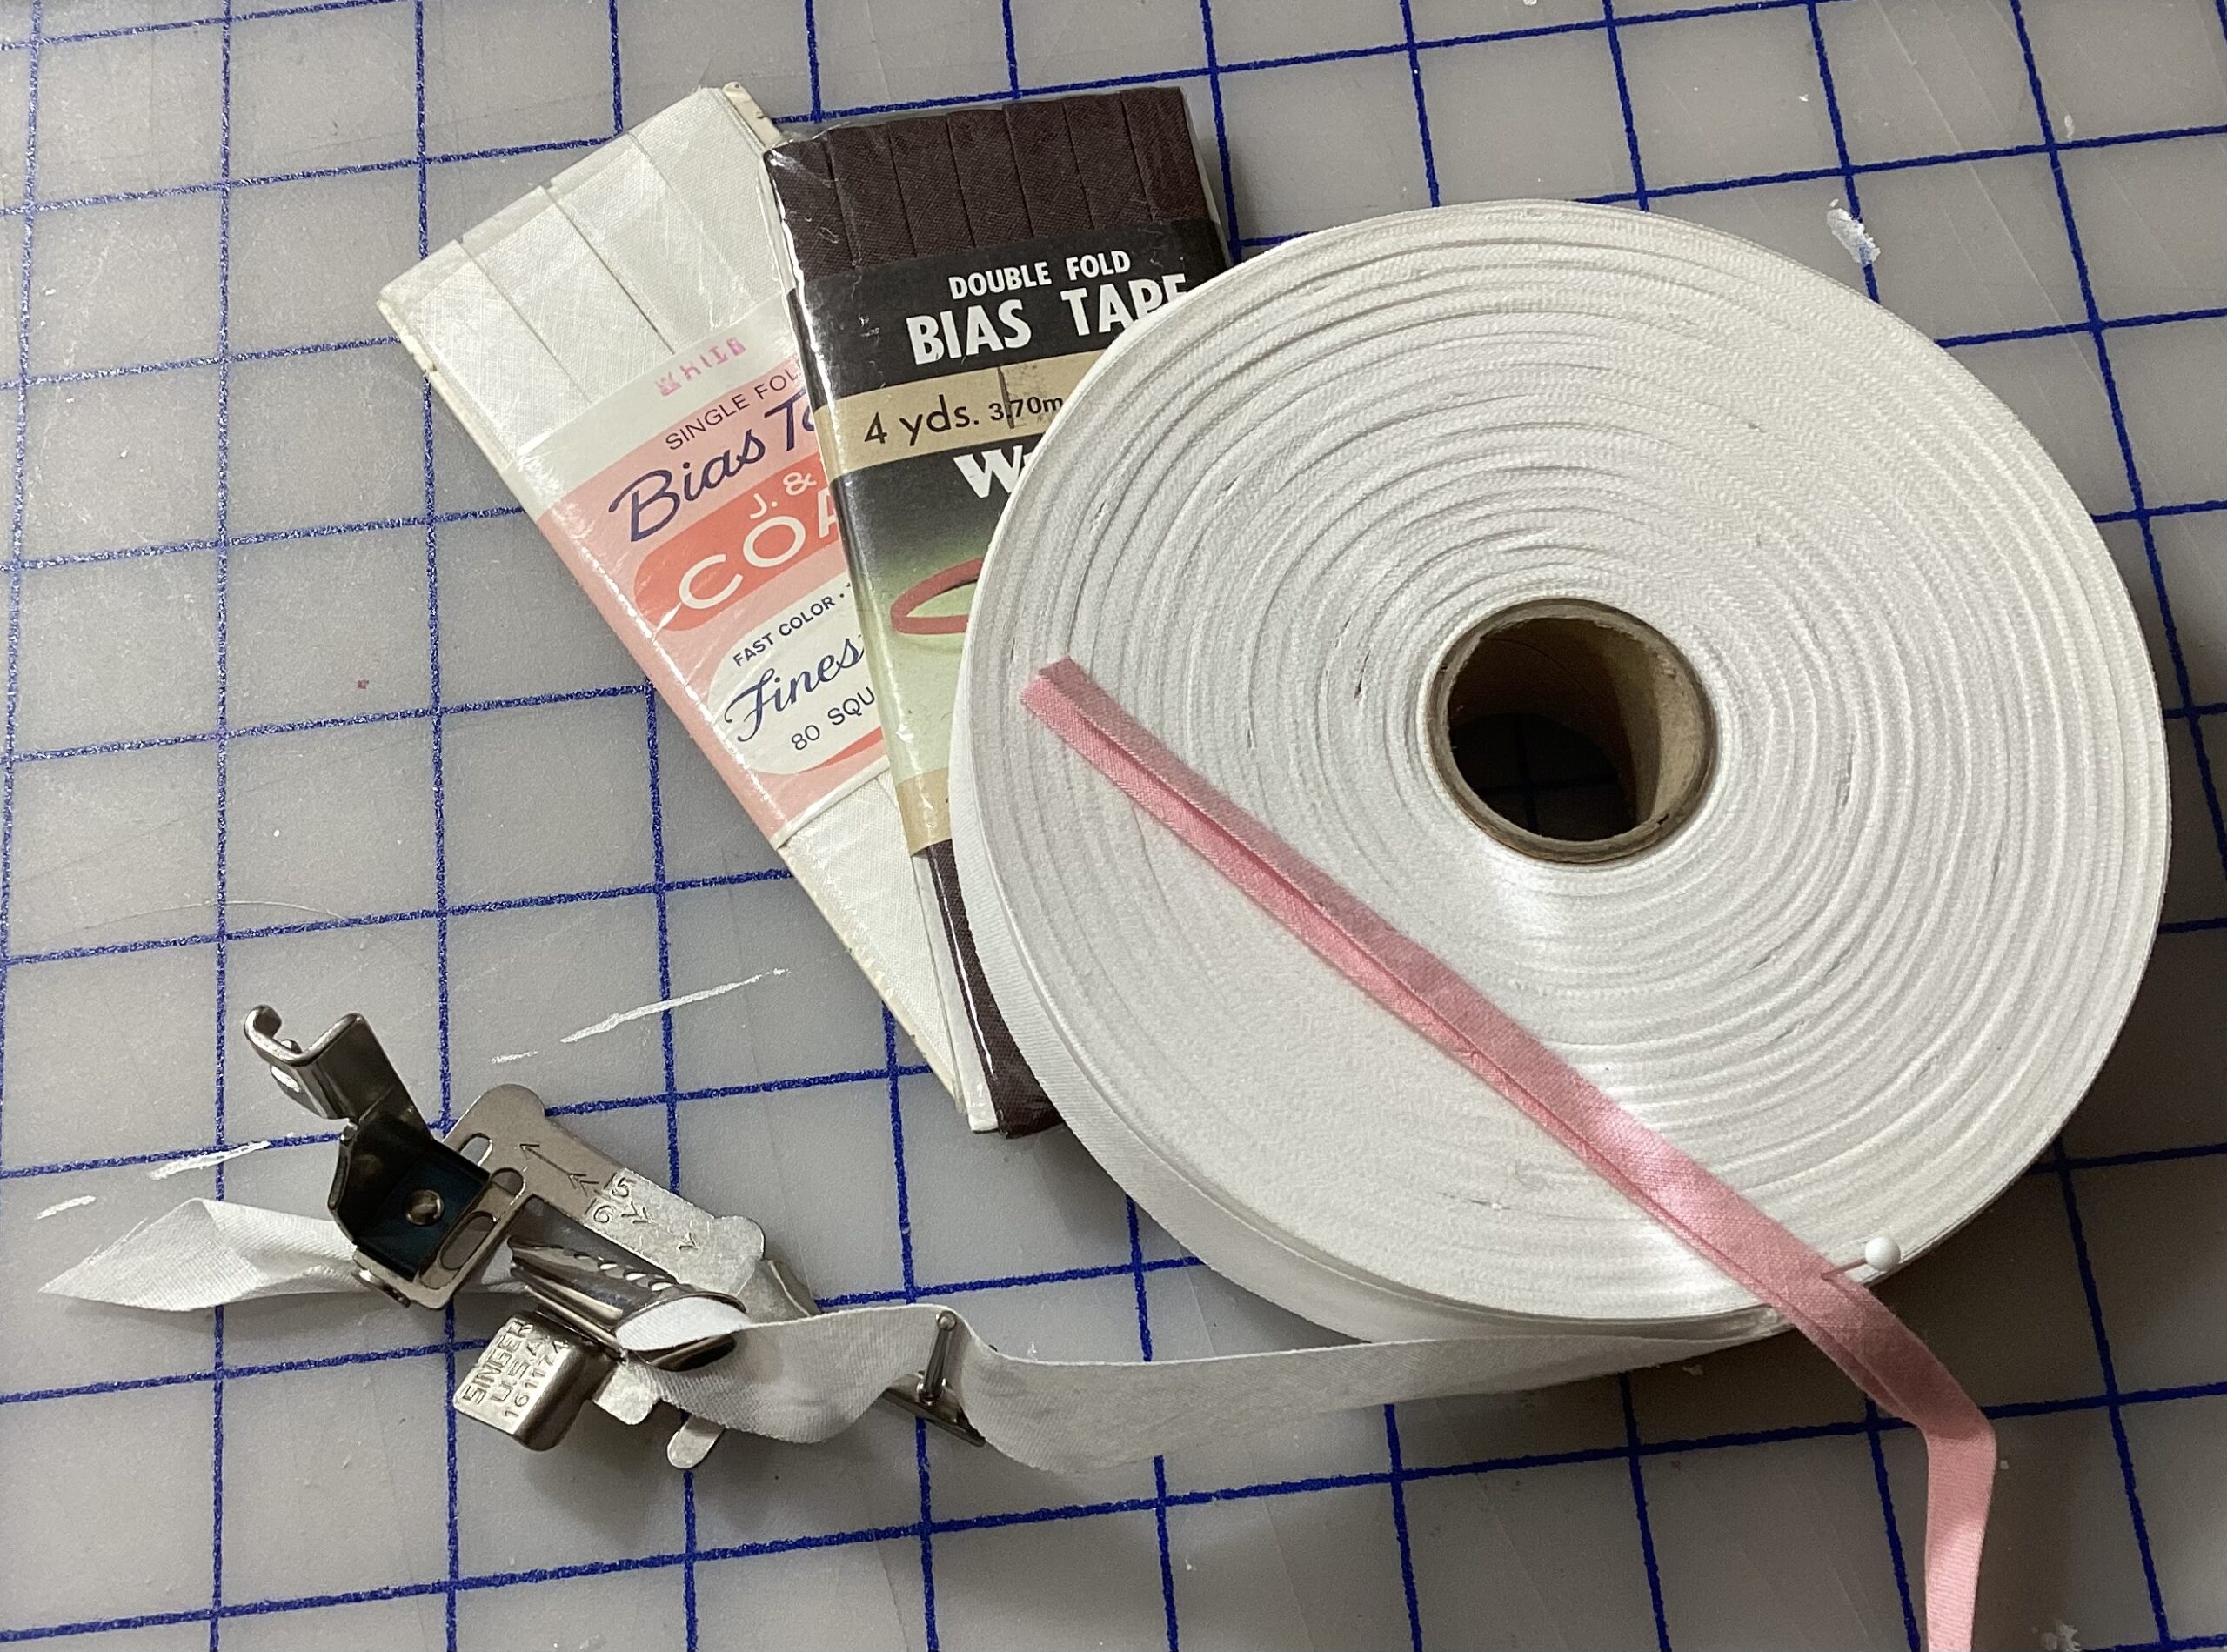
Commercial packages in standard widths (others are available) and a roll of bulk put-up threaded through a binding attachment. Note that the prefolded is asymmetric, so that it can be sewn as in example C below.
The sewing machine attachment is useful for either flat or folded. It’s fiddly to feed the tape through (I do that before attaching to the needle bar), but then almost all the length is sewn in one pass. The joining of loops is done afterward.
Plan on a practice run, to get used to feeding the fabric into the tape fold. Not shown in the examples below.
Bias strips easily stretch out, so handle them carefully.
Preparation: pre-treat your fabric before laying out and cutting.

Stay-stitch your garment’s raw edges slightly inside the future seam lines (closer to the raw edge) before starting to assemble it.
Making your own bias tape: first determine the width you’ll need – it’s significantly greater than what you’d think due to TOC – “ turn of the cloth”. That’s the extra that wraps around the flat bits: in a standard bias binding, around an extra seam allowance’s worth.

How do you calculate it?
Hands-on. It will vary according to the thickness, tightness of weave, and drape of your fabric.
Lay out your fabric and roughly deal out your pattern pieces, being sure that they’re on grain. DO NOT PIN OR CUT. Take a double layer on the bias from an unused section to use for your sample. In the unlikely event that your bias has interfacing, that must be in this sample.
I like to use long, flat-head quilter’s pins instead of chalk (which can smudge off) or washable (or permanent!) markers. If you’re feeling upscale couture, a contrast basting thread. La.
These photos are shown with the fabric pieces cut on grain. The process is identical for bias, as cut above.
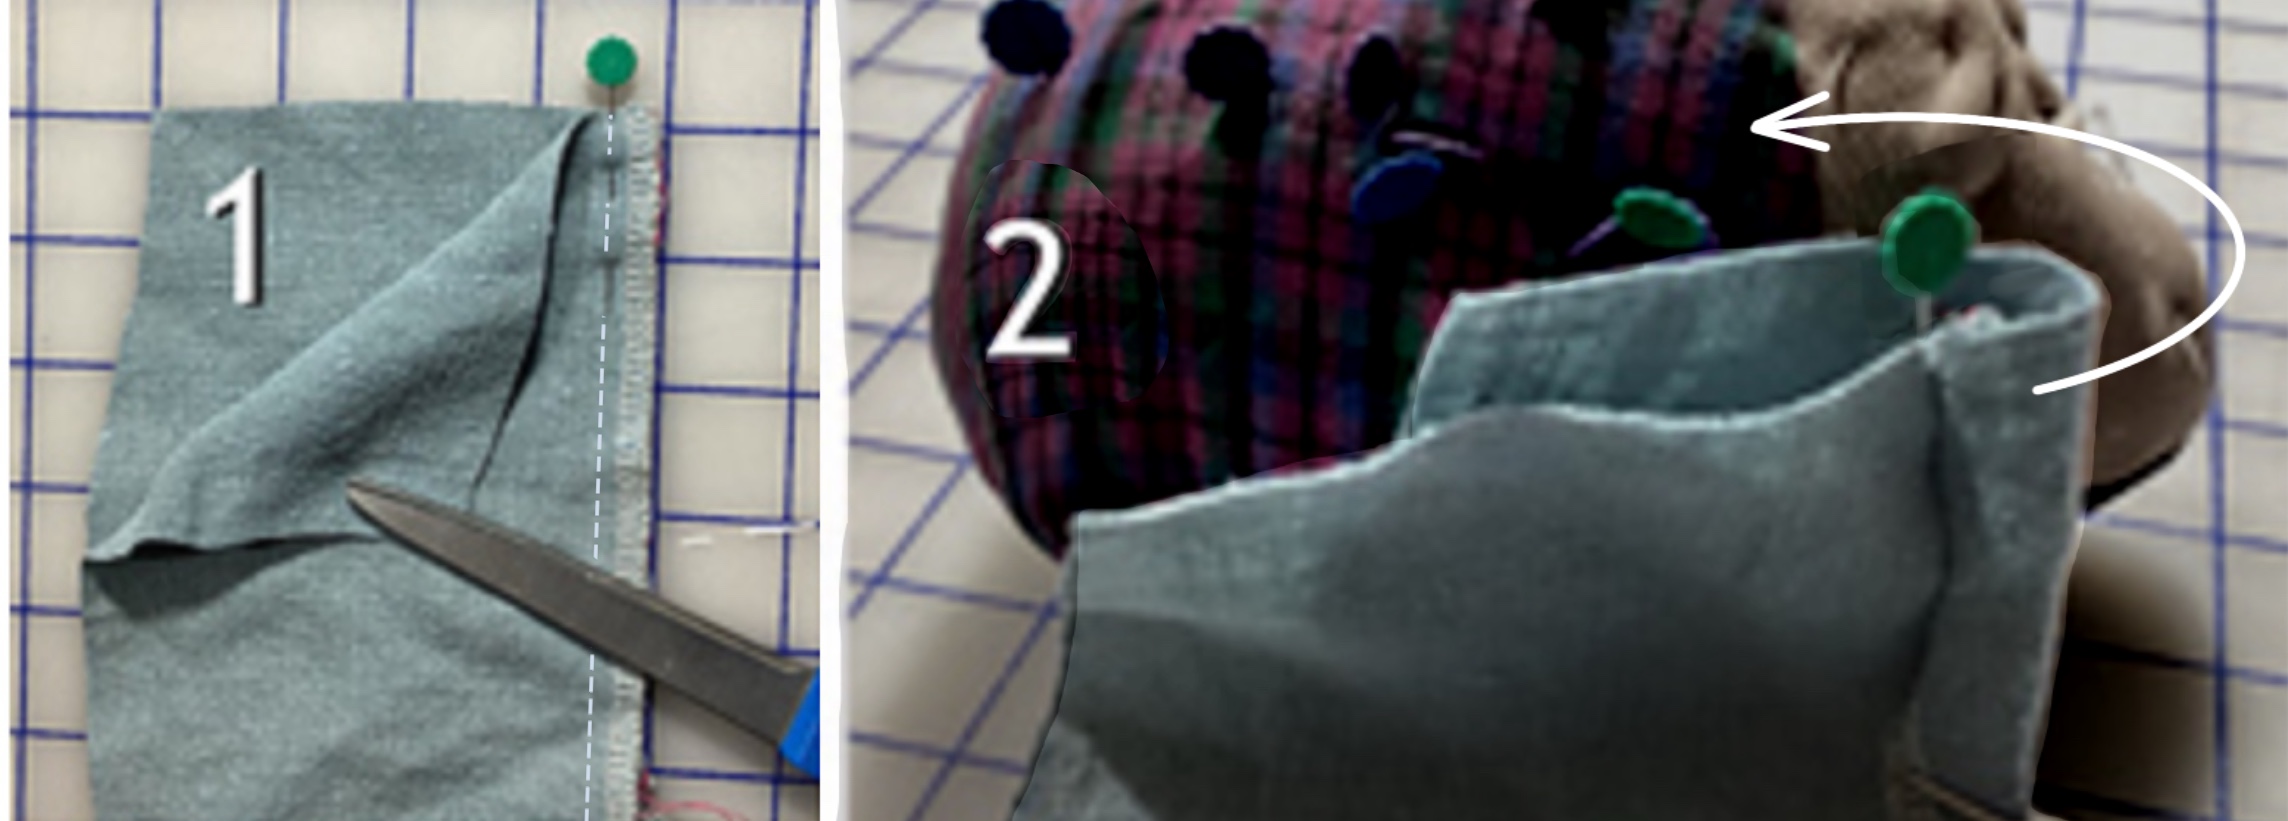
- Sew the pieces along one edge with the seam allowance you’ll be using. This sample is serged; on bias it isn’t necessary, and minimizing bulk is an advantage. Put a pin at the stitching line.
- Wrap the top layer around the seam allowances to the back.
- Put another pin exactly where the far end falls.
- Unwrap and measure.
We have gained an entire seam allowance’s worth. This would be less on a lightweight silk, and more if denim. As long as you’ll be using your standard seam allowance, you can cut strips to those specs. If you’re binding a blanket or quilt, retest for that width.

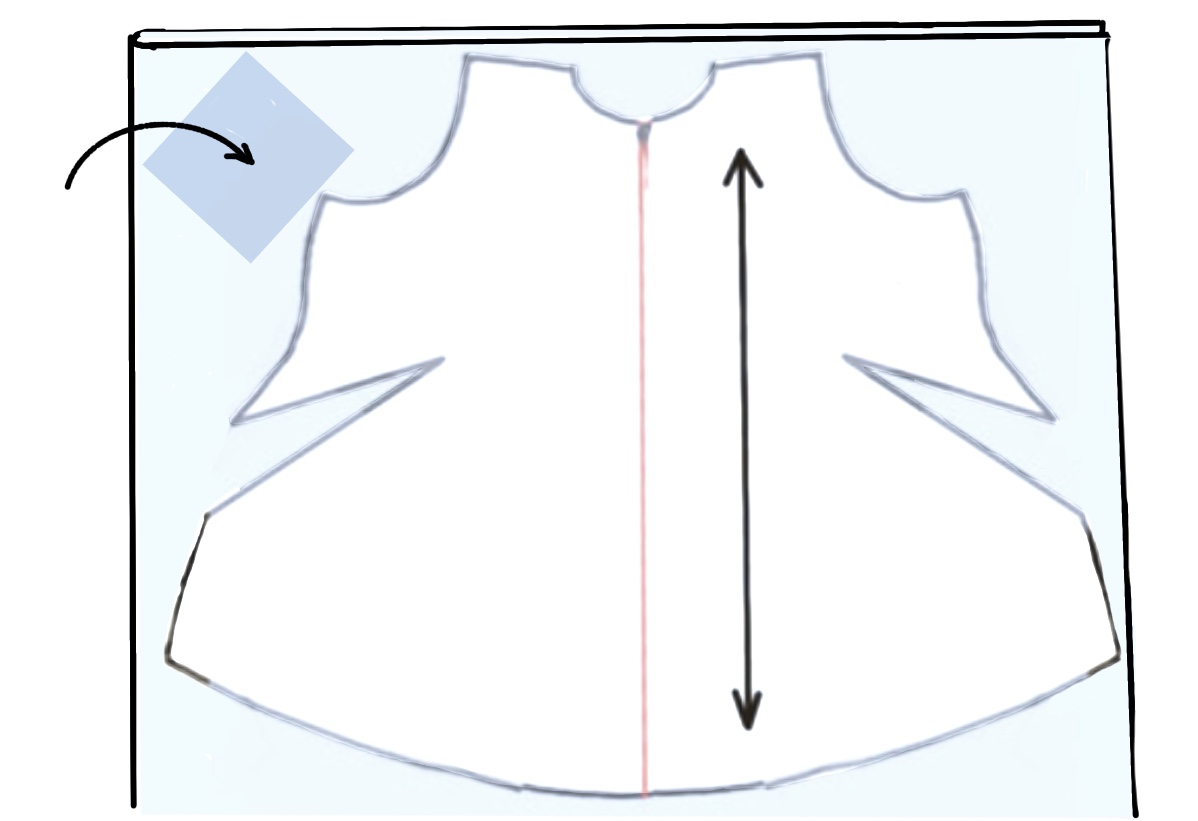
Top: the bias pieces stacked together in a rectangle. They could be slipped sideways into a parallelogram to make the layout easier. Don’t bother to stair-step the short ends, just be sure the needed length is there and cut it diagonally.
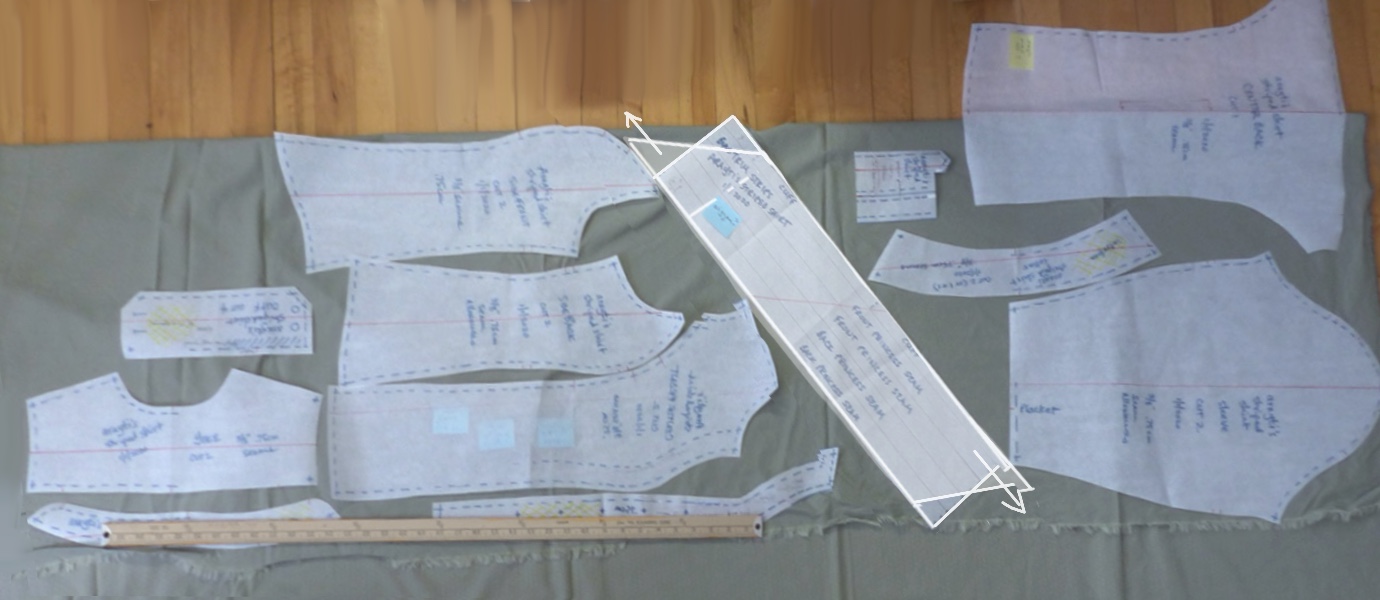
Pattern pieces for a shirt roughly laid out, with the block of staggered strips on the true bias.
Laying out and cutting bias strips:
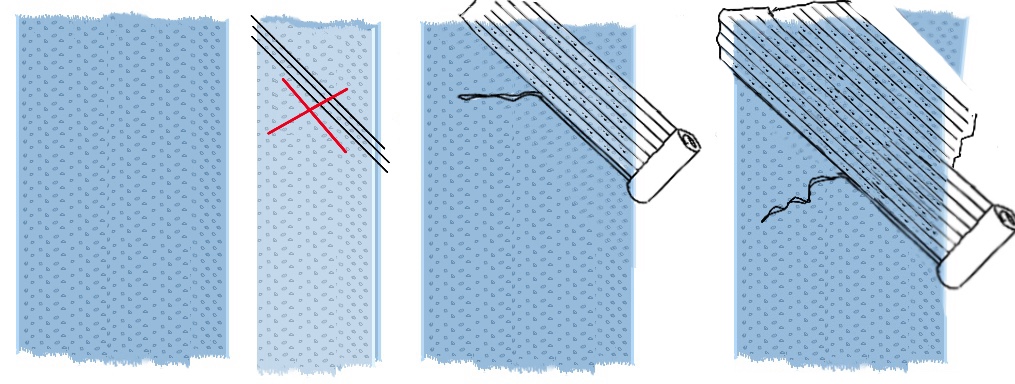
What doesn’t work is to fold your yardage in half and cut diagonals: you’ll get big Vs with the center chunk unusable.
- Instead, take a length of pattern paper and draw correctly-spaced lines on it.
- Pin the strips onto the top corner of your opened-flat fabric.
- Make a new set of lines on fresh paper.
- Pin, butting the paper exactly.
- Repeat until you run out of fabric or enthusiasm. Once you’re using the full width of the fabric, you can lift the entire block, position it exactly on the cut edge, reset the pins (don’t skip!) and continue.
- Only now do you cut apart the strips (if you can spare the pins, leave them in until ready to sew). If you’ve got too many layers to cut cleanly, cut only a few at a time.

While seam allowances showing through can be a design element, if they interfere with the style you can disappear them.
With binding that matches your skin tone your seams will not shadow through to the outside. Couture uses silk; nylon tricot is a cheaper option. Find it from bra suppliers or costume houses (ballet/dance/figure skating).
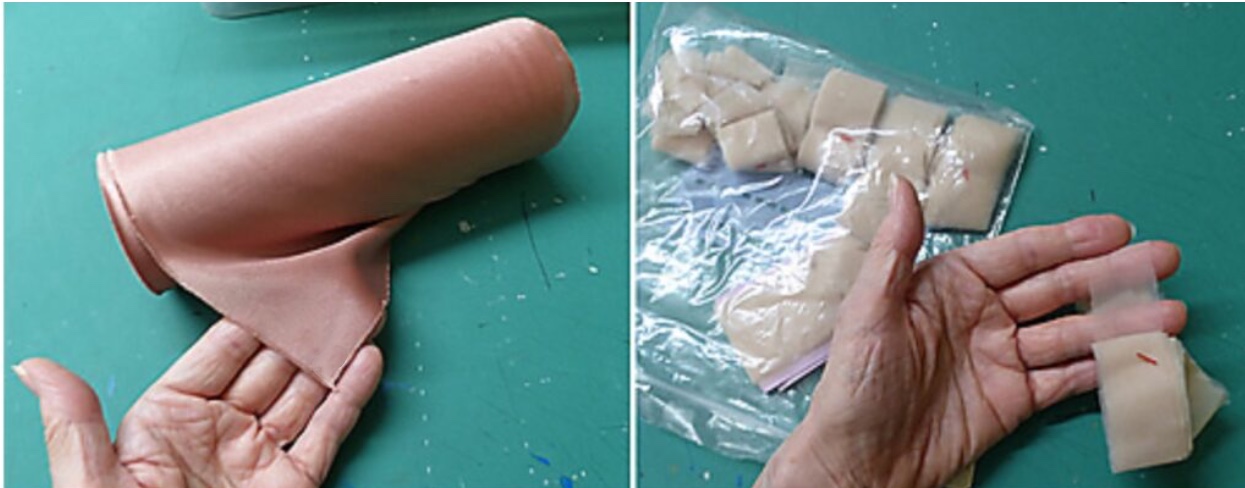
Two weights of bias tricot in my skin color: the first a roll from a lingerie factory, the second strips I hand-cut. These are loosely rolled and held with the little widgets from a tagging gun such as are used to put price tags on garments.
Claire Shaeffer told of a woman who was loaning one of her gowns to a friend, and sent her to her couture house for alterations. They said, certainly, madame, no problem (and no charge – they made plenty up front) but it will take slightly longer as we need to redo the seam binding for her friend’s different skin tone.
Very sheer or lightweight edges may roll. The old solution was spray starch. Wash it out after.
It may get sticky as you work, if so, keep a damp washcloth on hand to wipe down the bed of your machine (likewise grubby hands).
You may need to de-crud your needle too (use a wet Q-tip). The spray starch means its own set of fussing, but is far preferable to the stuff rolling and distorting.
Piecing bias strips
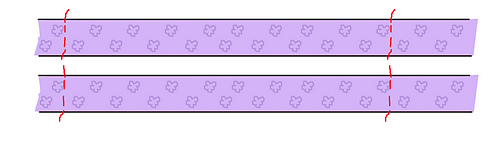
Bias binding’s seams are sewn on- or cross-grain (so they appear as a 45° angle rather than straight across) for stability.
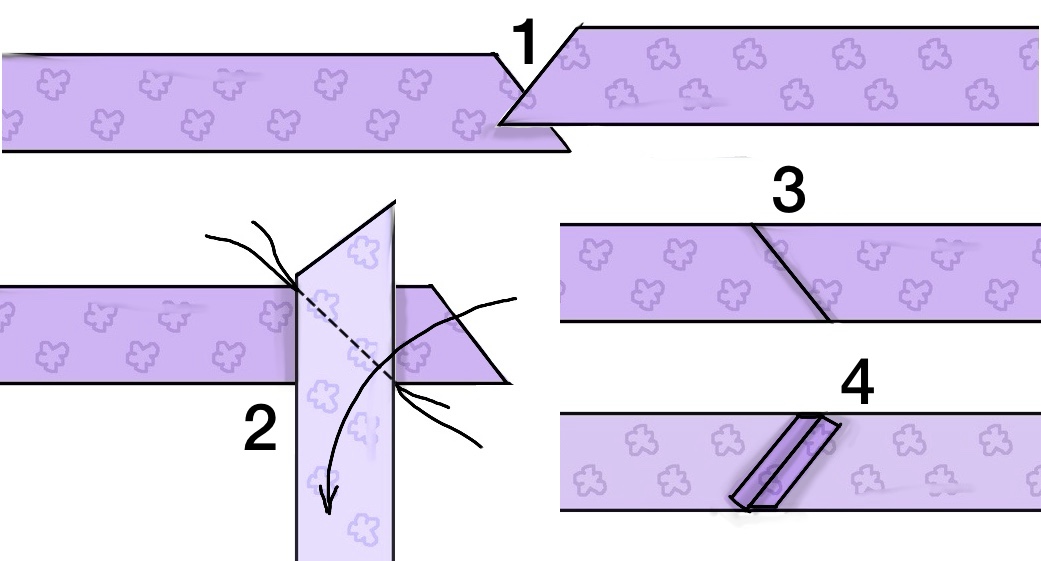
The strips’ short edges will always fall to maximize wastage. You will learn to get past it.
- Strips to be sewn
- Flip right-hand strip over and sew exactly from raw edge to raw edge. Press. Trim, press.
- Right side
- Wrong side
Types of bias binding:
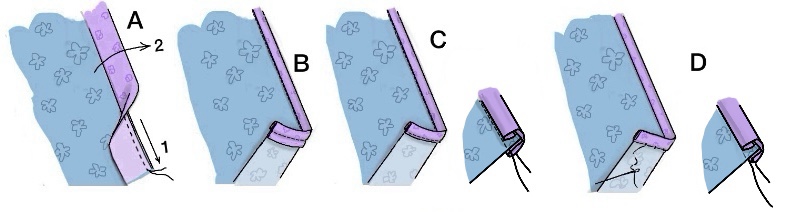
A. Set up for B through D:
- Right sides together, sew bias to edge of garment. Press.
- Wrap the bias around the seam allowances to the back. Press.
B. Hong Kong Finish, popularized by the tailors there as it was a fast and light-weight finish for tropical suits and other
garments. The raw edge of the bias is usually hidden and will not fray. It’s more supple and less bulky than the following two treatments.
- Wrap the flap around the seam allowances to the back. Press.
- From the right side, stitch in-the-ditch with a short stitch length. Press.
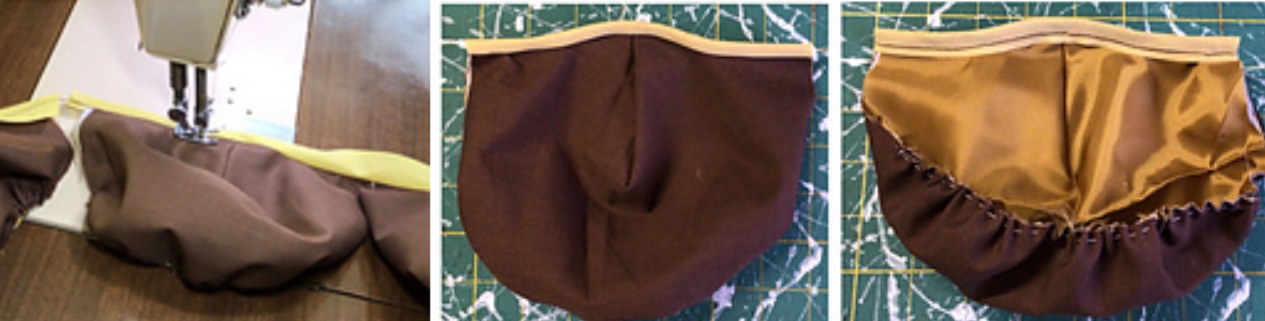
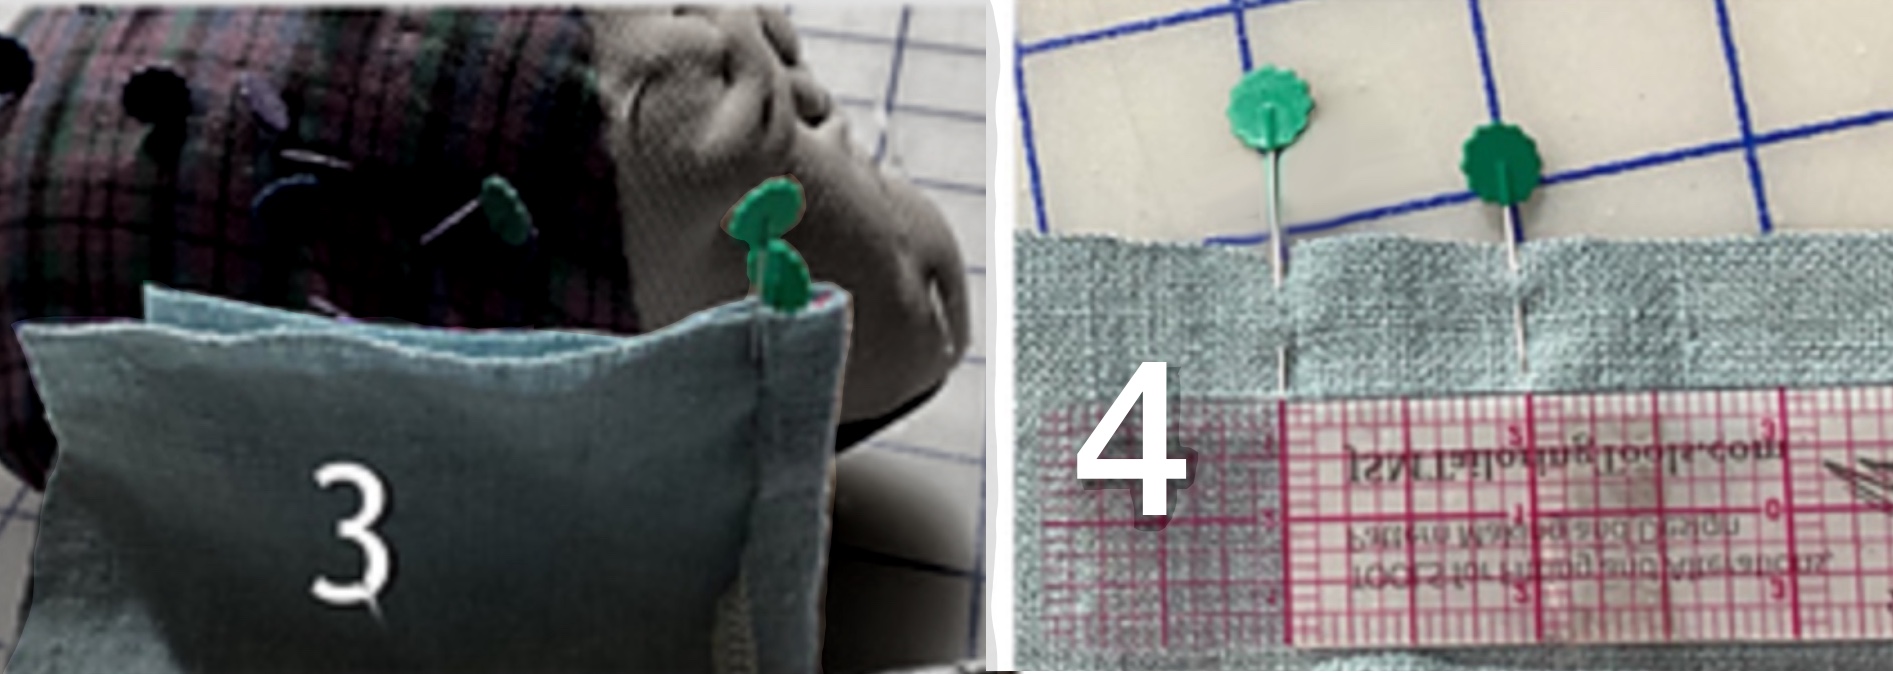
The Hong Kong finish is used to bind the top edge of these masks, chained together for more efficient sewing
C. Machine sewn (most common)
- Wrap the bias around the seam allowances and tuck it under itself so that the back fold is wider than the front. This gives the same result as using pre-folded commercial stuff.
- Press.
- Stitch in the ditch from the right side, going slowly and feeling that the underside is laying correctly. Press. If the inside stitching is off a bit but catches the fold, it’s okay. It’s secure and doesn’t show. If you want an application that’s even on the wrong side, too, use the next method.
D. Hand-finished, (Couture)
- Wrap the bias around the seam allowances and fold it back on itself to barely cover the machine stitching.
- Press.
- Slip-stitch the fold from the wrong side.
- Press.
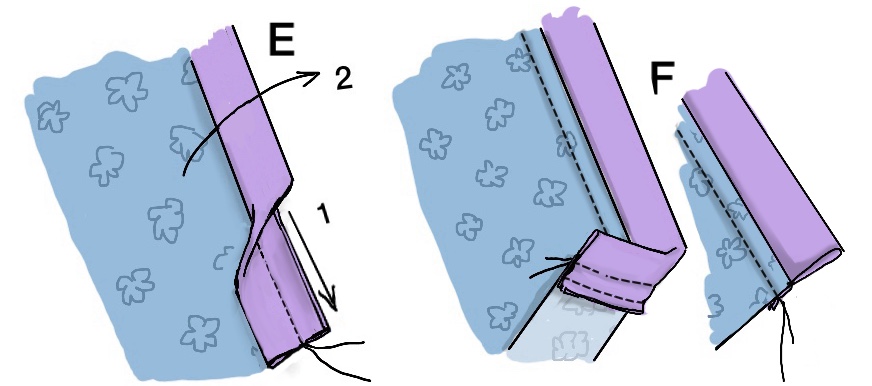
E. Set- up for F
F. Common industrial binding; also the usual treatment for a V- neck
- Fold the bias right sides together and sew to right side of garment. Press.
- Fold all layers below the stitching down. Press.
- Stitch, catching all layers (this stitching will show).
Actually applying bias strips
For the armscye strips, key (quickly hand-baste*) a couple lines across before sewing the first. This lets you adapt the length of the second strip and sew it into its loop before applying it.
* or chalk – the advantage of thread is that it shows from both sides and won’t smudge off
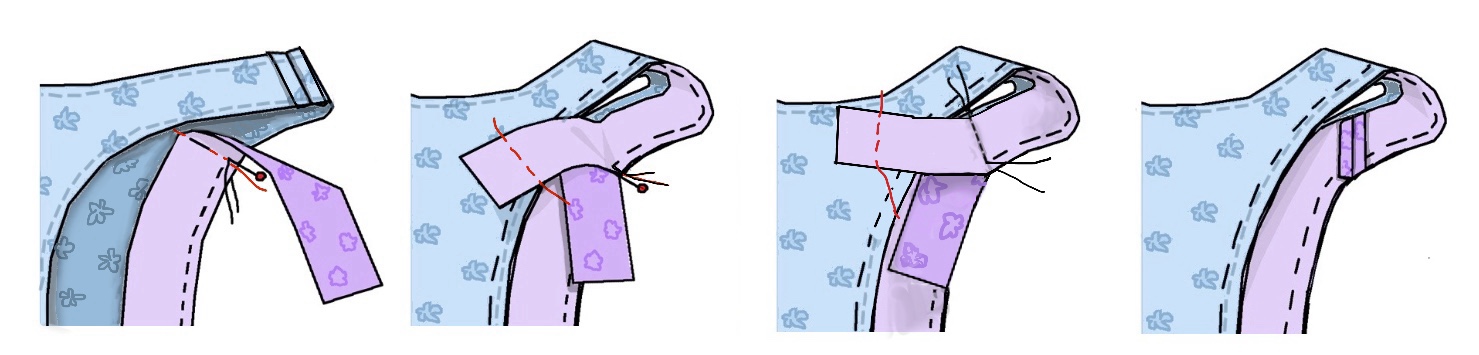
- Begin binding a neckline with the top inside out.
- Stretch the bias slightly as you apply it (if you under- or over-shoot, take it out and re-do it).
- End at the same point. Do not catch a fold of the strip where you started.
- Lay the strips across each other and sew them together, ending exactly where the ends of the stitching meet. Tip up the strips to sew; do not catch the main fabric underneath.
- Trim and press flat.
- Turn the top right side out. Fold bias to the wrong side and finish with one of the methods shown above.
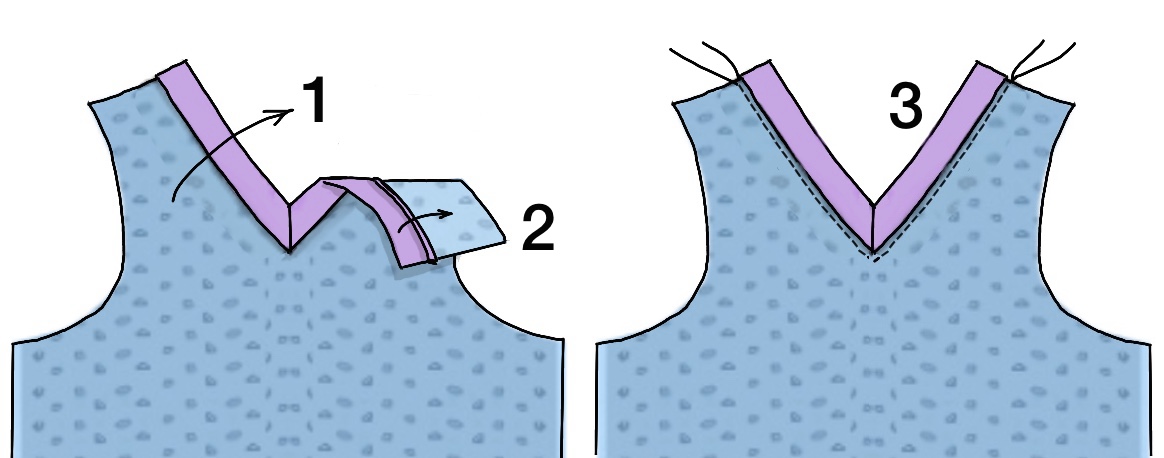
Binding a V-neck.
Industrial method:
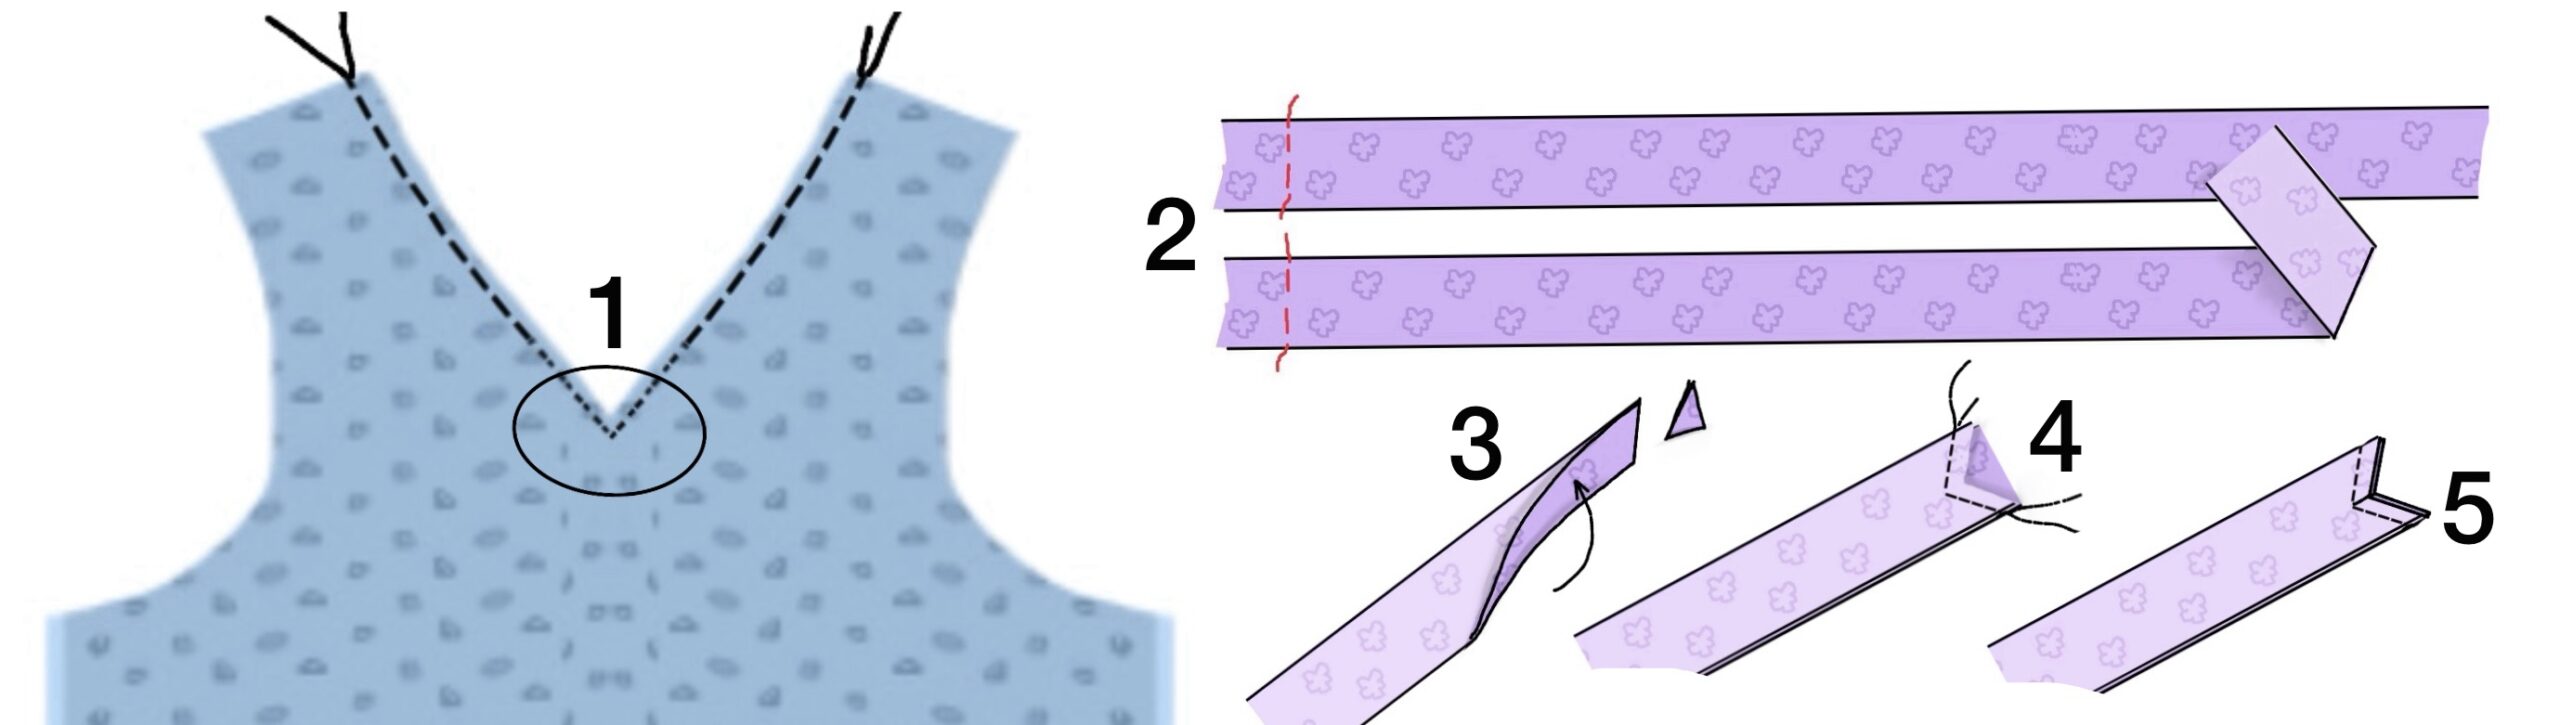
- Stay-stitch the neckline, tightening the stitch length a thumbs’-width either side of the Center Front (CF).
- Key one end of the two front strips.
- Fold one strip at its non-keyed end and cut on a diagonal.
- Lay this strip face down on the other and sew with a narrow seam. Press.
- Trim second strip to match (this is more accurate than trying to do both at once). Clip to within a thread at the CF. Press.

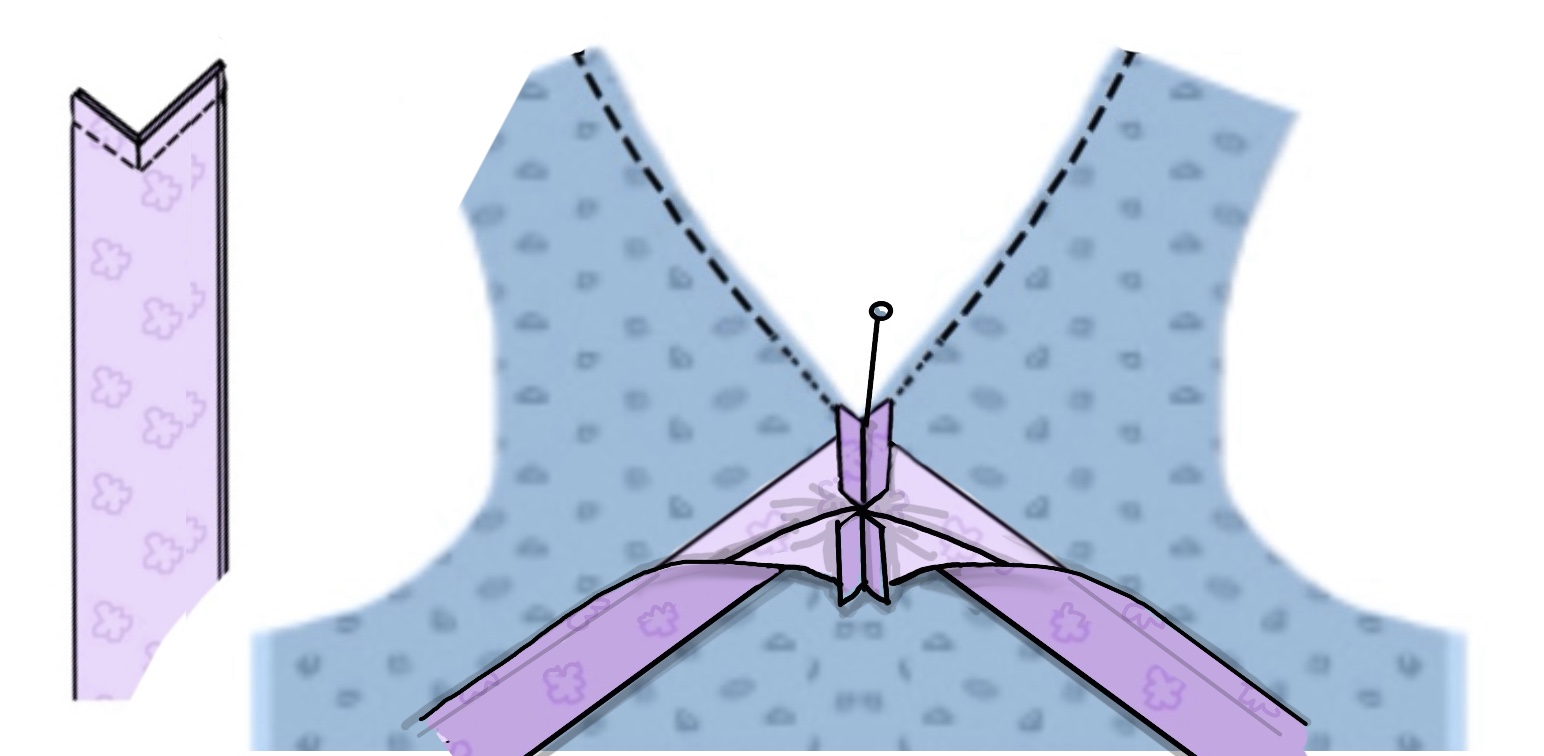
- Fold the strip wrong-sides together, splitting the seam allowances. Press.
- Narrowly baste together at the raw edges (if you’re tempted to serge, do it later when the bodice layer can be included).
- Lay the bias on the bodice front, with the sewing lines exactly stacked. Run a pin vertically through this point.
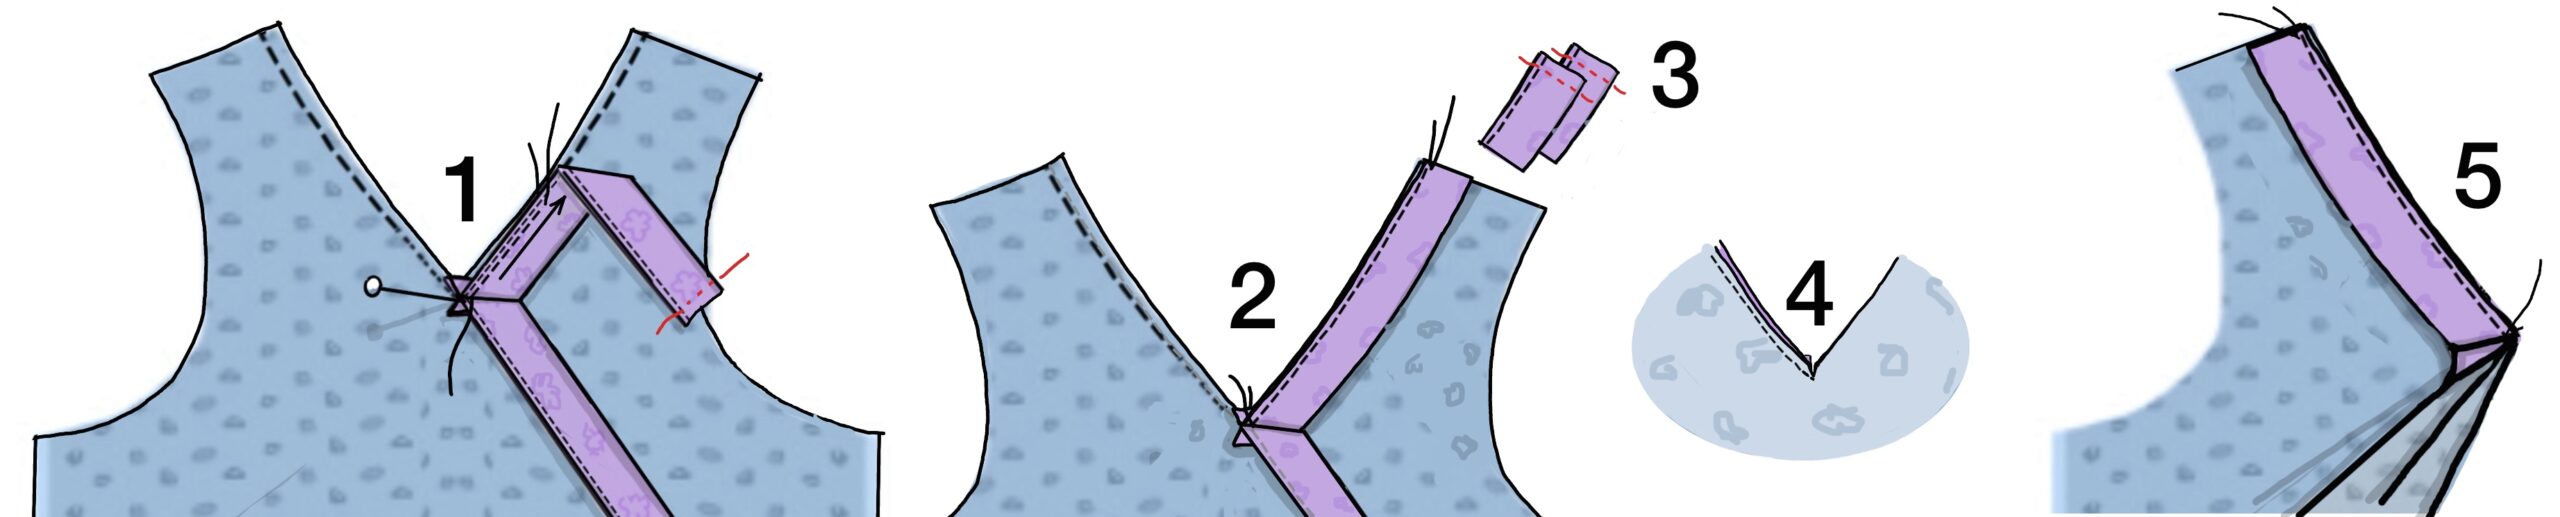
- Pivot the bias piece on the pin to lie along the left side of the neckline.
- Sew from the center front to the shoulder seam, stretching slightly. The stitching must begin exactly at the center front.
Press. - Trim both ends to length, matching the keying.
- Clip the bodice to a thread or two at the V in the center front.
- Pivot and sew the right side. Press.
(optional) Serge the raw edges (not shown)
- Flip the seam allowances to the inside.
- Press all layers of the seam allowances down.
- Narrowly topstitch the seam allowances, right side up, so that the bulk is eased in by the feed dogs. This stitching will show.
More finished versions:
Cut one side of the bias wider for the part that will flip to the inside.
Omit basting the outside edges of the strips together.
- Sew only one side of the bias to the top, same steps as above.
- Finish with B, C, or D as above, enclosing the seam allowances. Carefully trim out excess bulk as needed.
Notes:
There isn’t a magic formula for widths and lengths of bias; it’s safest to run a quick test. It took me a couple tries of hand-basting to get the tension right for the first wrap top for Arayti – the stretch varies as the shape curves, particularly under the breast.
The binding tilting out/not lying flat means the strips are too long, so you can reuse what you have once you’ve picked out its stitching.
A beautiful bias edging is worth it, IMHO. Arayti and I made several of these ribbed knit tops and the binding lengths were different for each fabric. I did the first, talked her through the second (we posted it back and forth), and stood by while she did a couple more and then went on to bias-bound tank tops.
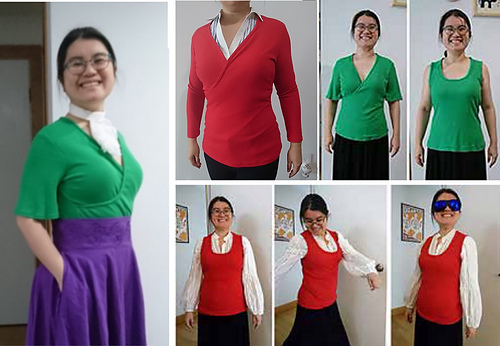
Unlike the Western style, which wraps one way for men and the opposite for women, the Asian wraps as shown for the living.