
Copyright 2024 Carol Kimball
(this is being added to and edited)
So, what’s a block? This is the industry term for a set of pattern pieces that are ready to lay out, cut and sew. They have seam allowances and wearing ease. More advanced blocks (evolved from the basic starter) can have design ease.
You will never again need to struggle adapting a commercial pattern (we’ll cover how to transfer interesting details from those: far less work than altering them).
All of your blocks fit together. Any sleeve/cuff/placket will happily marry with any shirt or top.
Whenever you want a different style, you pull out your basic block, trace a copy and make your modifications. You know up front that it will fit.
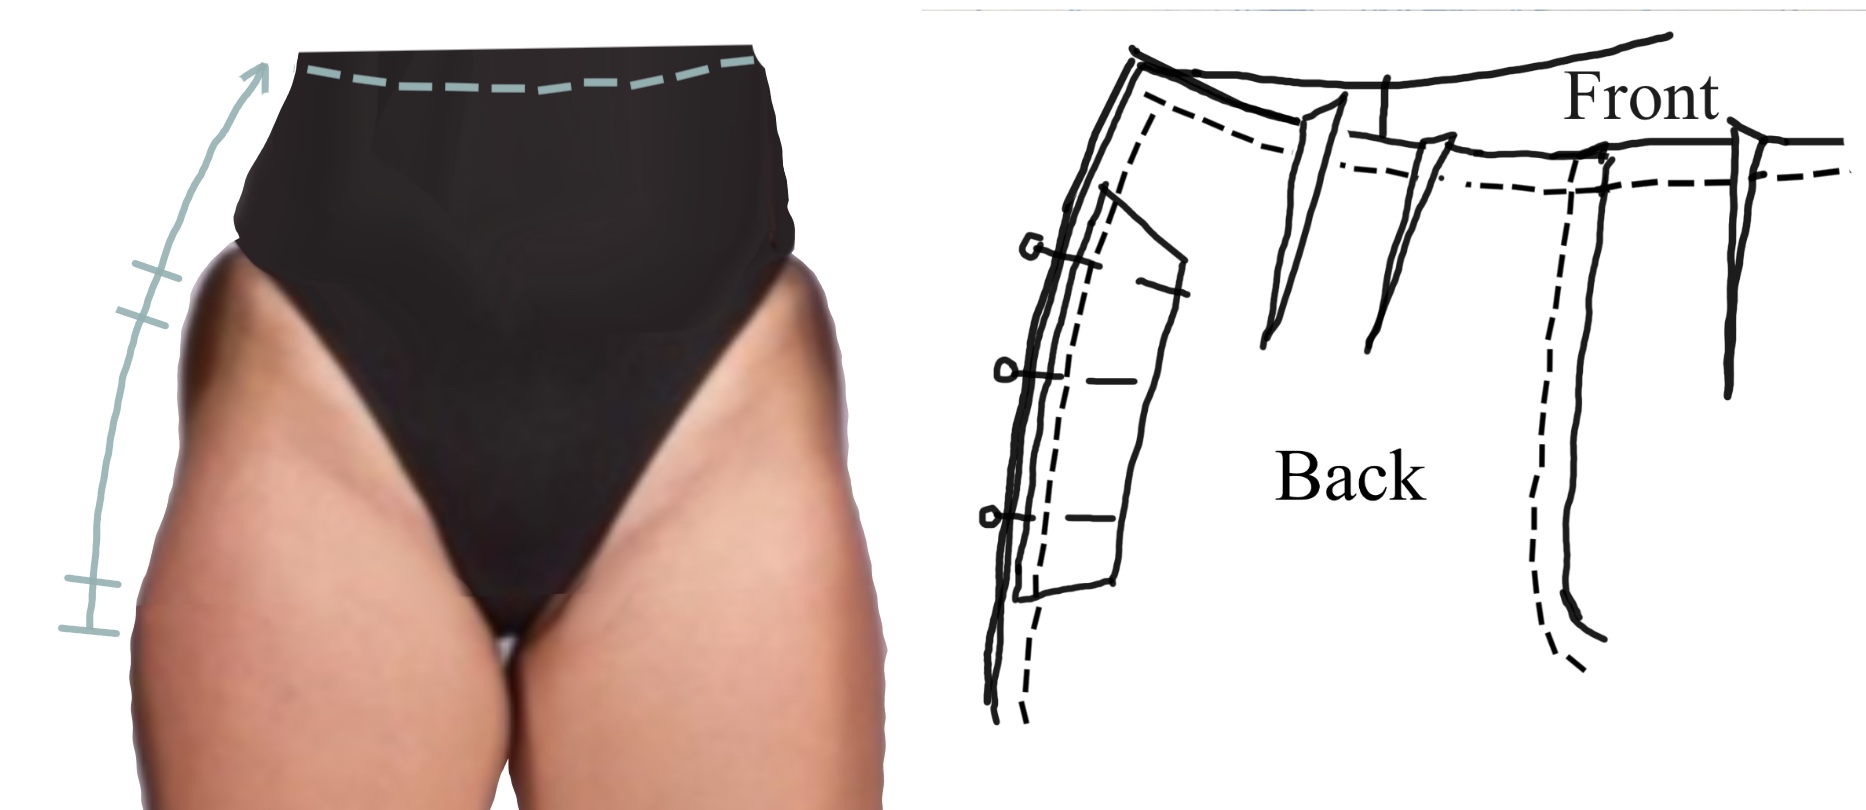
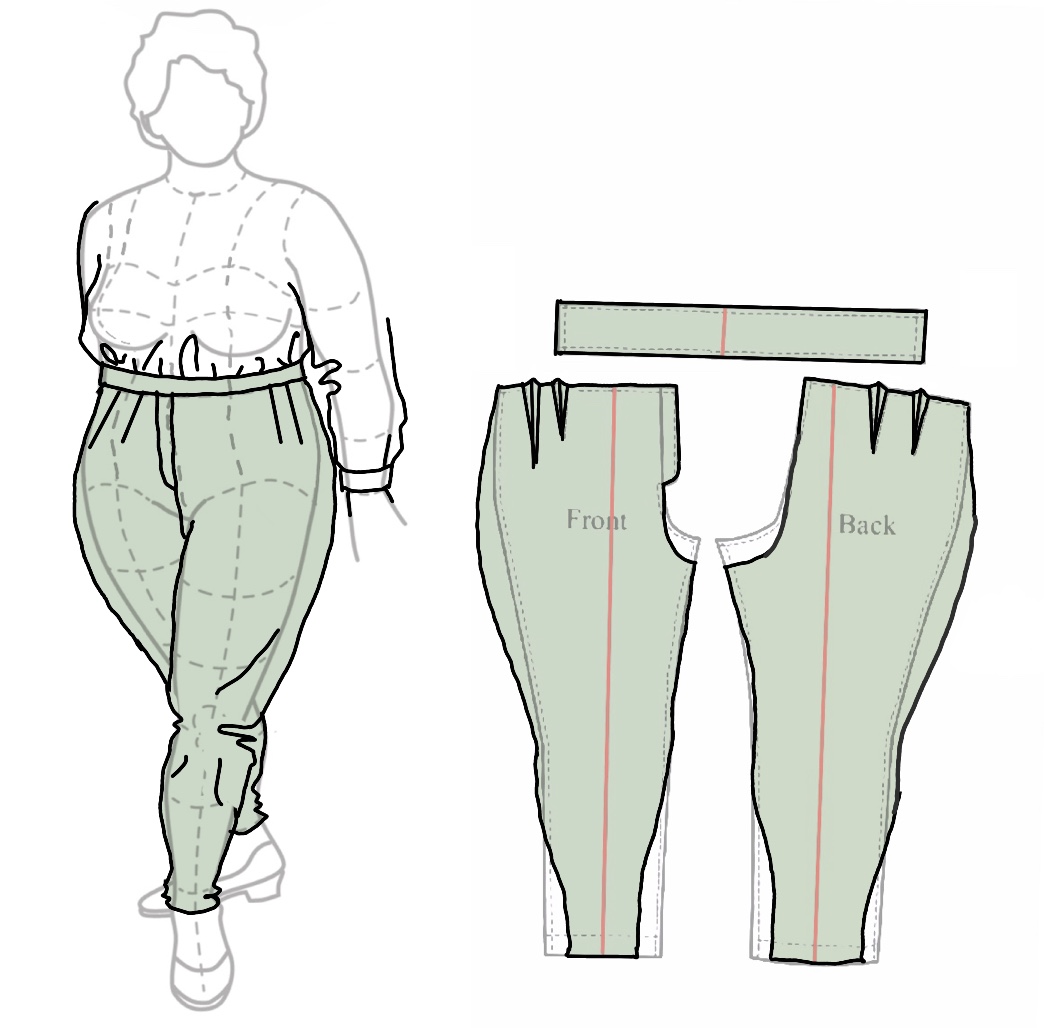
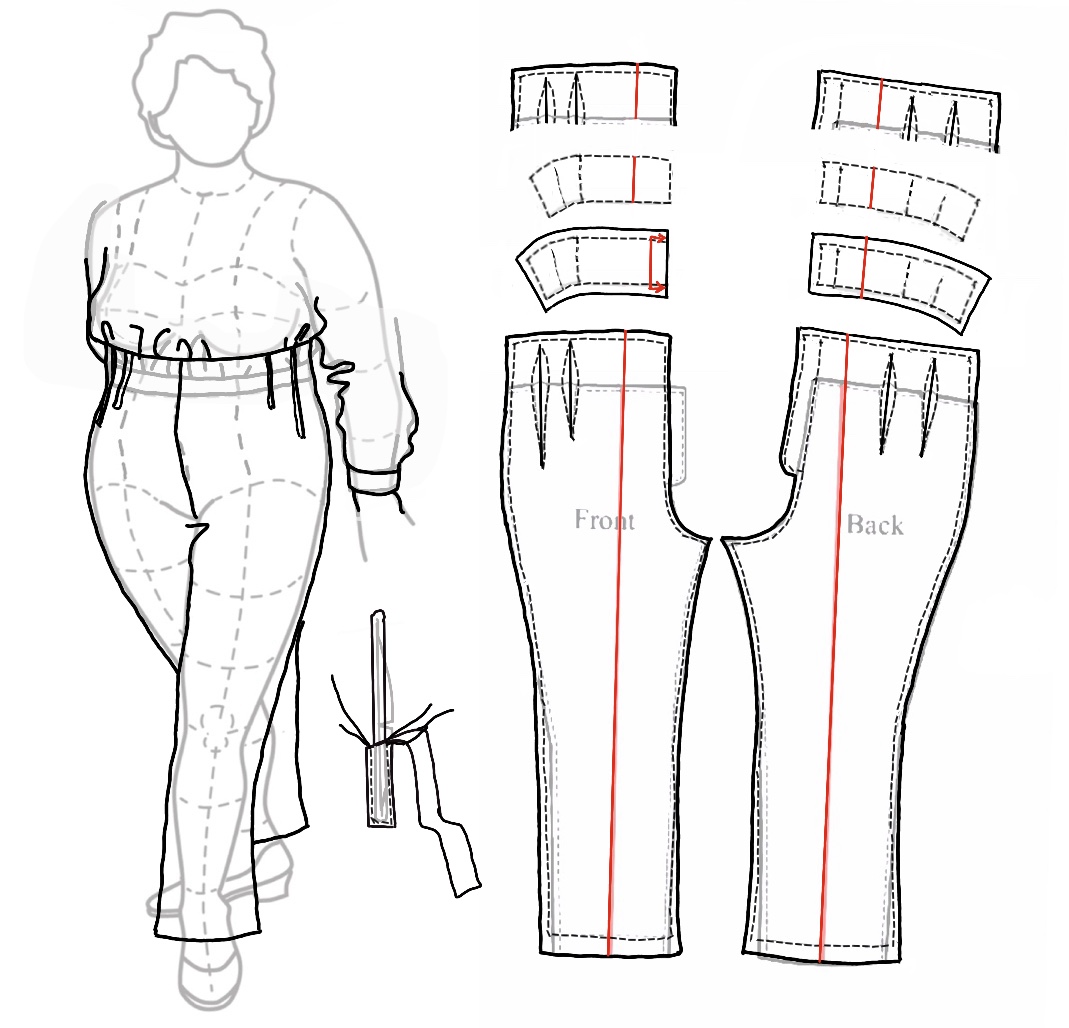
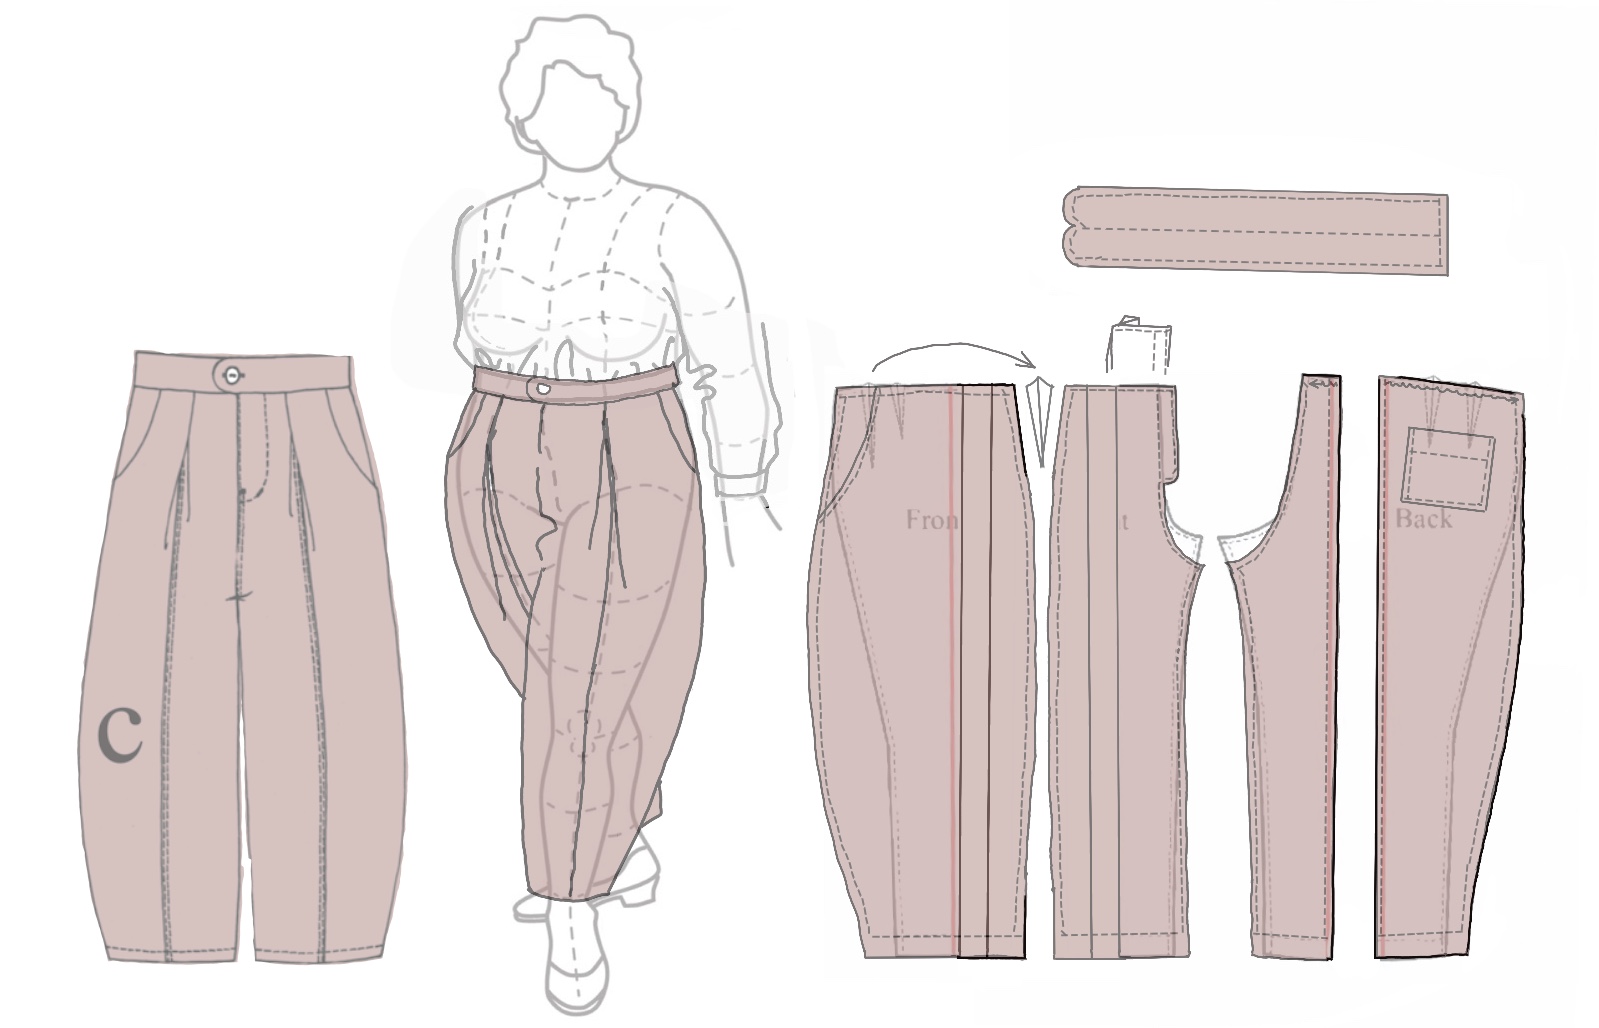
Here are the upper parts of two pants blocks (modifications are always made without seam allowances). At left is a pair with darts; the right one has a released pleat in the front. When changes have been made, the flap for a fly front will be added as well as the seam allowances.
Working up your Crotchmaster sets you up for any pants you’ll ever want to make.
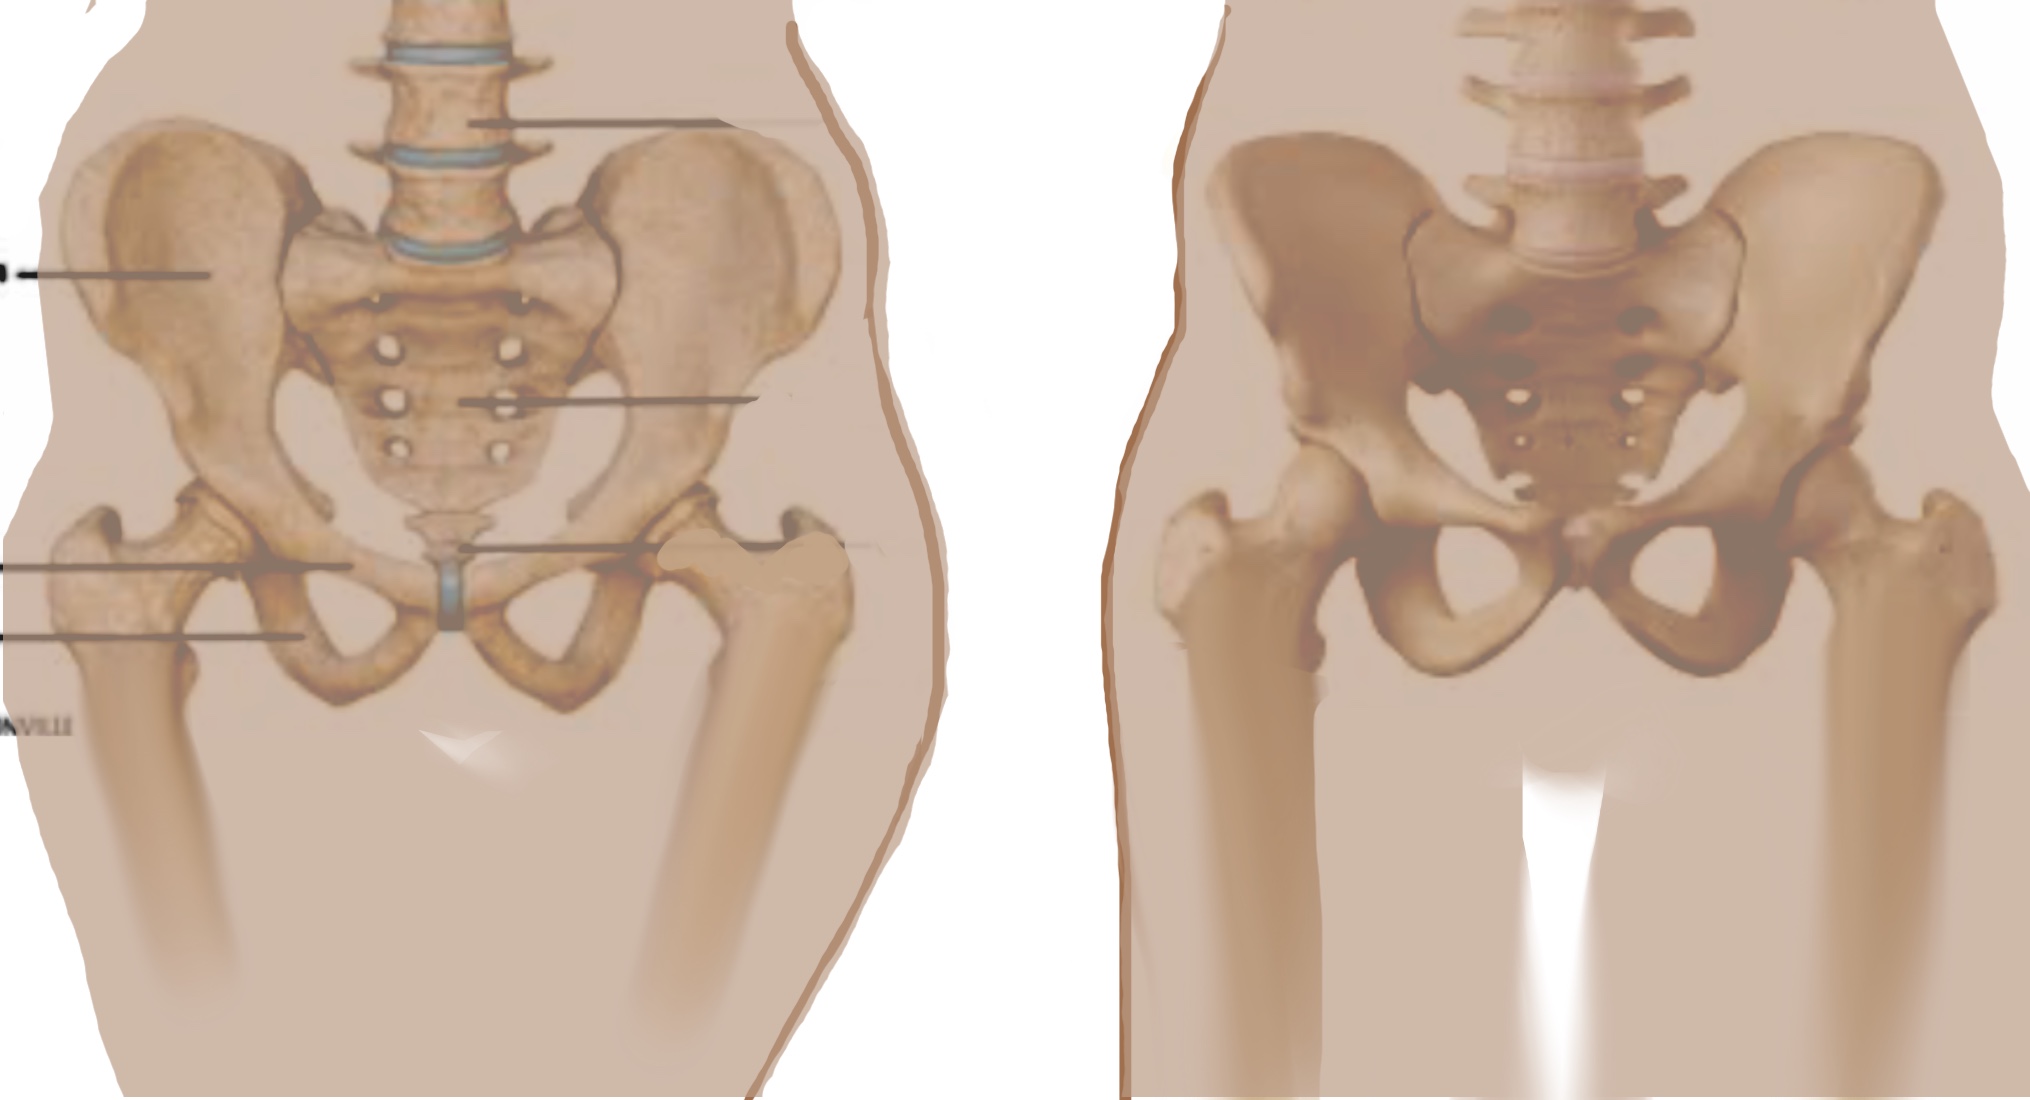
Regardless of how much weight you gain (or lose), your pelvis is bone and not going to change.
After babies and/or years, this person (not gender-specific, same techniques for everyone) is fuller around the middle. They need more fabric around their body, and also vertically to go over their stomach and rear.
Though the crotch rise has been extended front and/or back, the bottom of the pelvis curve hasn’t changed.
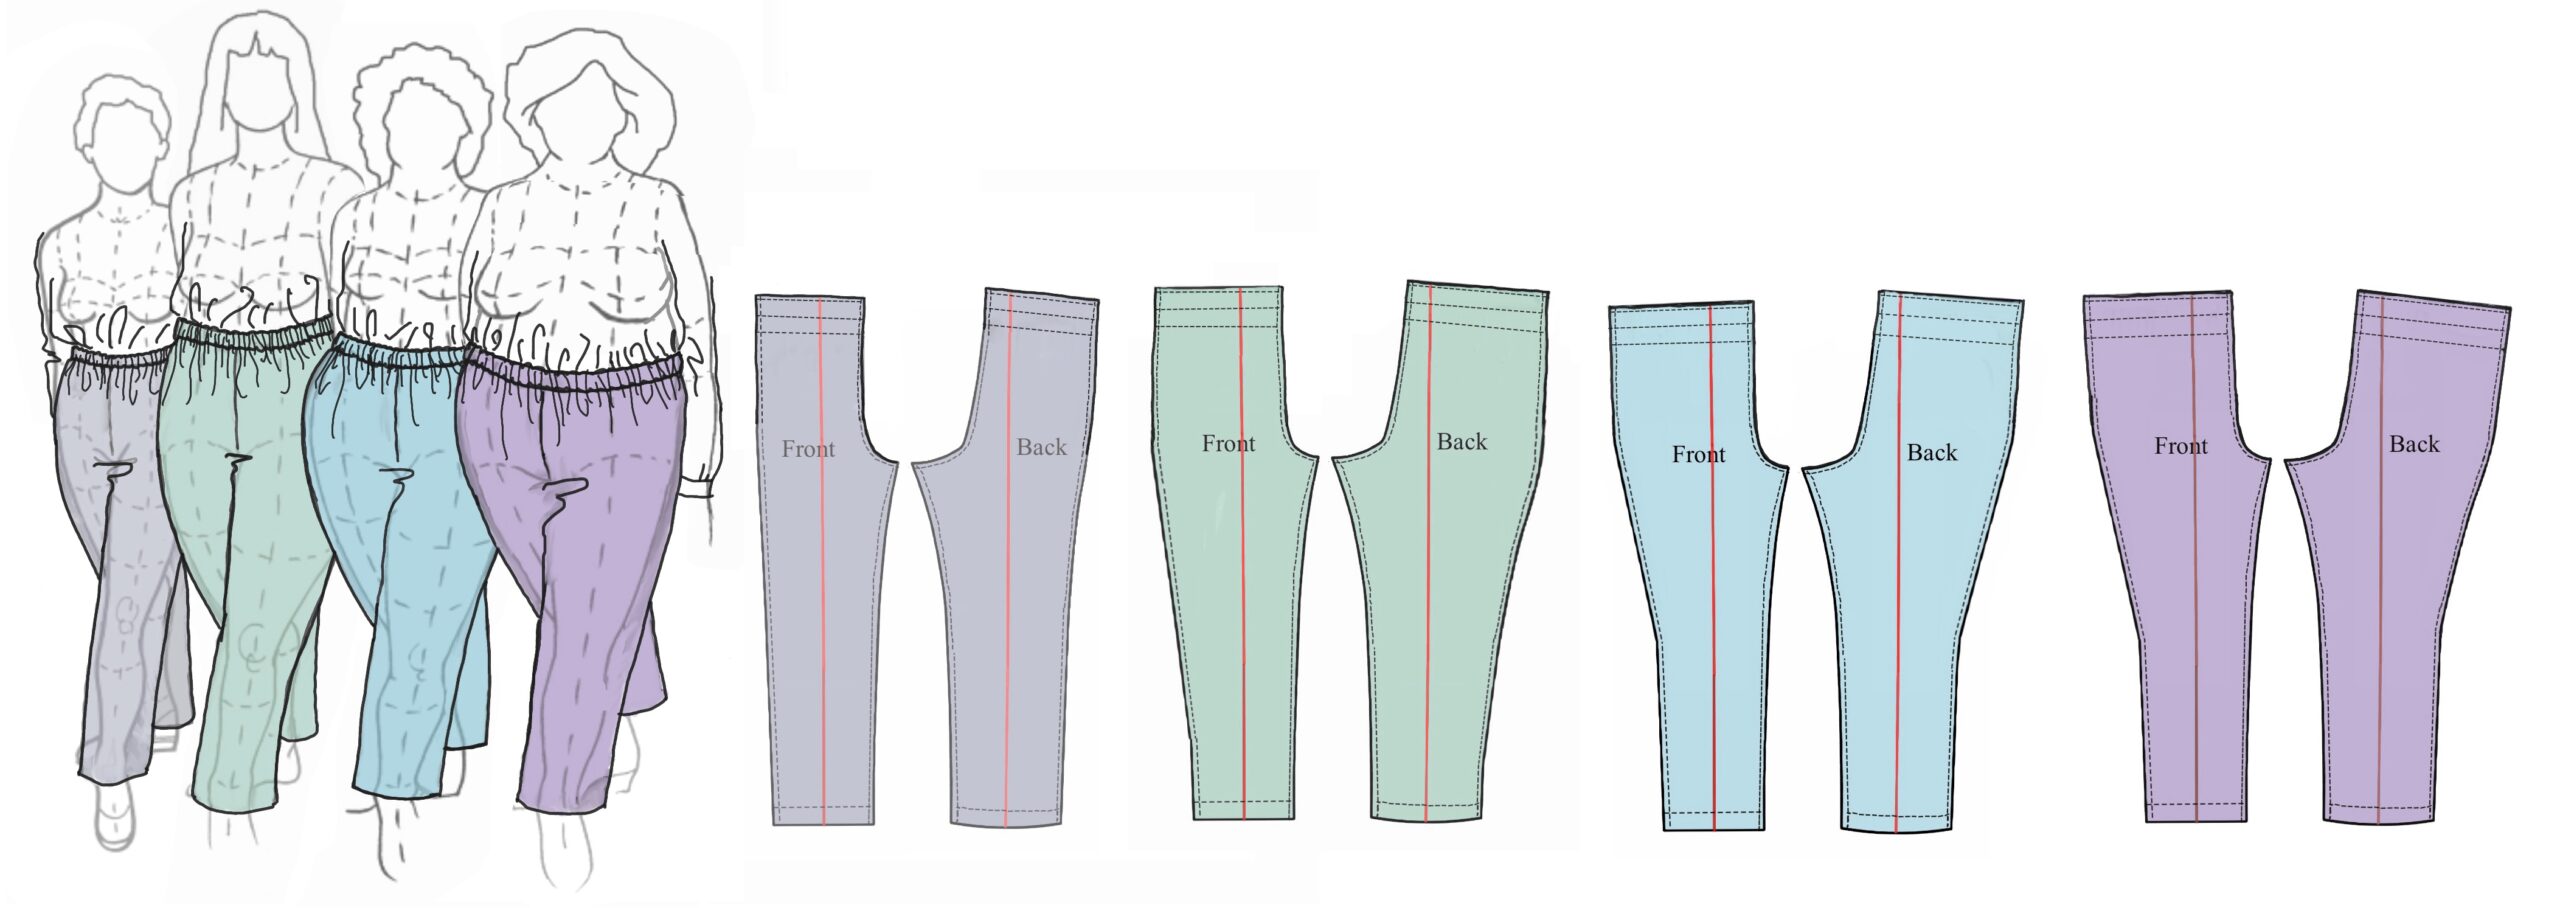
These pants backs have the same length of inseam and outseam, but the people have increasingly fuller bottoms. The pelvis area tips over but the grainline must run down the center of the leg for the pants to hang straight.
The four standard methods to get from the waist to the hips, assuming waists are smaller: gather, dart, pleat, yoke. The darts can be repositioned or split (or converted in the front to a pleat), as long as the amount taken out at the waistband remains the same.
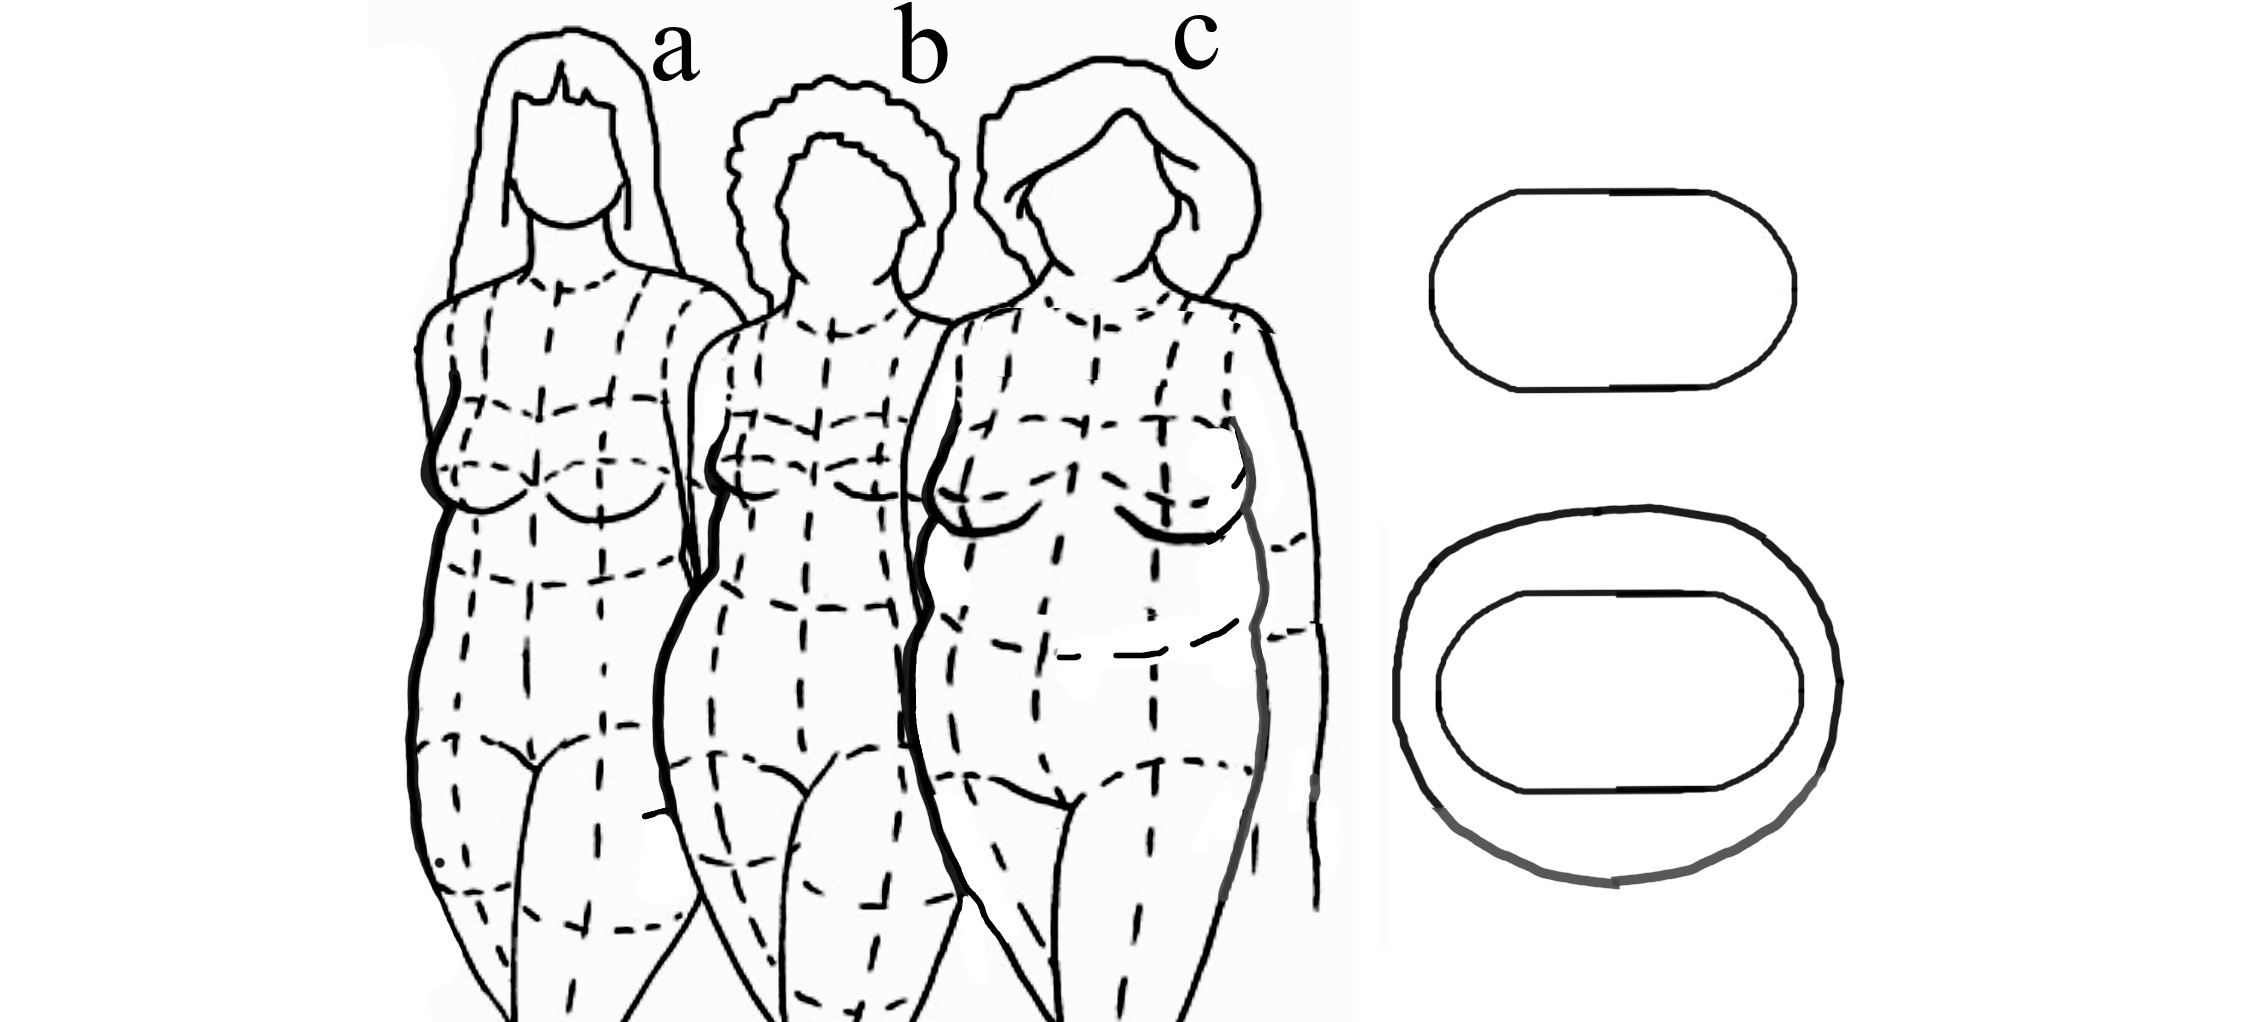
Our skeletons are wider side to side and narrower front to back – put your hands on your rib cage and you can easily feel this.
As we gain weight, the cross section becomes more spherical.
a) needs little if any waist-to-hip shaping; she may be able to get by with slightly curving in her side seams. Not the center front if she’s putting a zipper there! She may need to lightly gather, or sew with the WB on top with tension on it, so that the feed dogs ease the underlayer in.
b) coming up.
c) needs little to none
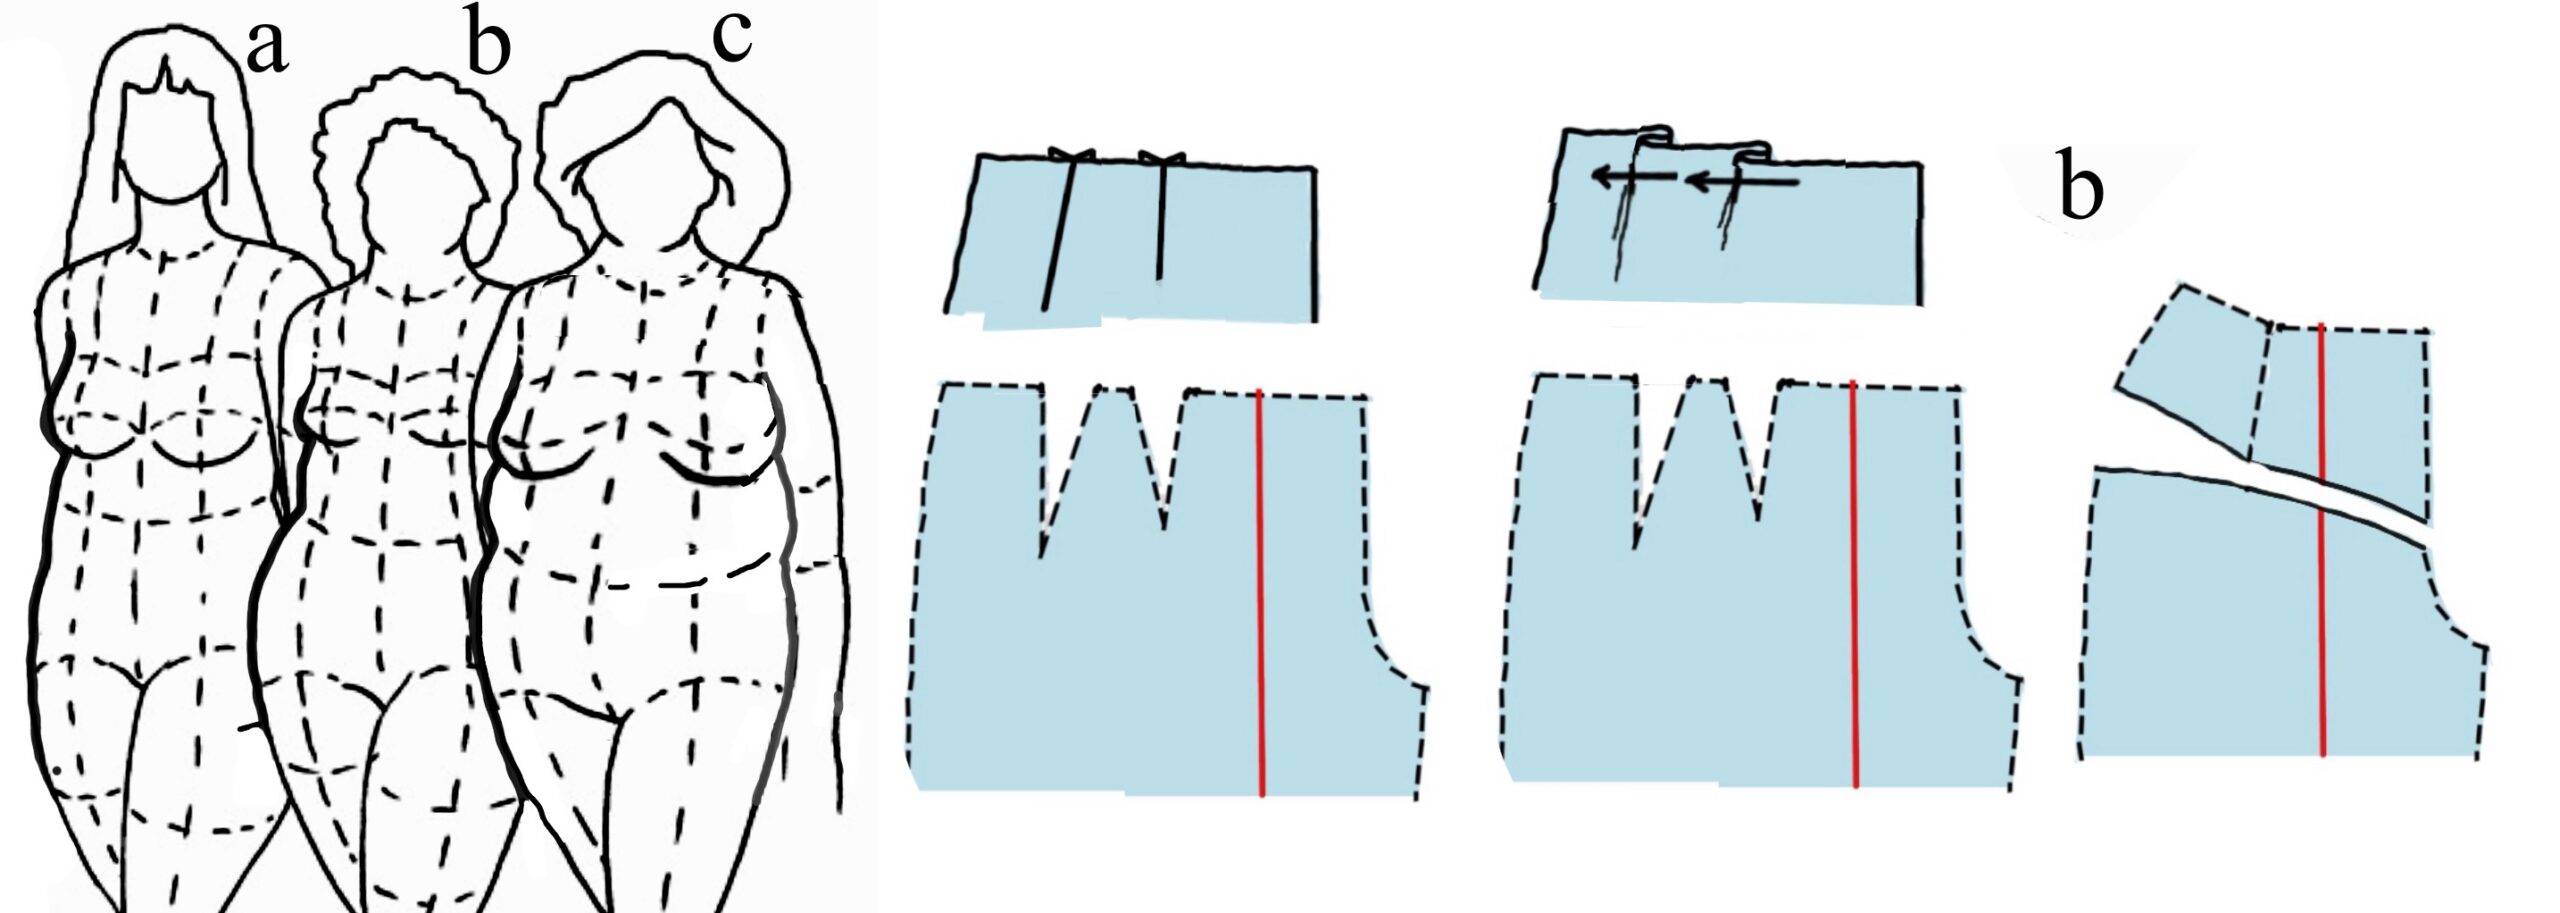
b) has unusually wide hips compared to her waist (I have designed and built clothes for a woman with an even more extreme figure).
Her options are darts, pleats, or a yoke.
”But aren’t yokes supposed to tip the other way?”
For many people, yes. This gal’s shape dictates otherwise.
Hip stays! Couture puts them in all pants, some dresses and skirts.
You will benefit from them if you have a hollow on your side hip (most women).
You need the length of the hollow, plus 1”/2.25 cm on each end, and then the measurement to the waist.
The stay itself is 1.5”/3.8 cm wide.
Place with a third into the seam allowance and 2/3 lapping into the pants.
Sew in with side seam, and after that ignore completely (do not grade).
- These were covered in the first couture workshop I took, in 1991, with Bobbi Carr.
- Her instructions called for the stay to be cut on the bias from a medium weight non-fusible interfacing such as Stay-Shape or Durapress. I have since seen others recommend lambswool (the kind used for tailoring shoulder headers). Years back I started using scraps of ordinary fleece (used for sewing pants) and angling the ends.
These are well worth the trouble. They cannot be seen (duh) or felt, just snug in quietly and smooth your outline. I keep a stack, safety-pinned through one end, with my pants buttons and zippers.
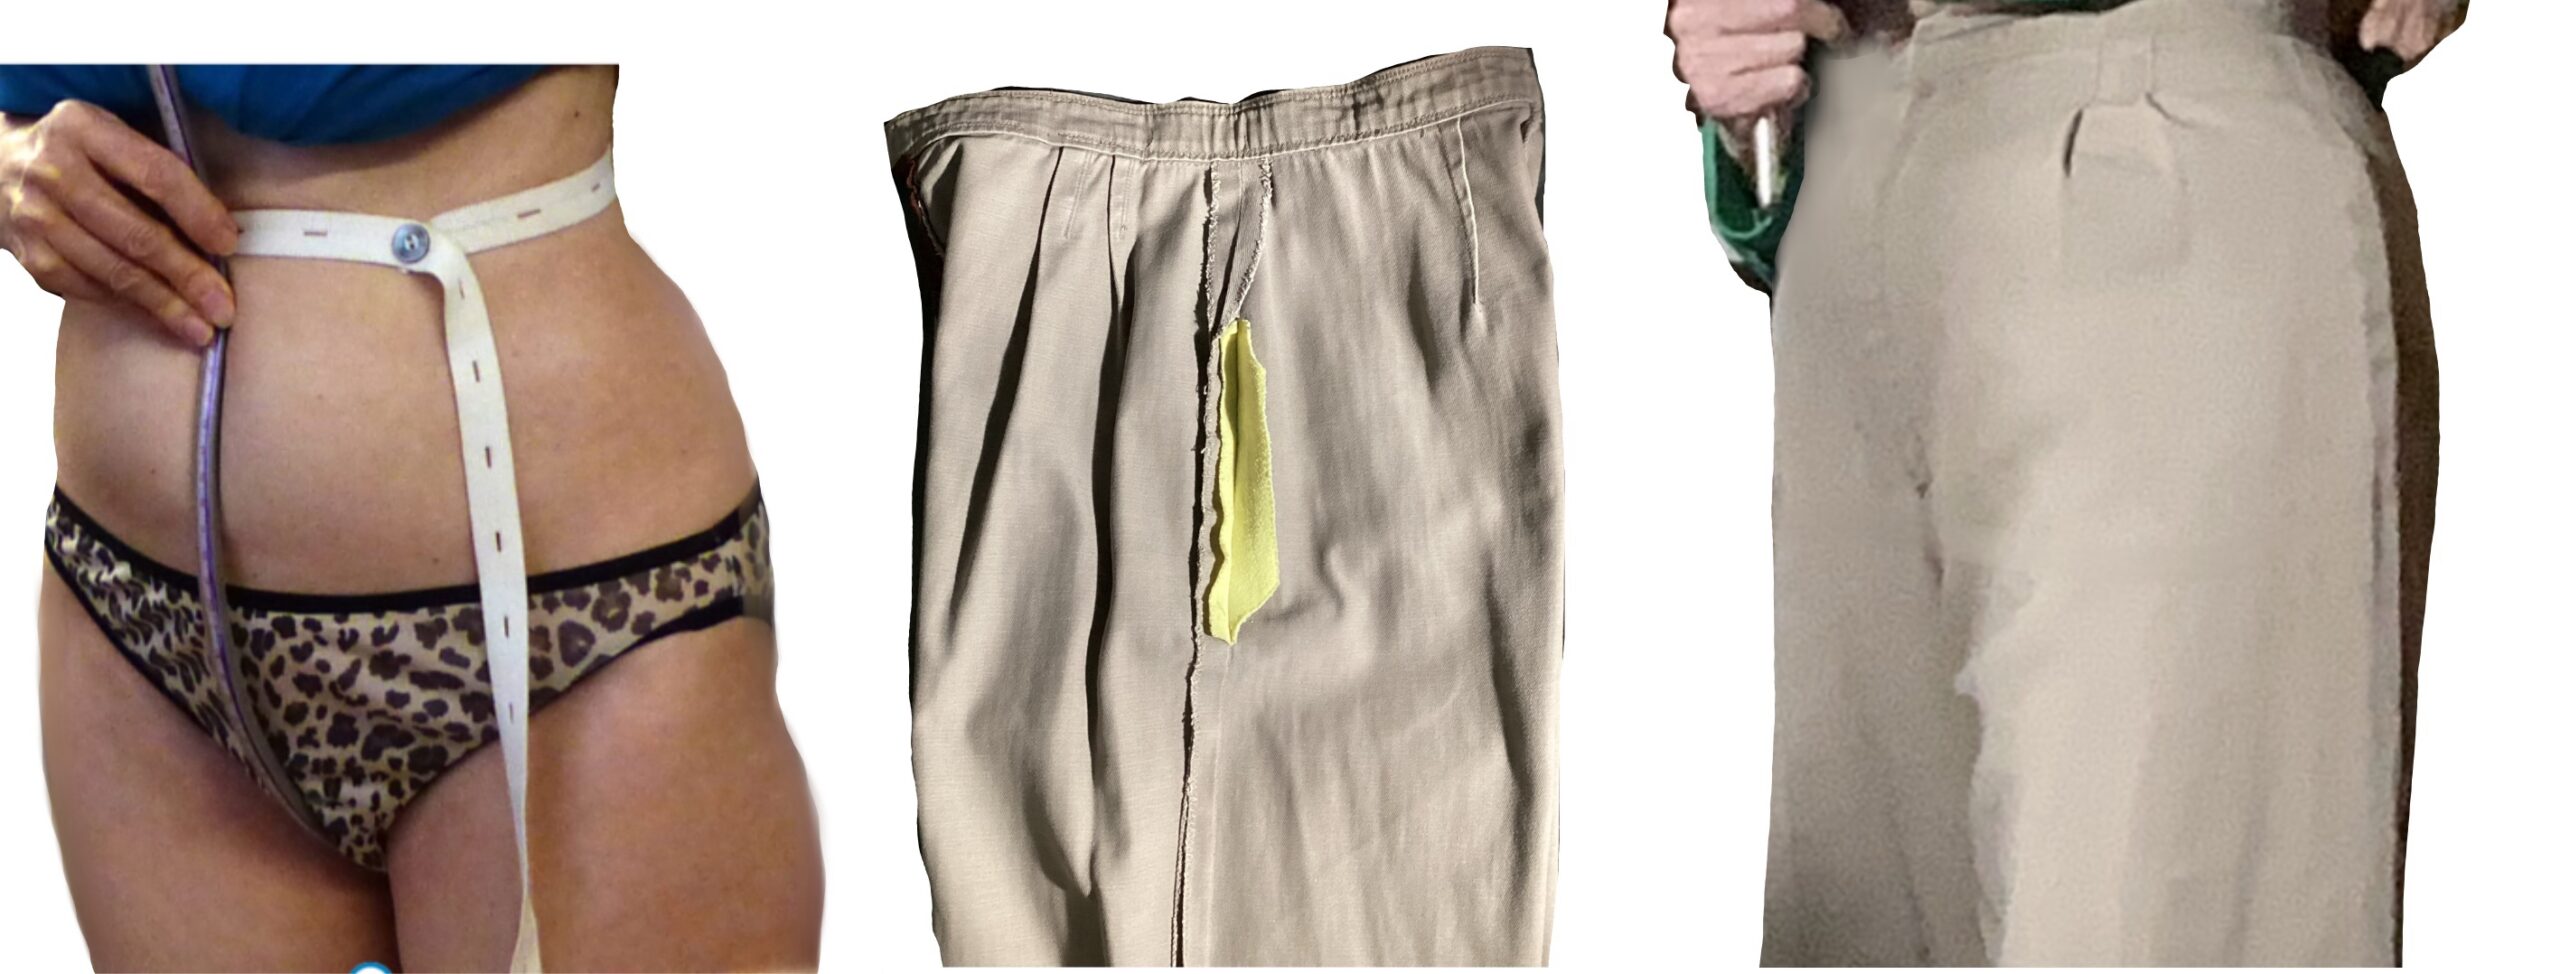
Pair of pants with hip stays
Left, a shot from my Crotchmaster series showing why I benefit from them (when these were made, the released pleats didn’t pull apart). As much tighter as they are now, my outseam is smooth.
The hollow is more pronounced when the more-angled femur is connected to a pelvis meant for child-bearing. This is why you don’t find it mentioned in tailoring.
Who benefits from one?
Essentially, move your leg, paying attention to the side of the pelvis and top of thigh. If there’s a noticeable hollow, then a hip stay would smooth that out.
If you need one and your material is sheer, make the stay of the same color of whatever shows through.
Couture bias-binds the seams of sheer blouses with skin-colored silk* (I’ve seen photos). Claire Shaeffer told of a woman who was loaning one of her gowns to a friend, and sent her in for slight alterations. They said, “Certainly, madame, no problem (and no charge**) but it will take slightly longer as we need to redo the seam binding.” Her friend had darker skin.
*when I ran across sheer tricot in my skin shade, I bought a couple yards and cut it into bias strips. It was nylon, and I may never use it for a sheer blouse, but it’s come in handy several times for other projects.
**couture costs enough that they have no problem giving a lifetime guarantee
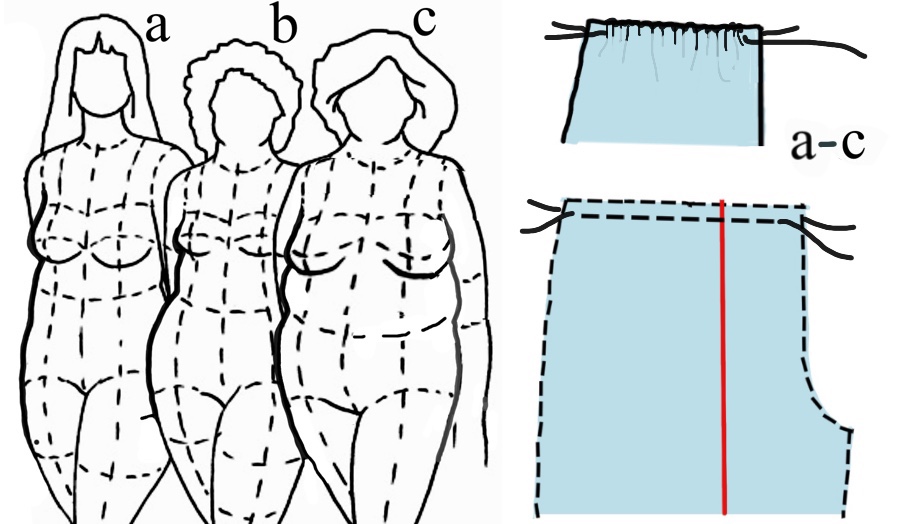
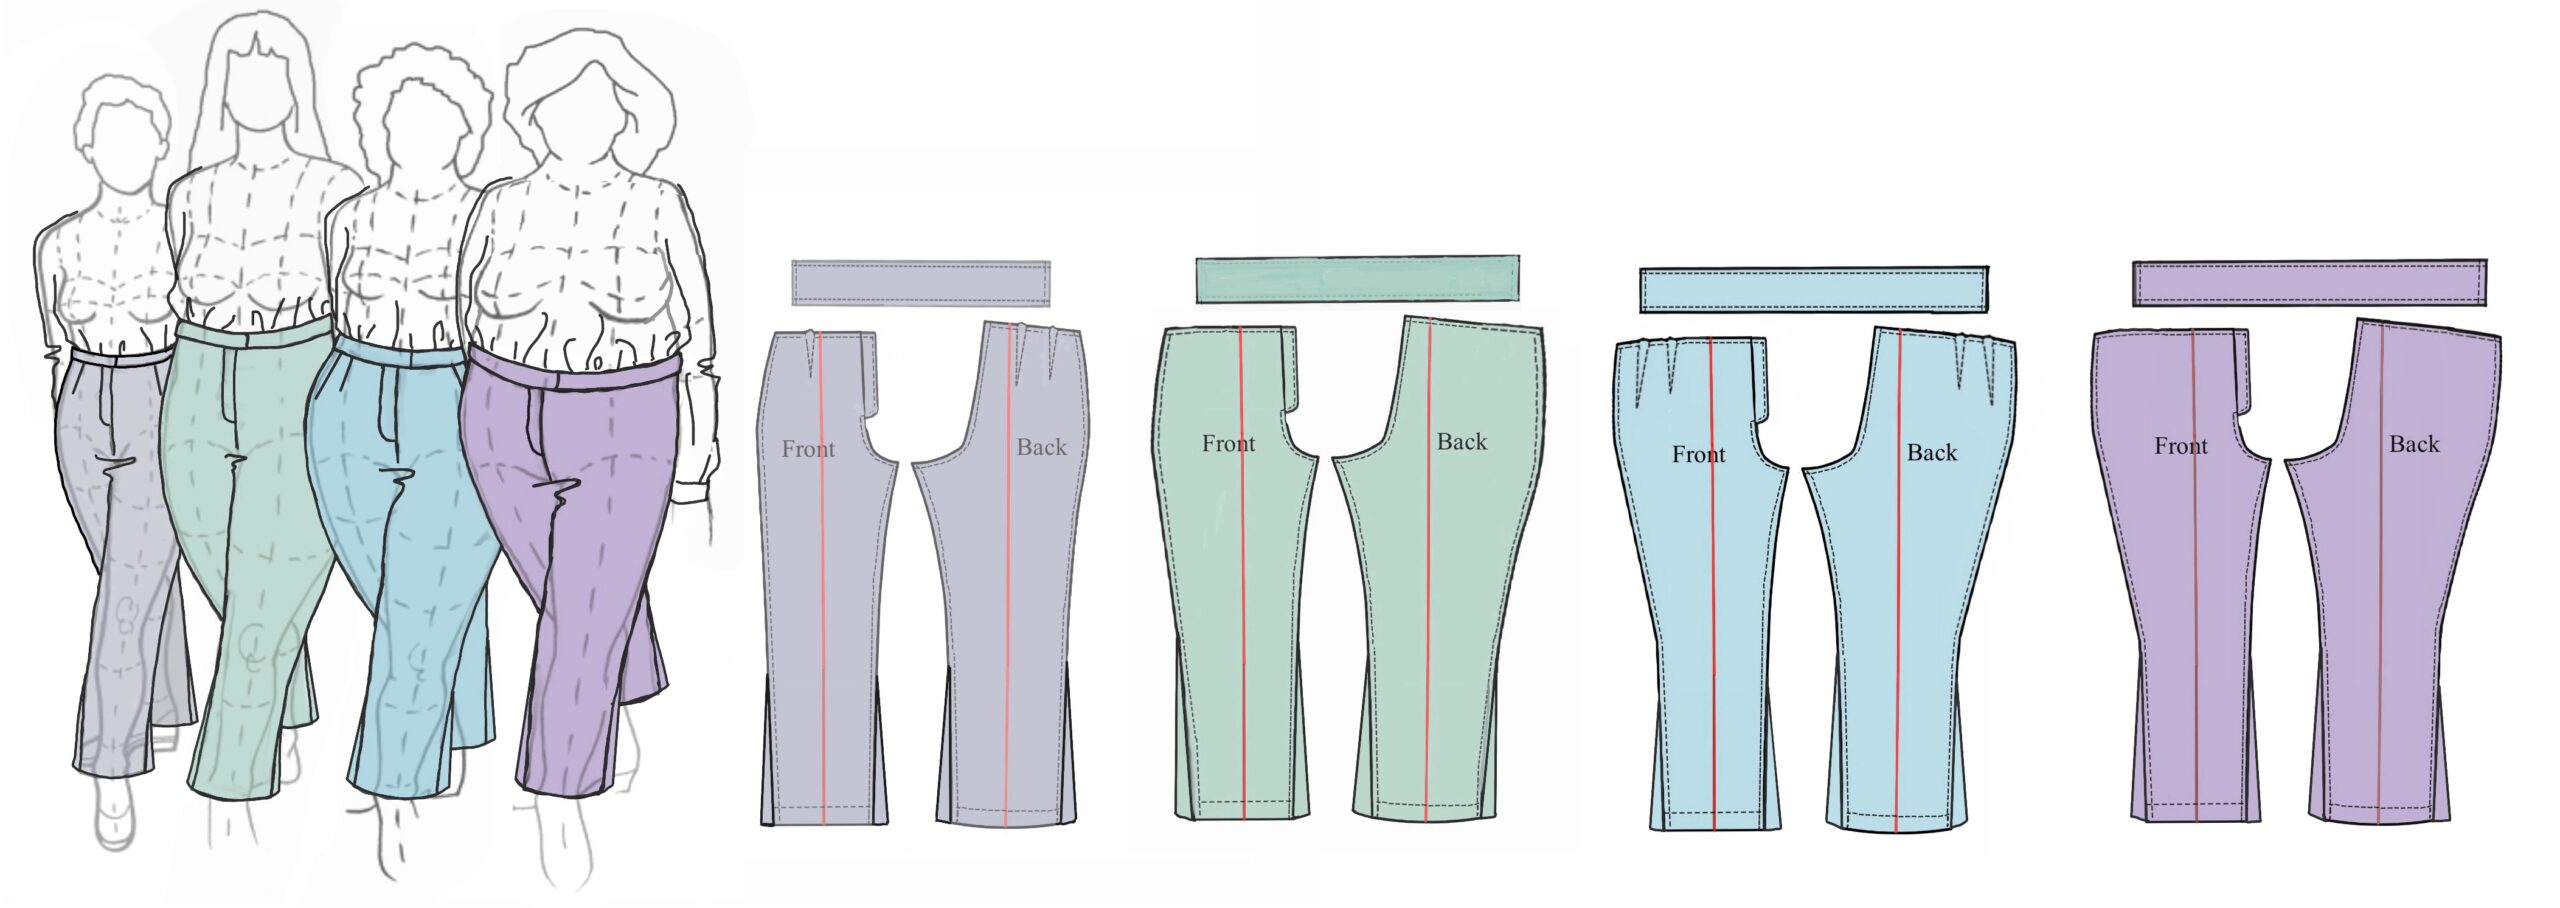
Now we start to get into how pants blocks vary from person to person, and for each person from design to design. We’ll start with elastic-waist PJ pants, with a folded-down self-casing (its own waistband). The outseams extend straight up rather than curve in and there are no darts, so there’s room to pull the pants over the hips without a zipper or other placketed closure. They usually have more wearing ease (the outseams are farther out) and may or may not have pockets.
Next is a basic darted block for a straight-legged pant.

A skinnier leg tapers in, front and back, from the calf down. Be sure your foot will go through the new circumference, or leave a slit (usually in the outseam).

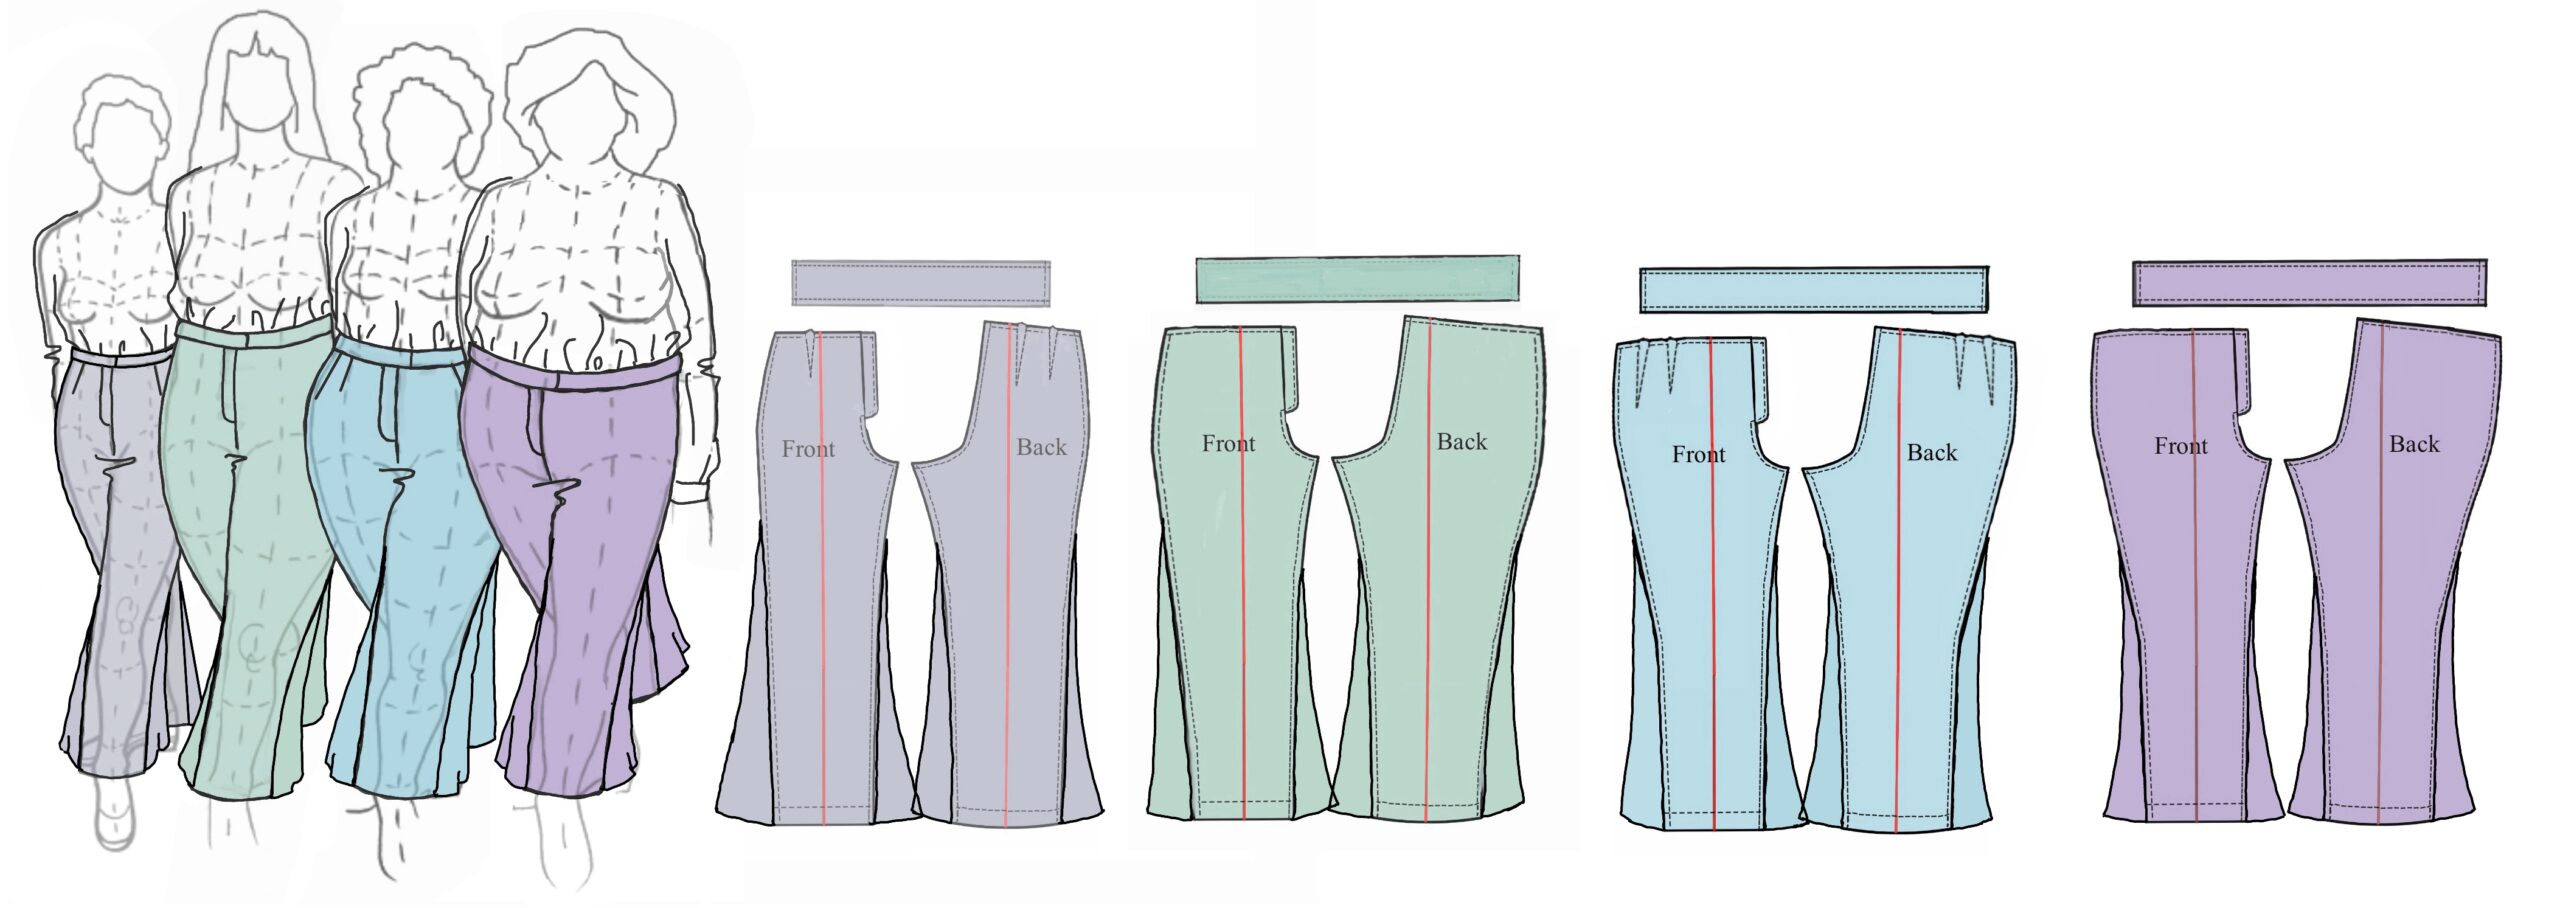
Flared pants:
Flares can run from the knee, the mid-thigh, or anywhere up to the hip. They usually are shaped at least slightly to the leg rather than straight.
The boot cut is slightly longer and flared on both sides, front and back, from the calf down.
Bell bottoms:
In the days of the Tall Ships, sailors’ pants were practical: in hot weather, when reversed upward from the hems, they’d cling to the thighs and be out of the way when up in the rigging. Seamen often worked barefoot: toes could grasp the ropes even when icy in winter (thank you, Patrick O’Brian).
The flap-front designs varied by the nationality and the era. Pocket bags were often added to the front facing/underlap of the variation with the waistband that joined in the center behind the flap.
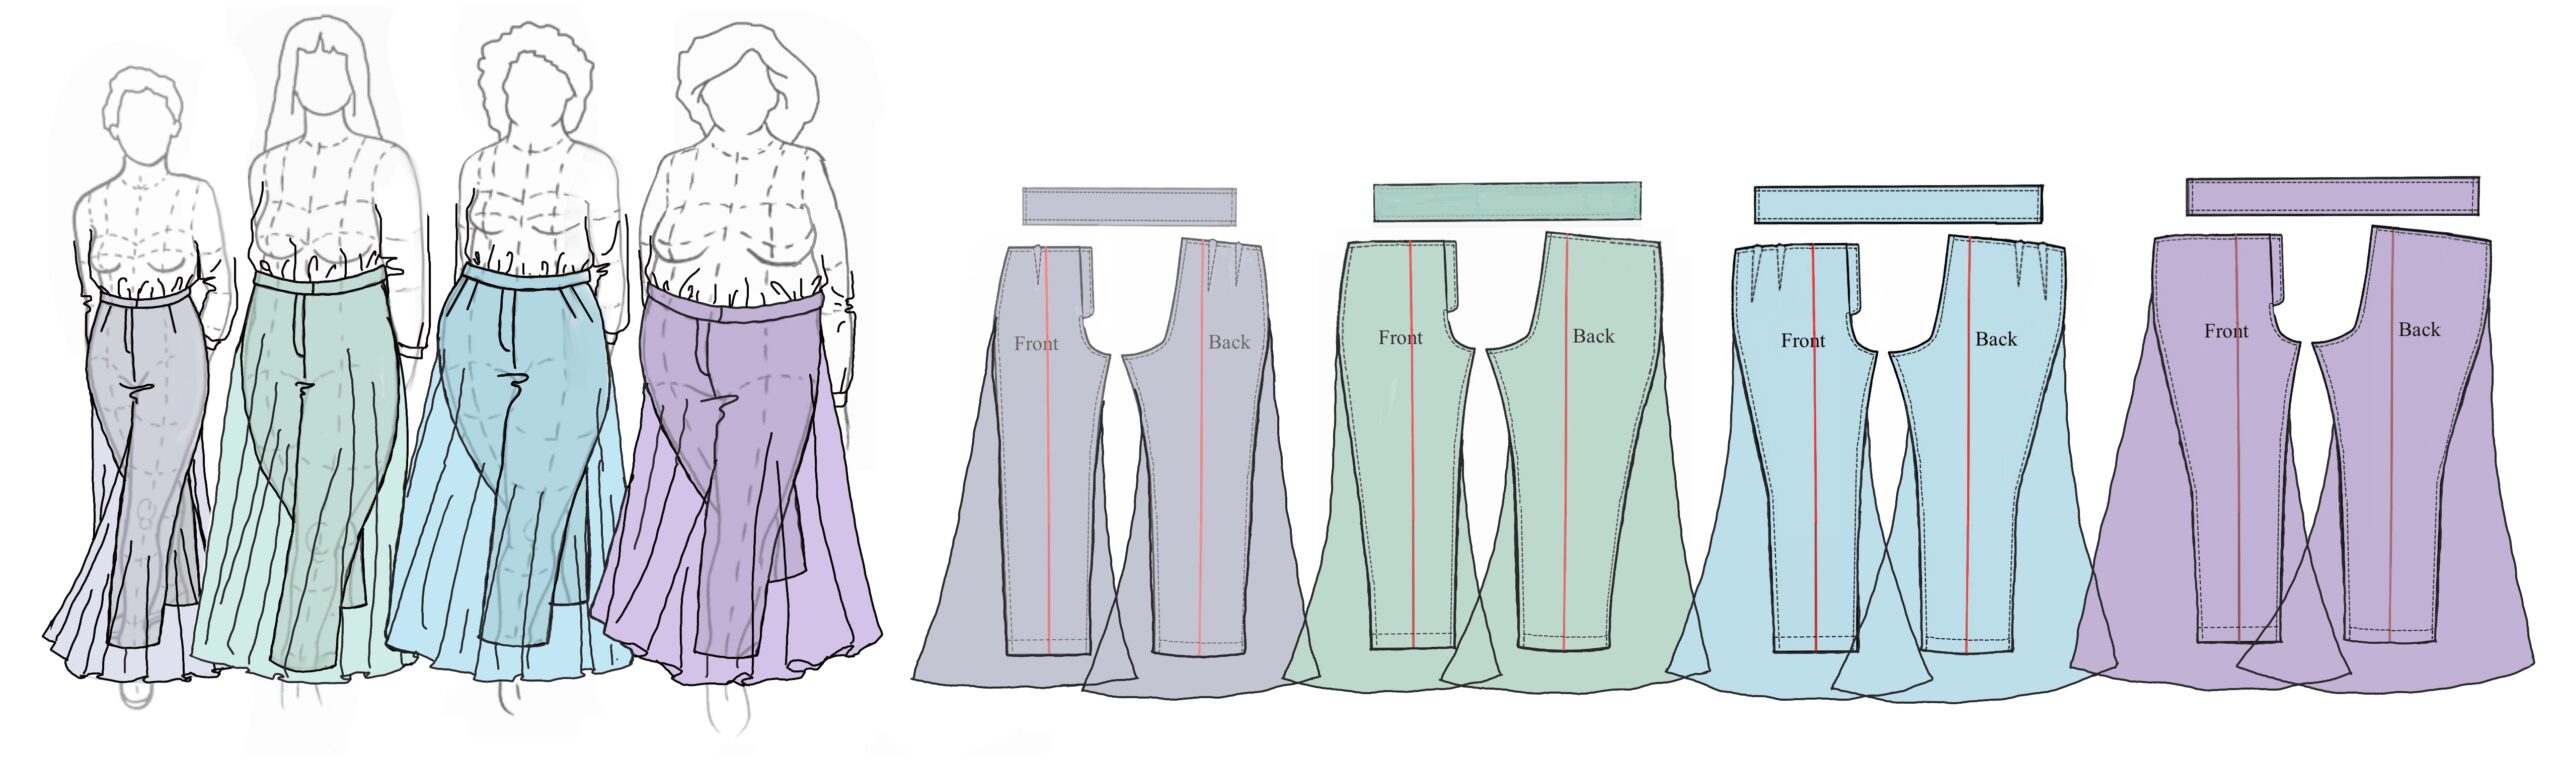
Full-leg flared pants. These will be revisited when we look at Palazzos/pleated Beach Pajamas, which are in the cluster with dropped crotches.
Flares can go all the way to the ground.
Two notes: never start the flare high on the inner thigh, much less at the crotch. No one, however skinny, needs extra fabric there unless they’re camouflaging bowed legs. For those with fuller thighs, it’s disastrous.
Be mindful when adding to the length about whether you’ll ever need to run around barefoot: it’s a dangerous tripping hazard. Of course, you can build your first pattern long and then trim it up for the cost of the trivial amount of fabric you’ll waste. An eighth of a yard? That’s 4.5”/11 cm.
Palazzos and Hollywood Beach Pajamas (and the trousers worn by Garbo, Marlene Dietrich, Kathryn Hepburn et. al.) often had dropped crotches, so that the pelvis was less defined and the pants would “skirt” – drop smoothly from the waistband. When a deep pleat was added either side of center front, it gave the illusion of a skirt with a box pleat there.
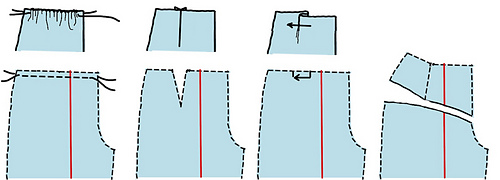
Box pleats and kick pleats:
Box pleats are the wide, fabric-eating design common (in the U.S. at least) for cheerleader/pep squad skirts. The upper parts of the pleats may be topstitched.
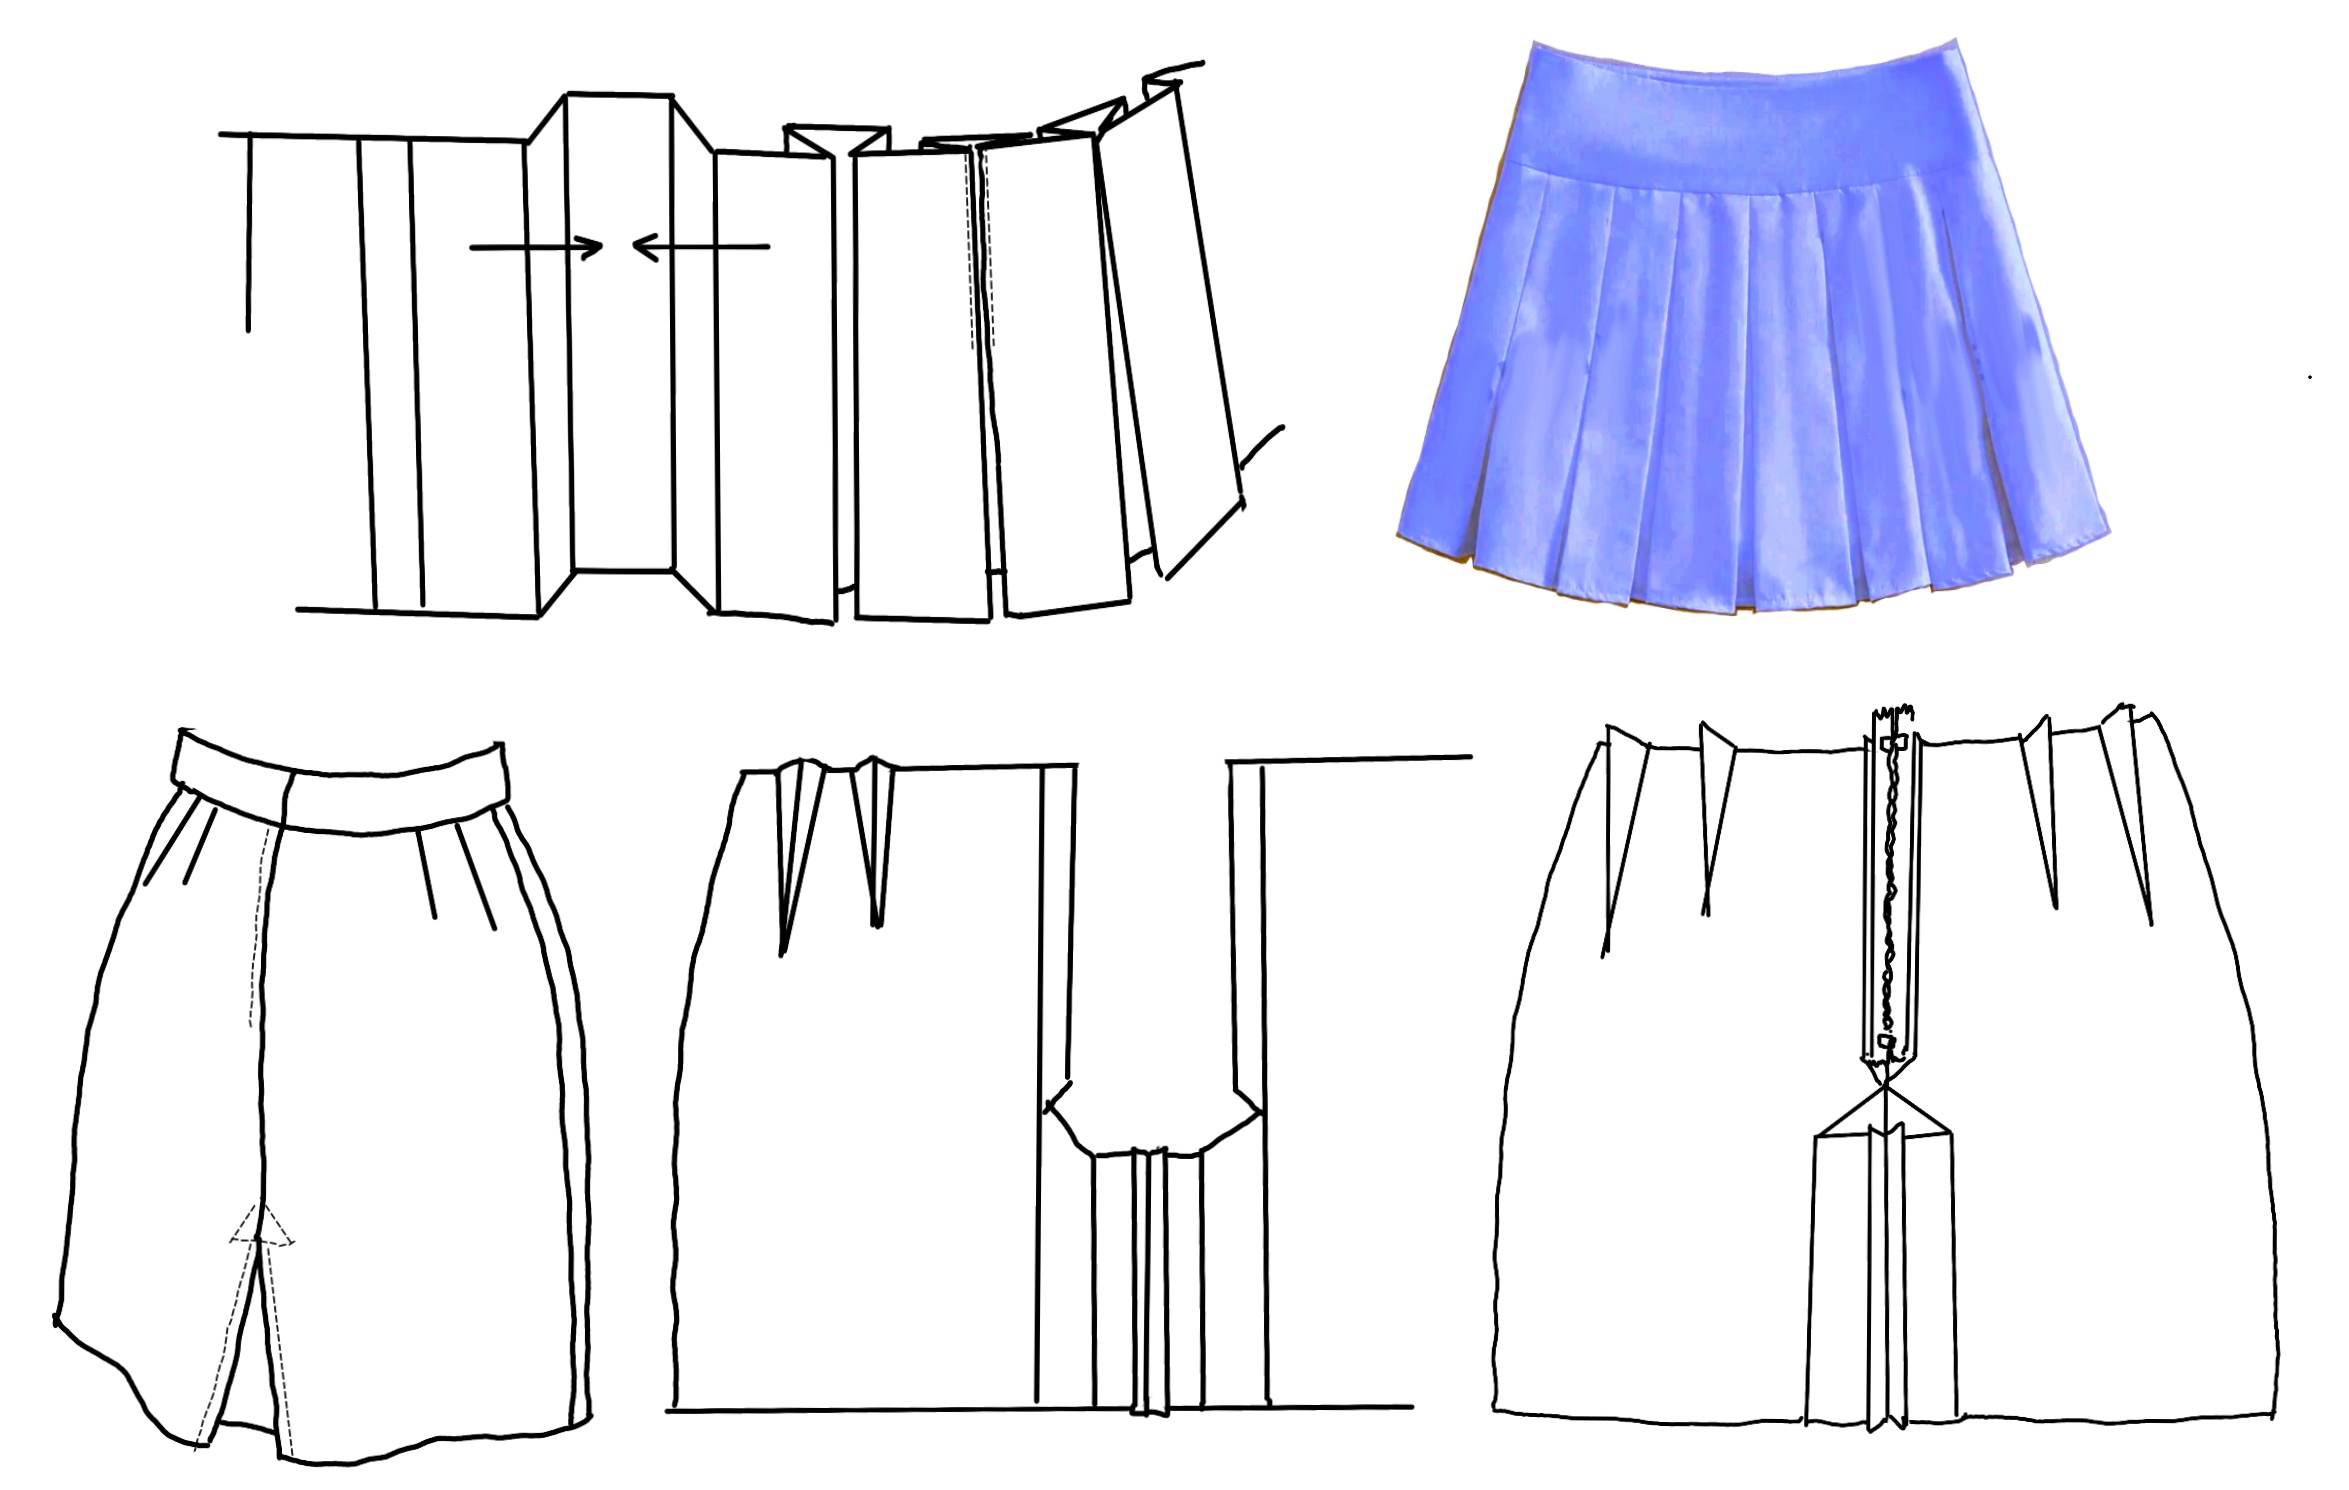
A kick pleat is a single inverted box pleat, to provide walking ease in the back of a slim skirt. Above: outside back of skirt with kick pleat, inside of back with the CB seam of the kick pleat sewn, inside with zipper inserted and pleat folded into place, ready to be stitched.
The zipper has been moved to the back; the side would also be an option.
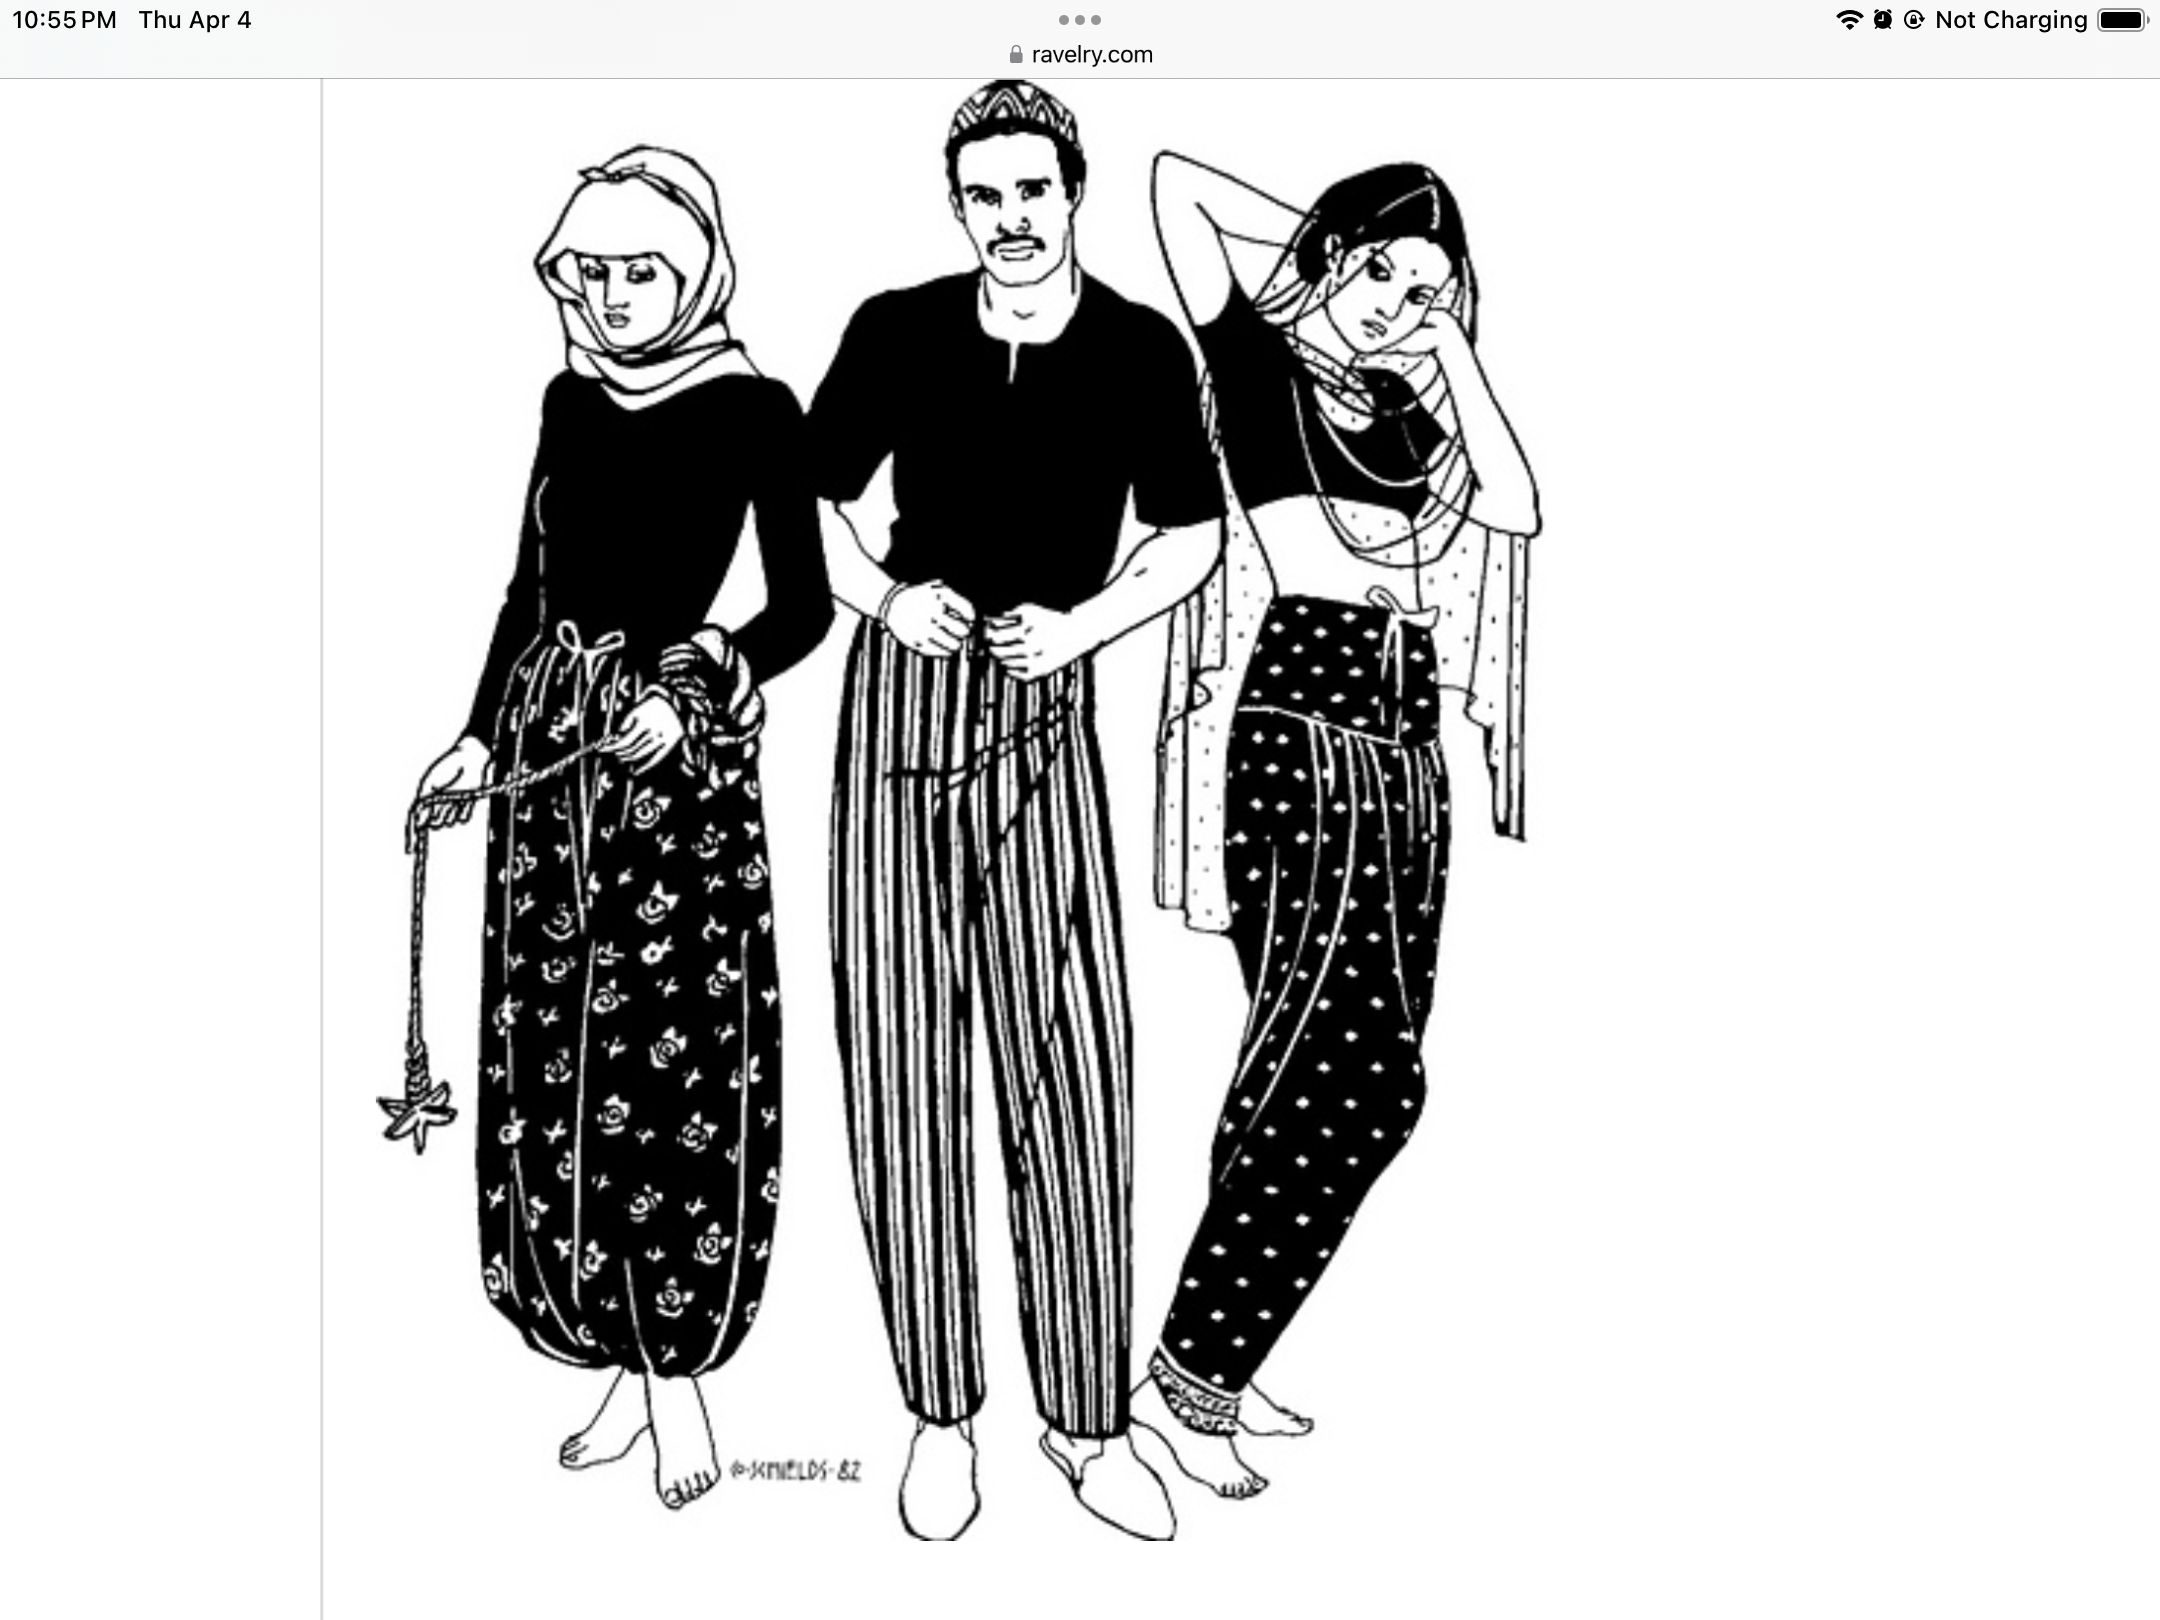
Full pants with a regular and a dropped crotch, integrating an apparent box pleat:
The woman in the lighter outfit has an apparent pleated skirt, with her companion’s stance revealing how the illusion is done.
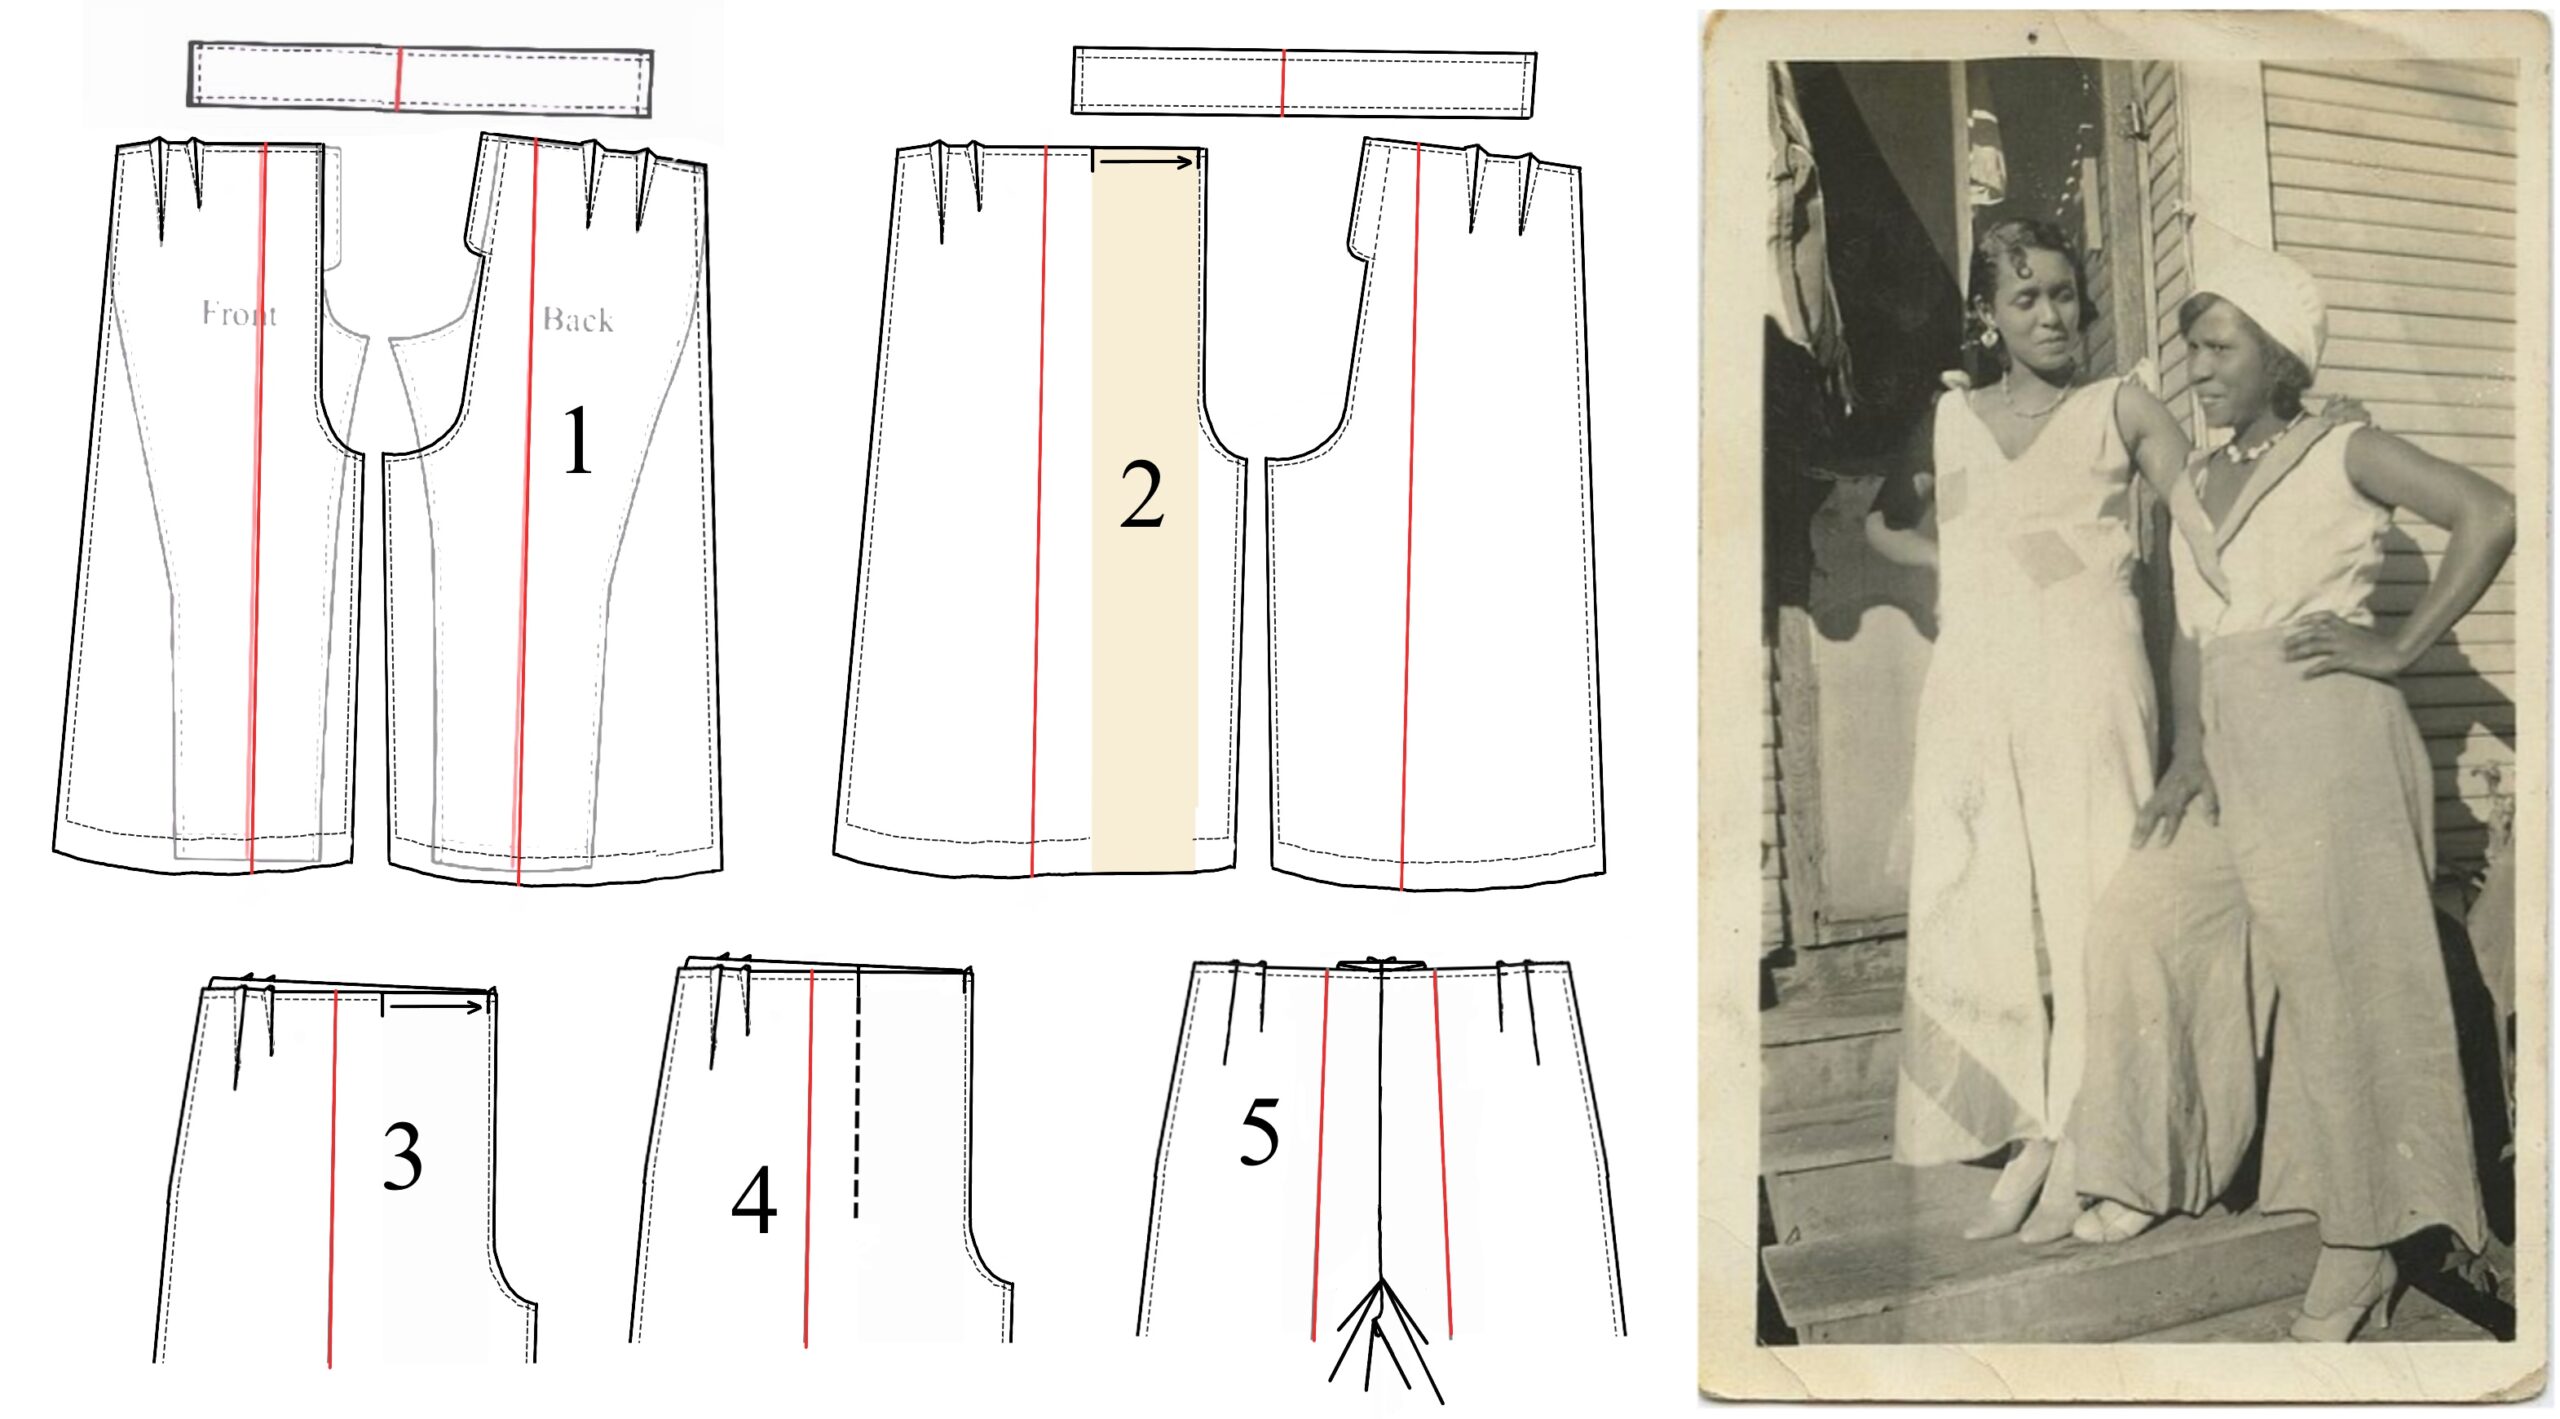
- Trace off a duplicate from your pants block. Deepen the crotch (straight down), front and back: this is halfway down the thigh of the woman on the right. Move the zipper placket to the center back (or one side). Set aside the back. Optional (not shown): add side seam pockets.
- On the front, slash and insert a rectangle from waist to hem, twice as wide as you want each pleat to be. It should touch the CF stitching line.
- Sew the darts and the front crotch seam.
- Sew a vertical line at the pleat mark as far down as the center front seam is straight.
- Lay the front right side up. Form the pleats, bringing the seams to meet at the center front. Baste at the waist.
This block, shortened, gives knee-length culottes or tennis/golf skirt-like shorts.
Gauchos, as with other riding pants, were cut higher in the back to accommodate the position on a horse (see next section). Today the term refers to below-knee length, widely flared pants. The waist can be darted or feature gathers or pleats.
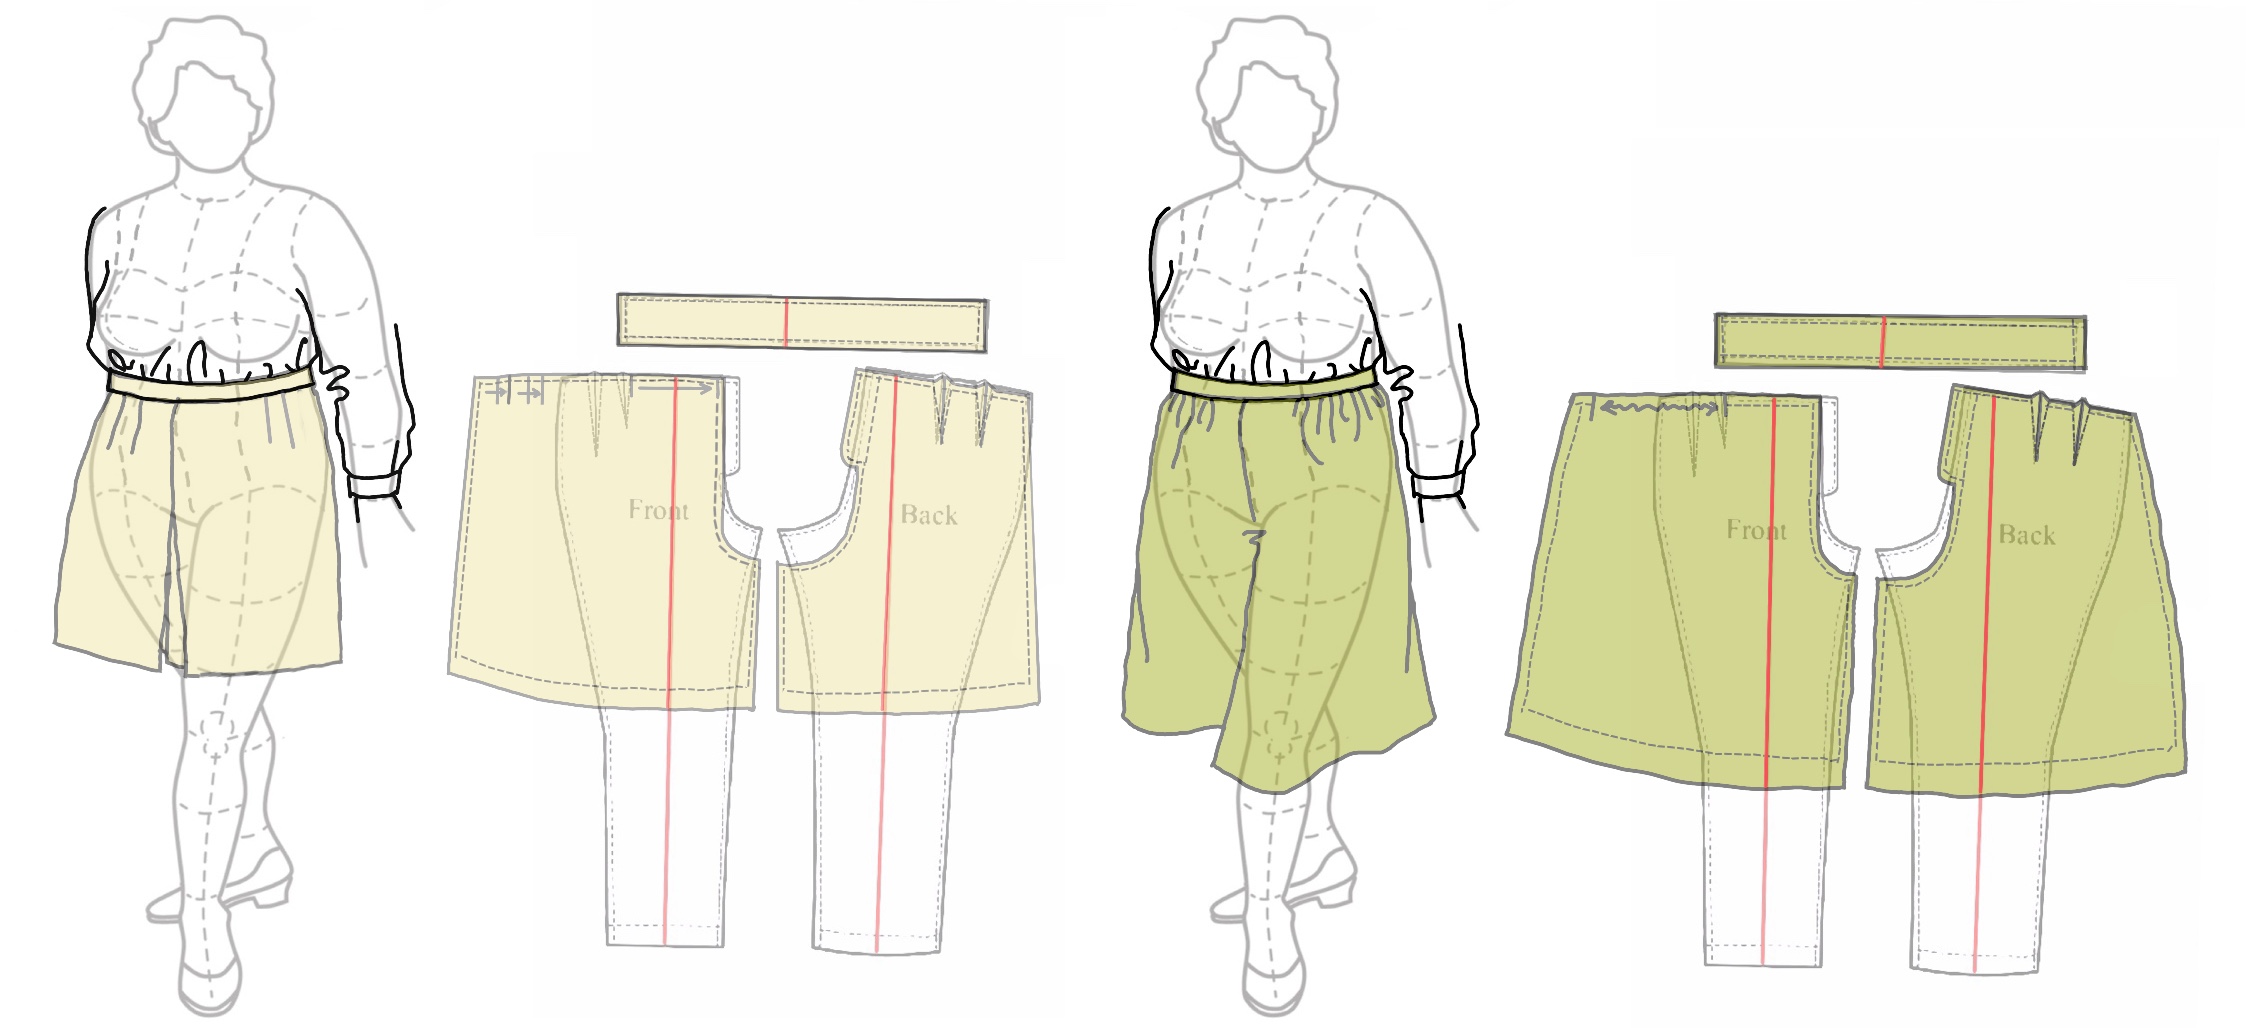
Left: Culottes with moderately dropped crotch, pleated fronts (indistinguishable from darts at this scale), darted backs, deep center front pleat. They can have the front pleats edge-stitched to keep them looking crisp.
Right: Gauchos with same dropped crotch (but not the center front pleats), section of front gathers, back darts, longer and more flared legs.
A dropped crotch also gives substantially more range of motion, so they show up in designs from the days before “miracle” stretch fabric. Jodhpurs, which originated in Asia along with polo, are eminently practical when riding a horse at full stretch.
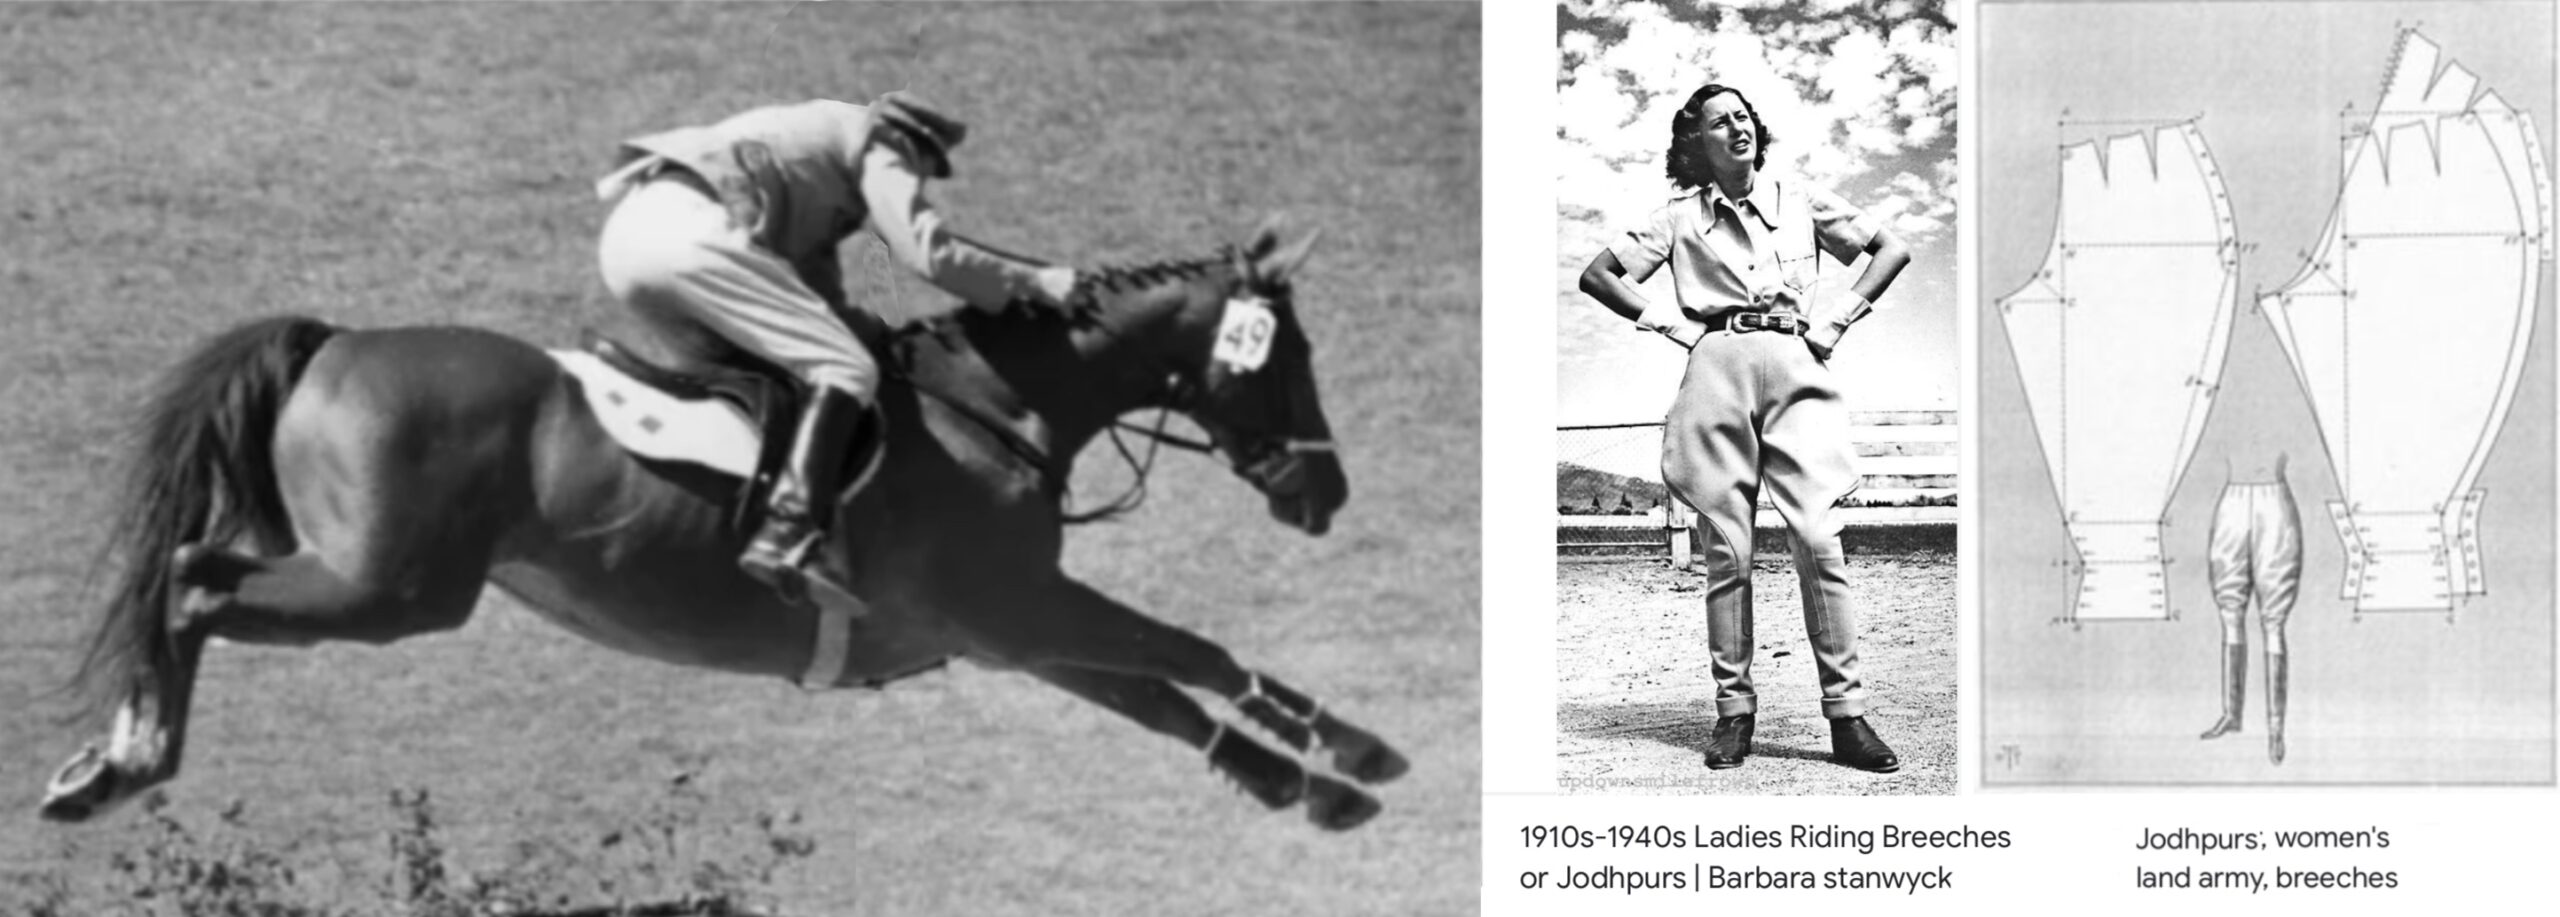
Here’s a compromise for those who want the retro vibe and more freedom of movement (built on their original pants block with more ease at the thigh). They may be kneeling or crouching for gardening, but are not going to be riding steeplechases and would prefer to skip the baggy butt look when standing around:
Stop below the knee with enough to tuck into riding boots, or go full length like Stanwyck.
Edit!
Let’s take a side trip into zero waste and traditional garments constructed from looms that produced narrow widths.
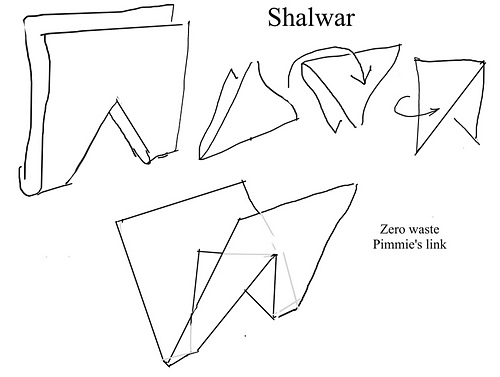
Shalwar are the wide-waisted, narrow-at-the-hems pants that usually accompany the kameez, a dress or tunic. This combination, which sstarted in the Indian subcontinent, has generalized world-wide.
The horizontally-extended front and back are usually identical (center graphic), and gathered or pleated to fit the waist yoke. Often a wedge is cut from the blank, folded and rotated, and used to expand the crotch. Pockets can be patch or added to the side seams.

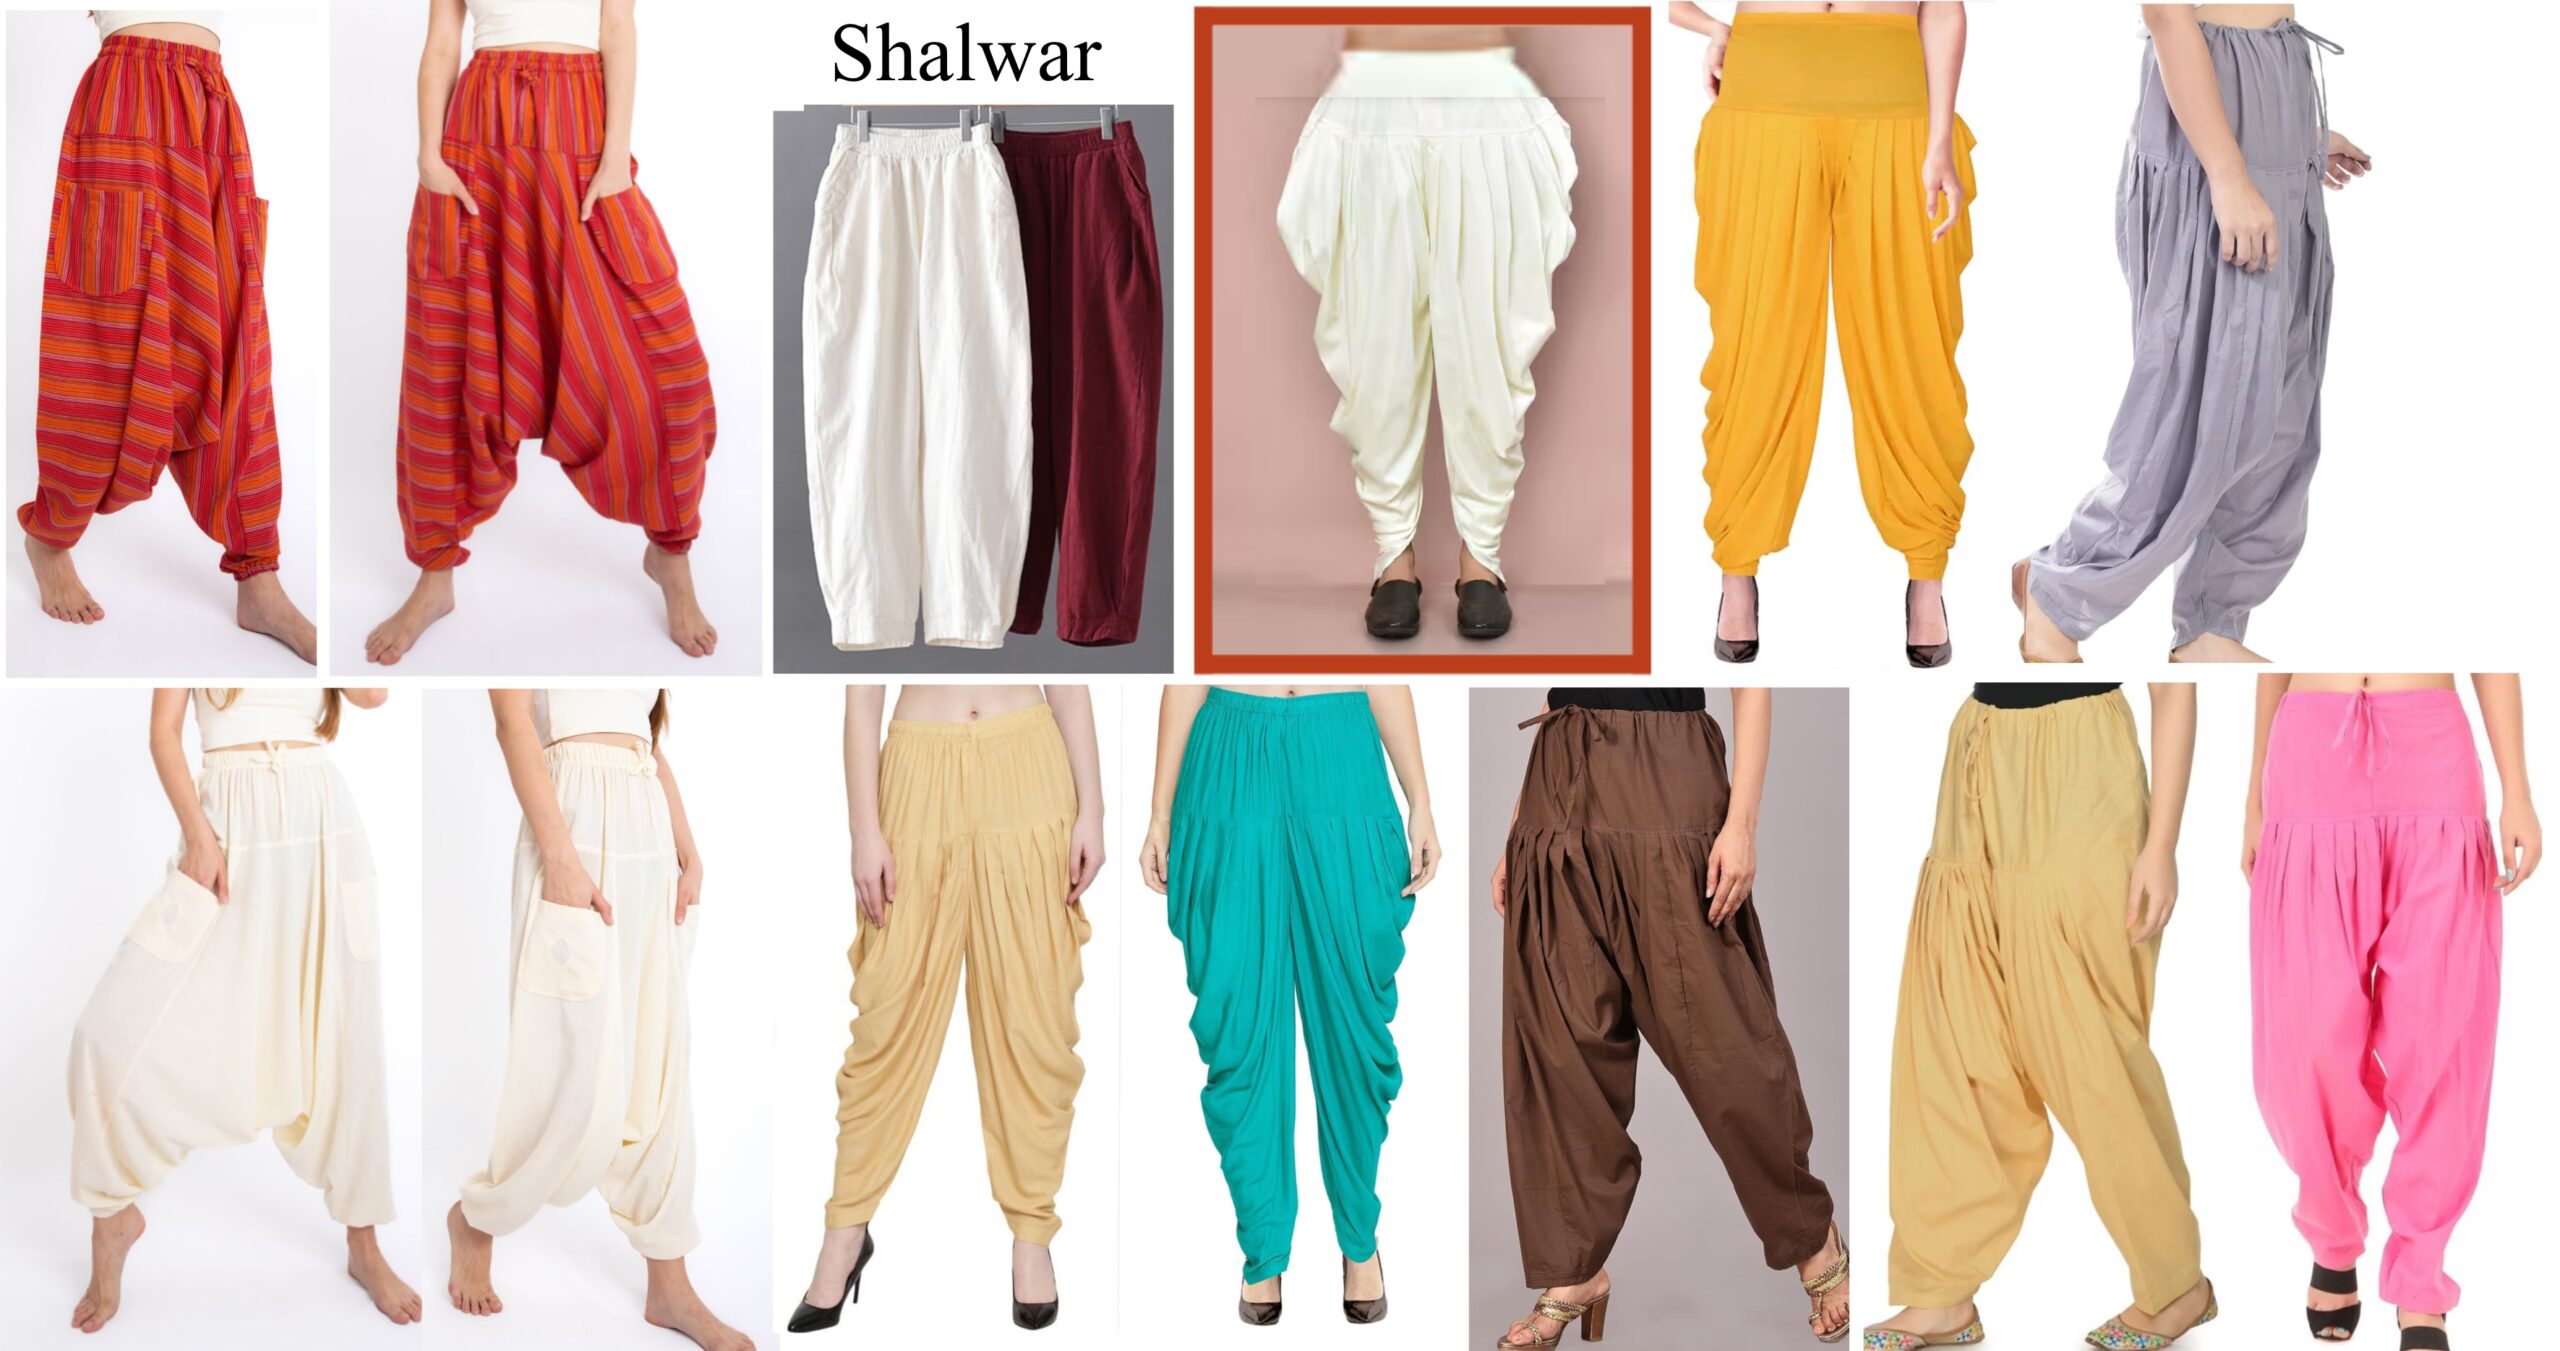
Examples of shalwar and their patterns
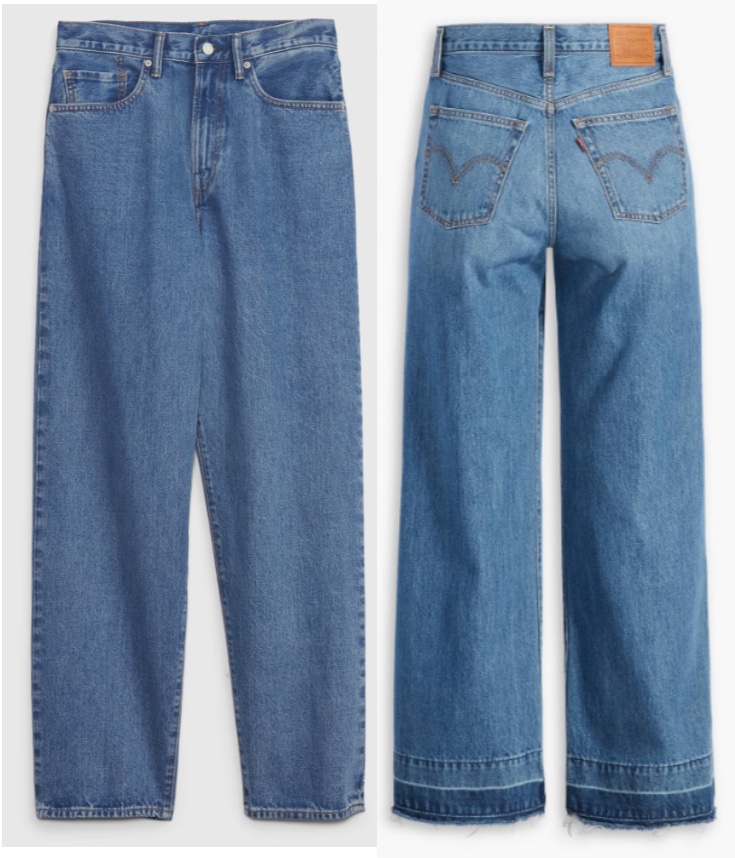
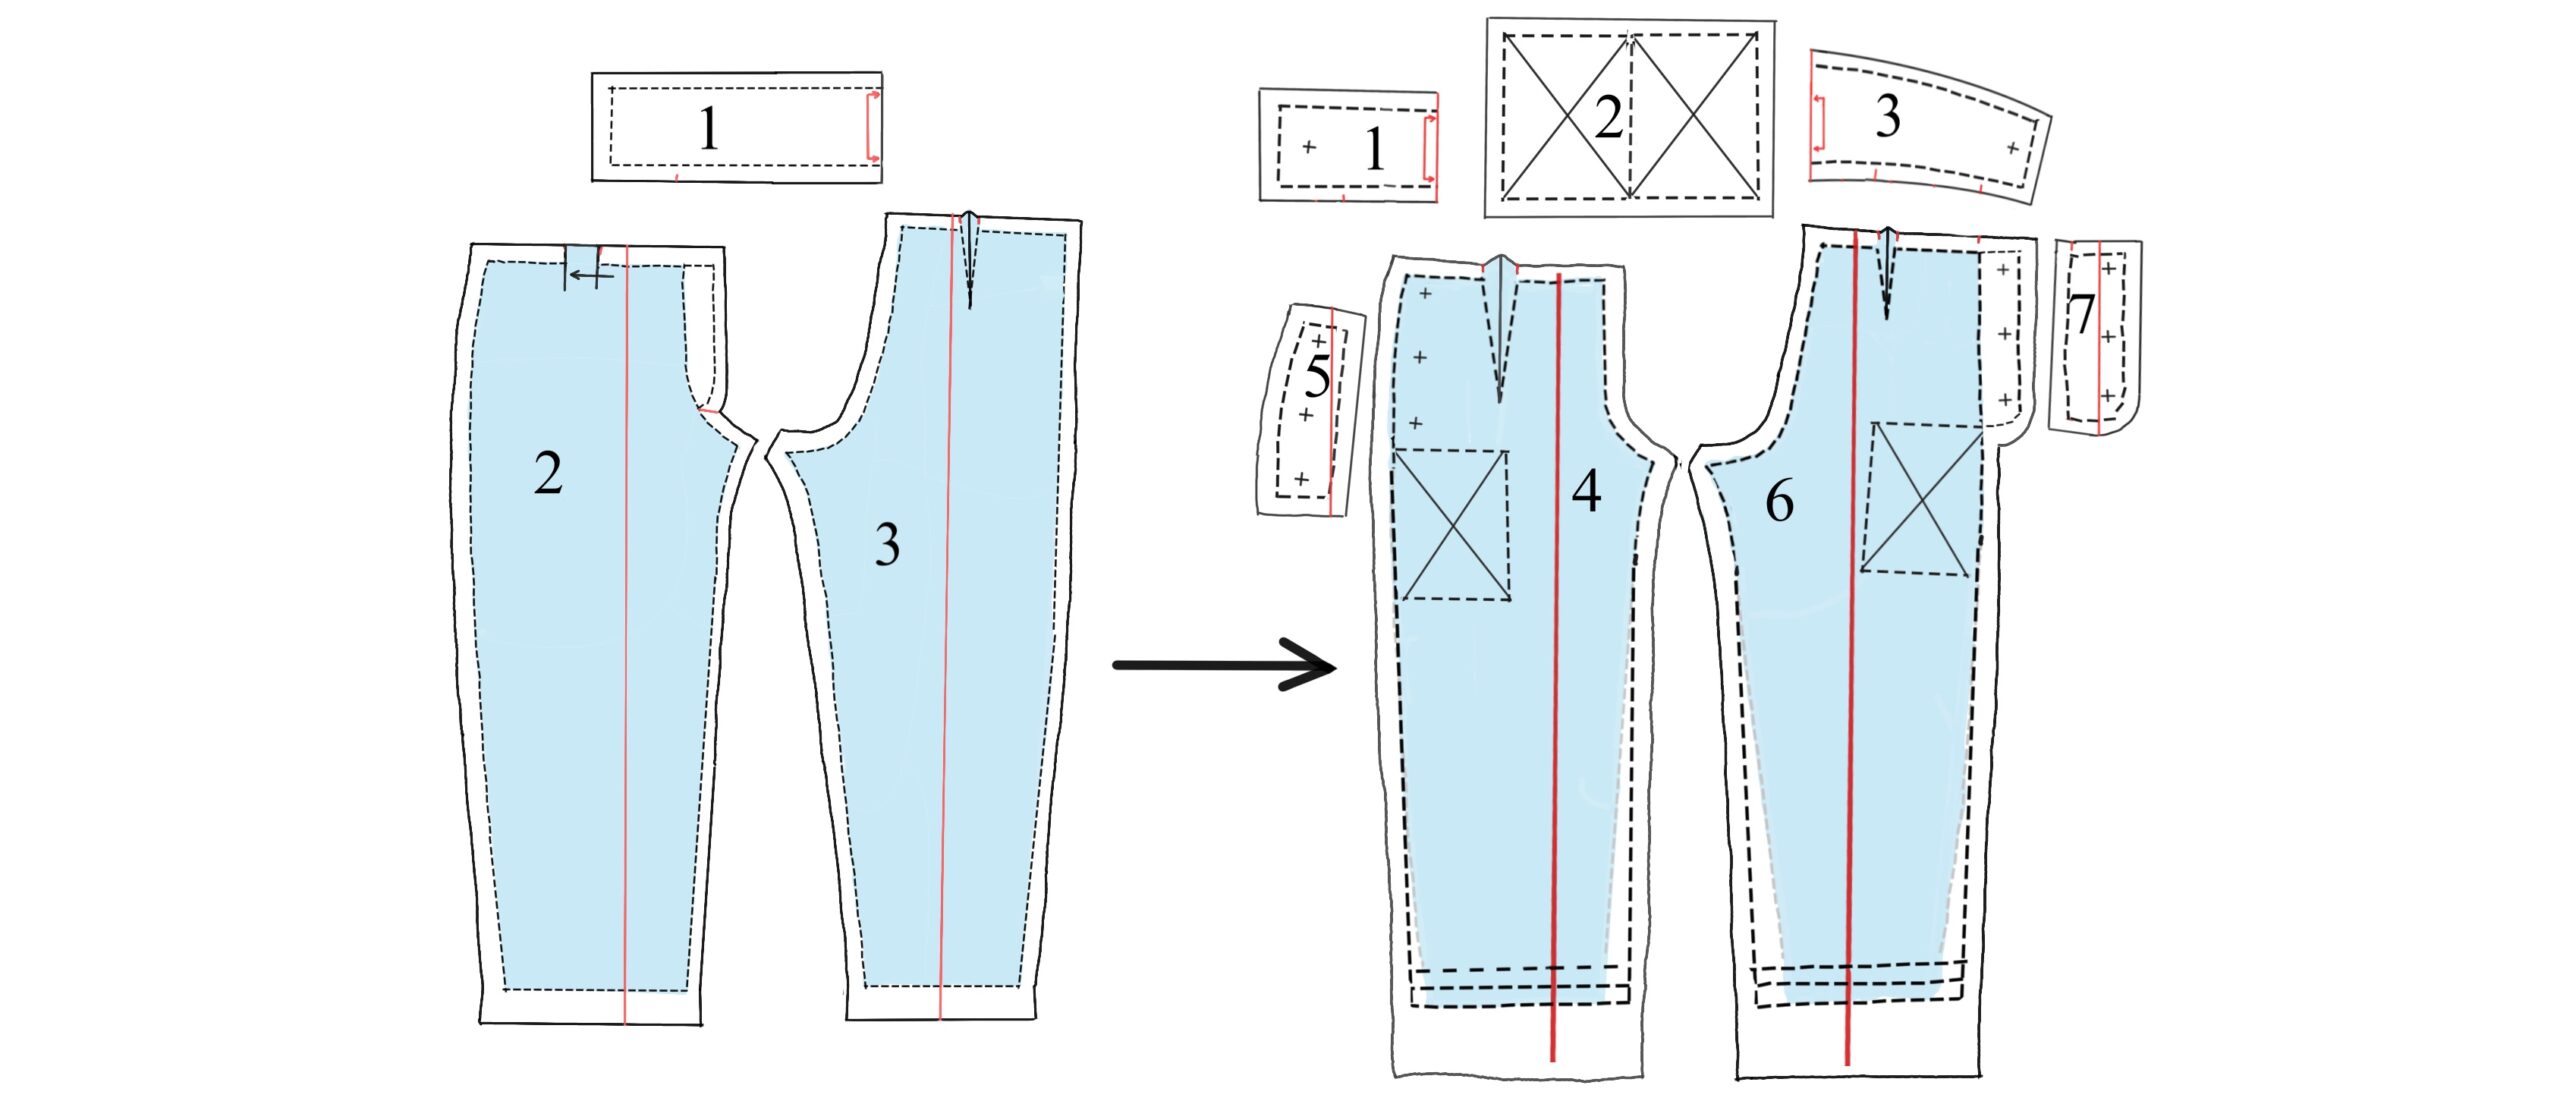
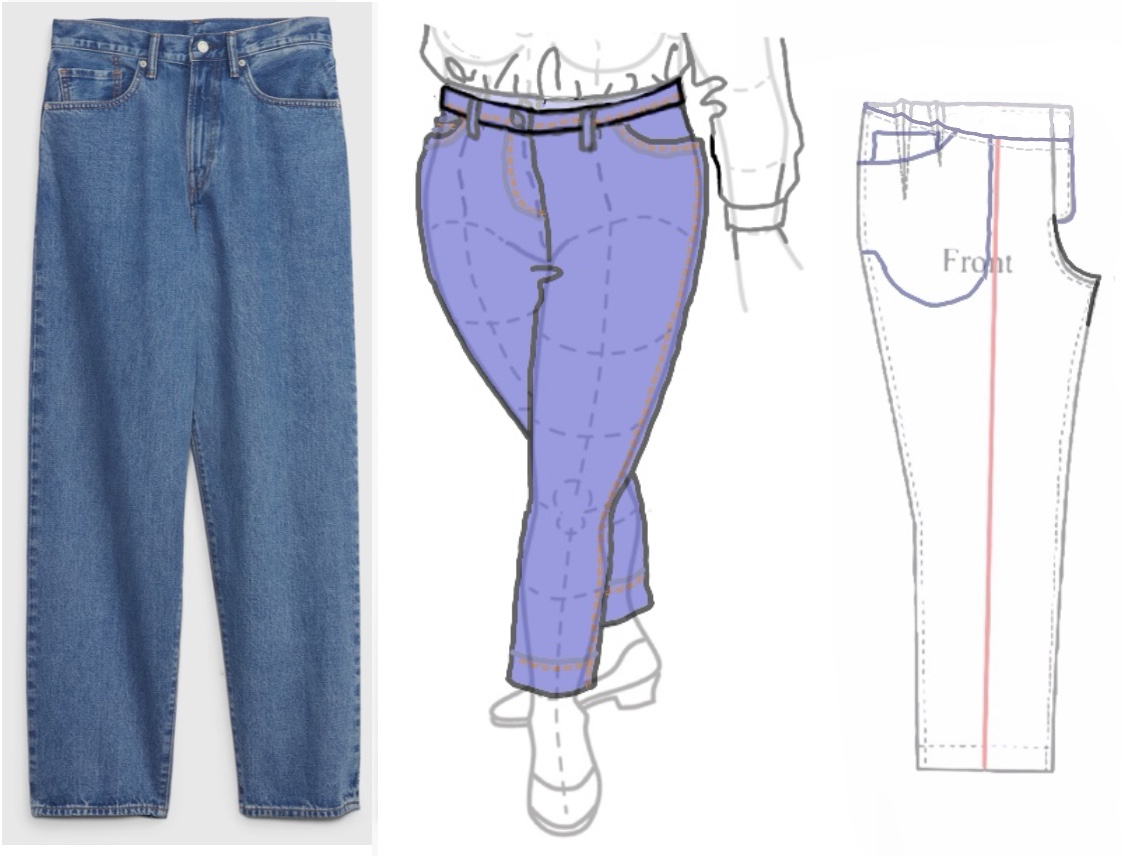
| Jeans are based on your pants block. They are cut more closely to the body so they cup the bottom (see the photo), though they don’t have to be so tight that you must lie on your back to zip them, as is periodically the fashion. The classic five-pocket jeans have a yoked back, a brass-toothed zipper (or a button front) and a stud rather than a button at center front. They’re constructed with flat-felled seams, and can be reinforced with rivets. Their established template for pockets often has a proprietary stitch pattern on the shield-shaped back patch pockets. The front pockets are a variation of a faced curved slash, and include a small coin pocket on the right front. They have decorative double topstitching of heavier gold or orange thread. Five belt loops. The waistline often tips to the front. Traditionally they’re made of a sturdy twill originally from Nimes , France (denim is “of Nimes”) dyed with indigo. The cotton can continue to shrink (mostly vertically) for six or eight launderings, so we MUST cut the waistband crossgrain! Pants that almost immediately are too tight at the waist show cheap construction, where the waistband was laid out vertically. The firm diagonal weave stretches with wear to fit the body. This builds in headaches when duplicating a well-worn pair. Women’s jeans often have ridiculously short front pocket bags, but that’s an easy fix. How tight or baggy the legs are, how high or low or tilted the waistband, etc. are variable. You’re going to need a heavy duty sewing machine, denim needles, and decent thread. Construction is standardized enough that the best way to deal with your stack of cut pieces is to look up what’s been published. Check list of pieces: |
- Fronts, 2
- Zipper fly, 1
- Front pocket bag with denim appliqué (the one touching your body), 2
- Front pocket bag, the one touching the jeans front, 2
- Denim appliqué, 2
- Coin Pocket, 1 (some call it a watch pocket but get real)
- Waistband, 2 (self-faced)
- Belt loops, 5
- Back yoke, 2
- Back, 2
- Back patch pocket, 2

Some patterns join the two front pocket pieces so there’s a fold toward the center front. The layout is easier with two. The front darts can usually be covered by an undarted denim facing, cut on the same grain as the front. If the dart take up is too extreme for the appliqué to lie smoothly, baste the pieces together and then sew the darts through both layers.
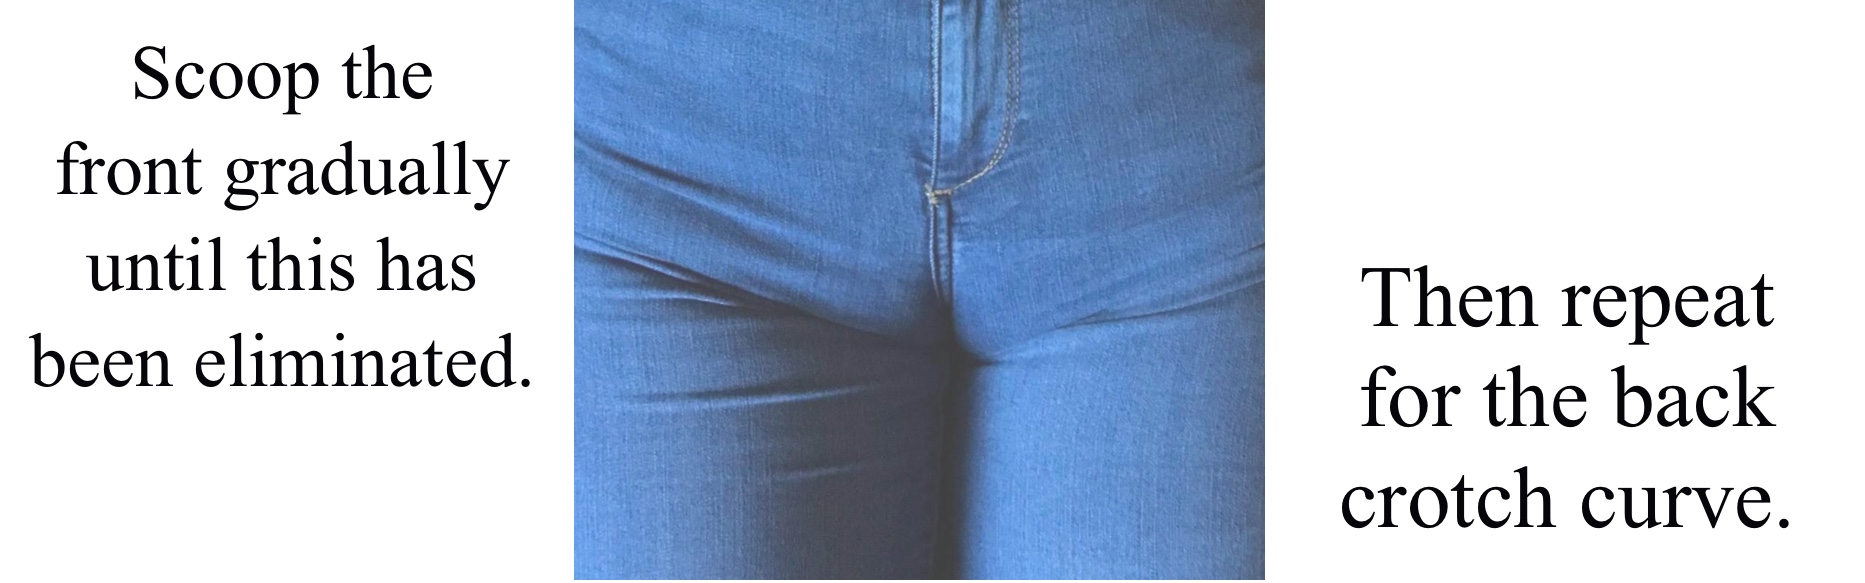
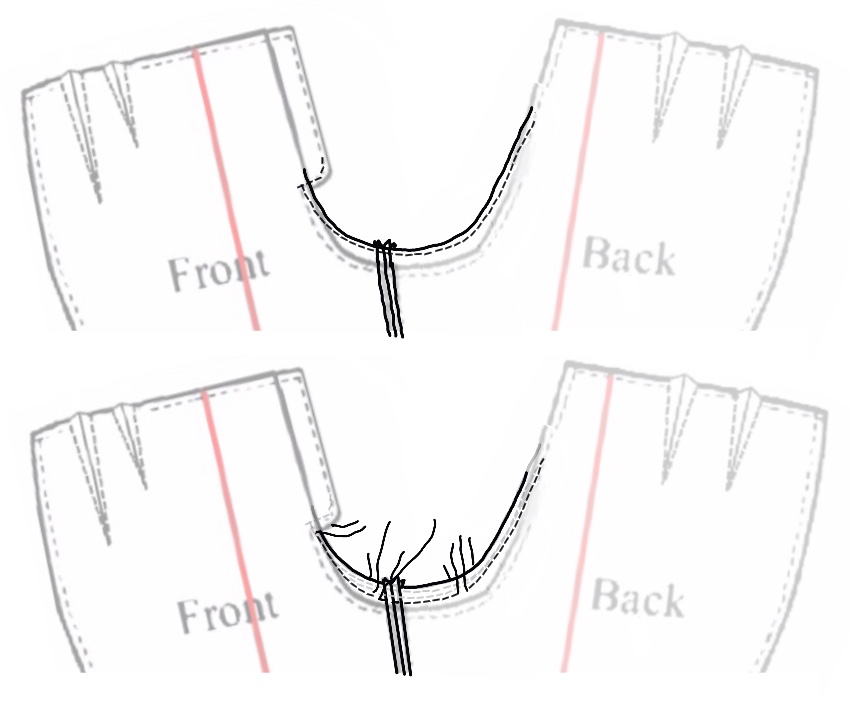
A note on tightening the crotch curve closer to your body:
When tracing the pattern that will become your jeans block, redraw the crotch’s cutting line a thumb’s width closer to your body. Cut out your pattern and sew the rest of your pants as usual, but baste the area shown (yes, it can be done at the end). They will be uncomfortably tight. Resew four or five threads over in sections, taking out the original basting and trying on and adjusting until you have the fit precise. I would start with the front until you’ve eliminated the badly-named camel toe, then move to the back.
Reset your machine to its normal stitch length and resew. Trim excess fabric. Immediately alter your jeans block pattern.
Front pocket pieces:
- Pants Front (full length), cut 2
- Pocket bag (darted out), cut 2
- Denim pocket facing, cut 2
- Smaller pocket bag, cut 2
- Coin pocket, cut 1
Some patterns join the two front pocket pieces so there’s a fold toward the center front. The layout is easier with two. The front darts can usually be covered by an undarted denim facing, cut on the same grain as the front. If the dart take up is too extreme for the appliqué to lie smoothly, baste the pieces together and then sew the darts through both layers. When sewn to the fronts and folded together, the sandwich will lay smoothly over the body.
Make a sample a hands’-width long of a flat-felled seam and measure your seam allowances (it will vary by weight of fabric and your preference). Adjust the pattern, mirroring when you sew.
Here’s a way to do a flat-felled seam from Margaret Islander that mimics what the industry does with a folder:
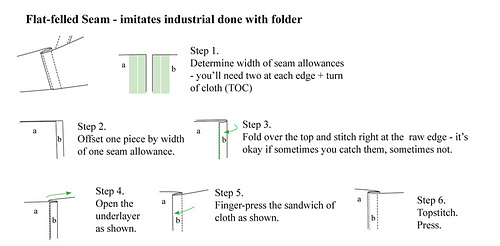
Slightly less telegraphic instructions:
- Add seam allowances to each piece, allowing for Turn of the Cloth (TOC).
- Offset pieces WRONG sides together by the width of the finishing fell.
- Fold the longer over to encase the other and finger-press in place.
- Sew along the raw edge, mostly catching it but not being too obsessive.
- Open out the underlayer.
- Press.
- Edge-stitch (narrow top-stitch).
ETA: looking at this, you’re going to have lost the width of two fells’ worth. If you’re using a pattern that specifies flat-felling, you’re fine. Make a sample about a hands’ length long and see what you need.
Jeans often have the front waistband lowered. This is why fronts may not have darts: the give and stretch of the denim may make the shortened ones unnecessary. Baste and try on your pants without them before adding the waistband, and put them back in if you need them.
Redraw the front section as a shallow curve that meets the side seam at its original point.
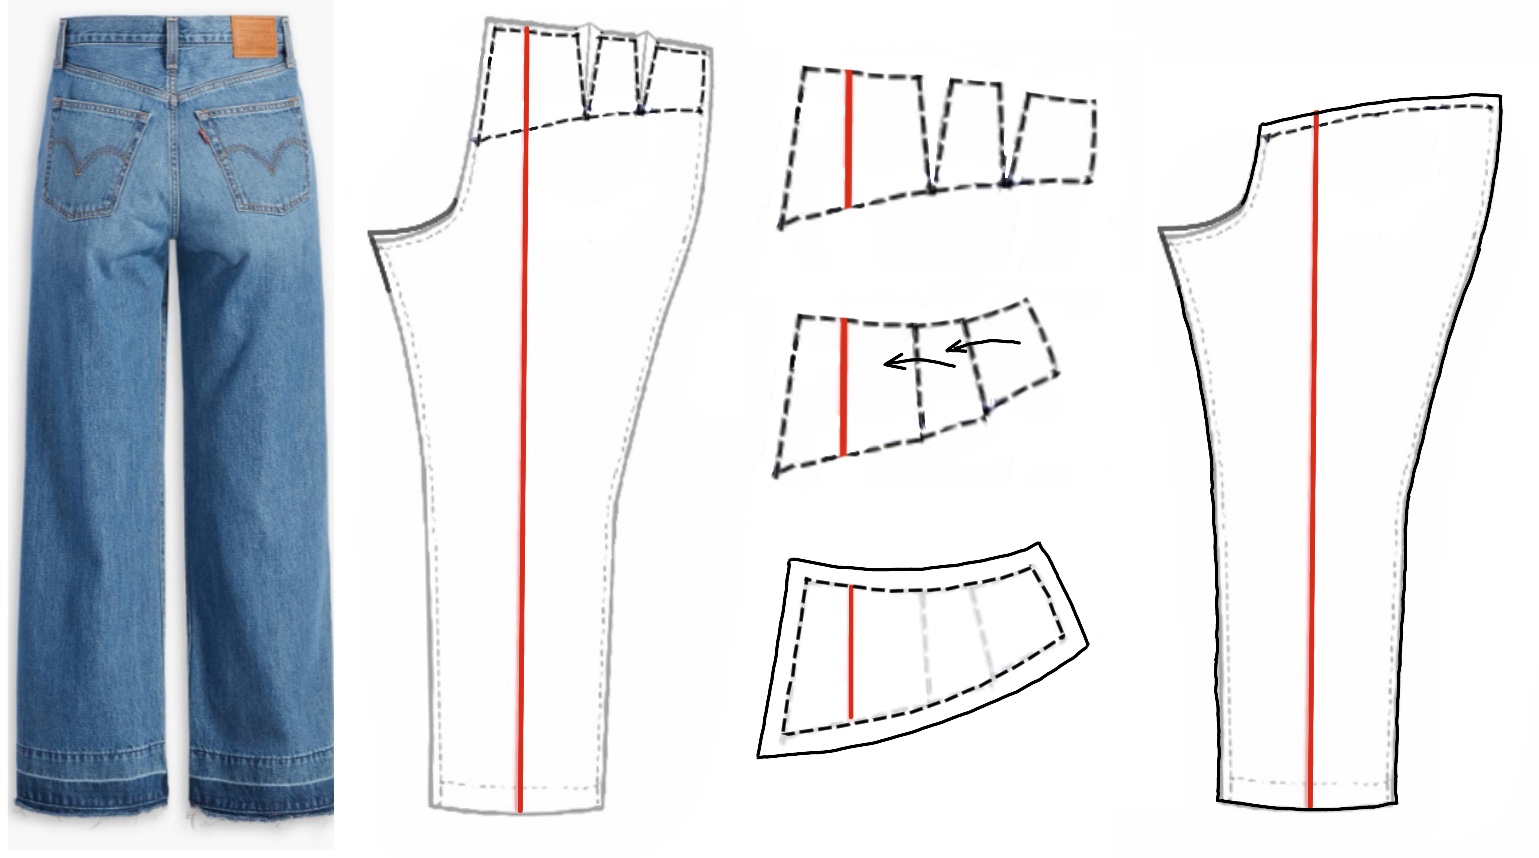
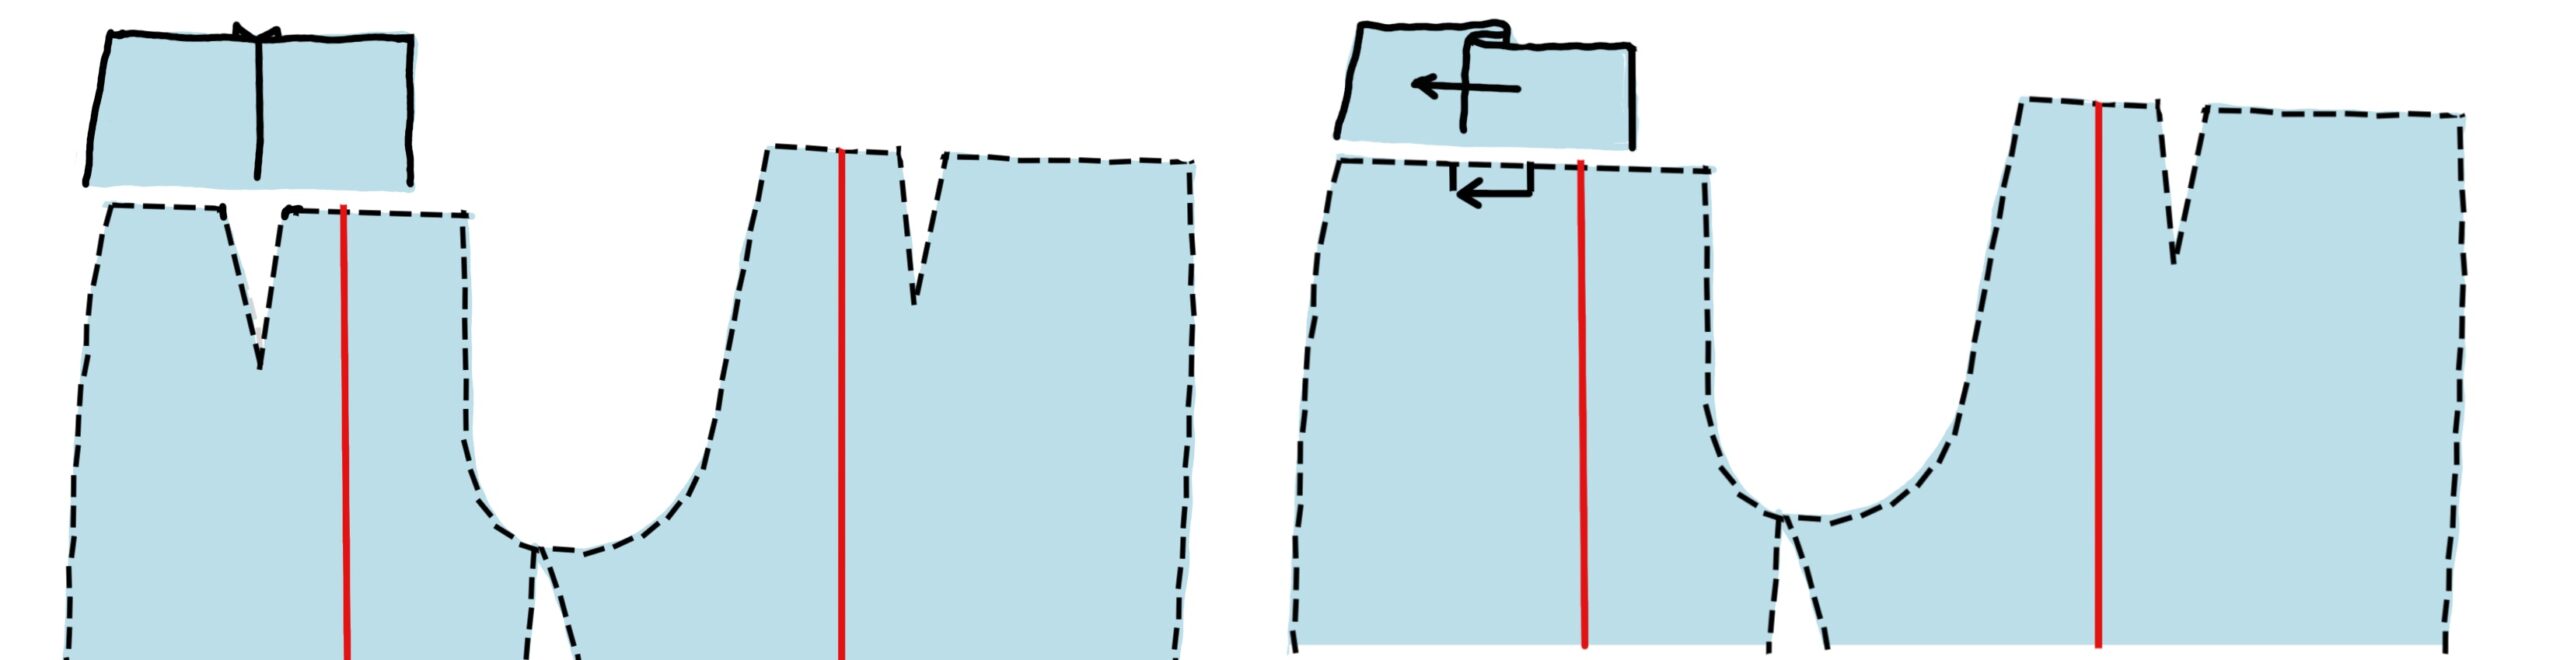
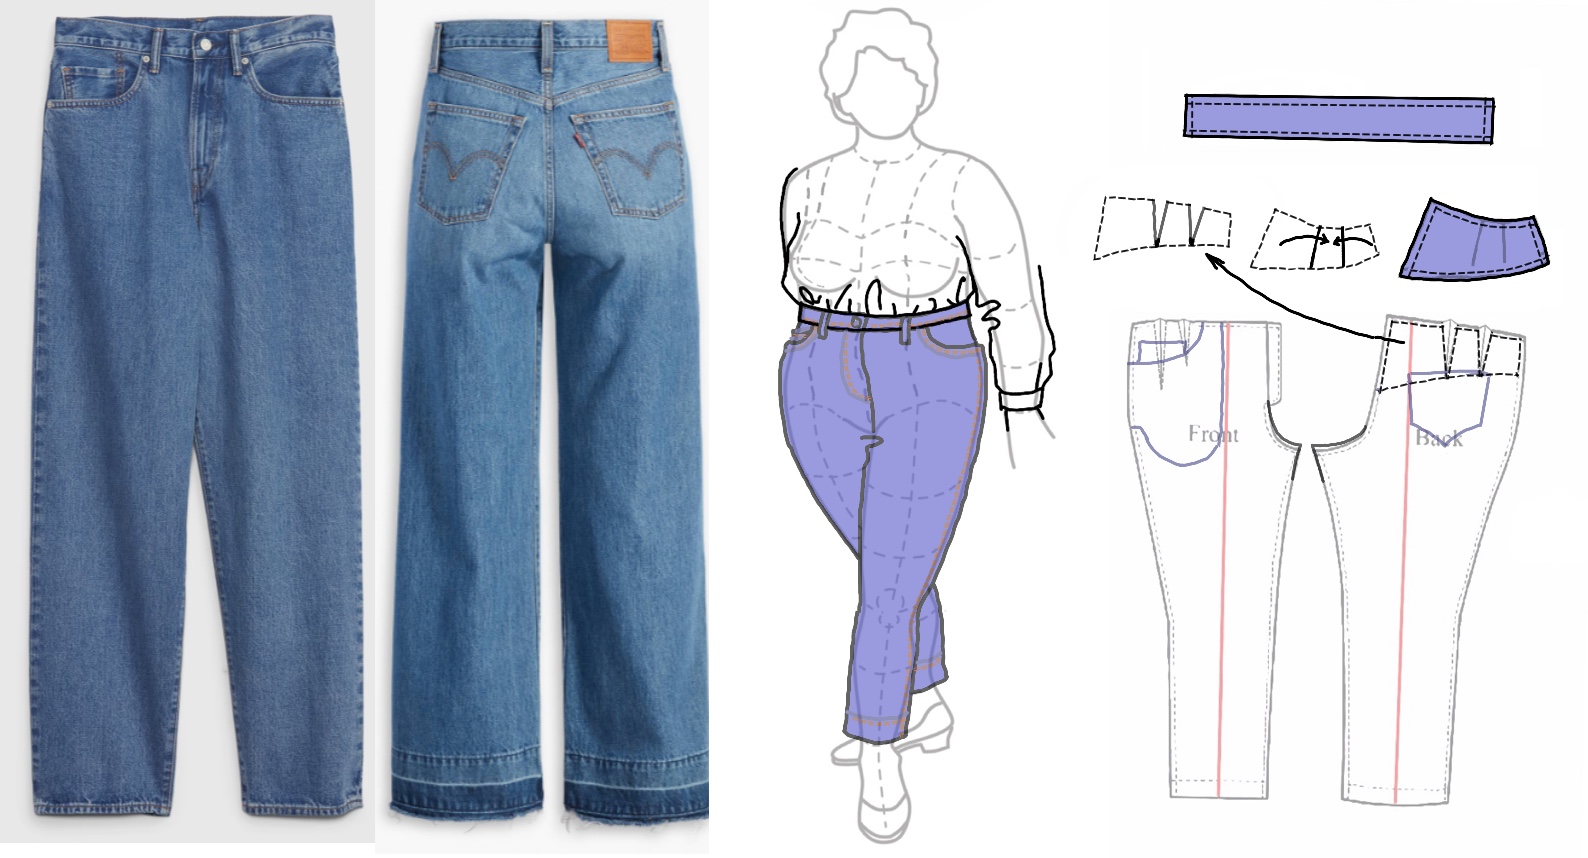
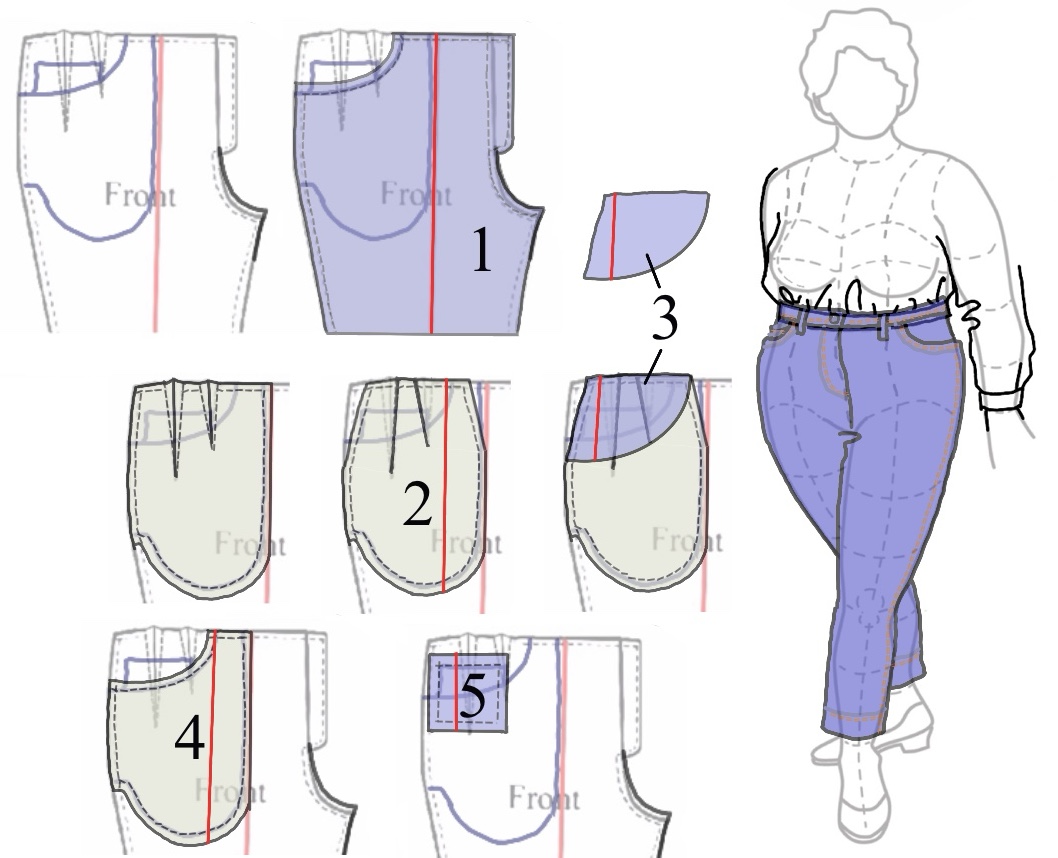
Here’s a fuller version of how to convert darts into a yoke:
Trace the area without the seam allowances.
Close up the darts.
Smooth out the curves when redrawing the stitching lines.
Put the seam allowances back on.
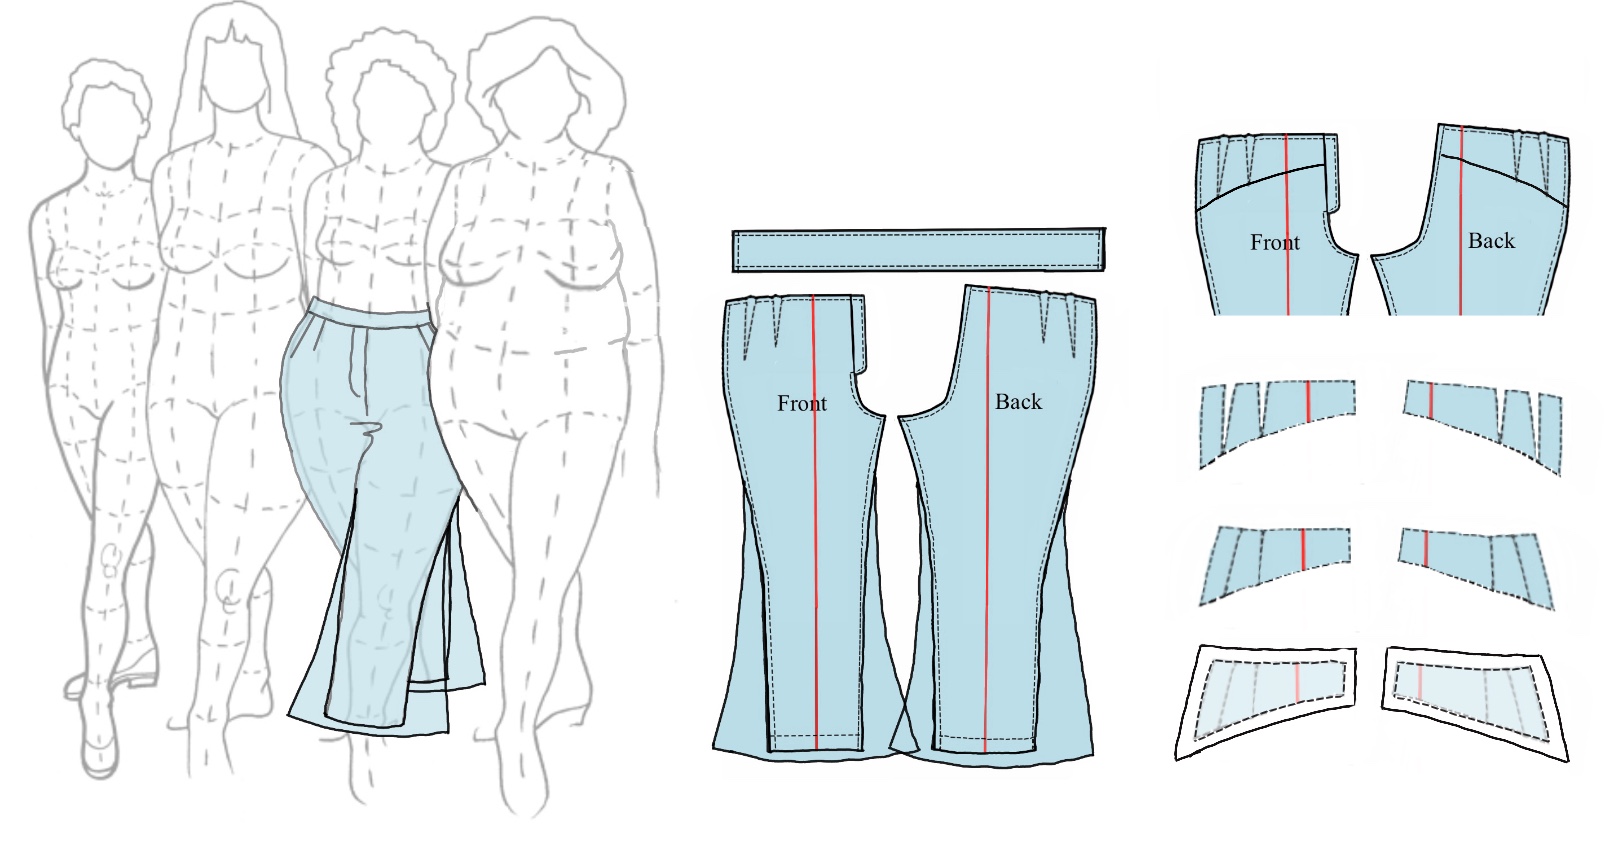
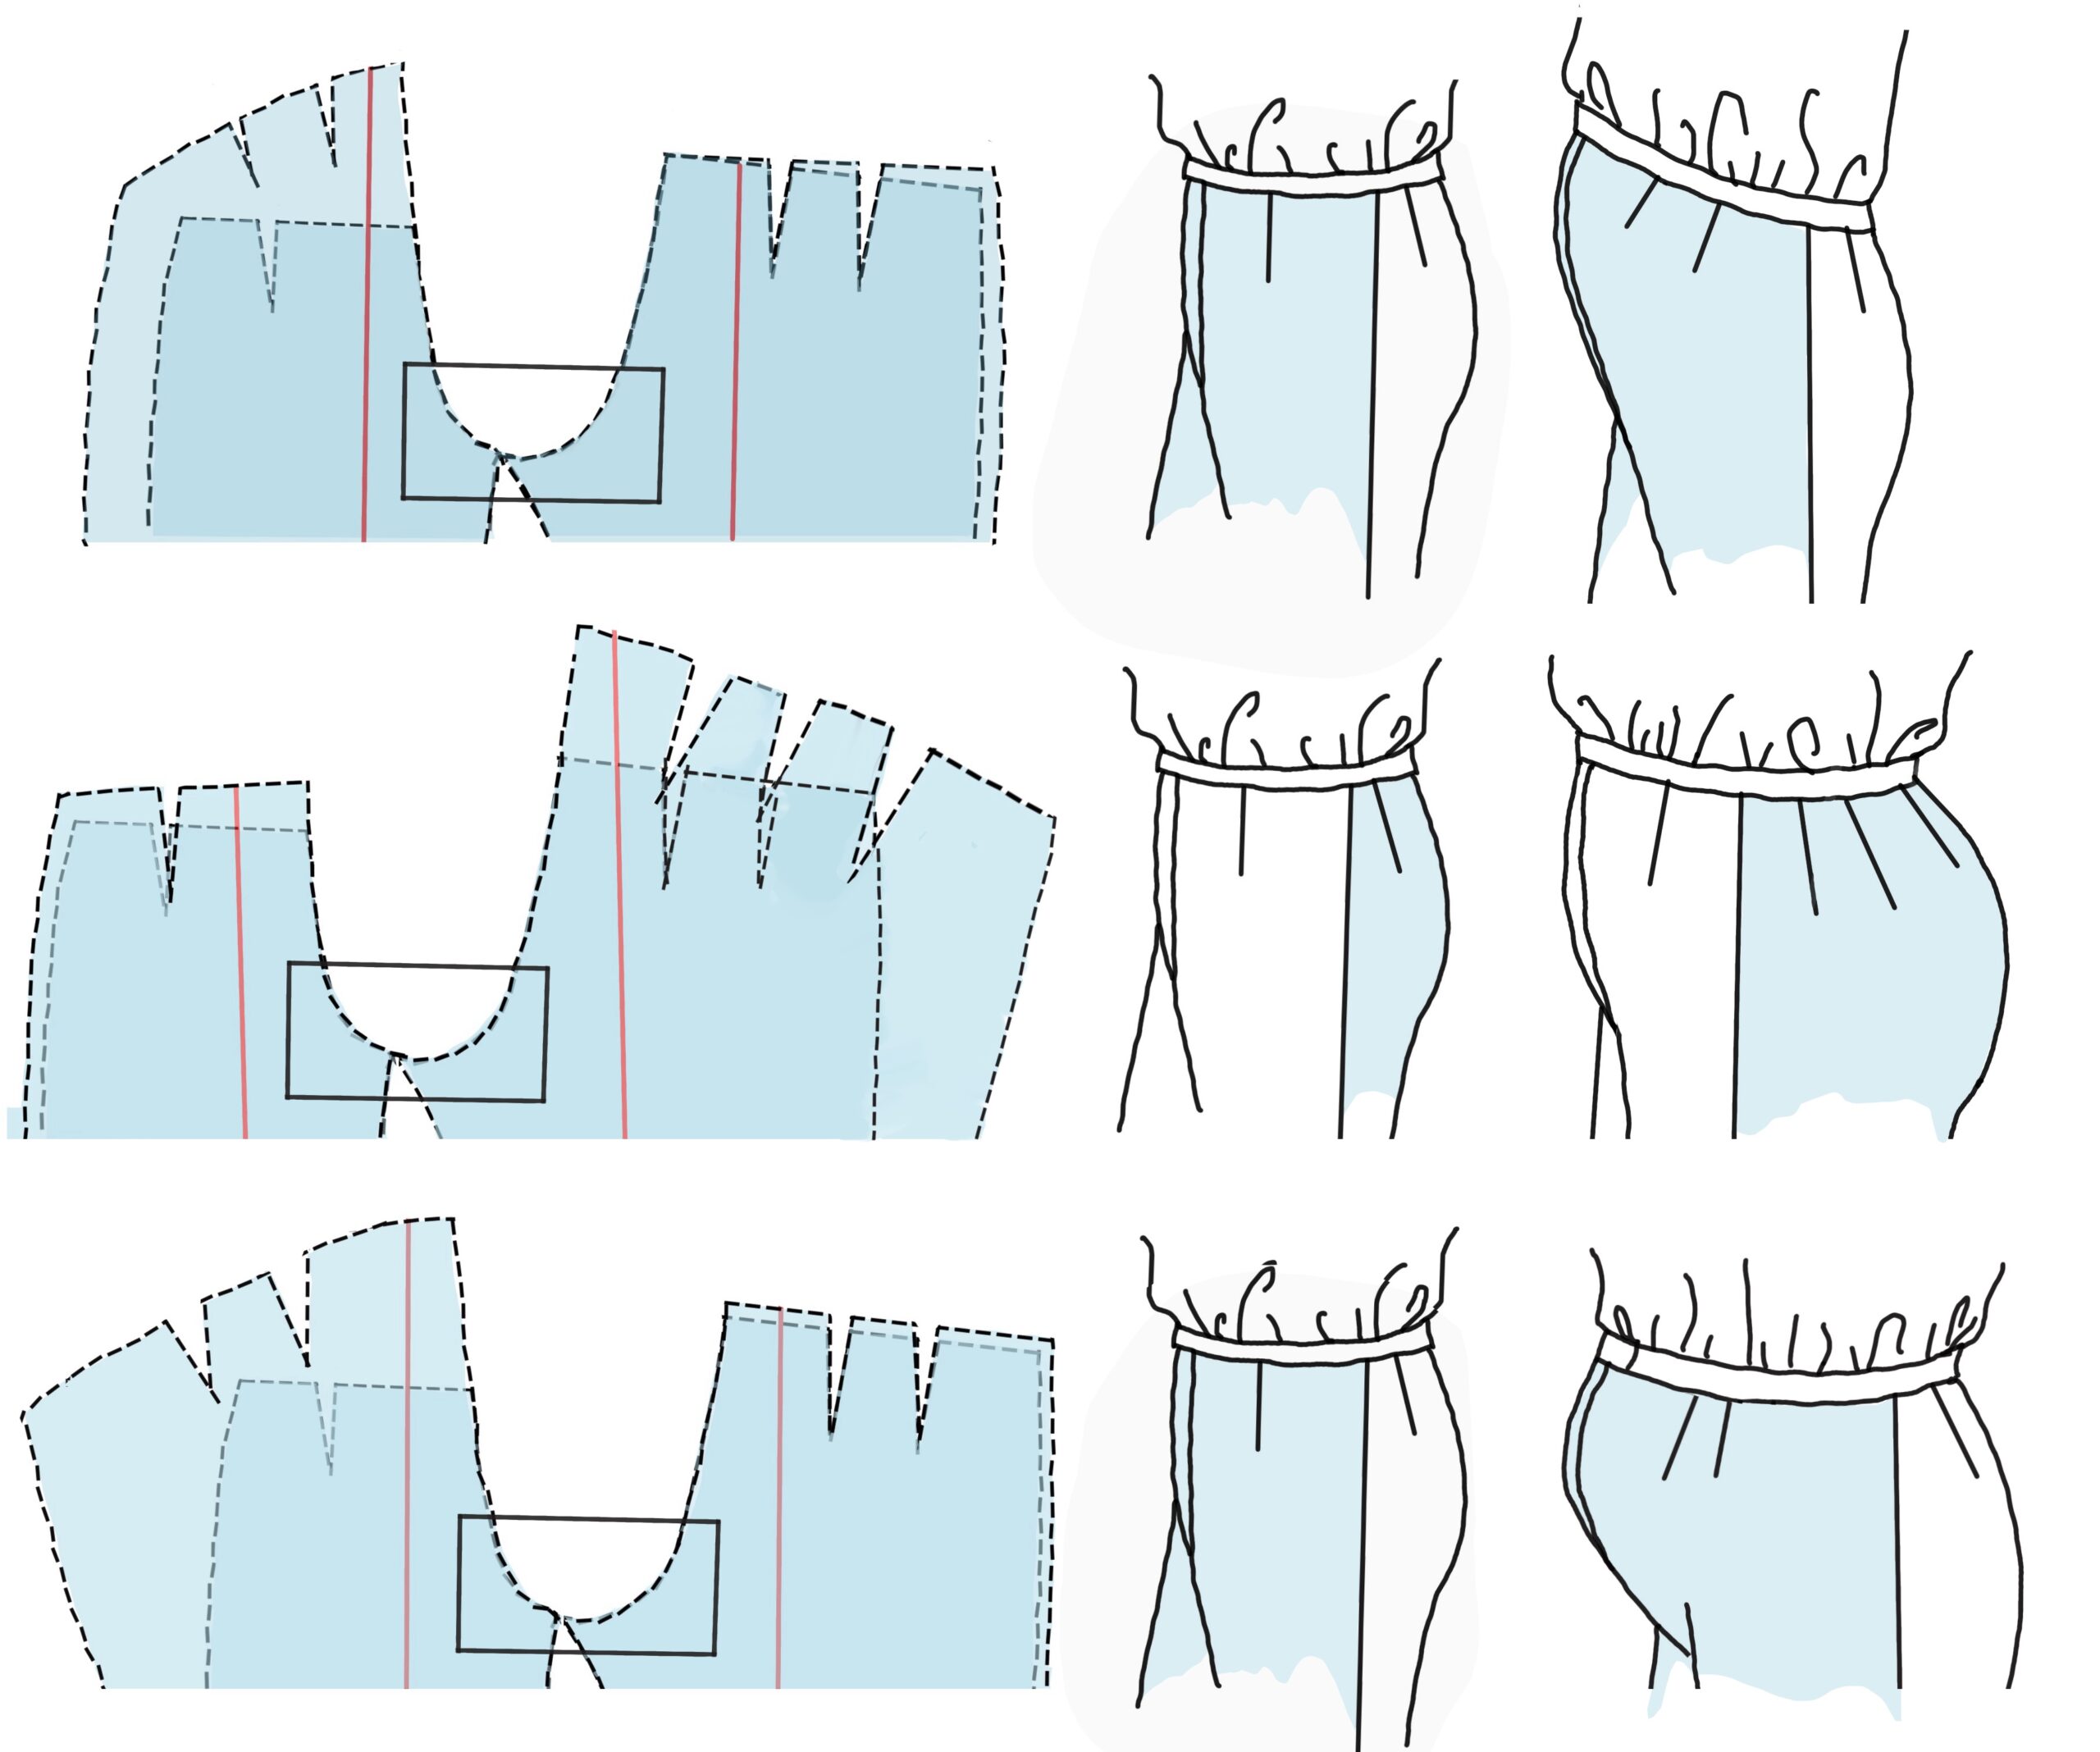
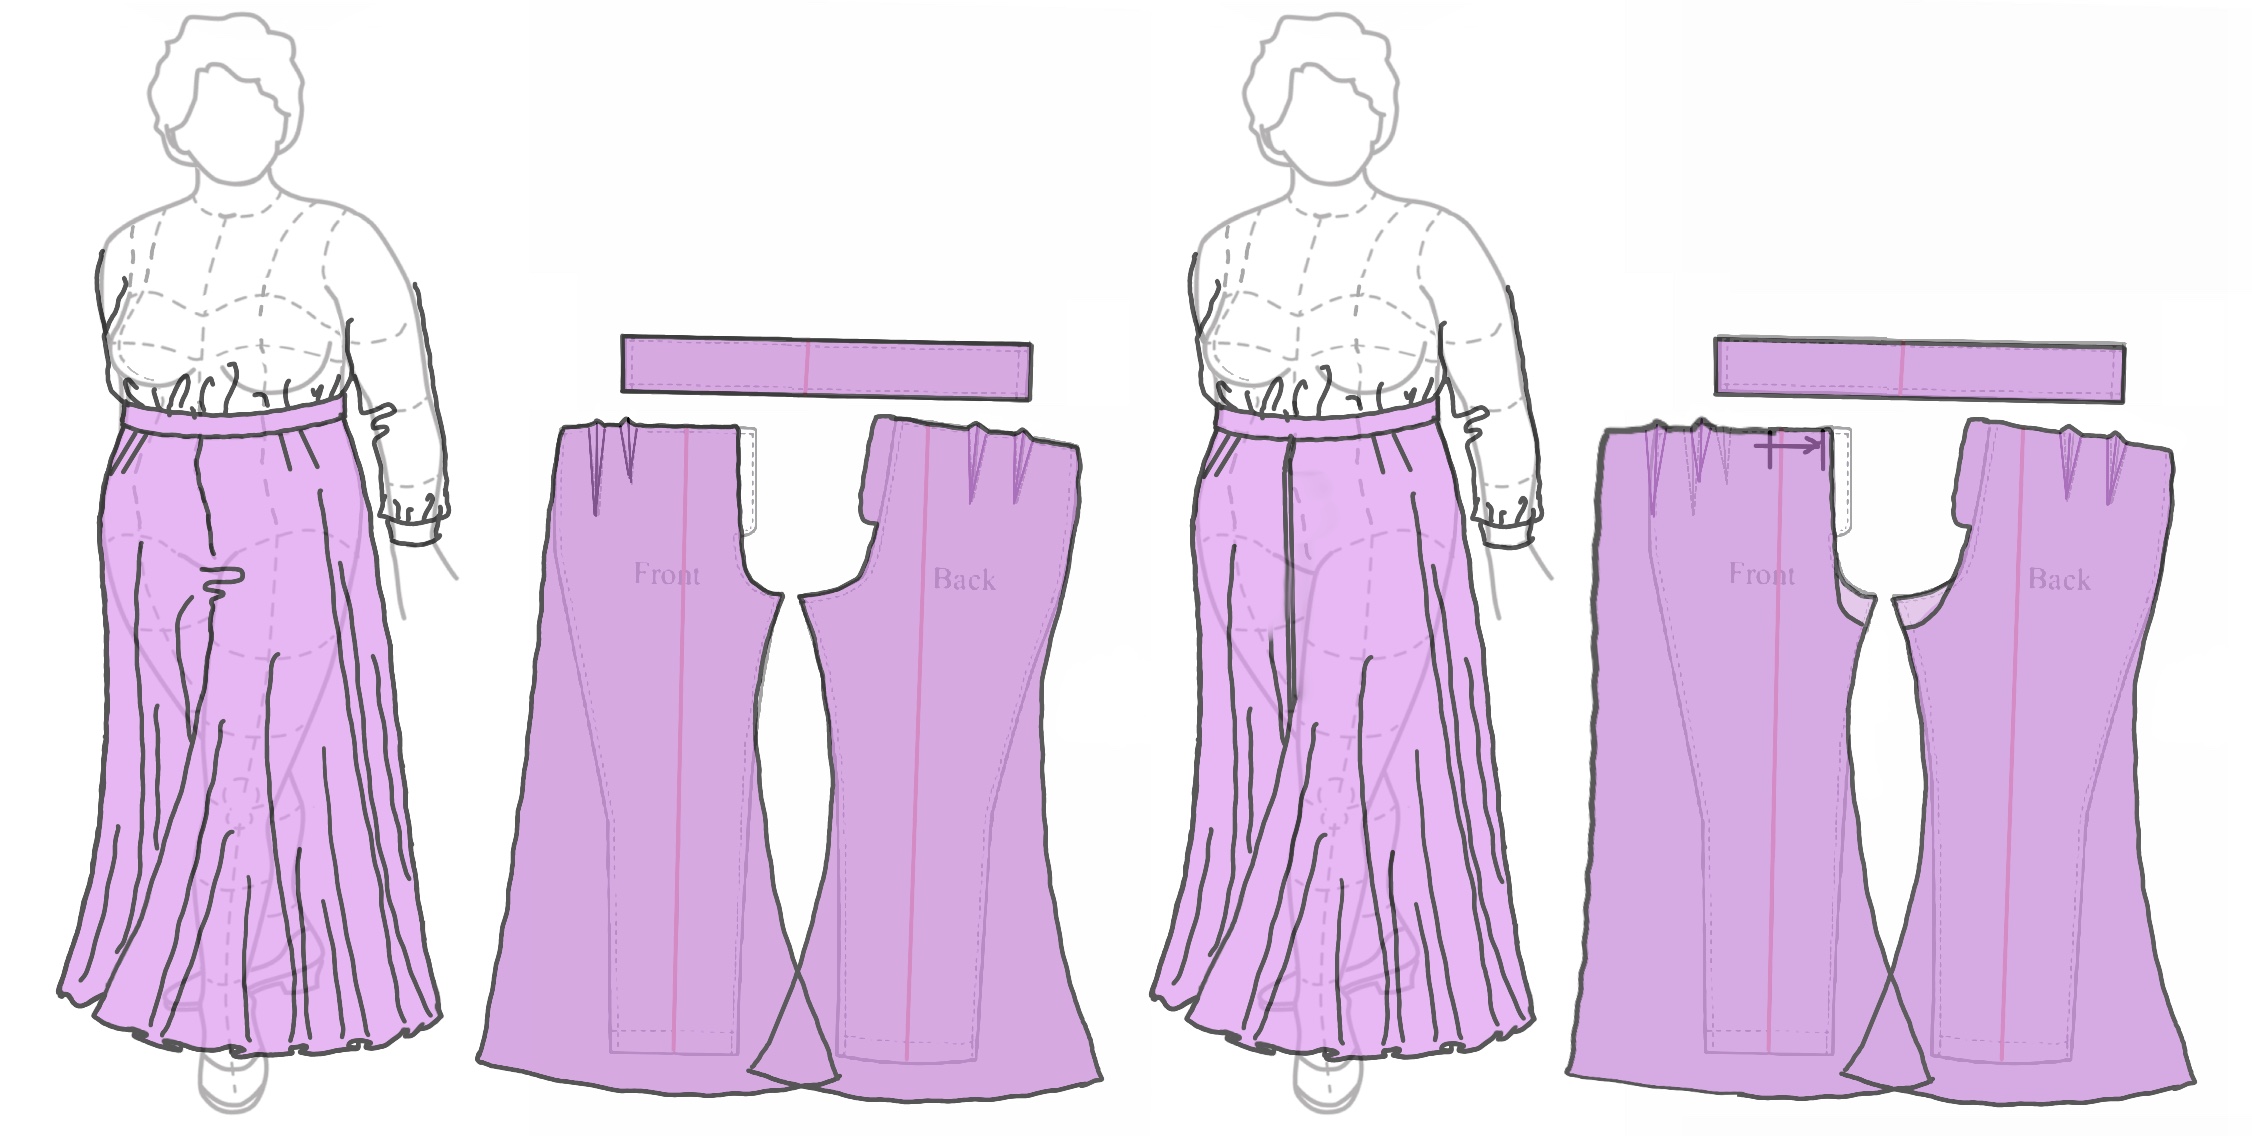
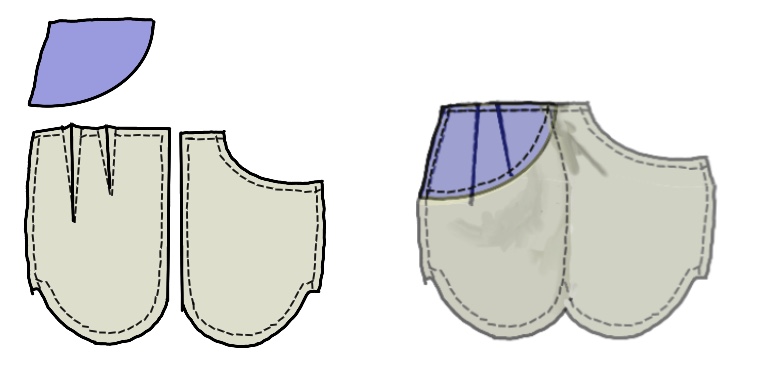
Remember this gal with the bounteous pelvis? Her yokes are going to look different.
“But the clothes in the stores are shaped differently!”
Honey, you’re here because ready-to-wear isn’t.
Shape your patterns to your body.
The so-called Hollywood Waist, not to be confused with Hollywood Pajamas:
The zipper placket has been moved to the back, though the side would be fine.
The waistband is extended up and shaped by extending the darts, same principle as in a sheath dress. Darts are sewn in two passes, from the fat center out. The new waistline is faced.
The upper part will collapse unless boned: short sections covered by tape casings over the darts, which have been clipped in the center and pressed flat.
The legs for this style are usually flared, and you often see suspender-type straps, which never stay centered over the breasts* (not shown).
* yes, I think they’re stupid, why do you ask?
Straps over a full bust might work if the under-bust area were slightly flared and darted. The position and angle of where the straps connect to the back would also be critical. Note: the straps are for style; they do not replace the boning.
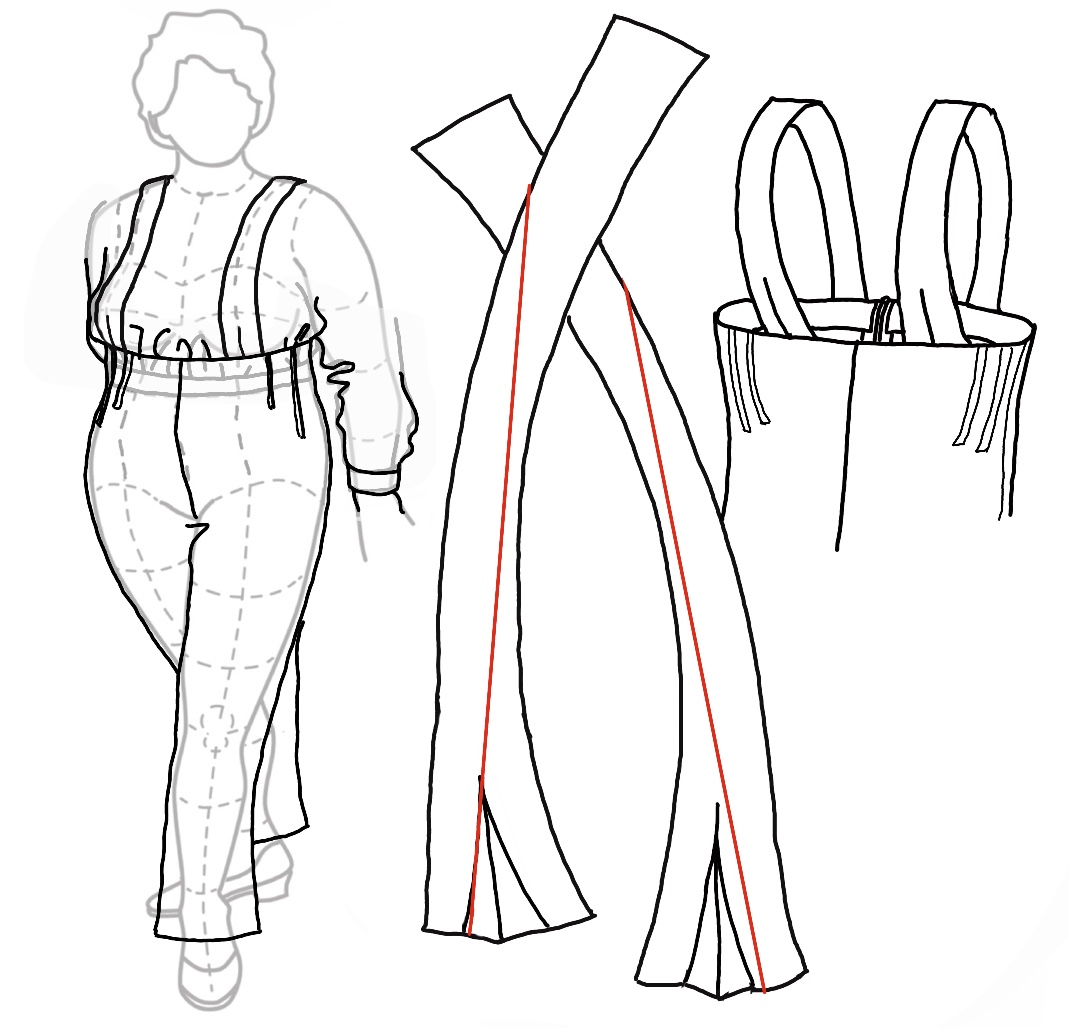
The straps need to be curved. There’s considerable engineering to look like a pair of long rectangles!
ETA: how to make your own cheapo-but-perfectly-adequate curve templates:

Use a strip of paper such as adding machine tape. If it’s stiff, crumple it up, smooth it out, crumple it up again. Pleat little darts into it and check against the curve of you neck, or waist or whatever, and then tape it into place. If there are uneven places such as at left, slash them with scissors, re-shape and tape.
Including the photography and processing the shots, this took less than five minutes.
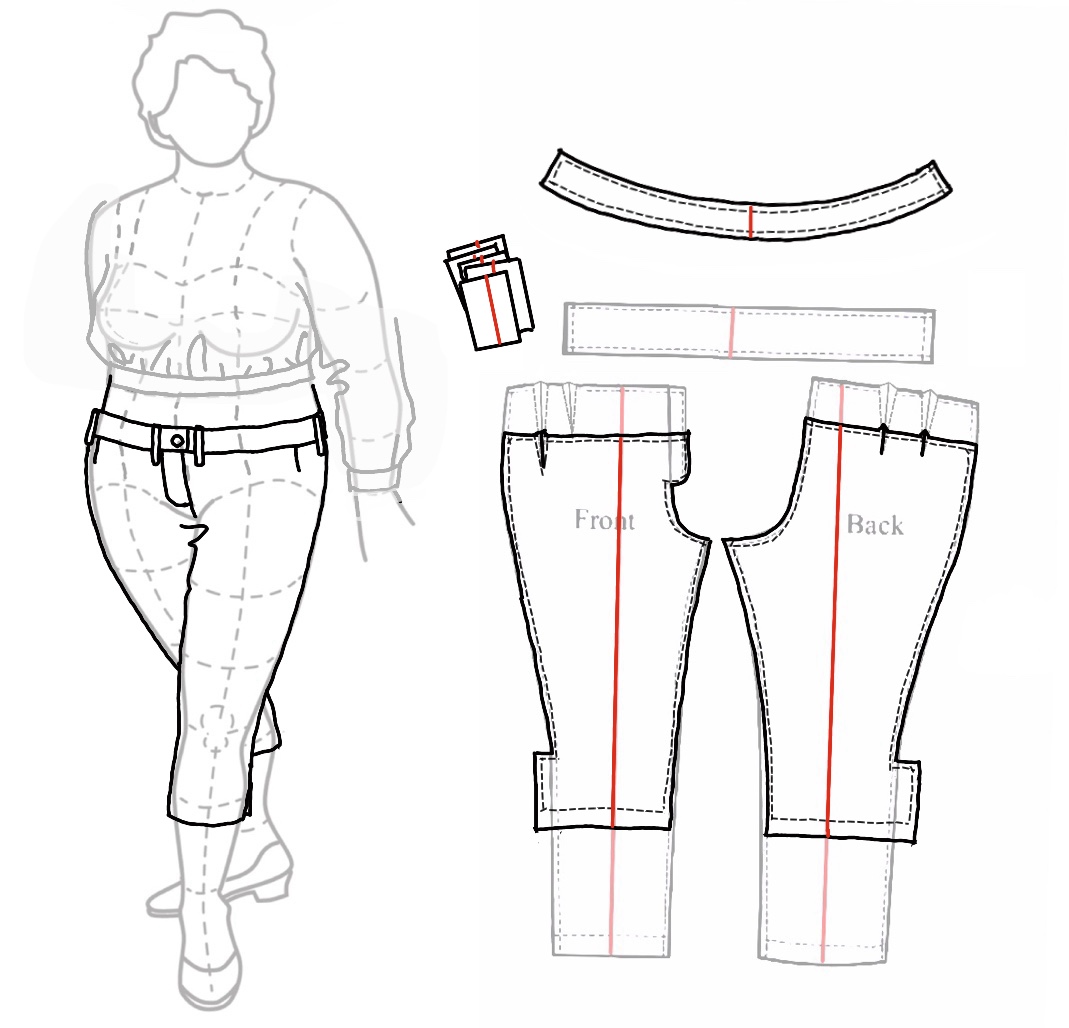
Dropped waist/hip huggers.
Wider than usual waistband: this one is cut-two-and-seam-across-the-top rather than the previous self-faced fold-over.
Belt loops, six, the others are at the side backs.
Capri length (or whatever they’re calling it these days) with slits in the outseam to get the ankle through.
These take a very short zipper!
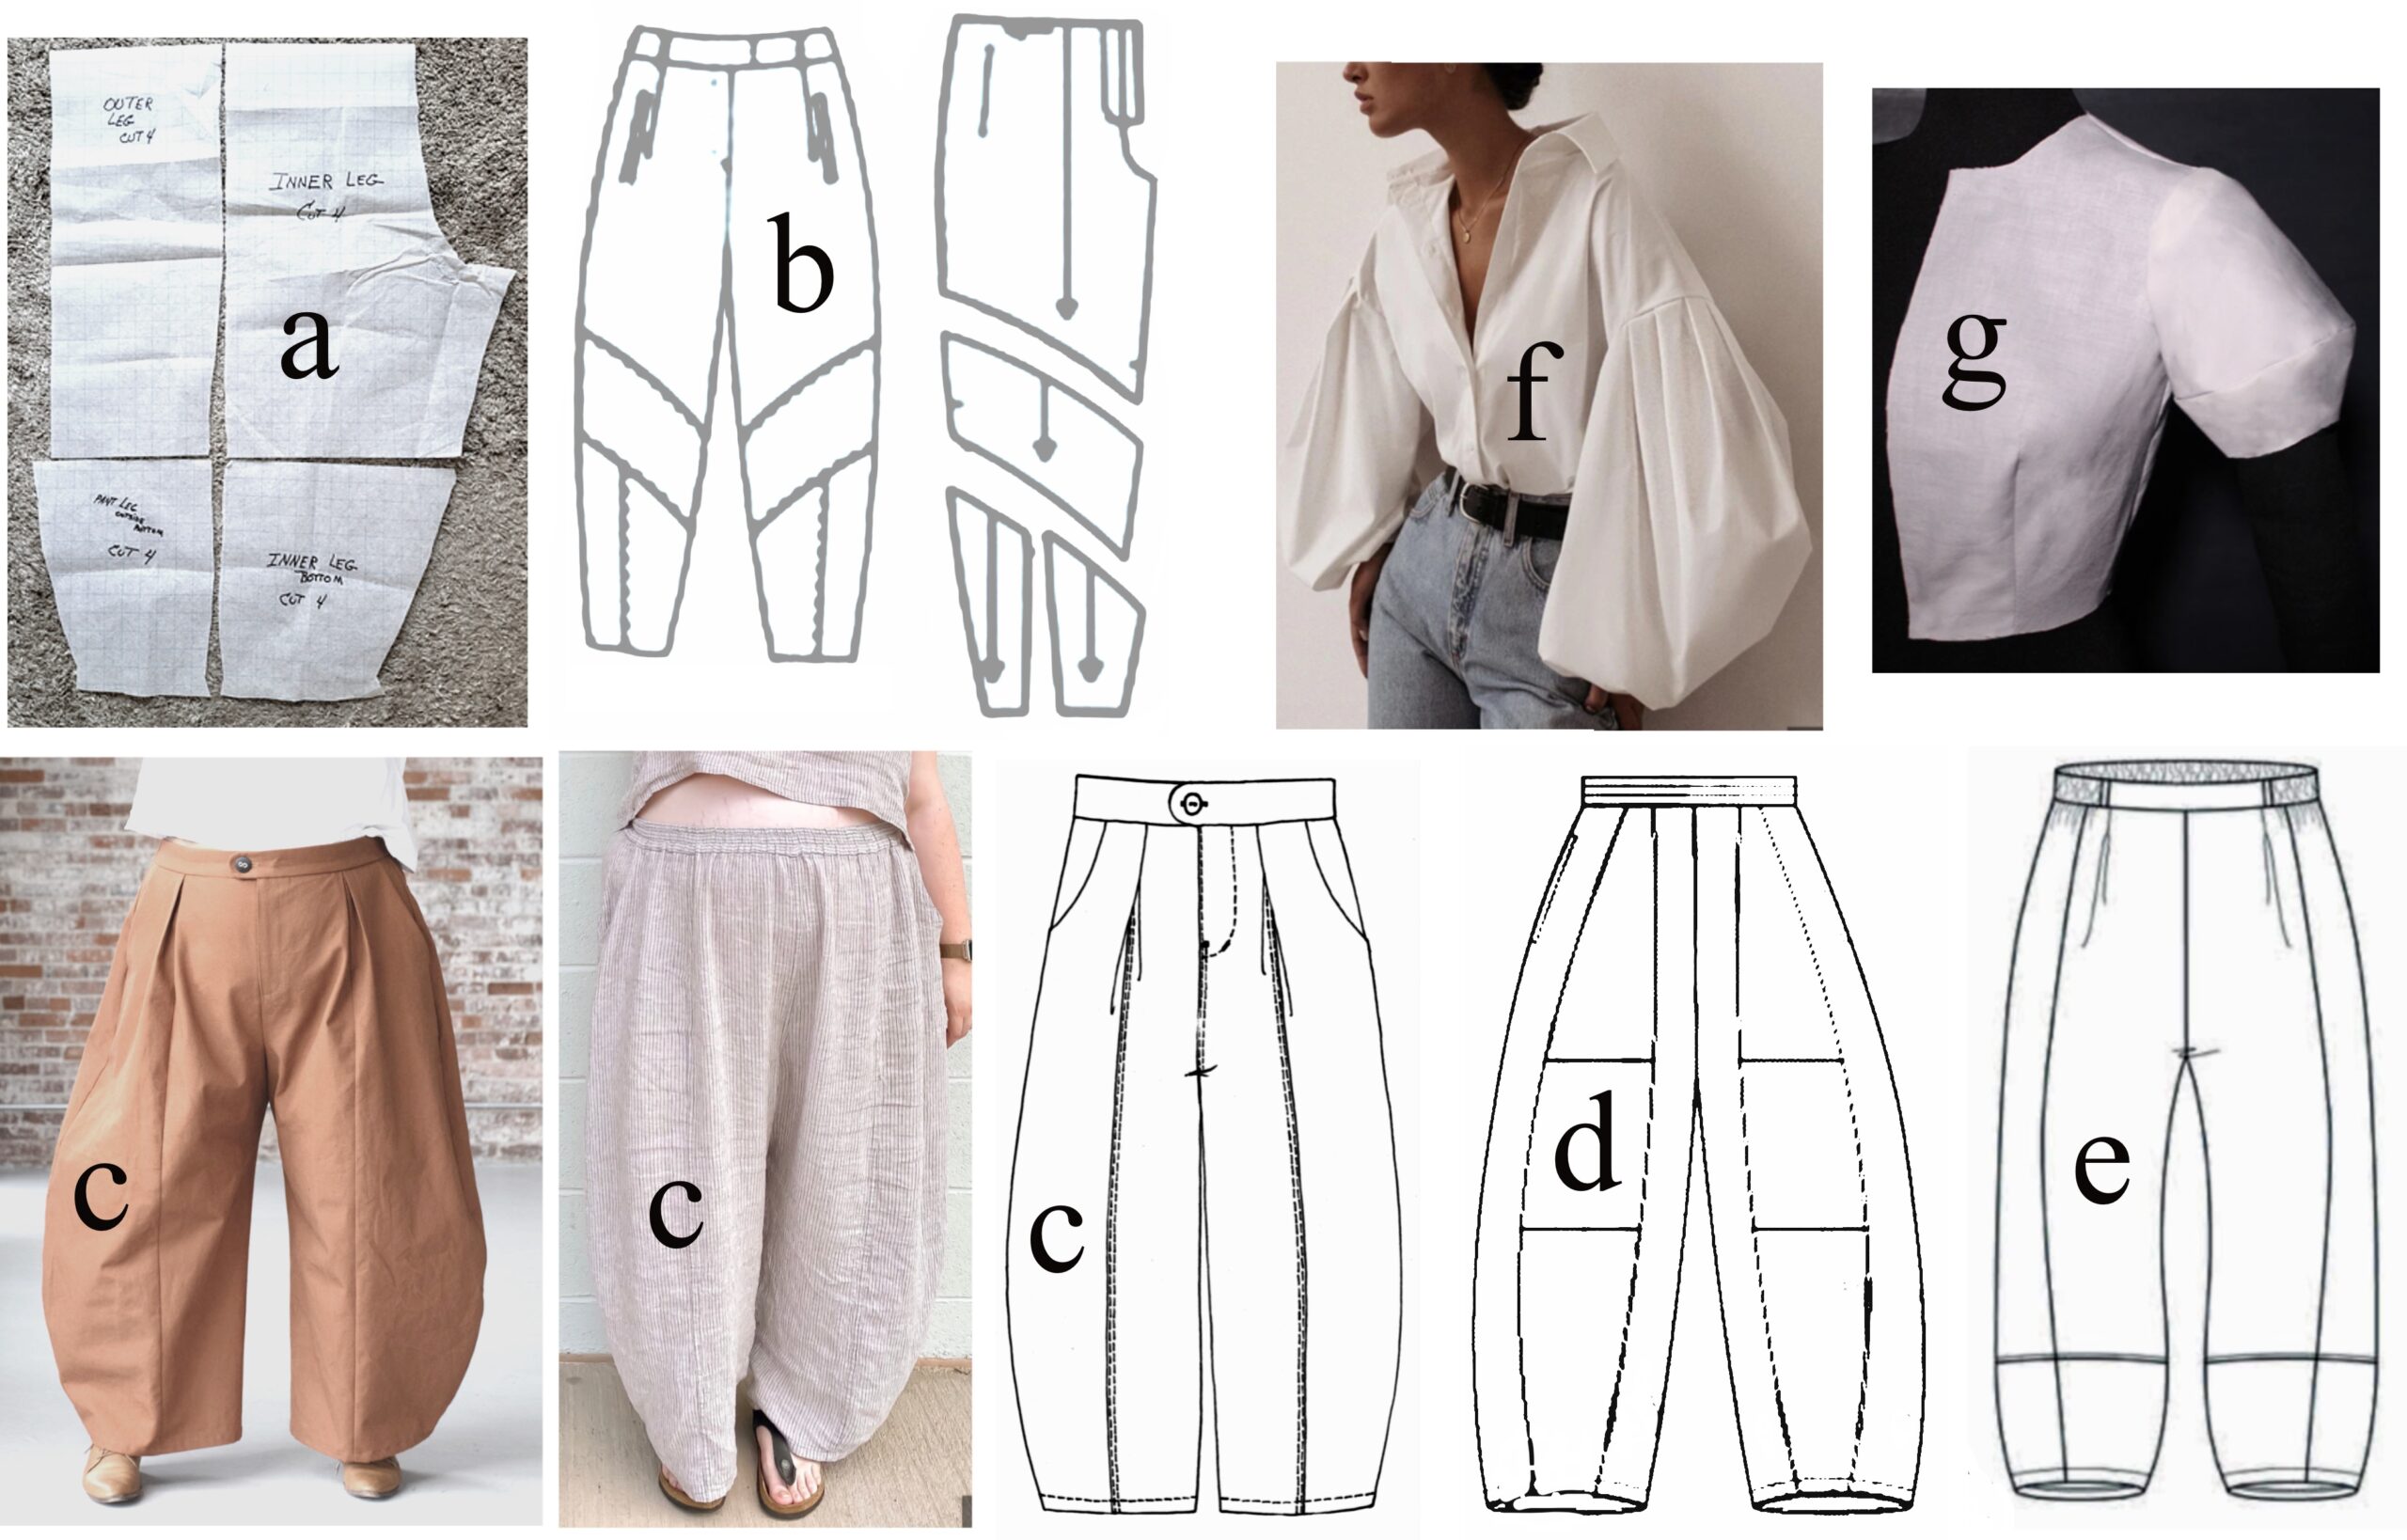
Let’s talk about adding fullness.
(a) are front/back for the person in a wheelchair
(b) are a balloon pair
(c) are the Arthur
Note the difference between using a crisp woven and a drapey knit
(d) are lantern pants
(e) is another variation, same flavor as (a) but different proportions
(f) and (g) are lantern sleeves
The first way to add volume/stiffness is to split the pattern pieces, add seam allowances, and sew them back together: a, b, d, e. The stitching and thread add a surprising amount of weight and stability (which is why couture likes single-thread hand stitching for drape and softness). Flat-felling your seams adds, too.
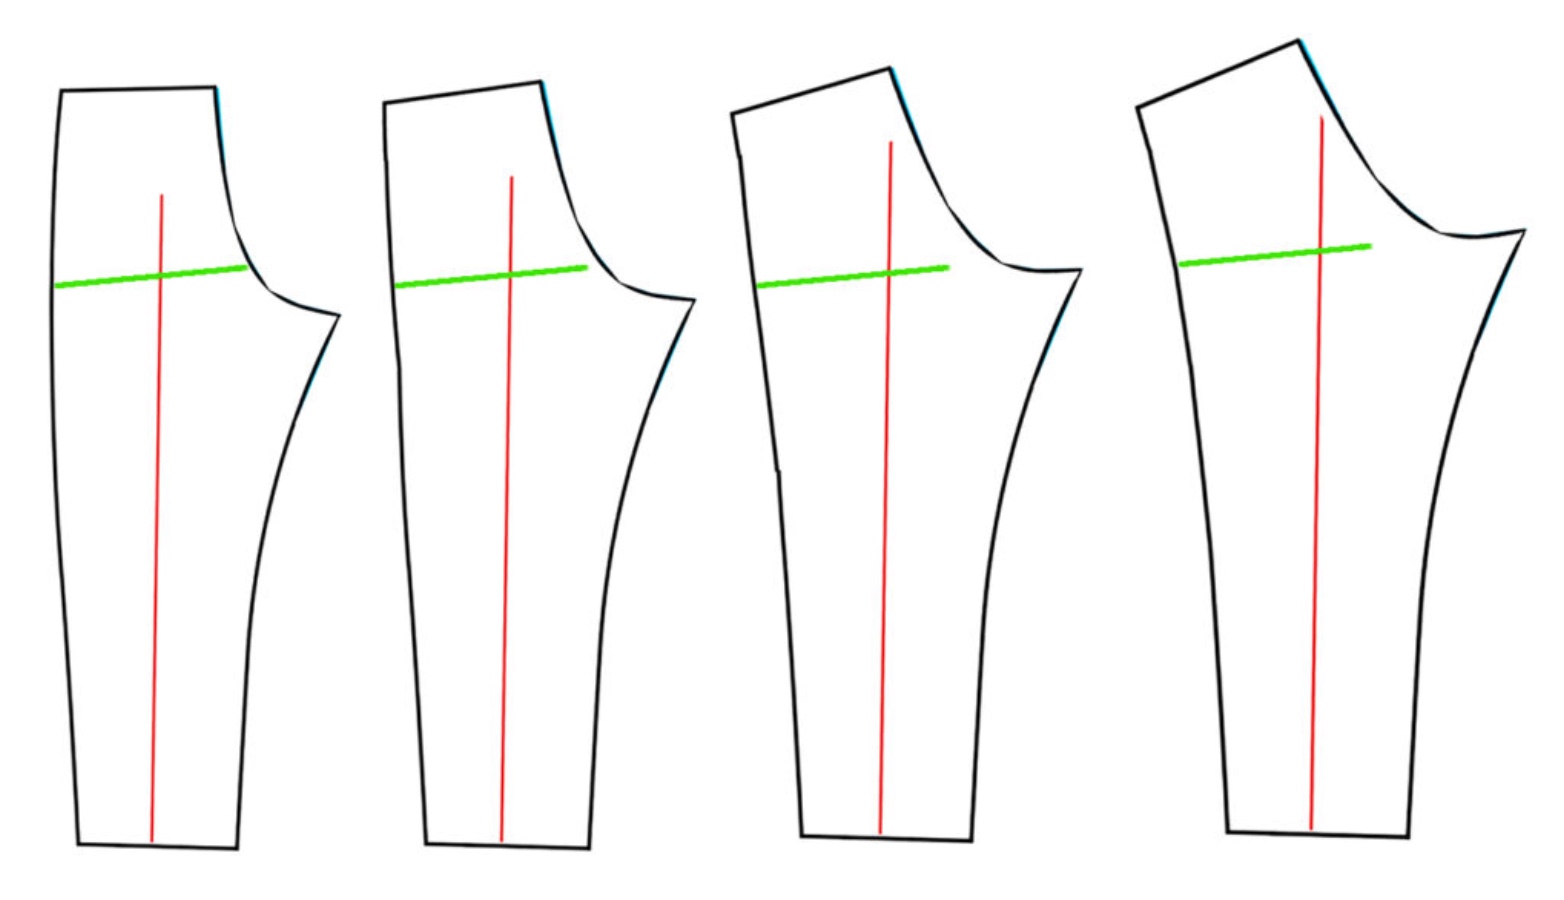
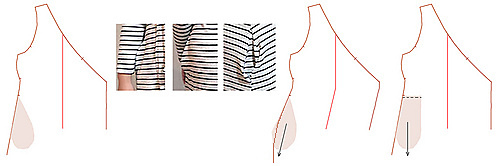
The second is to curve pieces slightly out (there’s a limit to how far this works before you need to split the piece and curve both sections): b, c, d, e.

(the question was how much curve to add)
At left is the maximum to add to a straight (or mostly straight) line. The next figure is a better amount.
These guidelines will maximally curve out the pants. We’ll not touch the upper thigh, and the lower inseam already has plenty.
We can add more fabric by putting a deep vertical pleat in one or both sections (not shown).
The Arthur pants (mostly; I didn’t do the front pocket as it’s the same pieces though differently shaped than jeans). No, I don’t know why they’re called Arthur, unless it’s after the rubber plant in Mad Magazine.
Dropped crotch.
Self-faced waistband.
Front is split, all vertical pieces are gently rounded out. The dart take up has been moved from the side to the side front. We get away with it due to the volume of the pants, but without it, the waistband won’t fit. A deep inverted pleat meets over the side front stitching.
The back is likewise split and sewn back together, but the photos don’t look like any extra has been added to the centered seam: looks like a style decision to match the front. The inseam and outseam mirror the front.
The back waist is elasticized.
There are two patch pockets.
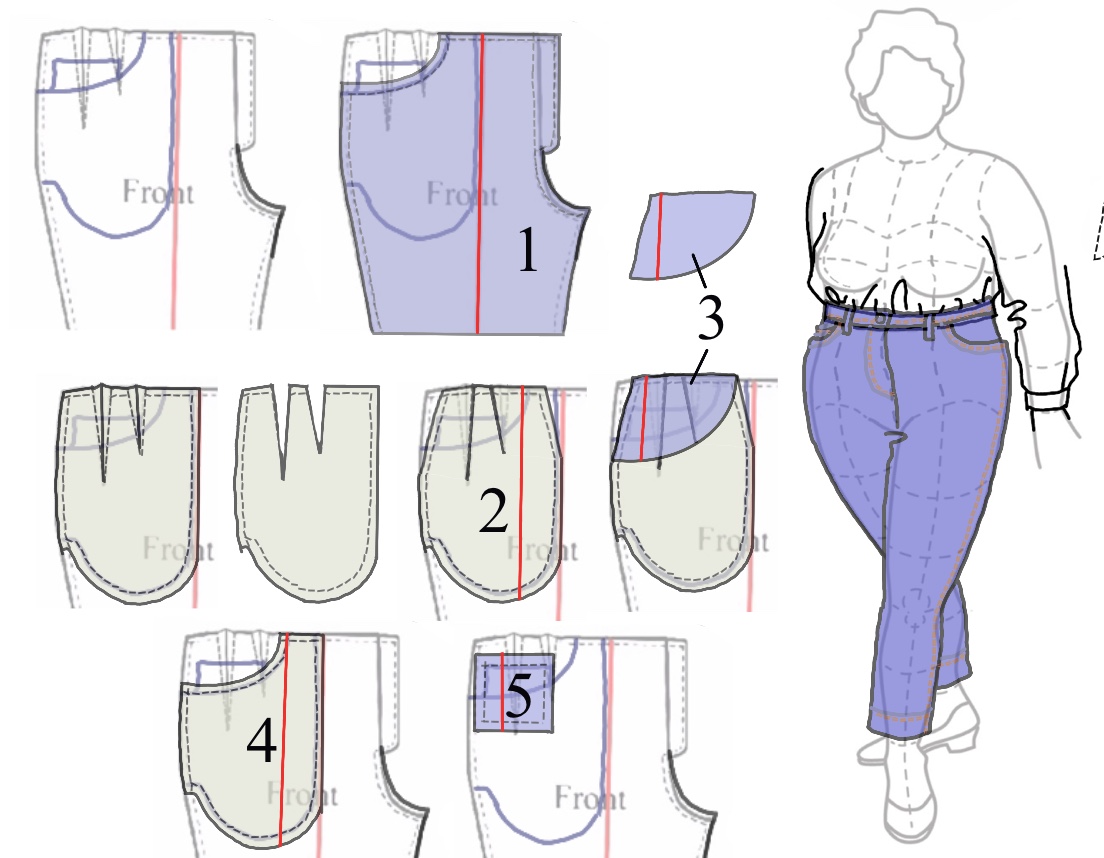
Adding a side seam pocket (this is general theory; it may be reworked/edited at the construction stage).
This pocket is cut in one with the front and back pieces; it’s fastest to sew but takes more fabric, particularly if you’re working with a nap. You can cut the pocket pieces separately and sew them to the side seams at the expense of a little more bulk there.
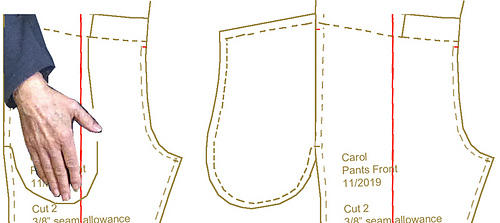
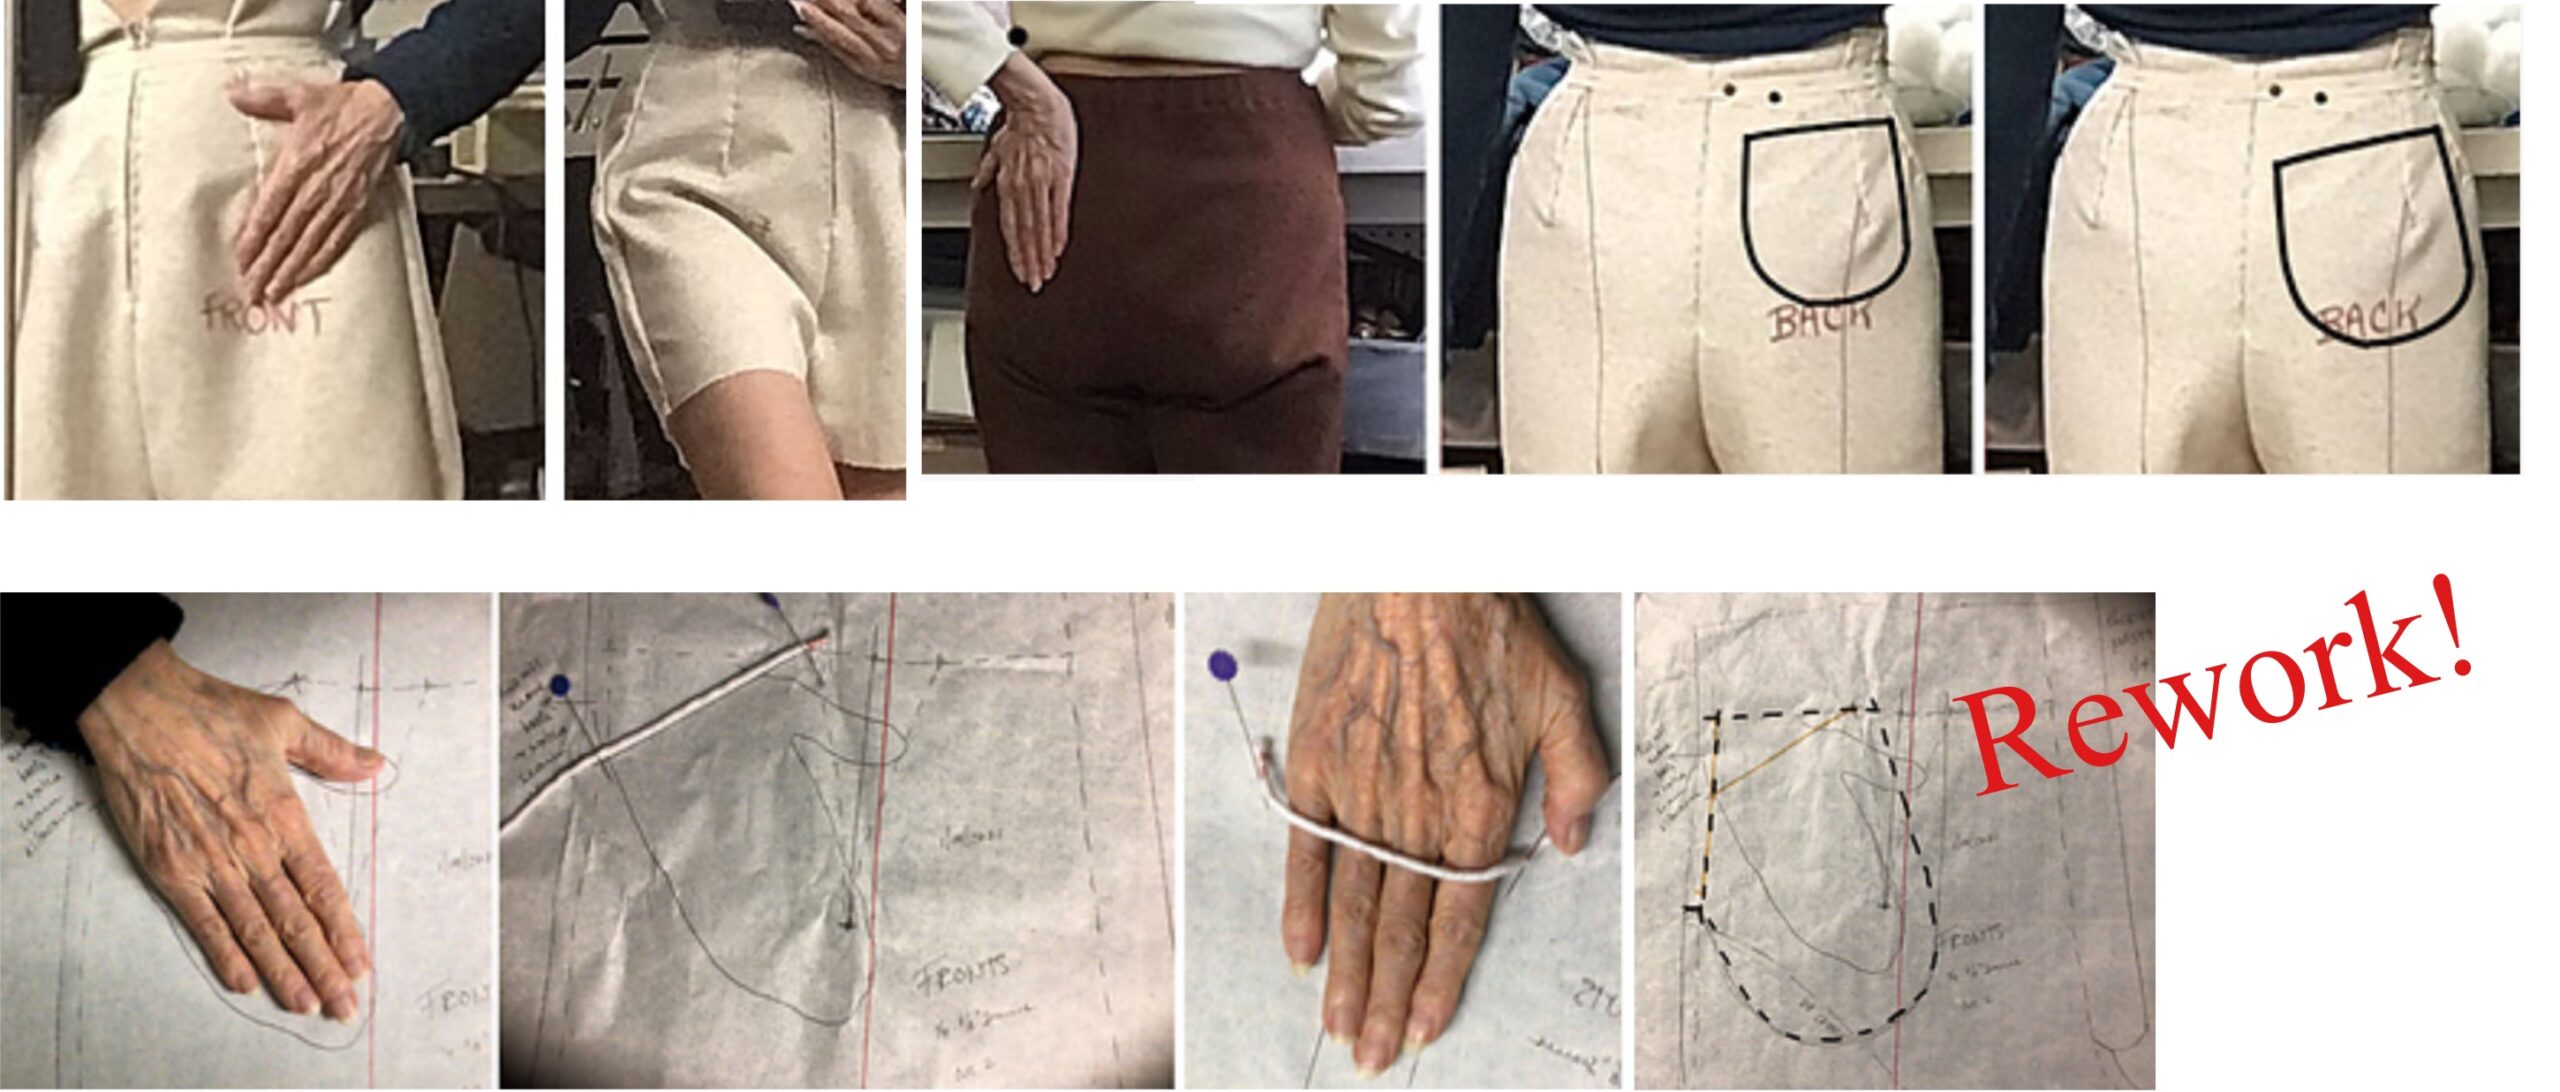
- Place your front pattern on your body.
- Position your hand “in your pocket”.
- Draw around your hand.
- Flip the pocket to the outside.
- Add the seam allowance.
If the bottom of the pocket opening is lower than the crease at your hip when you sit down, stuff will fall out of your pocket (maybe not a Kleenex, but a pocket knife, definitely). You can shorten the opening in the pattern or sew up commercial pants: it’s a trade-off between fall-out and being able to get your hand inside.
A slant pocket opening solves this.
Even with only its own weight, if its top is a point at the side seam rather than a line across at the waist the pocket is going to pivot from the side seam and its bottom pooch out. Square over its top slightly above your waistline and topstitch through the pocket bag and the dress front in one whack. The stitching (in an a-line skirt the pocket top is caught in the waistband) won’t show as it’s under your waist tie.
ETA: slap a couple strips of interfacing to the side-seam areas of the pocket bag pieces and understitch them, and that should solve everything*.
* not world peace, alas.

“Harem” bloused to yoke and at hems (with shalwar)
Jeans/pockets/yokes/ curved seams (back shirt yokes, lantern sleeves)
patch pockets with bellows becoming belt carriers
show pleating for bellows
Daisy Dukes/short shorts/hot pants
Cuffs, completely machine-sewn
The industry has a great method for finishing pants or sleeves that looks like a straight cuff and has no hand work. The sleeve is cut longer than usual and must be a straight cylinder. It’s enormously faster than the home-sewing method of adding a cuff.* It doesn’t work where you’re gathering or pleating the sleeve into it.
How much you fold up is arbitrary; it’s a good idea to fold it and pin, then unfold to see what you’re getting, instead of stitching.
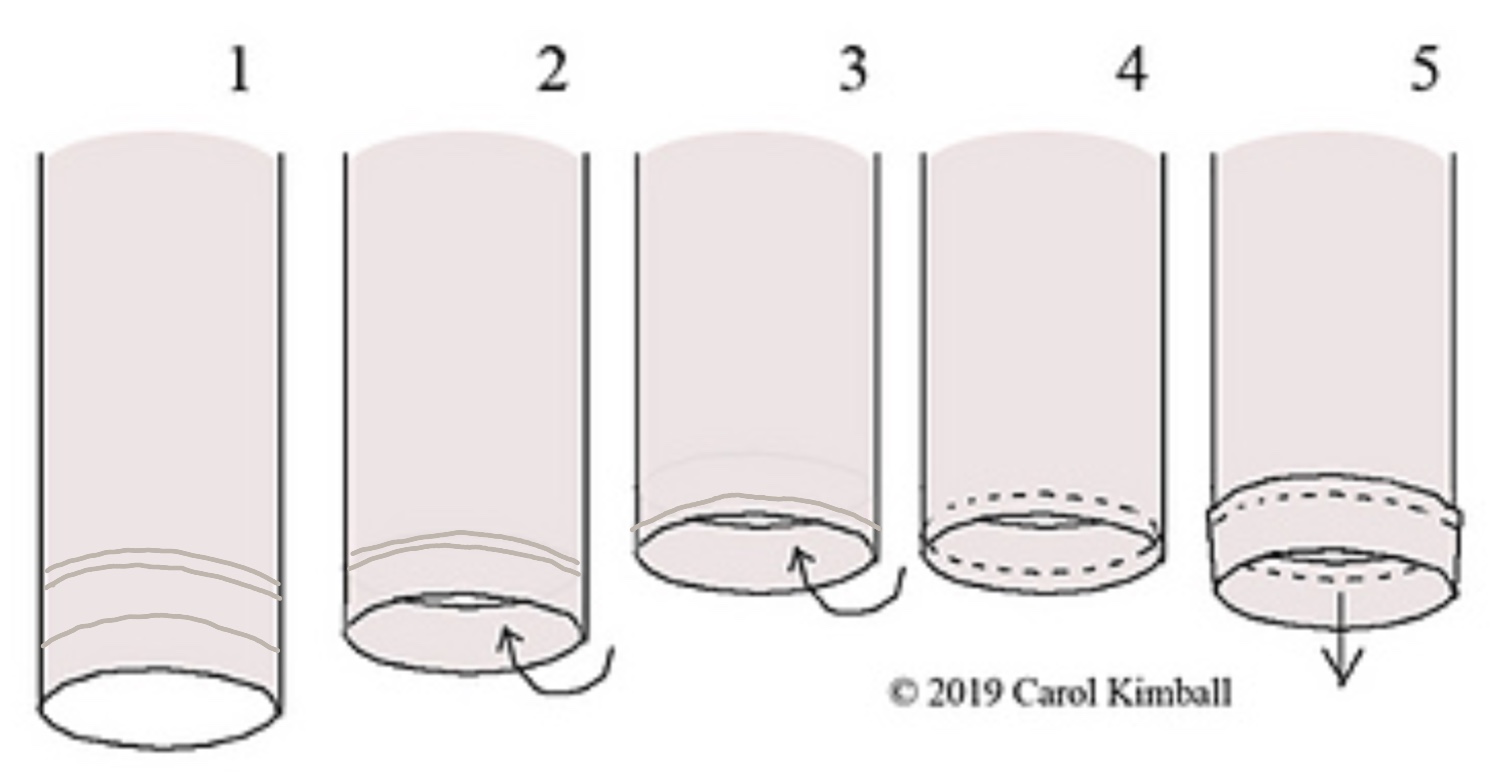
- Trim the sleeve straight across as long as you can above the blown-out elbow.
- Fold up to the inside.
- Fold up to the inside again, being sure that the raw edge is tightly in this fold.
- Sew.
- Pull the cuff out, being sure the little flap is going up, and give a good press.
* It can be used to shorten pants, too, but double-check that there’s no taper or there will be tears. arayti’s sleeves weren’t suitable for this, alas.
Leggings/tights (stirrups) negative ease; no outseam
CarrieClothwright
Knickers? (kind of kidding, I realize they are mostly a matter of length and cuff)
Also tap pants with crotch gusset, but that might be veering a bit far afield.

These are from 1994, so too stretched out to model for you. The fit (particularly before many swims in chlorinated pools) was excellent.
The secret was in the treatment of the elastic. Measure the total stitching line of the front and 3/4 of the back (this works for most underwear elastic; you may need to adjust it). Divide the elastic into quarters. Divide the garment (unevenly) at crotch and side seams, and half of each of those. Pin the elastic to each section. Sew. The fronts will have a little stretch, the backs much more so. This lets the garment cup under your bottom, and the tension across keeps it from sucking where you’d rather it didn’t go.
ETA: This is truly magic, regardless of the type and amount of stretch in the fabric. I must have tried five or six other methods, some unbelievable complicated (and my OCD loves math/proportion), and this beat the others hollow.
Knickers share details with harem pants.
There are more crotch variations than tap pants’ gussets: chi pants from martial arts uniforms, see also bicycle shorts.
Other pages to create/link:
pockets. NuRav/Discord: pockets // transferring info from a different pattern, zipper inside, stabilizing a teardrop/side seam pocket, Egyptian from side seam
Bodies:

These women are the same height and weight and have the same body measurements. They need their side seams proportionately shifted for a decent fit.
Stays, corsets, bustiers.
Ballet, ballroom dance, ice skating costumes.
Historical costumes. Capes, cloaks, plunder garments.
Pleats as design detail insets, also ruching.
Gores/godets.
Yeah, let’s do requests. Sailor front flap pants, top with v-front and squared collar with middy trim. We can discuss the support pieces (stays, linings, interfacings/facings) as anyone wants to know
(Cfabrification)
There are a few zero-waste (or low waste) patterns that I like for pajama pants. (I use any fabric outside the needed width for pockets.)
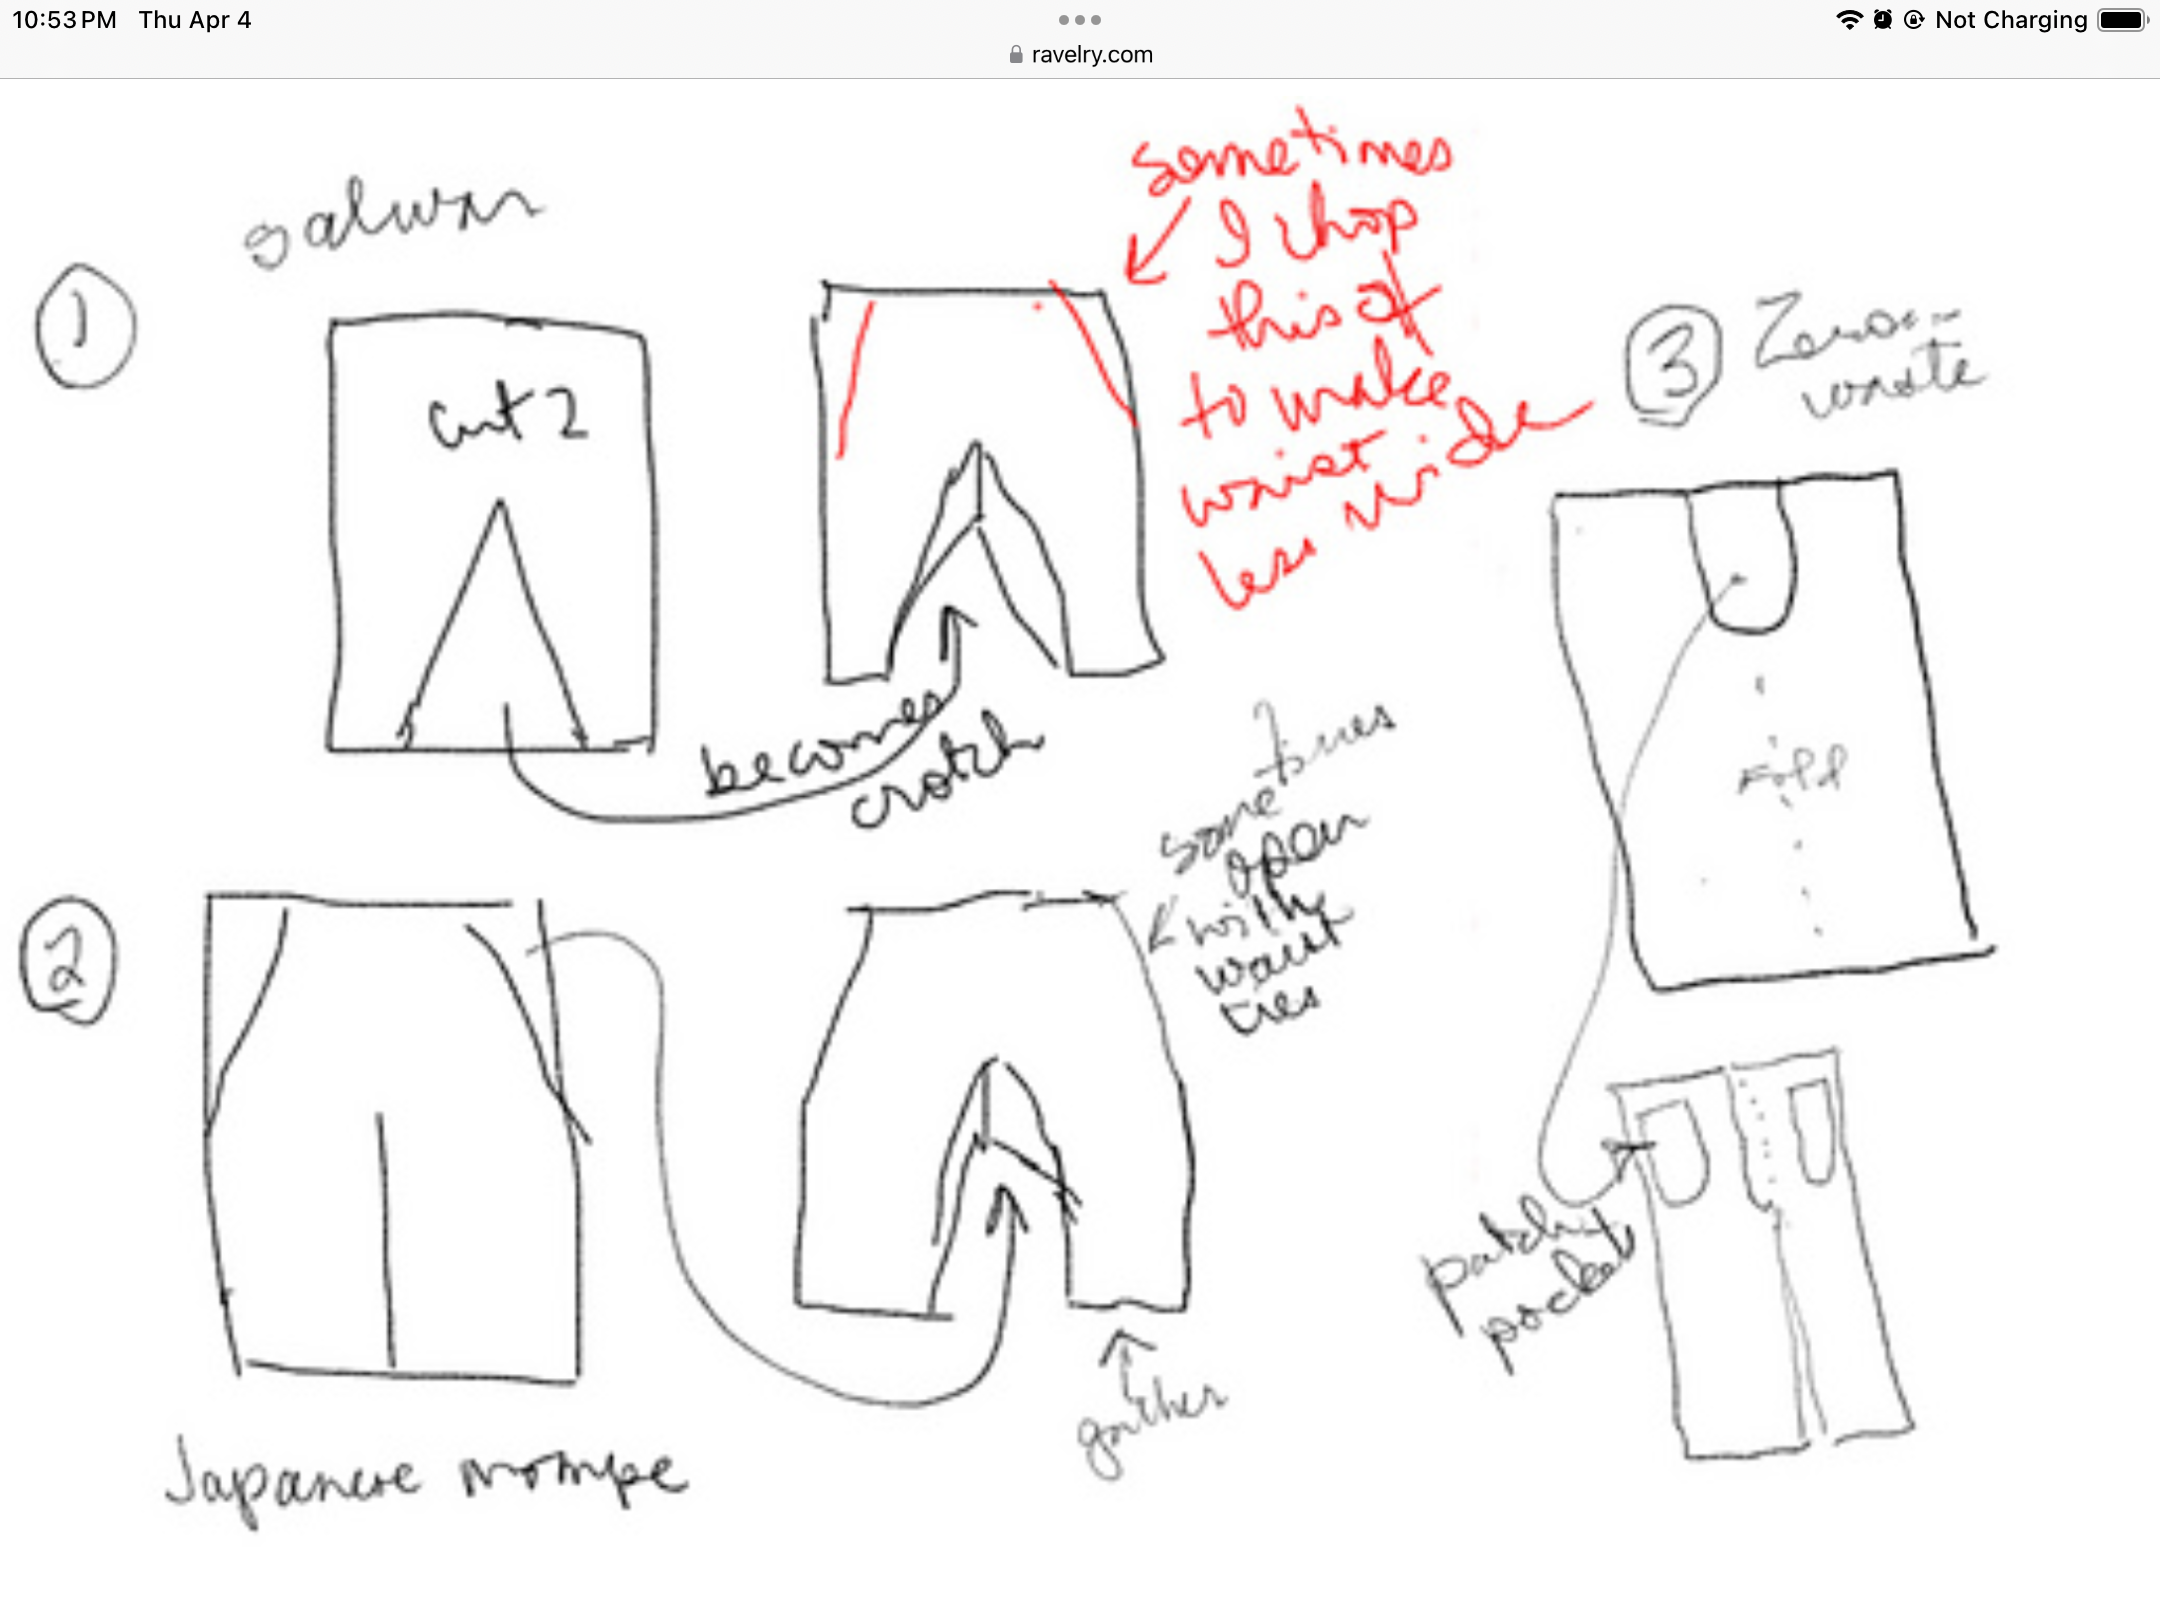
The last pair I made (using #1) were too wide in the waist and narrow in the leg so I took wedges out of the waist and stuck them in the lower leg.
#3 would be very easy using a Crotchmaster.
#1 is based on Liz Haywood’s scrub pattern. https://lizhaywood.com.au/making-a-zero-waste-pattern/
My problem with the zero-waste movement is that I’d rather trim out the extra fabric that gets in the way of comfort/range of motion. Otherwise I feel like I’m wearing a pup tent.
I do admire efficient fabric layout, as did Arayti. Were I weaving my own fabric, there would be diamond gussets and their ilk all over to use every precious inch!
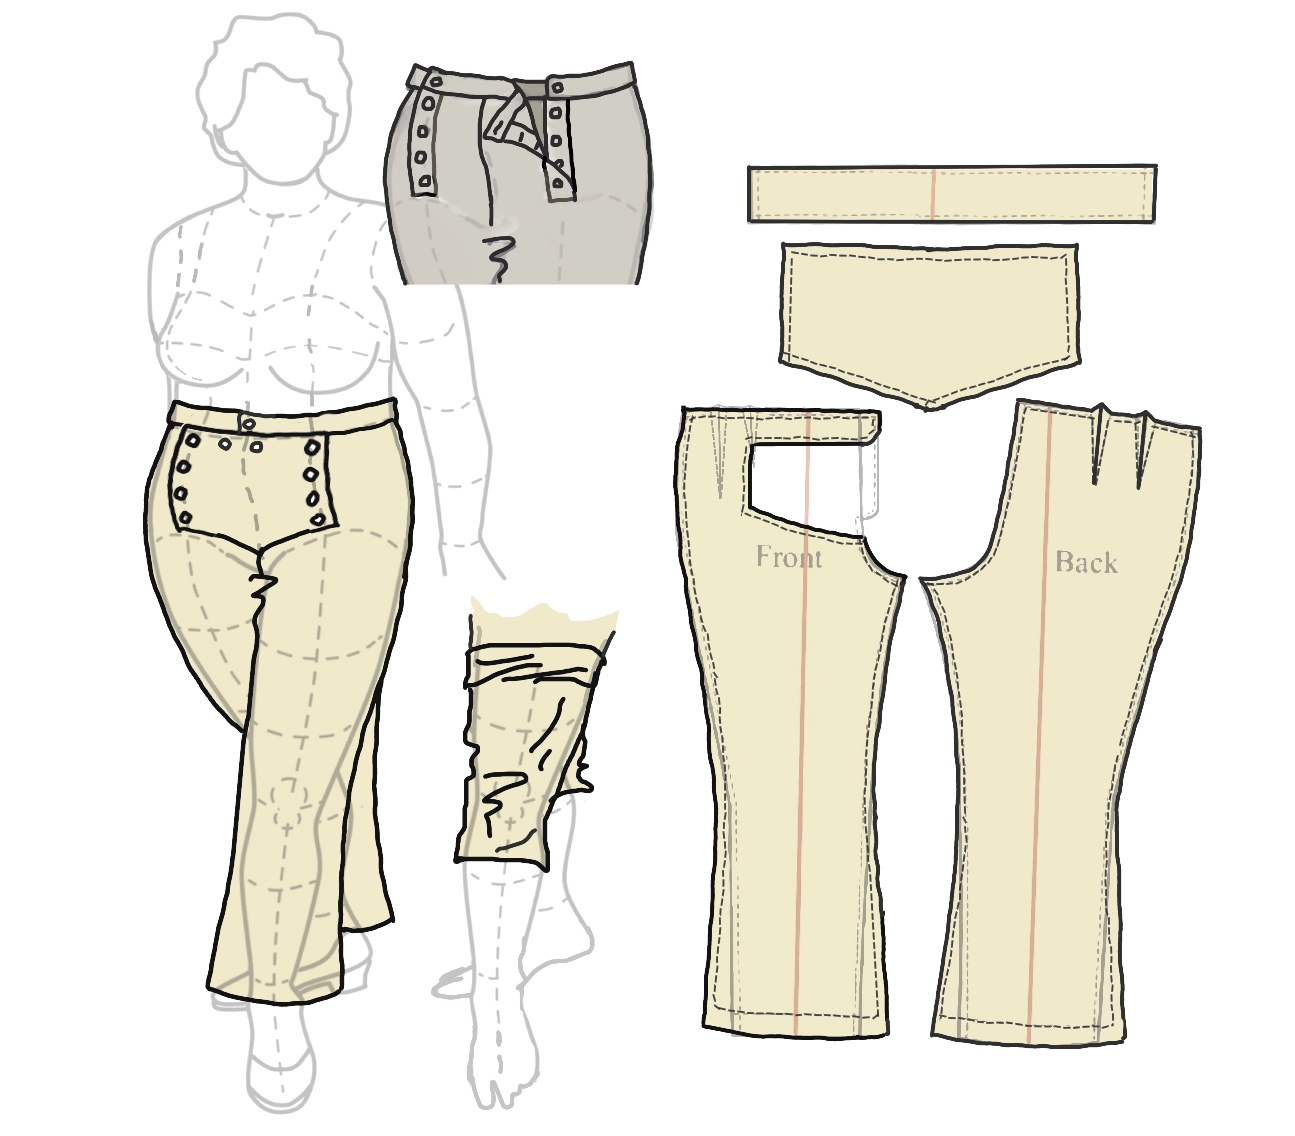
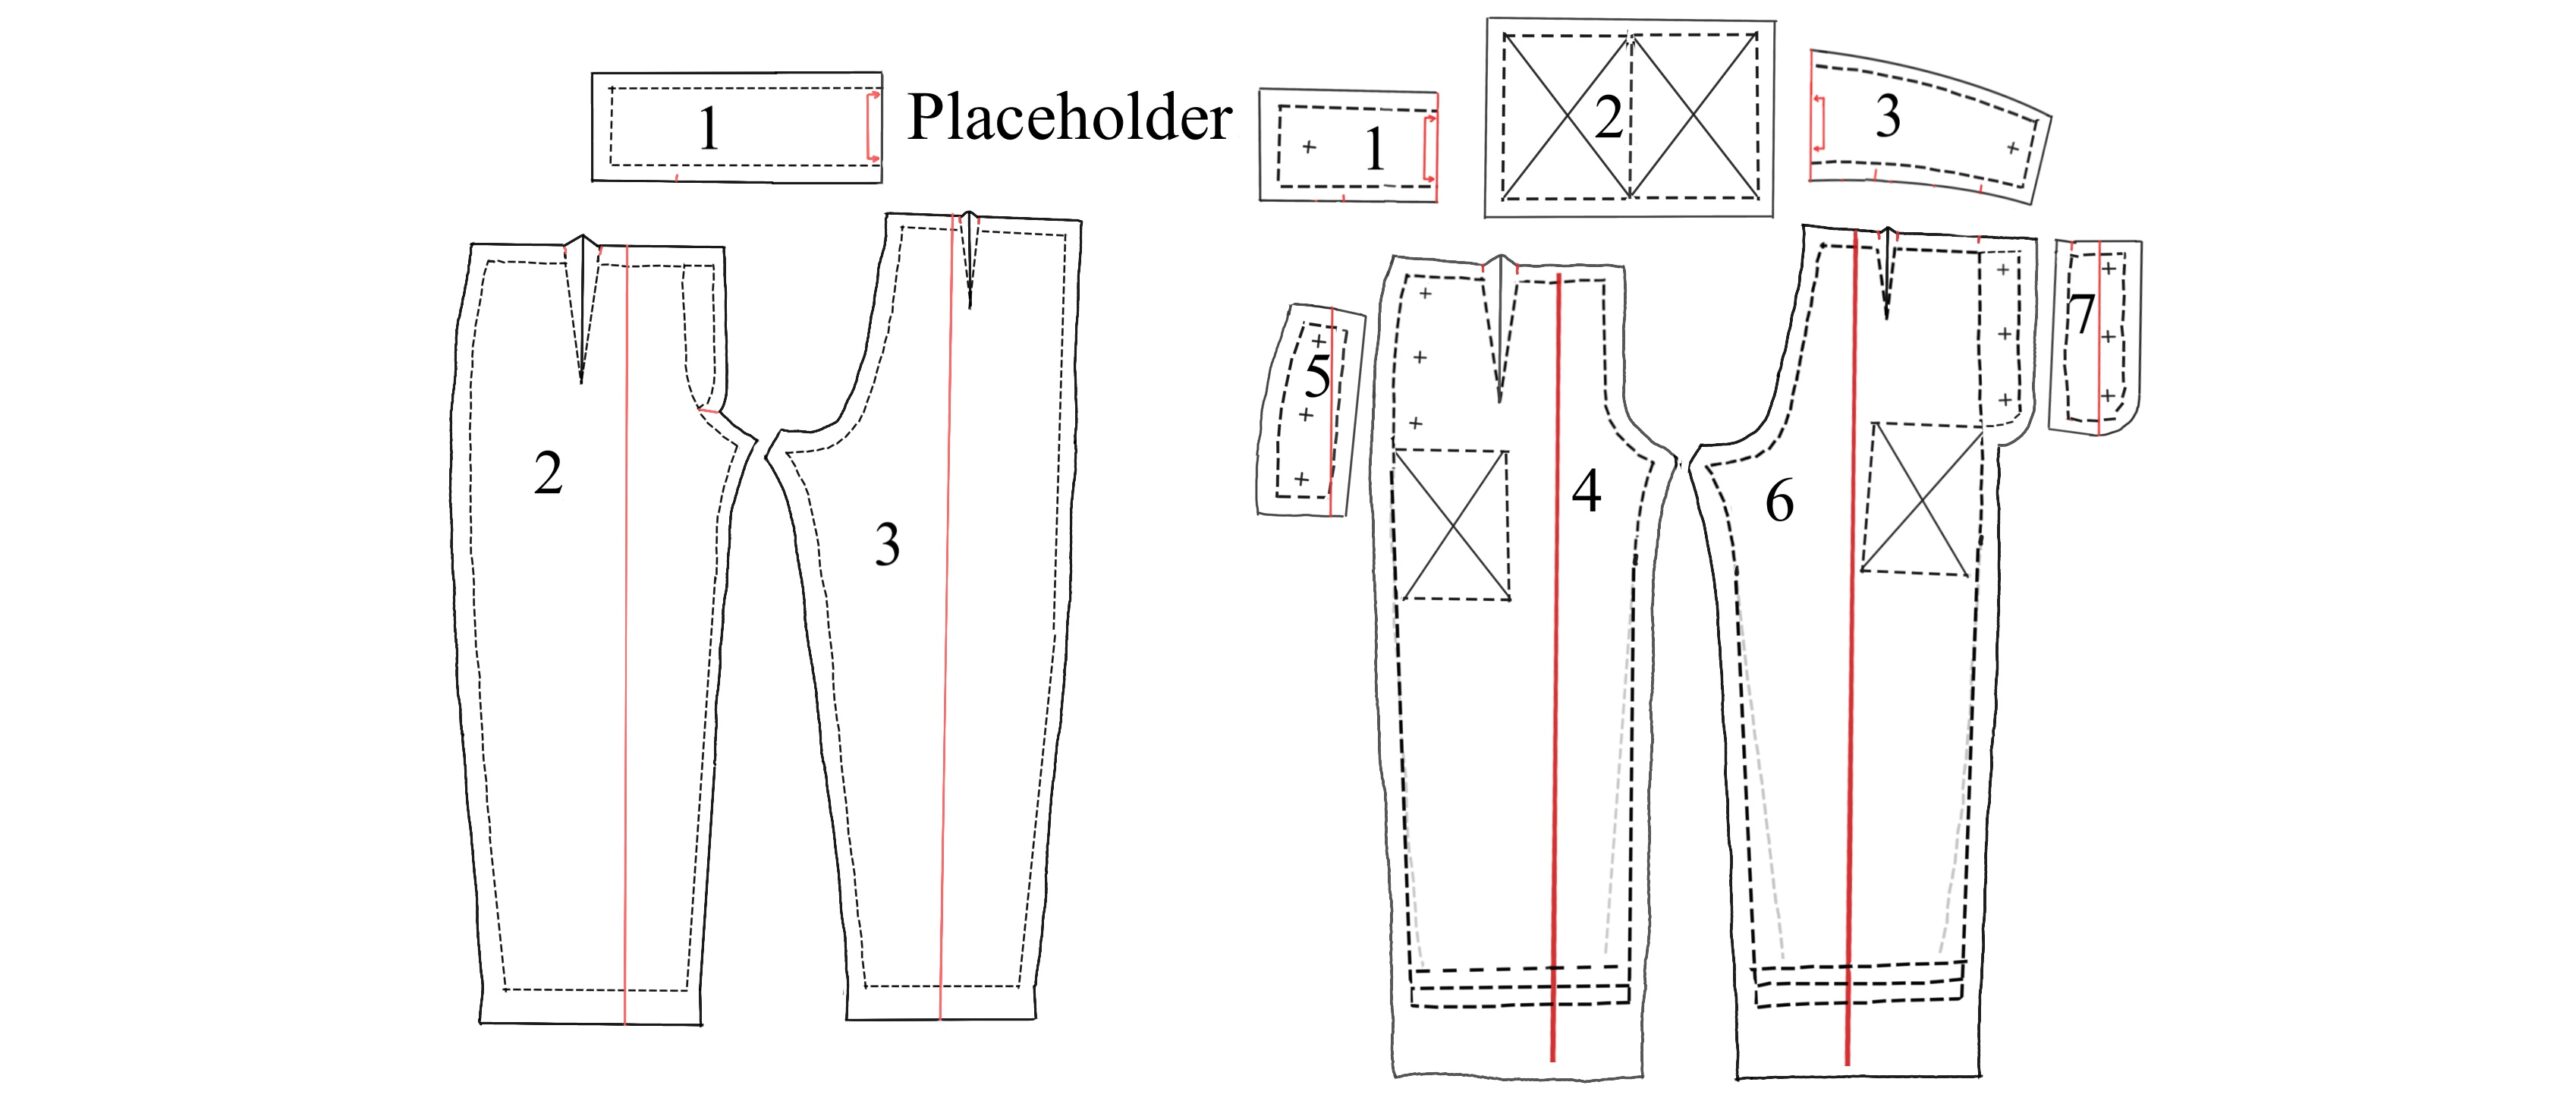
Working up the pattern pieces for Sarah’s Landgirlcore pants:
Reverse-engineering a pattern from a garment
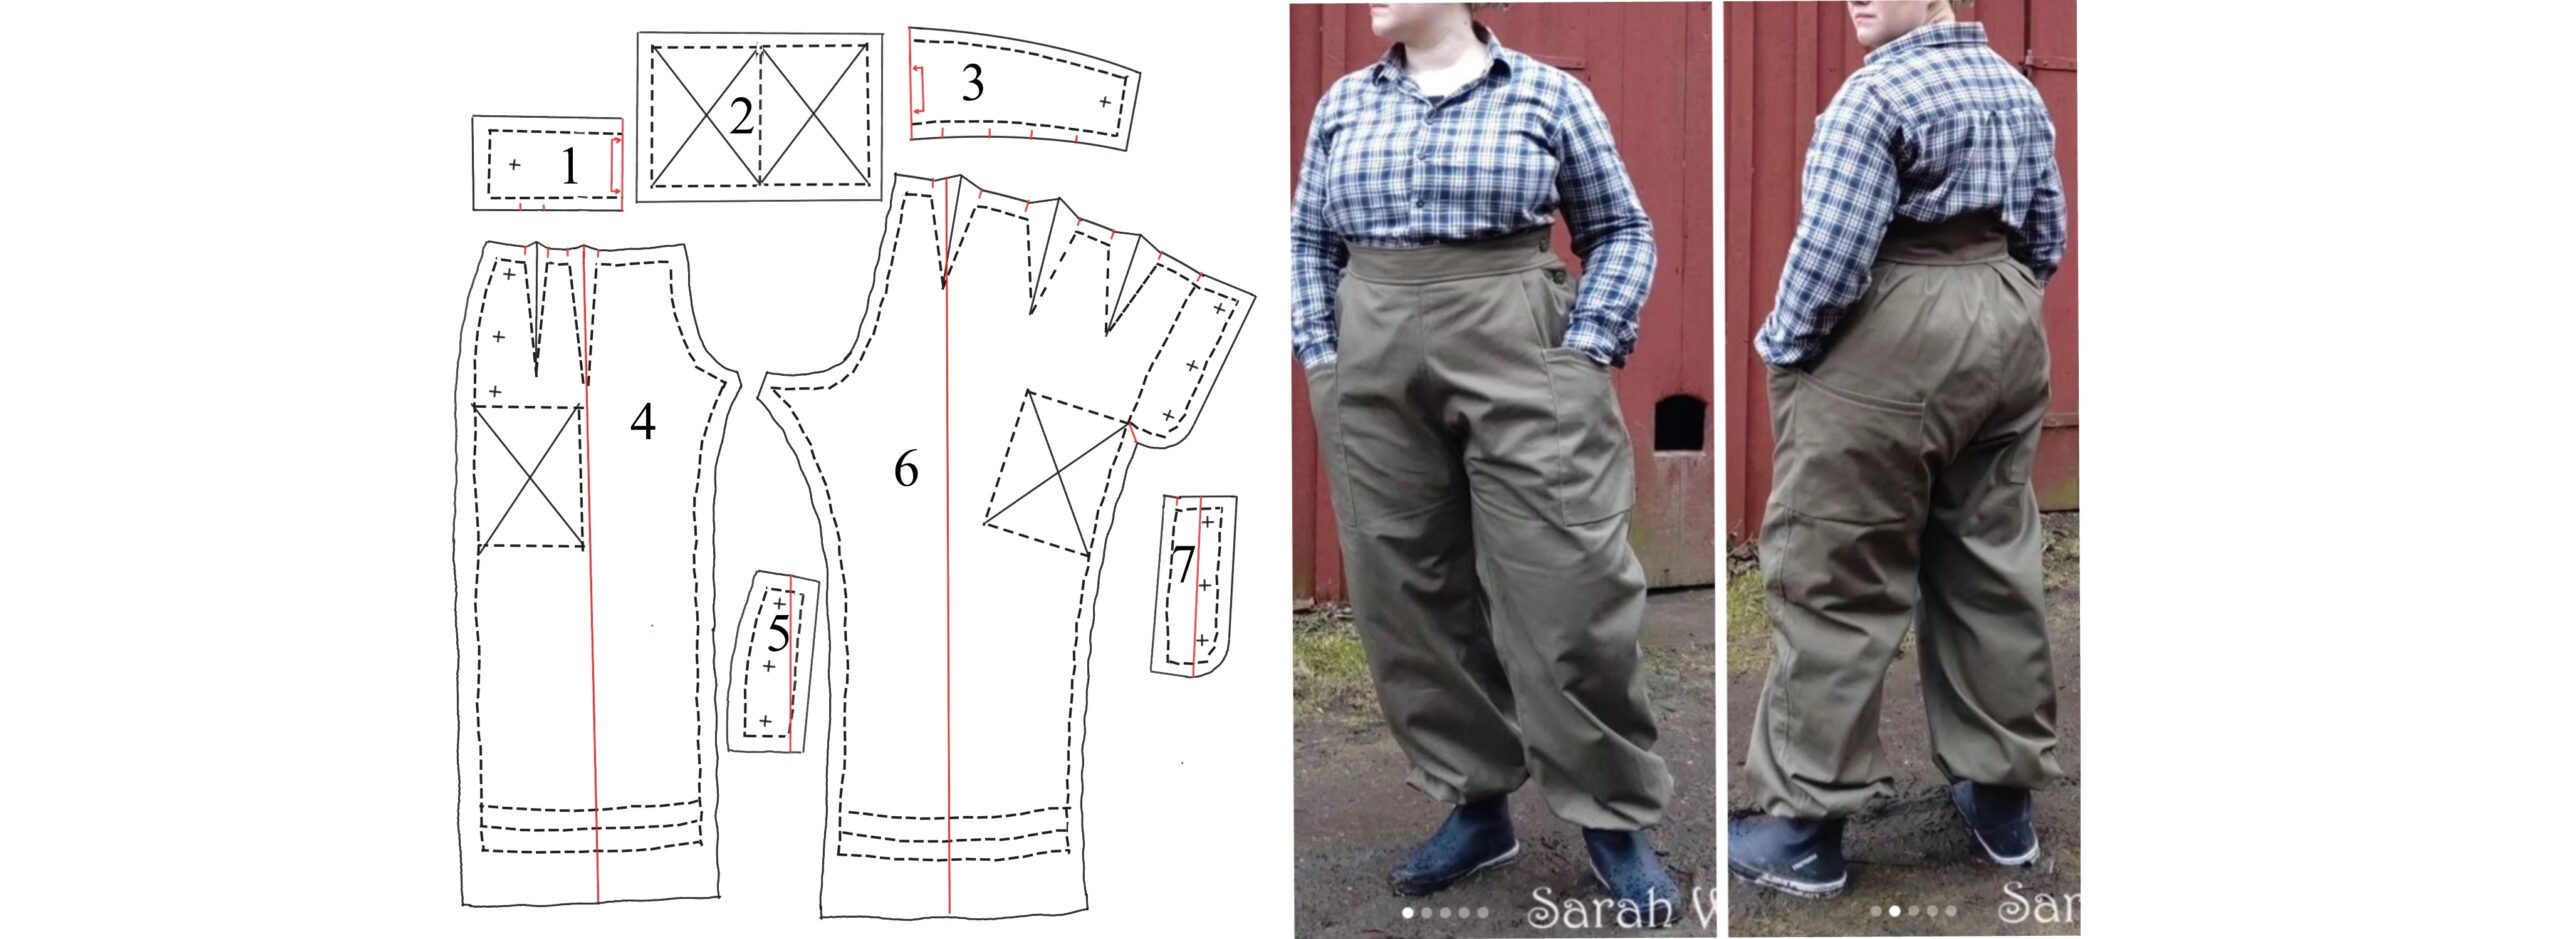
Let’s look at the same pattern using a pants block for a different body. The Burda Balloon Pants (left) did have a waistband, belt loops, and hem facings. Sarah’s pattern is on the right.
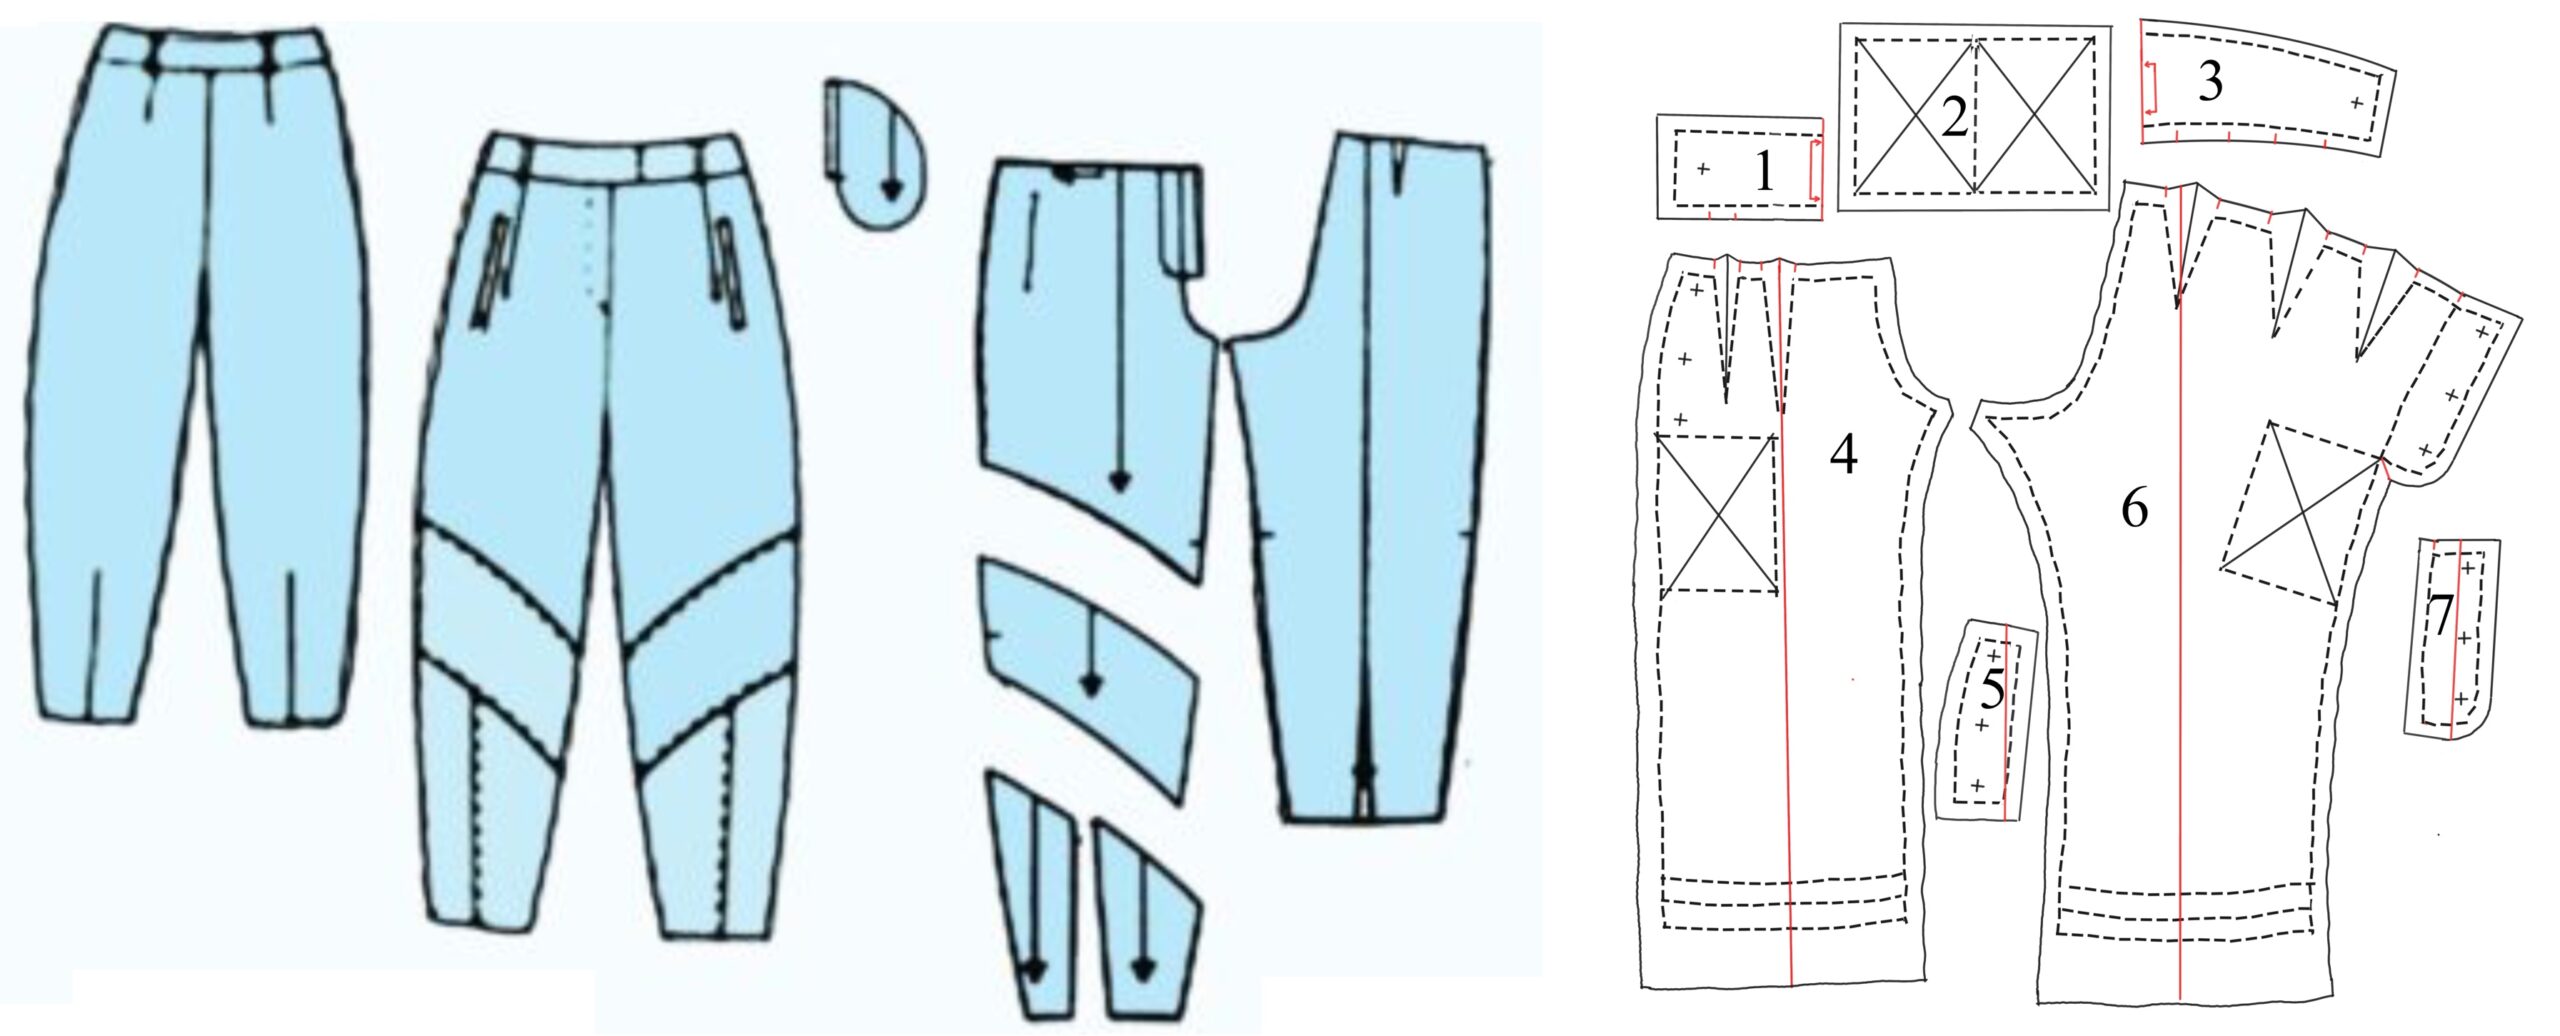
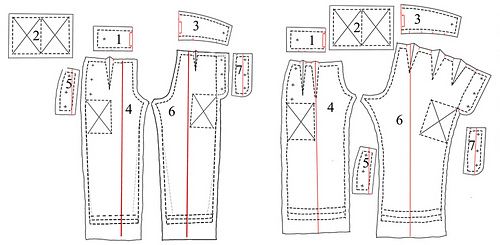
Seam allowances were taken off. The front released pleat was changed to a dart. The legs were straightened; two rows of elastic added with a self-hem. The waistbands’ proportions/lengths were altered.
xxx
xxx
xxx
xxx
xxxx
xxxx