
When you have a shirt or bodice pattern that fits correctly, resist the temptation to monkey with the armscye as you develop the sleeve. You will throw off areas that you could not dream will be involved.
You will need pattern paper (that ideally you can see through), and a surface that can be pinned into.
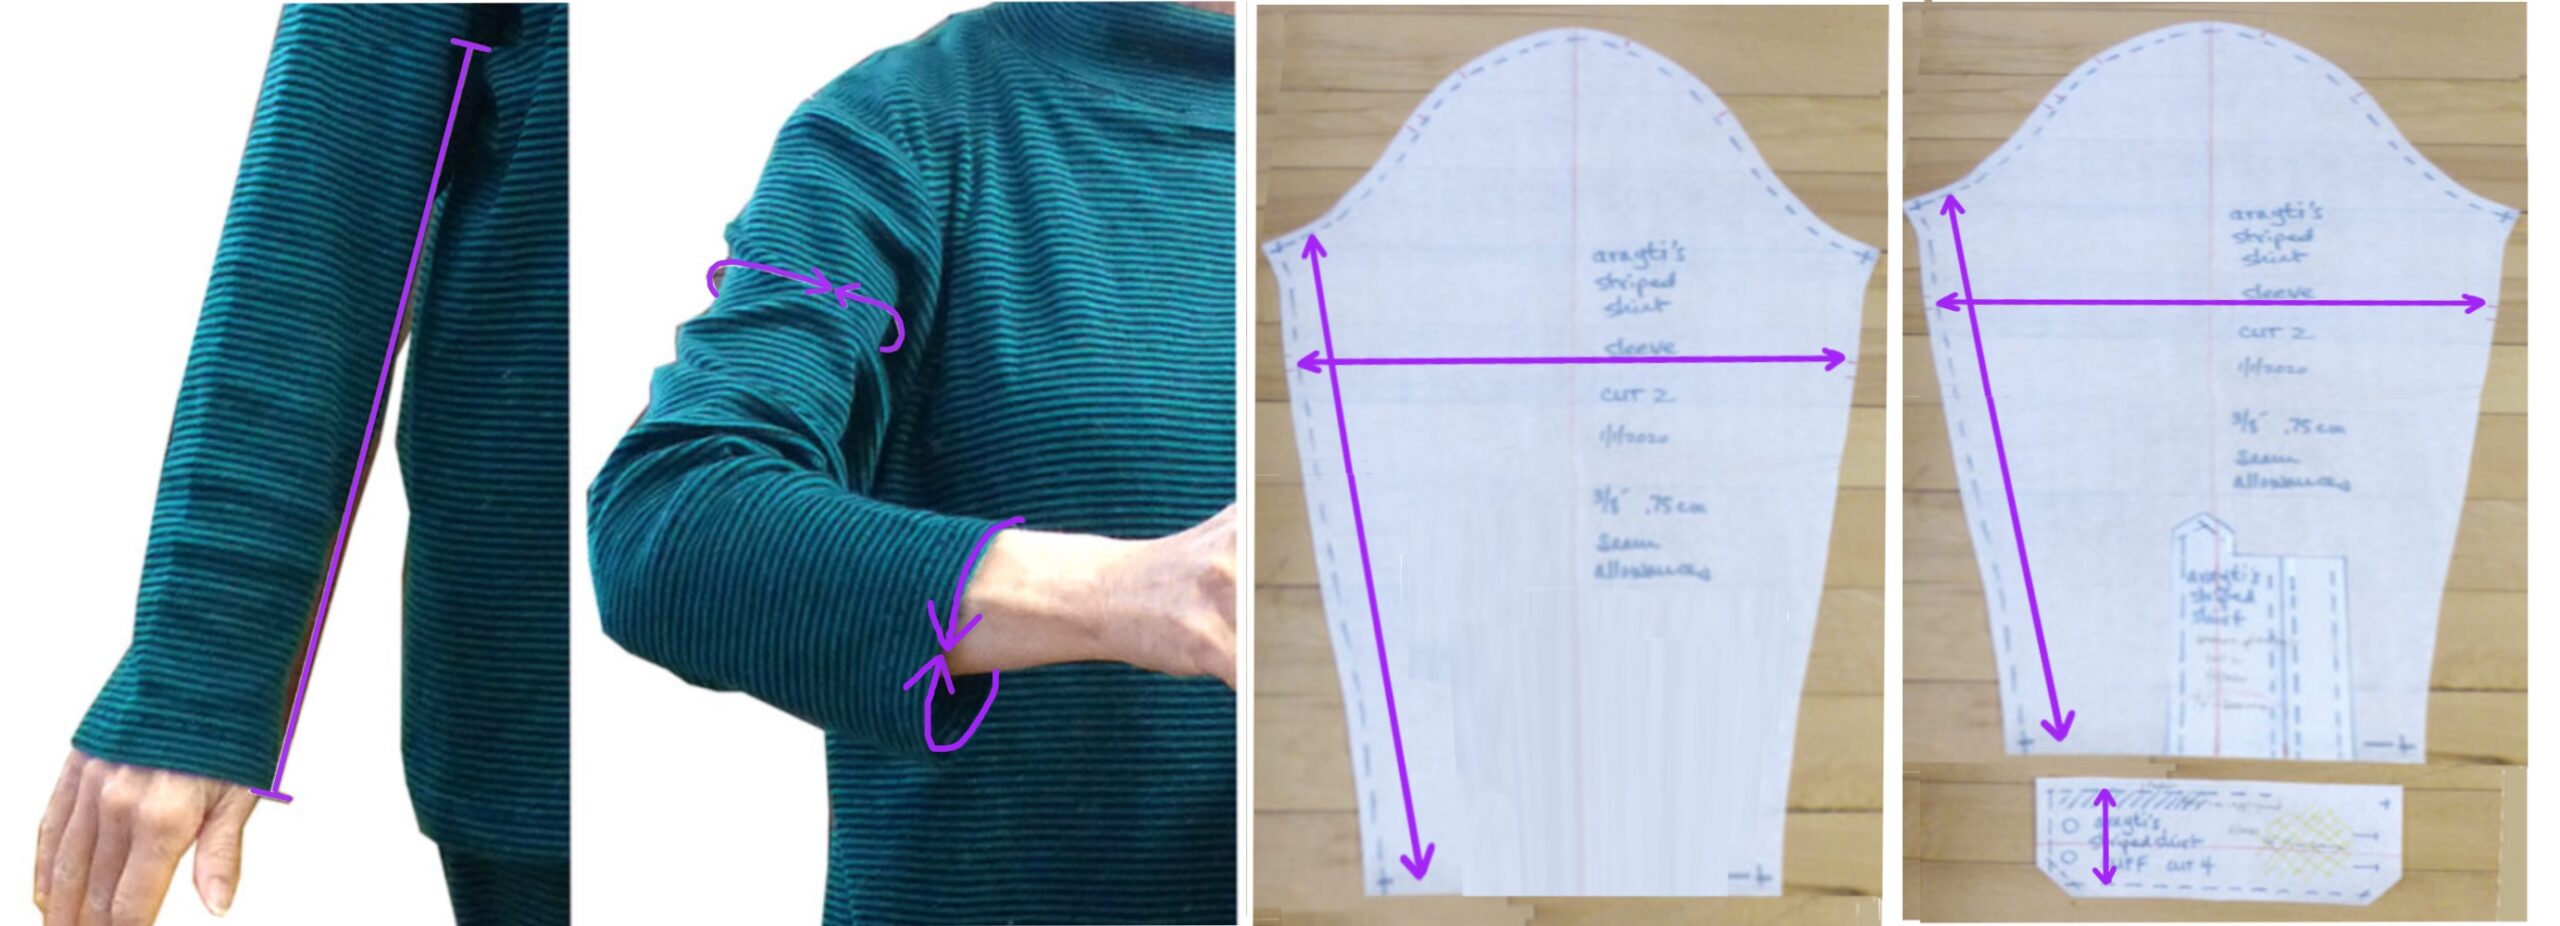
Determine the length of your underarm seam (not necessarily as shown). Allow for your sleeve pulling up when you bend your elbow. If your sleeve has a cuff, the length must include this, and is usually cut a little longer so that the elbows won’t blow out (a problem in inexpensive men’s shirts). You also need your biceps circumference, which includes wearing ease, and your wrist circumference, which must be big enough to get your knuckles through.
Next, remove the seam allowances from your bodice pieces (overlap the pieces rather than cut your pattern, and be sure you’re using the sewing, not cutting lines). Don’t forget the yoke if your pattern has one.
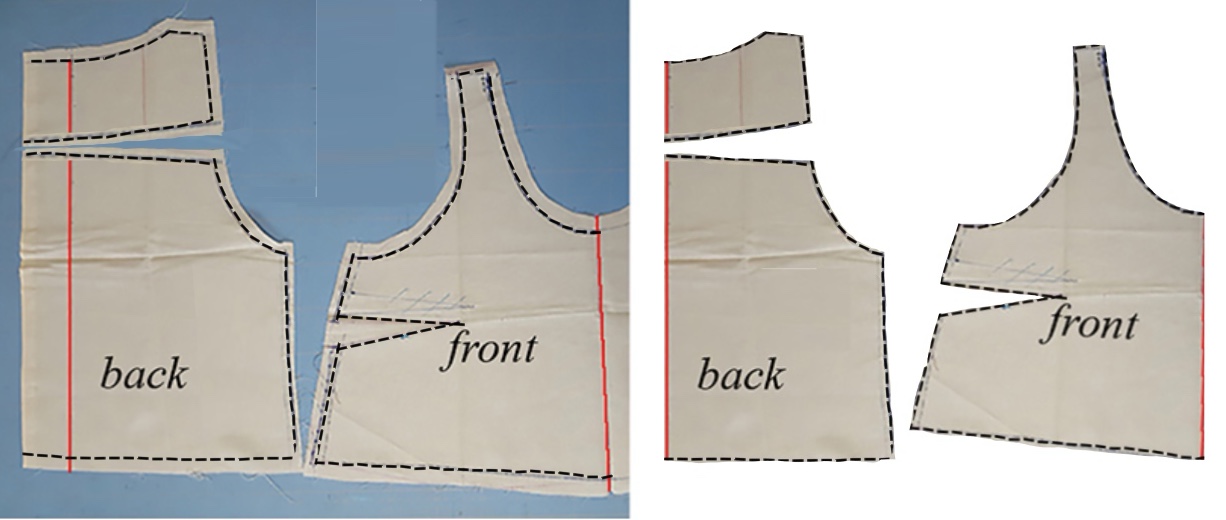
Rotate and butt them so that the armscye sewing line is continuous.
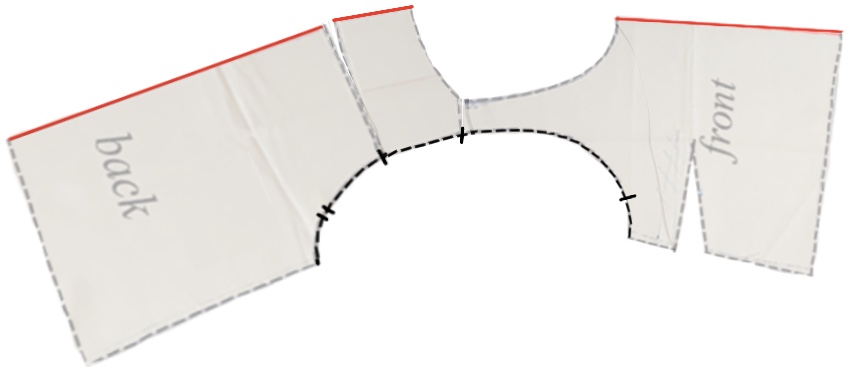
Place a cross mark at the shoulder seam. Place one cross mark on the front up three or four fingers’ from the underarm seam and two at the back (or use the ones already on a commercial pattern). If there’s a yoke, place a cross mark there too. When assembling, line up your ends and sew from reference point to reference point, not needing to take the time to pin, while reassuring yourself that you’re on track.
The front and back registration marks must be transferred carefully through successive work on this and other patterns, so that any of your sleeve blocks will fit any of your bodice blocks.
Set up your sleeve cap master:
- Use a piece of paper wider than your biceps measurement and roughly the height of your lower arm. Draw a grainline (red here) vertically in the center.
- Draw a crossgrain line about the length of your hand from the top.
- Label
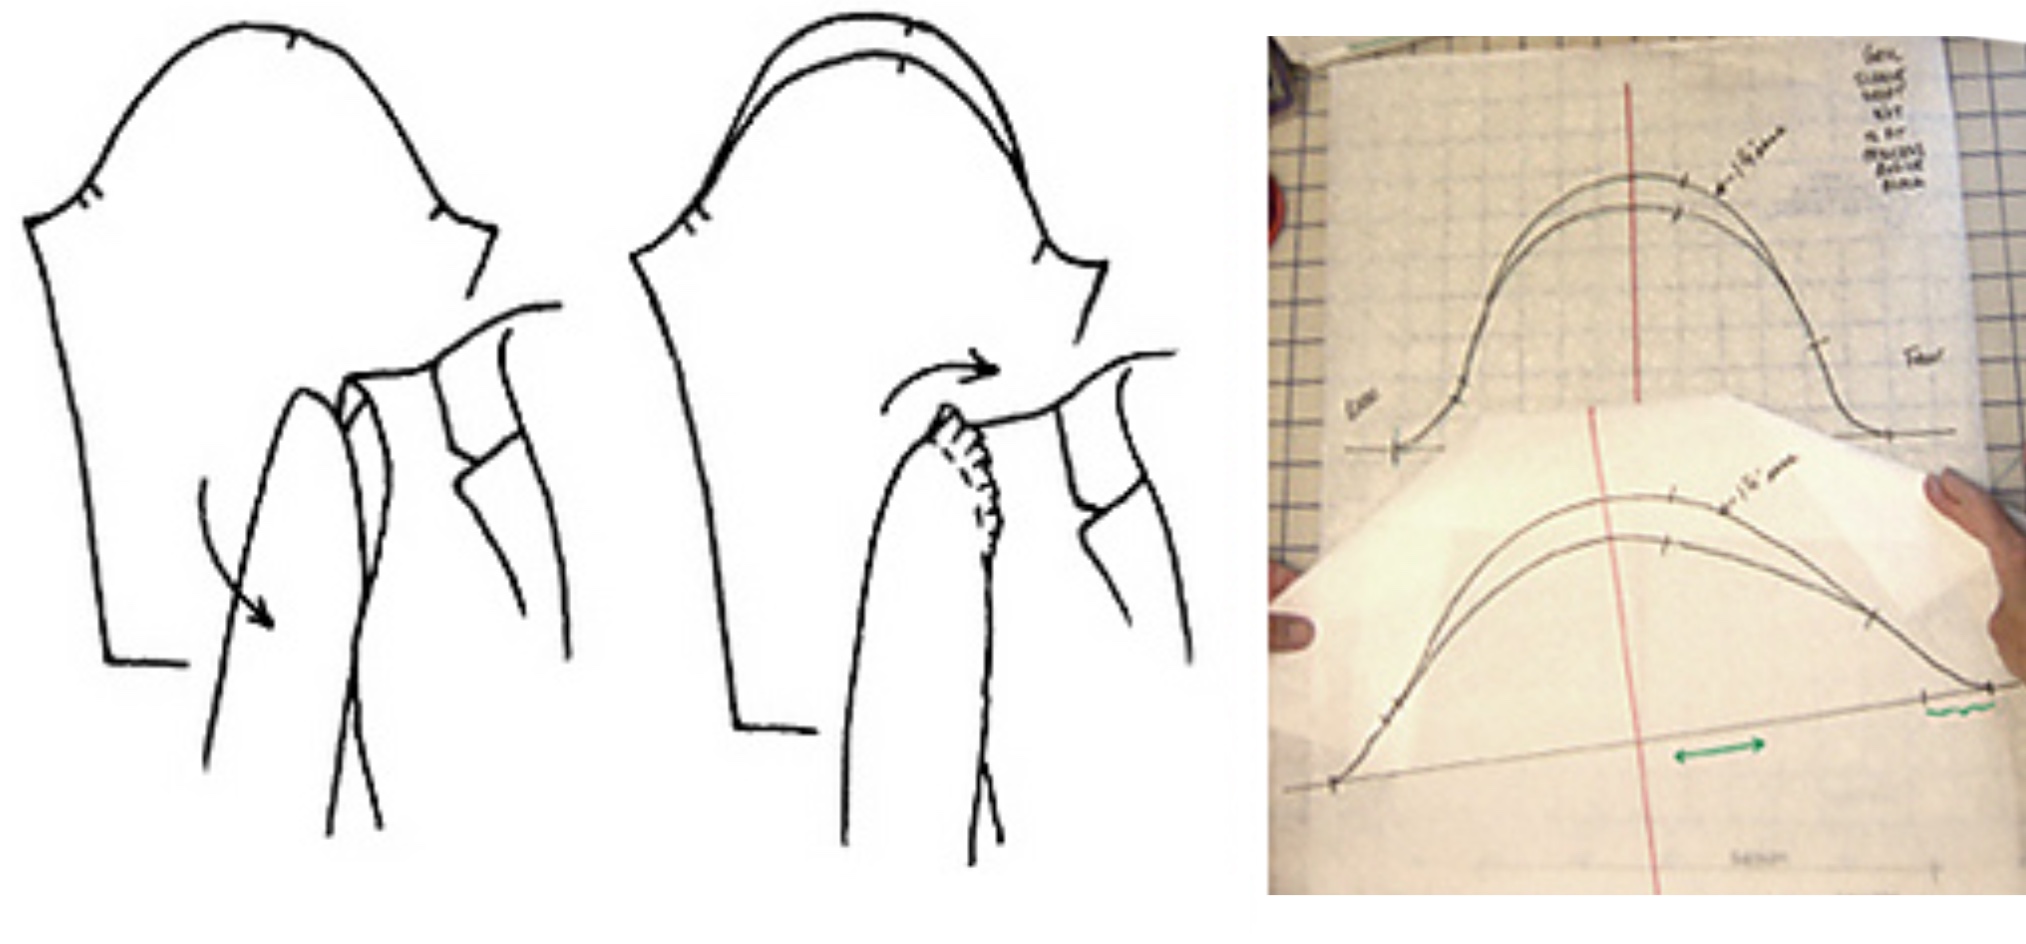
- Use a non-stretching cord to transfer your armscye registration marks. Drapery weight works well (metal pellets in a thin casing from the upholstery area of a fabric store).
- Transfer your biceps measurement to the crossgrain line.
- On two smaller pieces of paper, trace the front and back armscyes, including the side seam and extending up past your front and back registration marks. Note that their orientation has been flipped. Label.
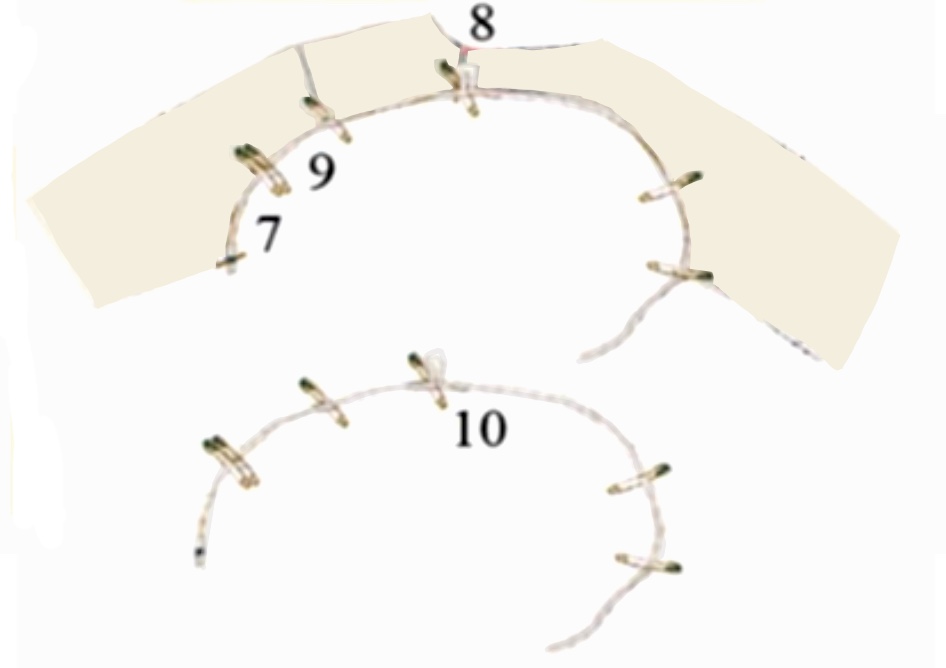
- Lay out your cord exactly on top of the sewing line of your butted bodice pattern, starting where the side seam meets the back.
- Place a safety pin at the shoulder seam, pinning out a 1.25” / 3.2 cm loop of the cord for ease. We’ll discuss adjusting this later.
- Place safety pins at your other registration marks.
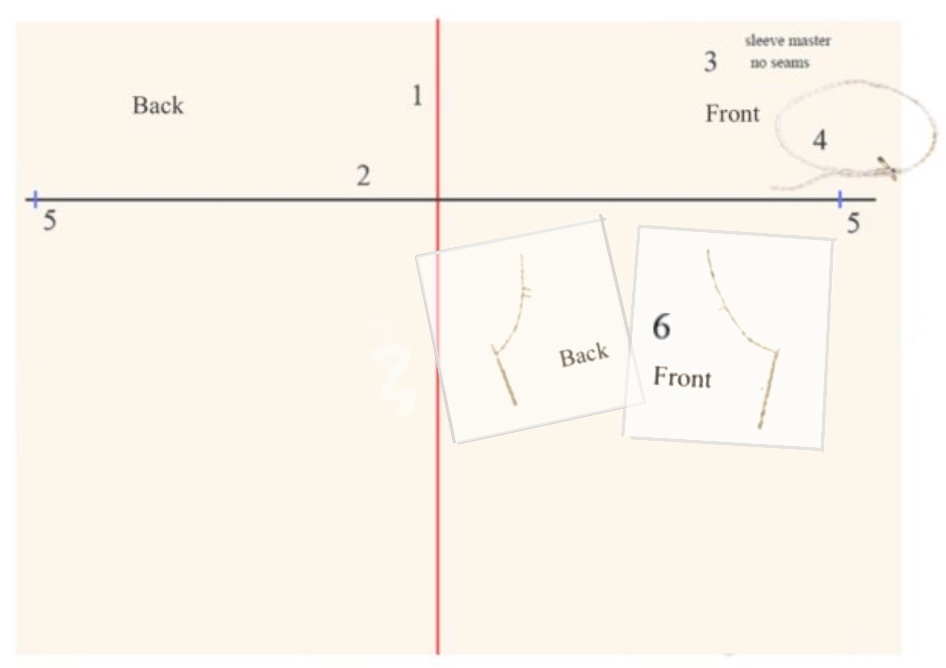
- The cord with pins for registration marks.
- Pin the back armscye piece to the end of the biceps line.
- Re-pin including the end of your cord. It’s easier to do this as a separate step.
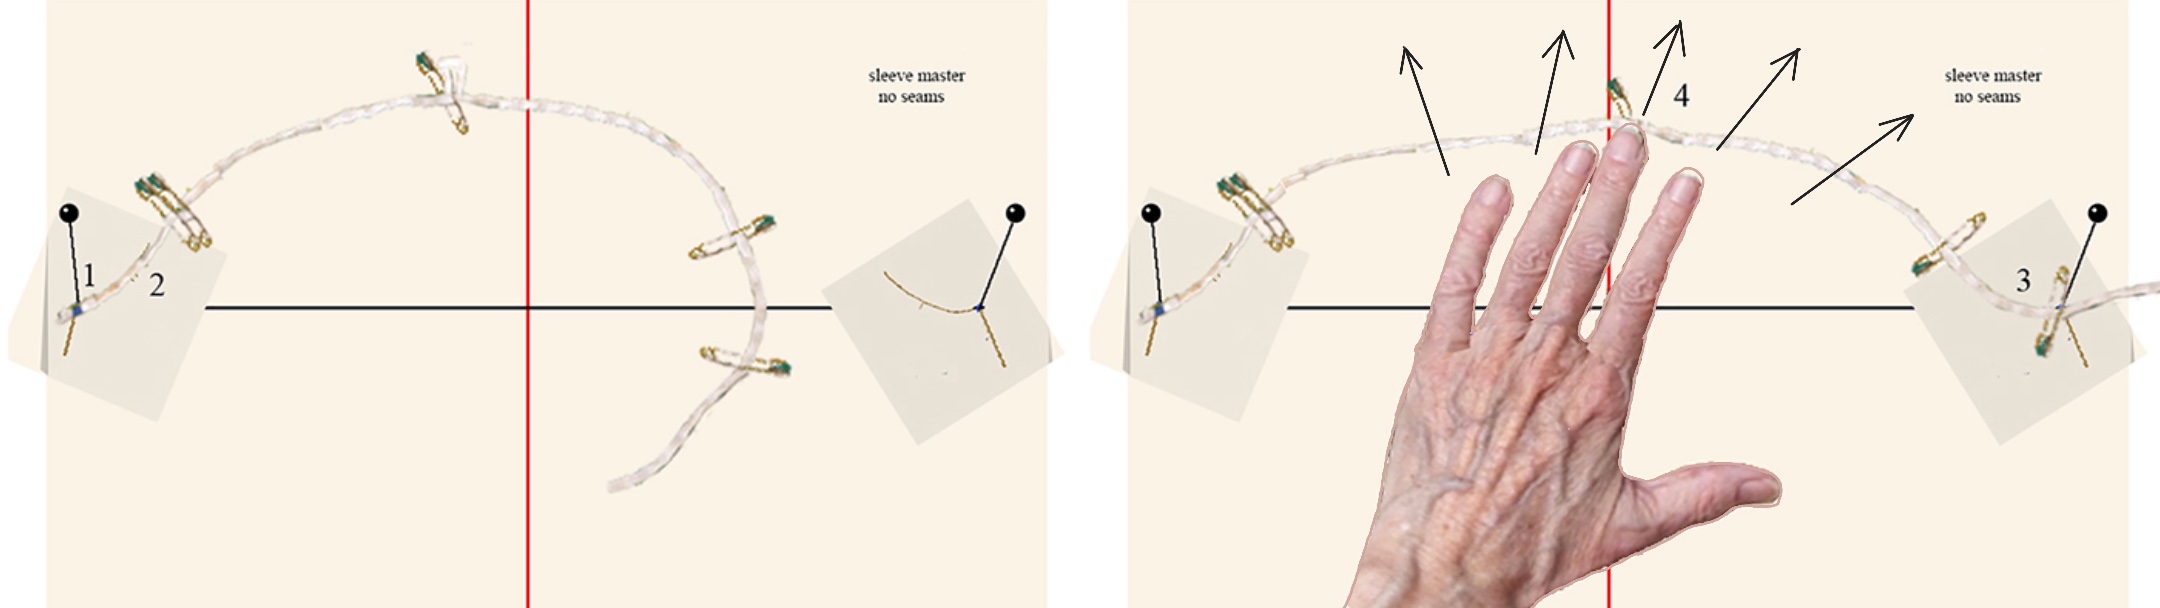
- Repeat for the front. Track the cord up from each end over the smaller curves as far as possible, pivoting the paper pieces so that the cord is over the curve.
- Without disturbing the lower sections, use your spread fingers to gently move the cord into an arc.
Transfer crossmarks from pins on cord to pattern paper.
To add ease to raise the top of the sleeve cap, release the loop at the top, smoothing up the excess without disturbing the bottom sections. The amount we added earlier is a good average. Couture garments made of expensive wool that can be eased in with steam and time can have up to 4”/10 cm added! High sleeve caps limit the range of motion for the arms.
We’ll use this sleeve cap master to generate a full-length sleeve in a moment.
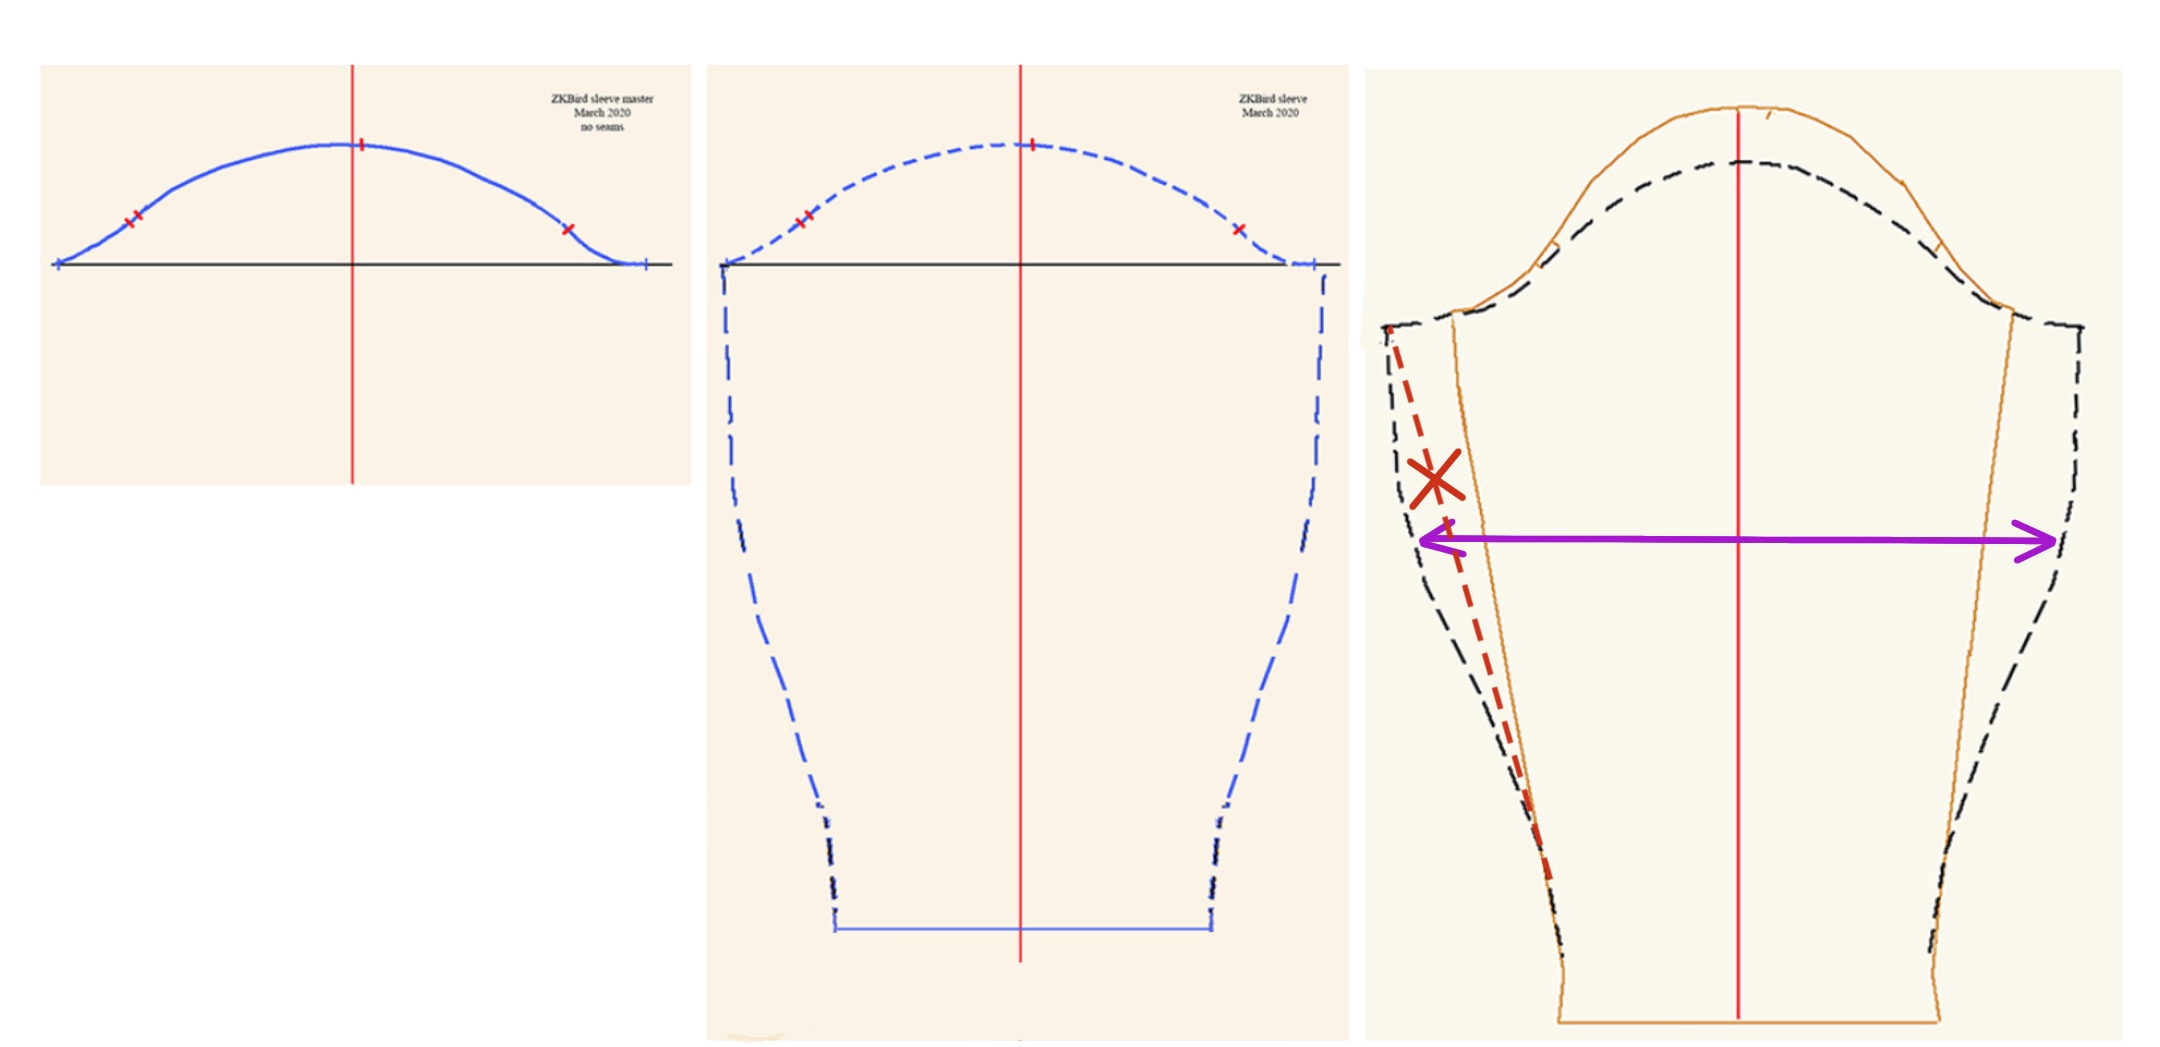
For a sleeve that fits a fuller bicep but goes into the same armscye, the same procedure is used, except that the biceps line is longer. The sleeve cap automatically flattens. It’s important to draw the underarm seam as an S-curve rather than a straight line to have room for the fullness of the upper arm.

To create a working sleeve pattern from your master:
Trace the sleeve cap on a long enough piece of paper. Lightly draw in the wrist length perpendicular to the grain. Pivot the length of the underarm seam from where it meets the armscye. Jockey until the ends meet.
Your body is happier with curved rather than straight lines, so shape the underarm seams. There should be triangles where the underarm seam and armseye meet, necessary for range of motion. These are little versions of the crotch forks in a pair of pants. (Optional) straighten the sleeve as it approaches the wrist so that the turn-up for the hem is the same width.
This is a one-piece, straight sleeve. The cuffed version is coming.
Add your seam allowances: commercial patterns are usually 5/8”/1 cm, but can be wider or narrower as you prefer.
U. S. Plastic measuring tapes are usually this wide.
If you do want a tapered sleeve, the hem allowance must flare out to mirror the sleeve where it turns up.
As mentioned at the top, a sleeve with a separate cuff is slightly longer than one cut in one piece. The sleeve has a placket slit and is pleated (crisp fabric) or gathered (soft, flowing fabric) to fit the cuff.
Which type of placket/binding you choose will depend on your design decisions and your construction method.
Miscellaneous other sleeve stuff:

The long-sleeved t-shirt has almost no angle from the shoulder seam. This gives enormous range of motion. The trade off is that when the arm is dropped, there’s a wad of fabric at the armpit.
This linen jacket has a considerable angle, so the front area is smooth. I’ve seen a town-and-country suit like this where the woman could not lift her elbows up or to the side. Very chic, but not good for carrying anything.
This couture jacket has barely enough fabric to go around the biceps, and a high sleeve cap.
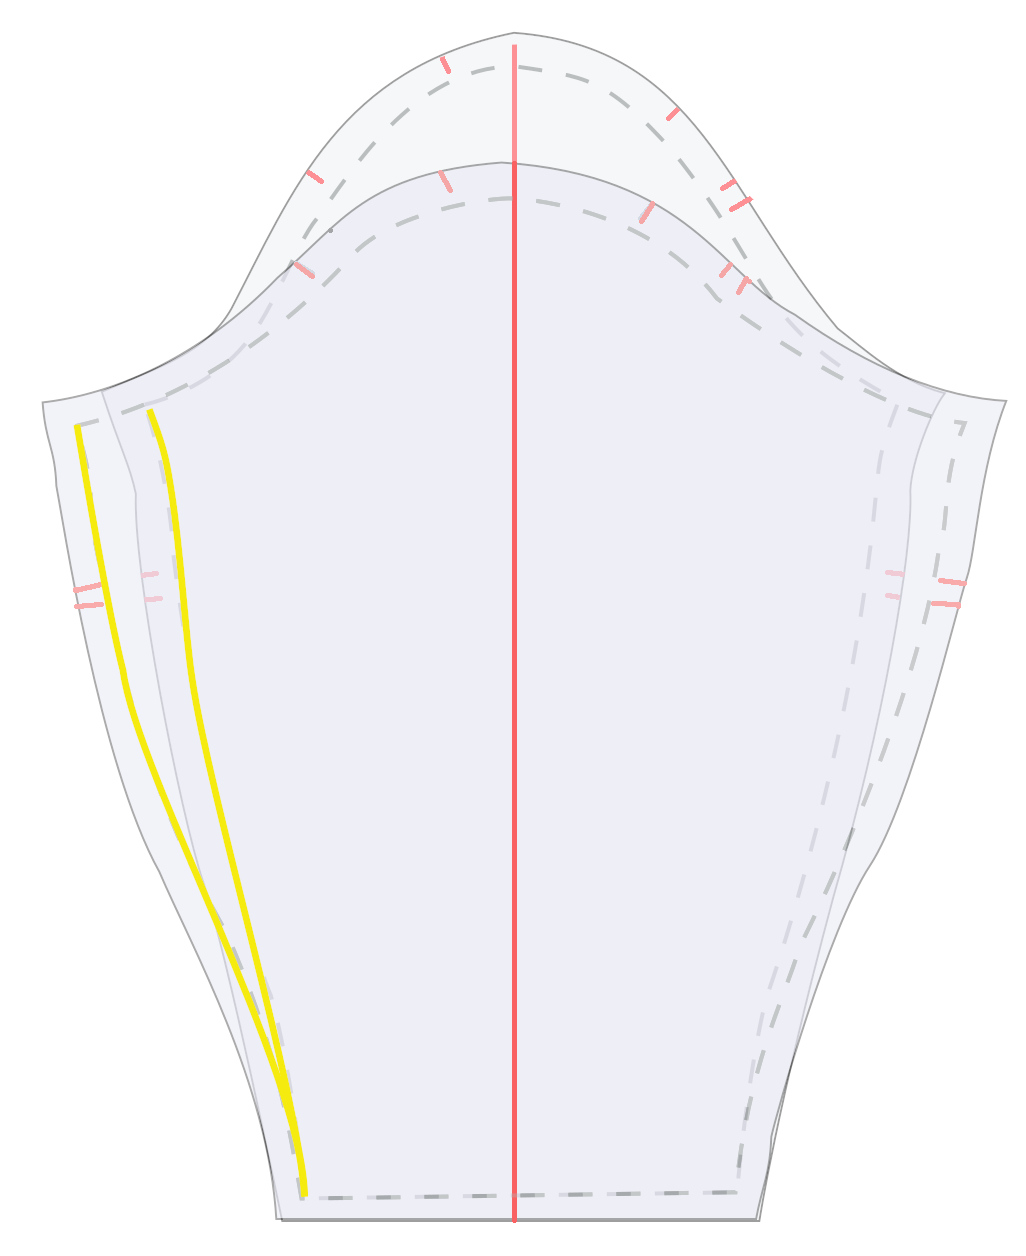
The higher the cap, the lower the sleeve angle. To raise the cap, you extend it up (or add more to the little loop of cord added at the shoulder seam). The extra fabric generated makes a longer stitching line that has to be eased into the shoulder opening.
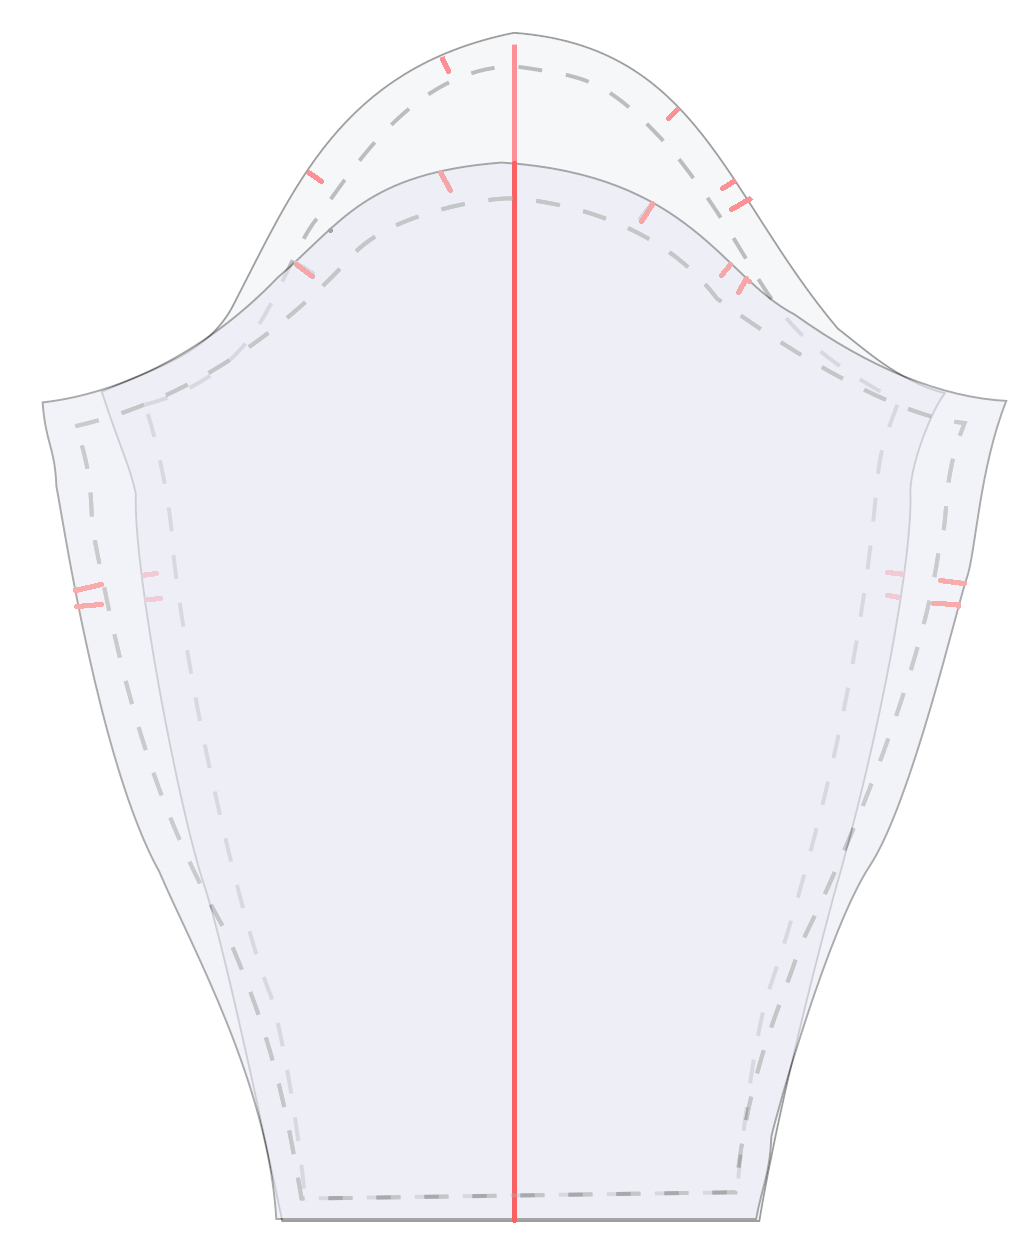
These two patterns have the same biceps circumference and will fit the same armscye (the upper line on each shows added ease, though it’s not necessary on the wider sleeve).
A sleeve that fits a fuller arm will have less angle to the shoulder and more fabric at the armpit.
You are allowed to make this choice!
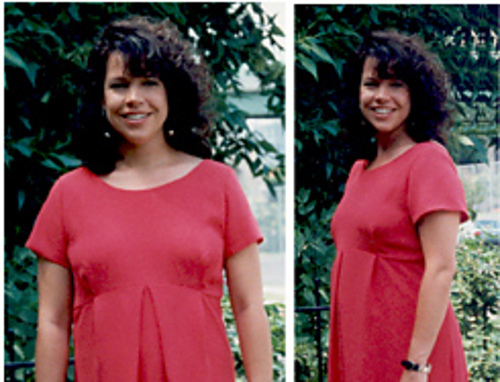
This client, a fitness instructor, decided on full mobility (she could raise her arms well above her shoulders with the dress itself hardly lifting) so she could dance at her friend’s wedding. A flatter cap is less obvious with a shorter sleeve, as the sleeve itself can tip up.
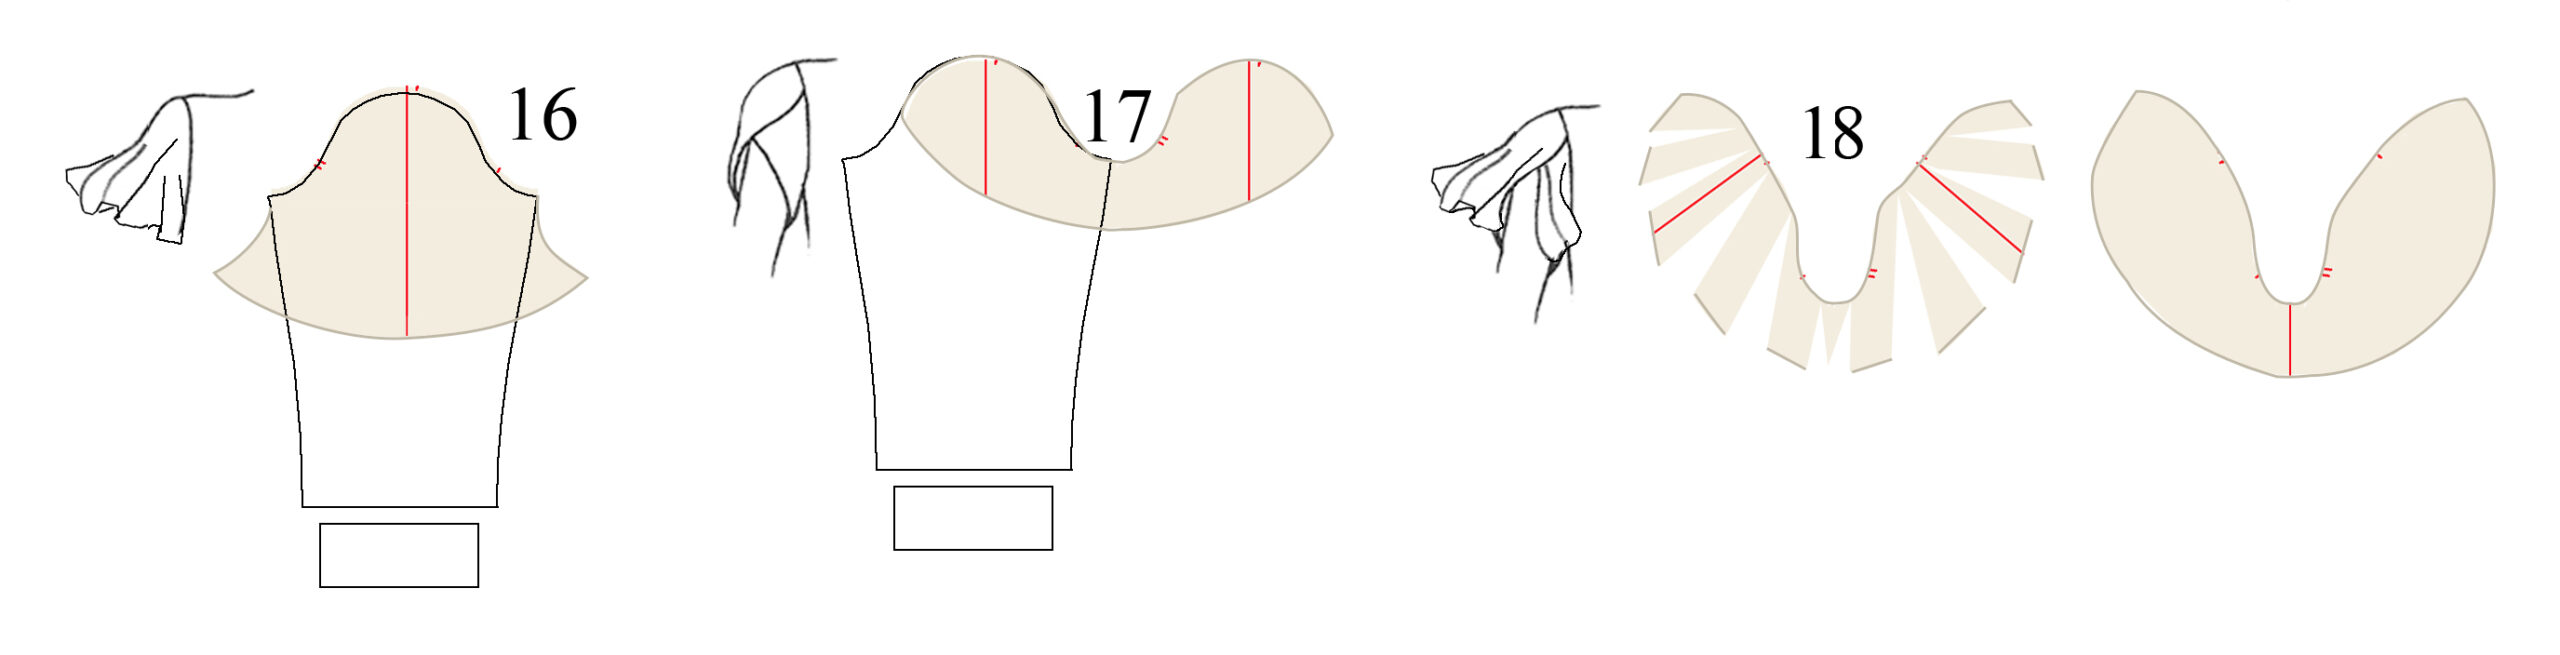
Shape of sleeve cap:
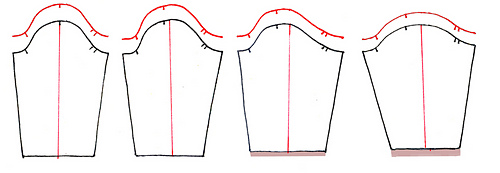
As long as the sleeve cap/armscye length remains constant, there’s considerable latitude shaping it.
At left is a sleeve that’s symmetrical front and back, a bad design (and too common these days). Next is a better design for most genders. European design scoops the front armscye and flattens the back, which builds in a better range of motion (my default choice). The one at right shows the modification for a wider bicep.
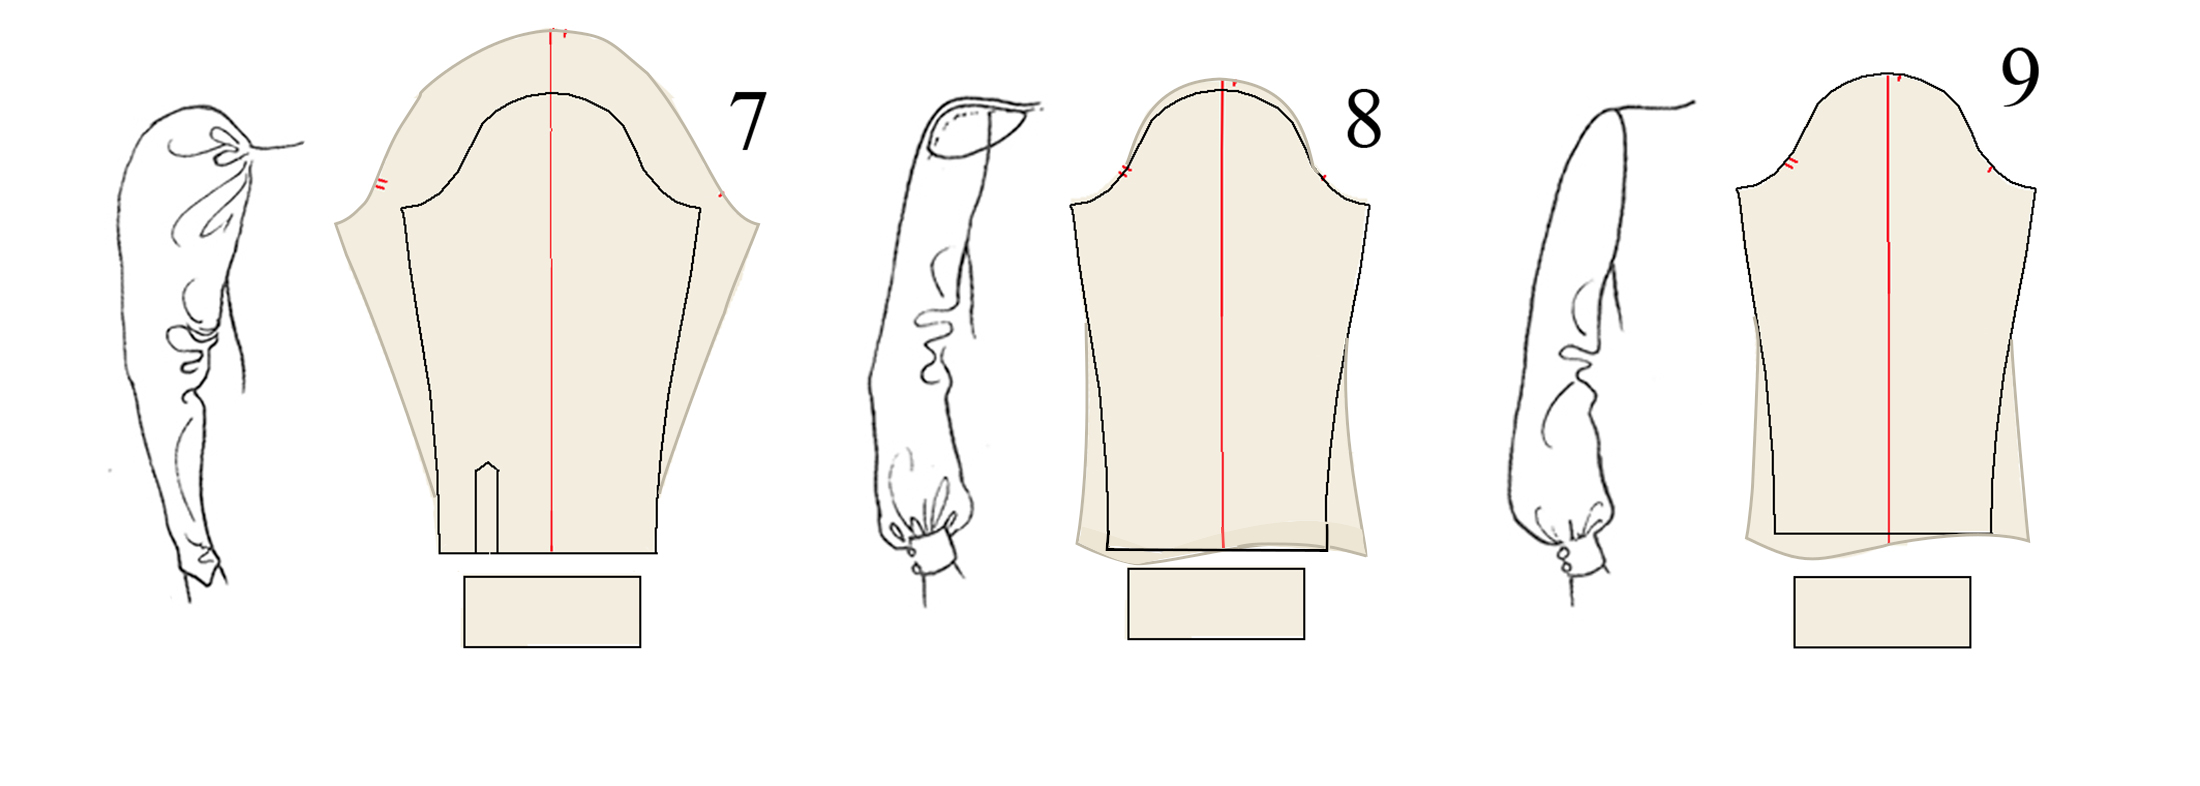
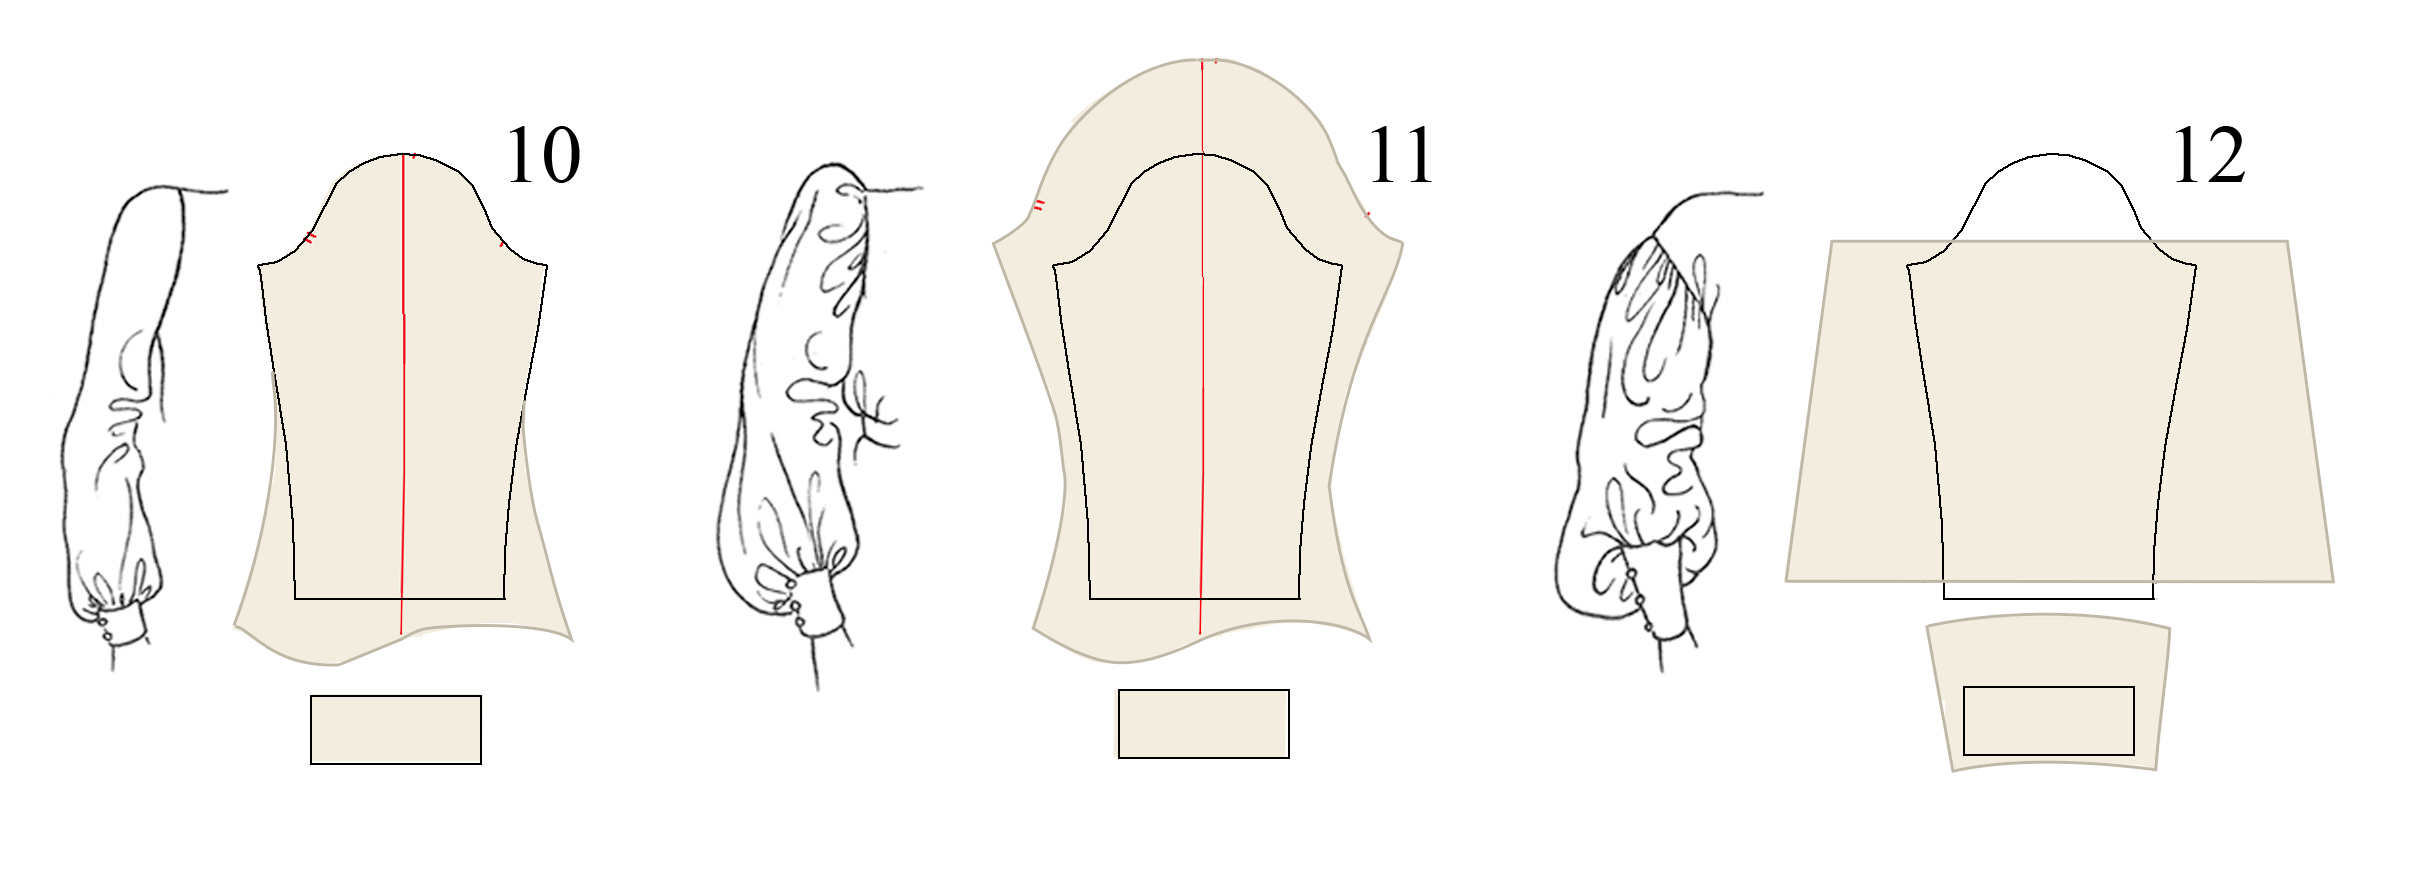
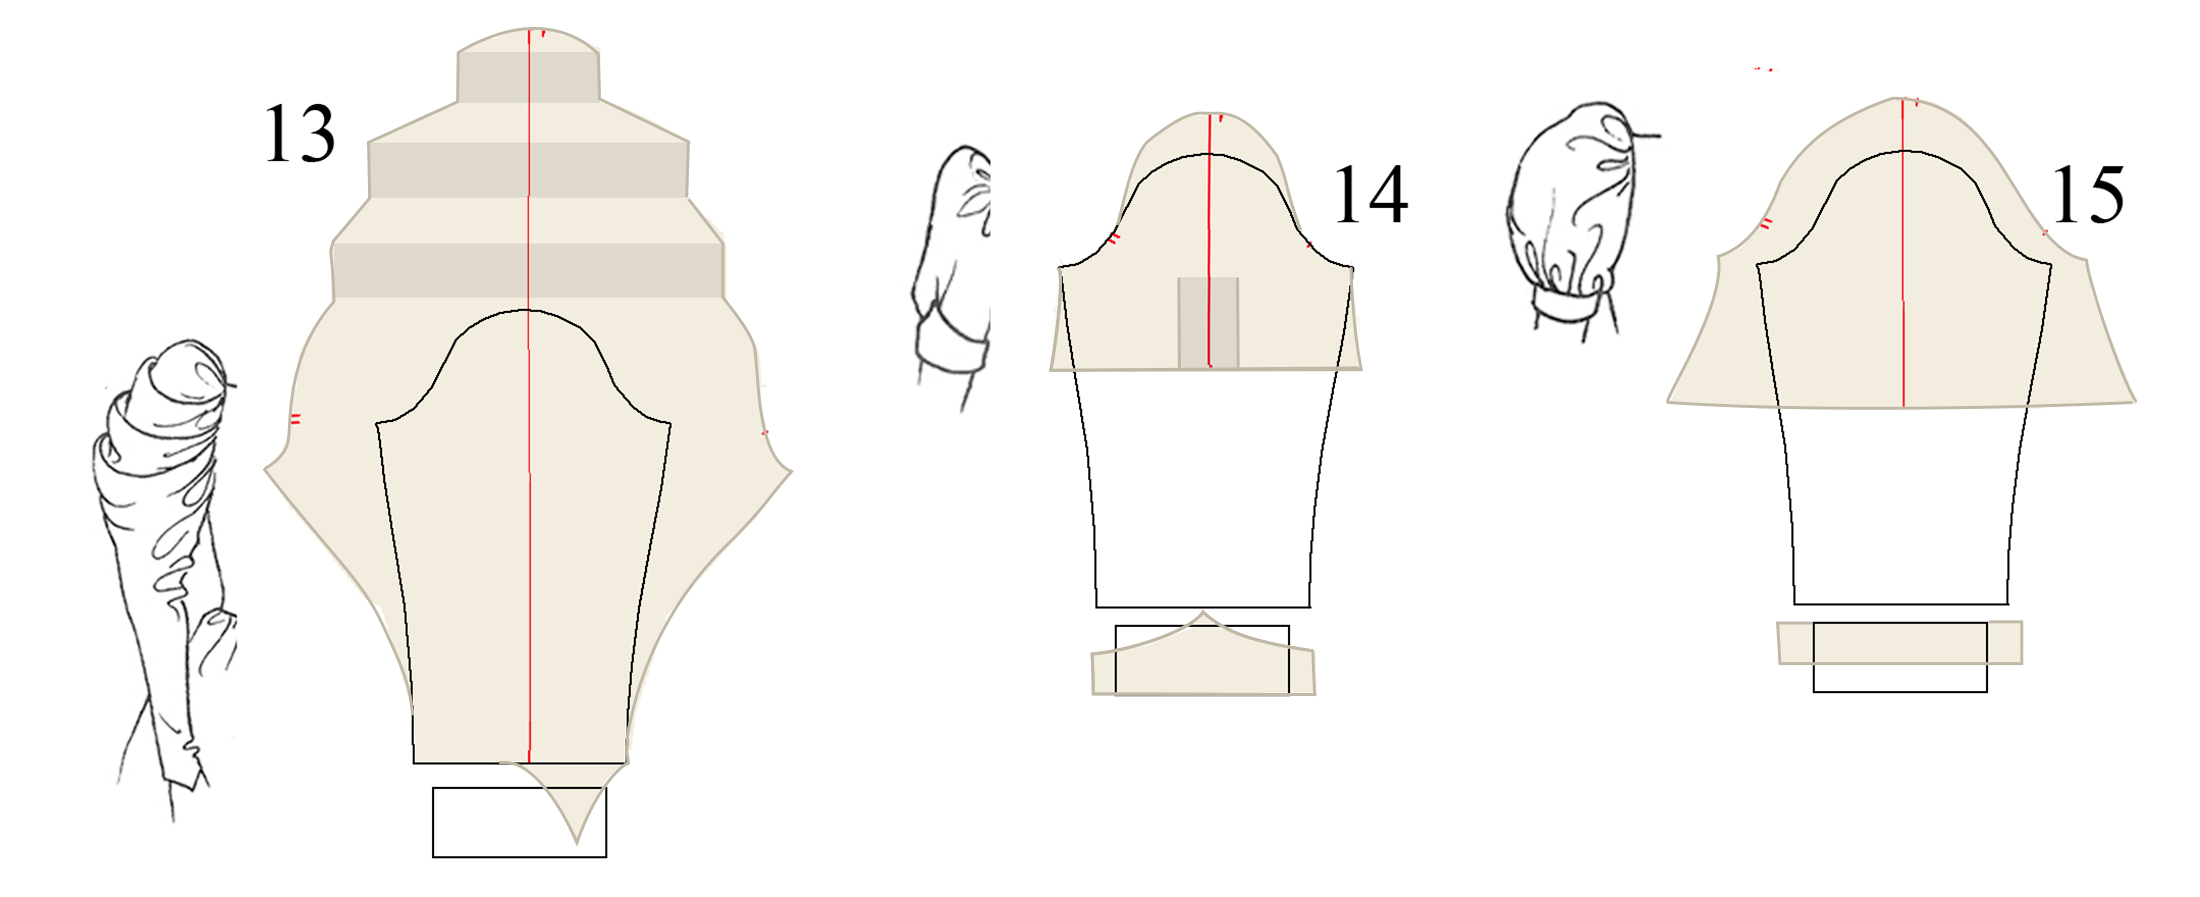
Types of sleeves and how their patterns compare
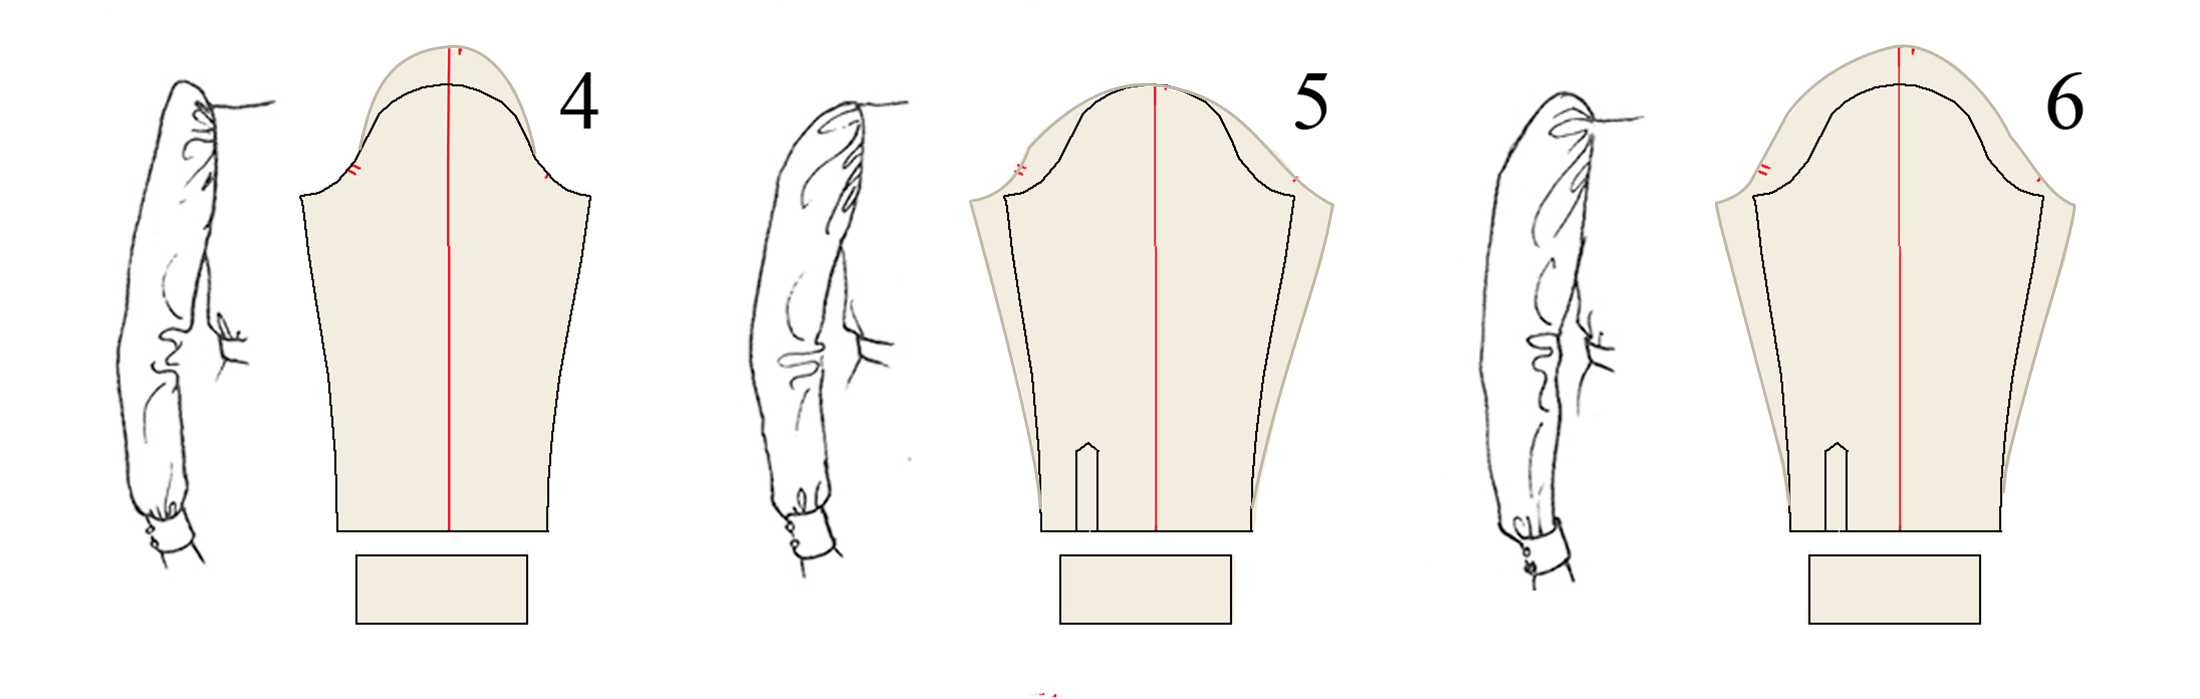
- Common shirtwaist sleeve
- Roomier upper arm – more width at biceps, flatter cap
- Negative ease – note this is only around the arm!
- High gathered cap
- Wide gathered cap
- High, wide cap
- (so-called) Leg of Mutton
- With shoulder pad
- Bishop (as in the clerical kind, not the Bishop Sleeve method)
- Fuller cuff
- Fuller cuff and high wide cap
- Wide sleeve gathered to dropped armscye seam; wide arc for cuff (aar, matey)
- Extreme bridal with pleats at cap – looks weird but if you live long enough you may see it again
- “Waitress” short sleeve, high cap, released pleat under shaped cuff
- Short puff – these may have a shorter straight lining that keeps the outer sleeve from collapsing down towards the elbow
- Flared bottom edge
- “Tulip” sleeve – can wrap either to front or back
- Tulip with flared bottom edge
“I have heavy upper arms, so I need a deeper armscye”. Not necessarily. The oval where the arm attaches to the body is often smaller than a full biceps circumference.

Both women would be comfortable wearing an armscye of the circumference shown, though the gal on the left would have trouble getting her arm through unless the fabric were stretchy, and she’d need rapid increases for her sleeve not to be too tight.
Yes, I’d give her a deeper armscye. Because something is possible doesn’t mean it’s kind.
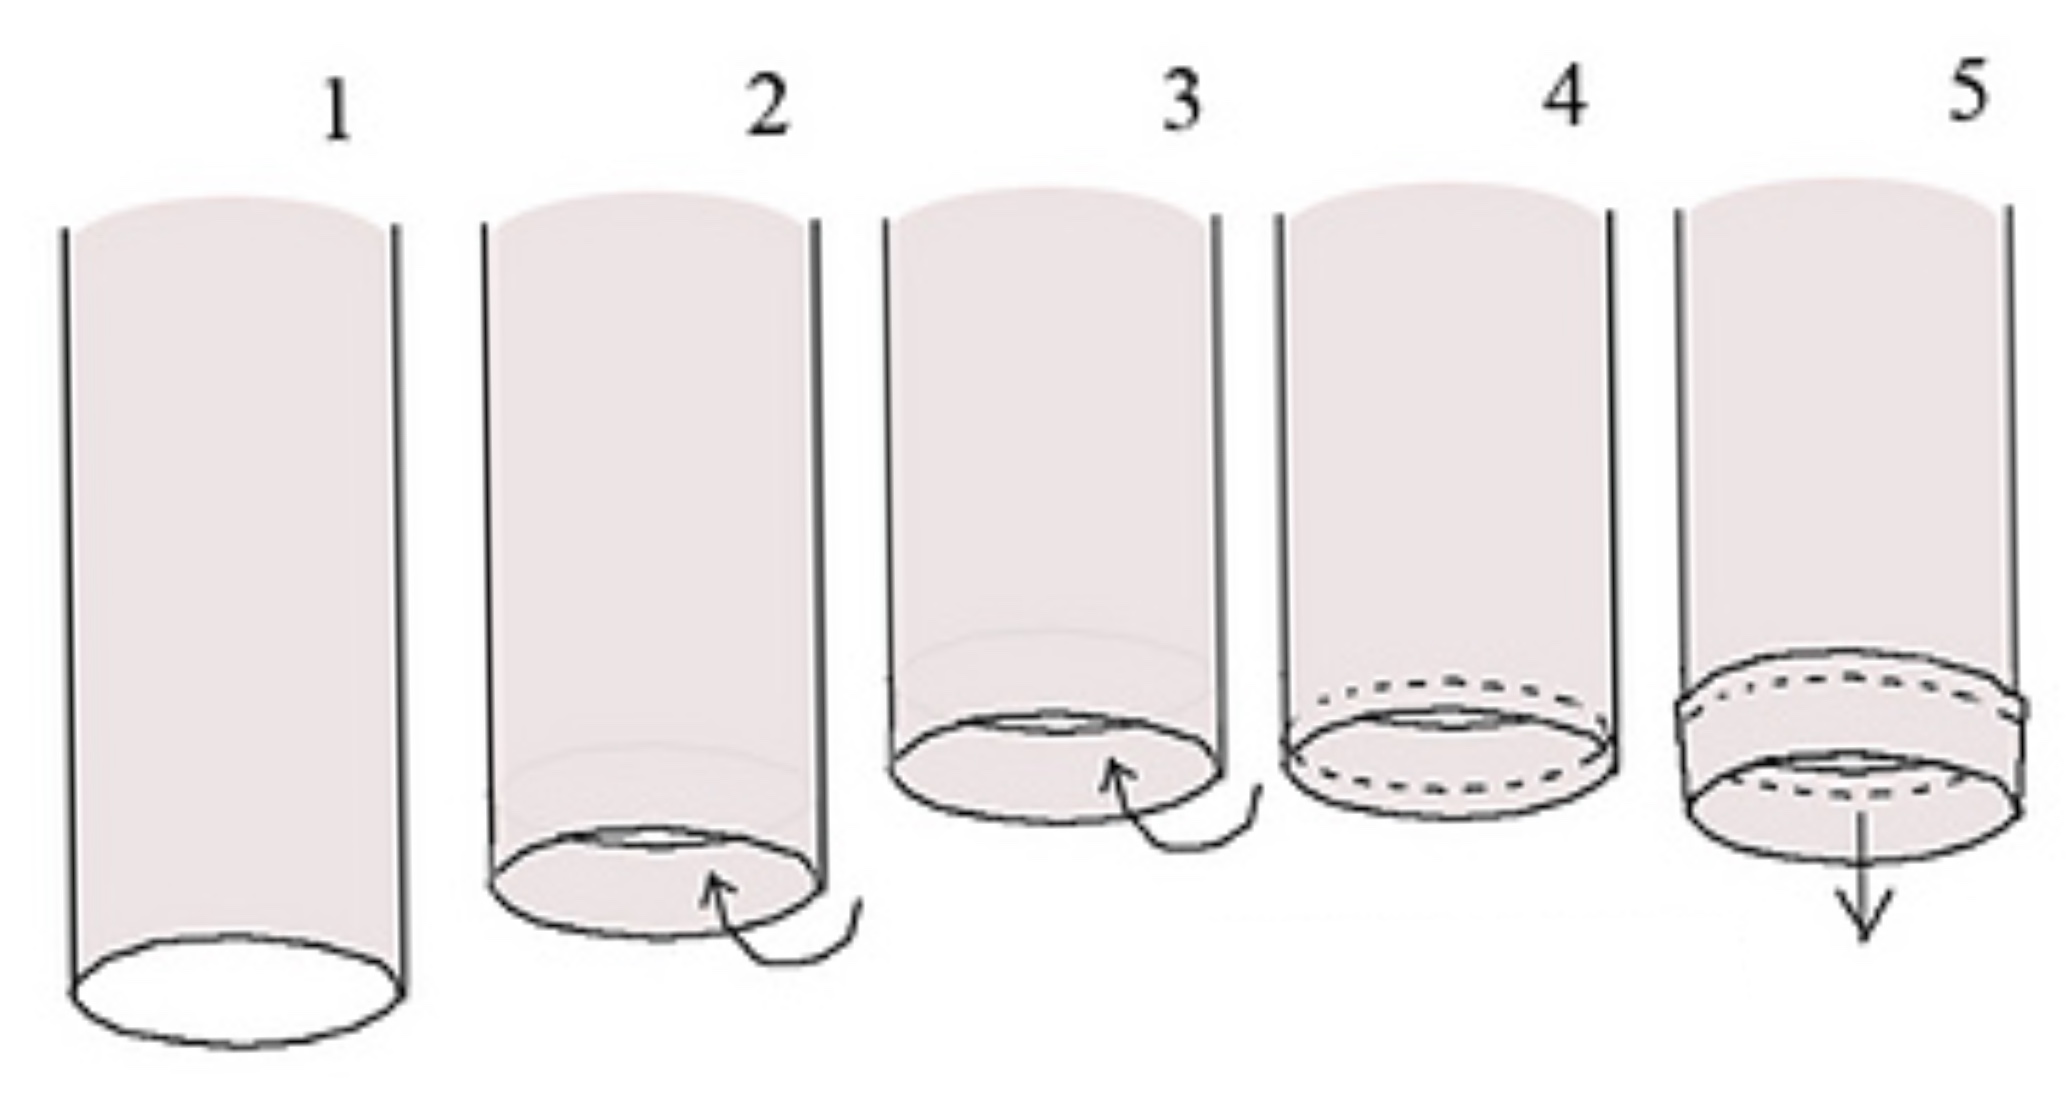
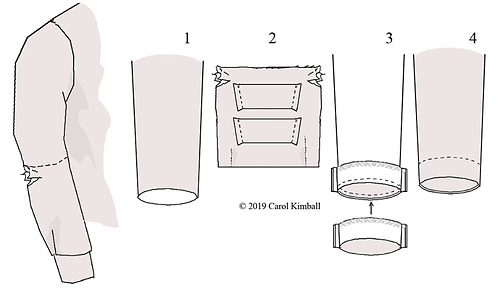
- Here’s an industrial trick used to finish a straight sleeve with a machine-sewn mock cuff (make a quick paper sample to determine your proportions).
- Fold up to the inside.
- Fold up to the inside again, being sure that the raw edge is tightly in this fold.
- Sew.
- Pull the cuff out, being sure the little flap is going up, and give a good press.
Here’s how to shorten a tapered sleeve; you have to add a facing.
- Cut off the sleeve straight across above the blown-out elbow.
- Open the seam (you can cut right next to it) of the lower sleeve and trace the shape of the bottom of the upper sleeve. Add seam allowances: note the extended little ears. If you can’t harvest some of the same fabric, use something else similar in weight (and ideally, color).
- Clean-finish the upper edges and sew each pair of facings right sides together. Slide over the sleeve, right side of facing to wrong side of sleeve. Sew.
- Turn facing to inside, press. Topstitch in place.
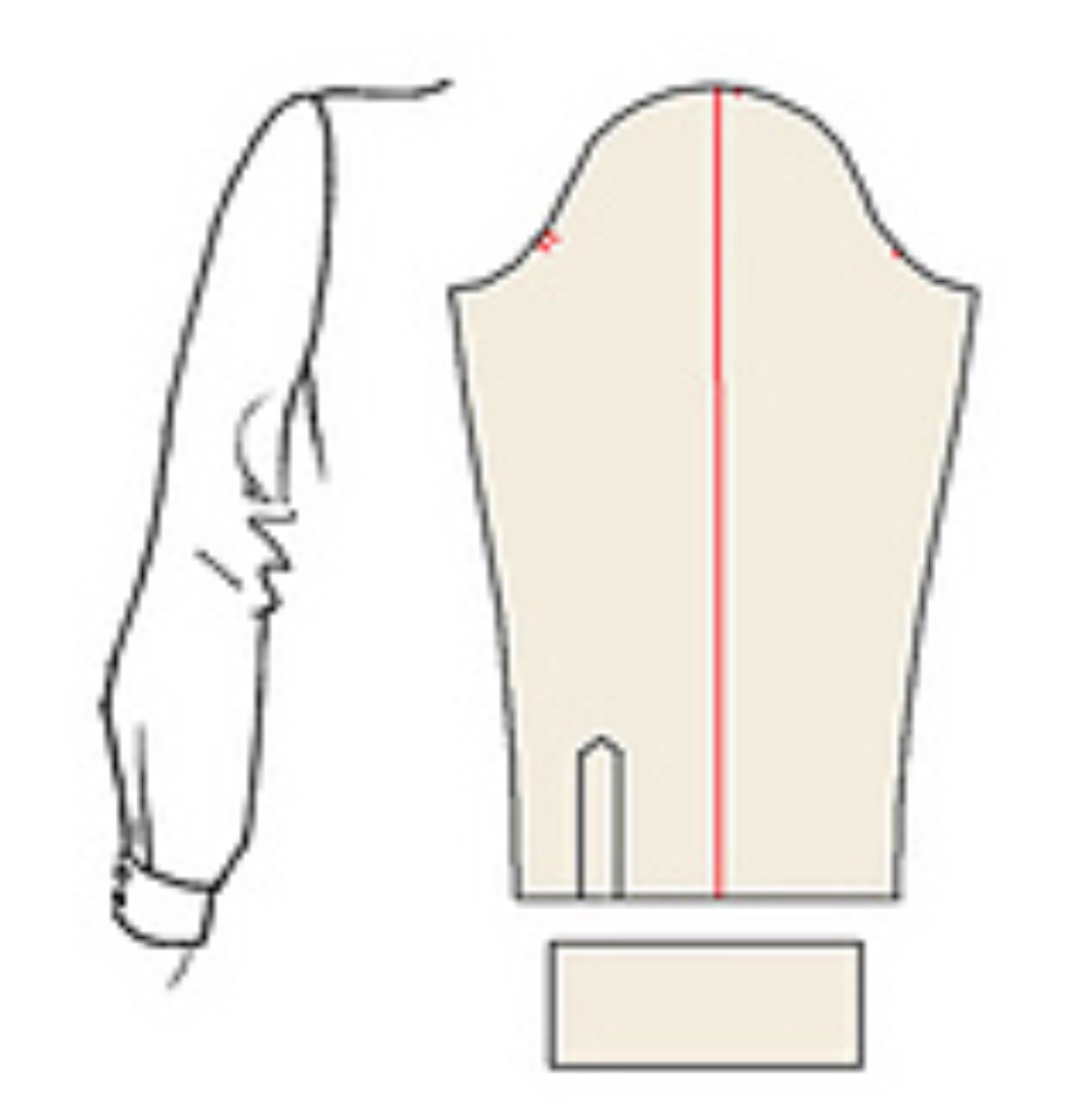
Creating a Block for the Sleeve from the Terrazzo Pattern
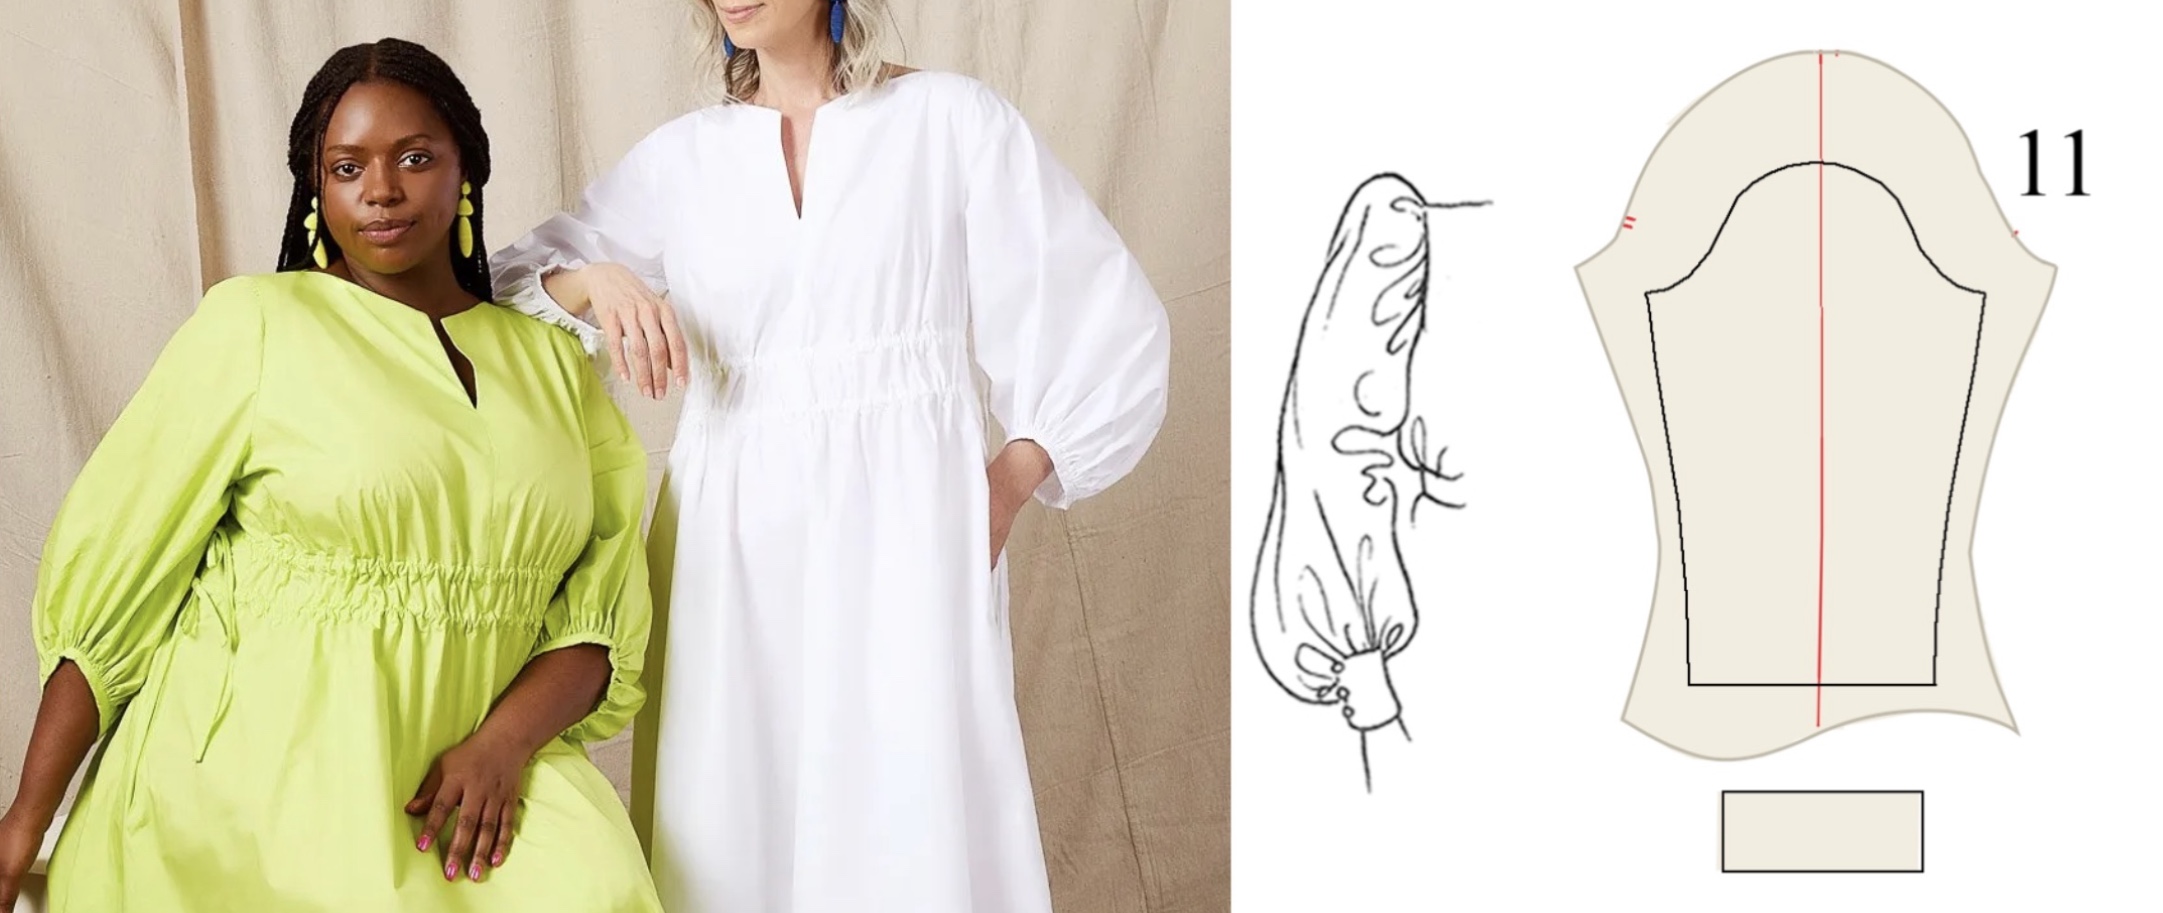
Ah! It has a shortened version of our old friend the Bishop sleeve! You should have seen my grin when this dawned.
…as in the liturgical garment (which has a smooth rather than the gathered cap in my old drawing). There is also a Bishop school of construction with a different sleeve, no relation.
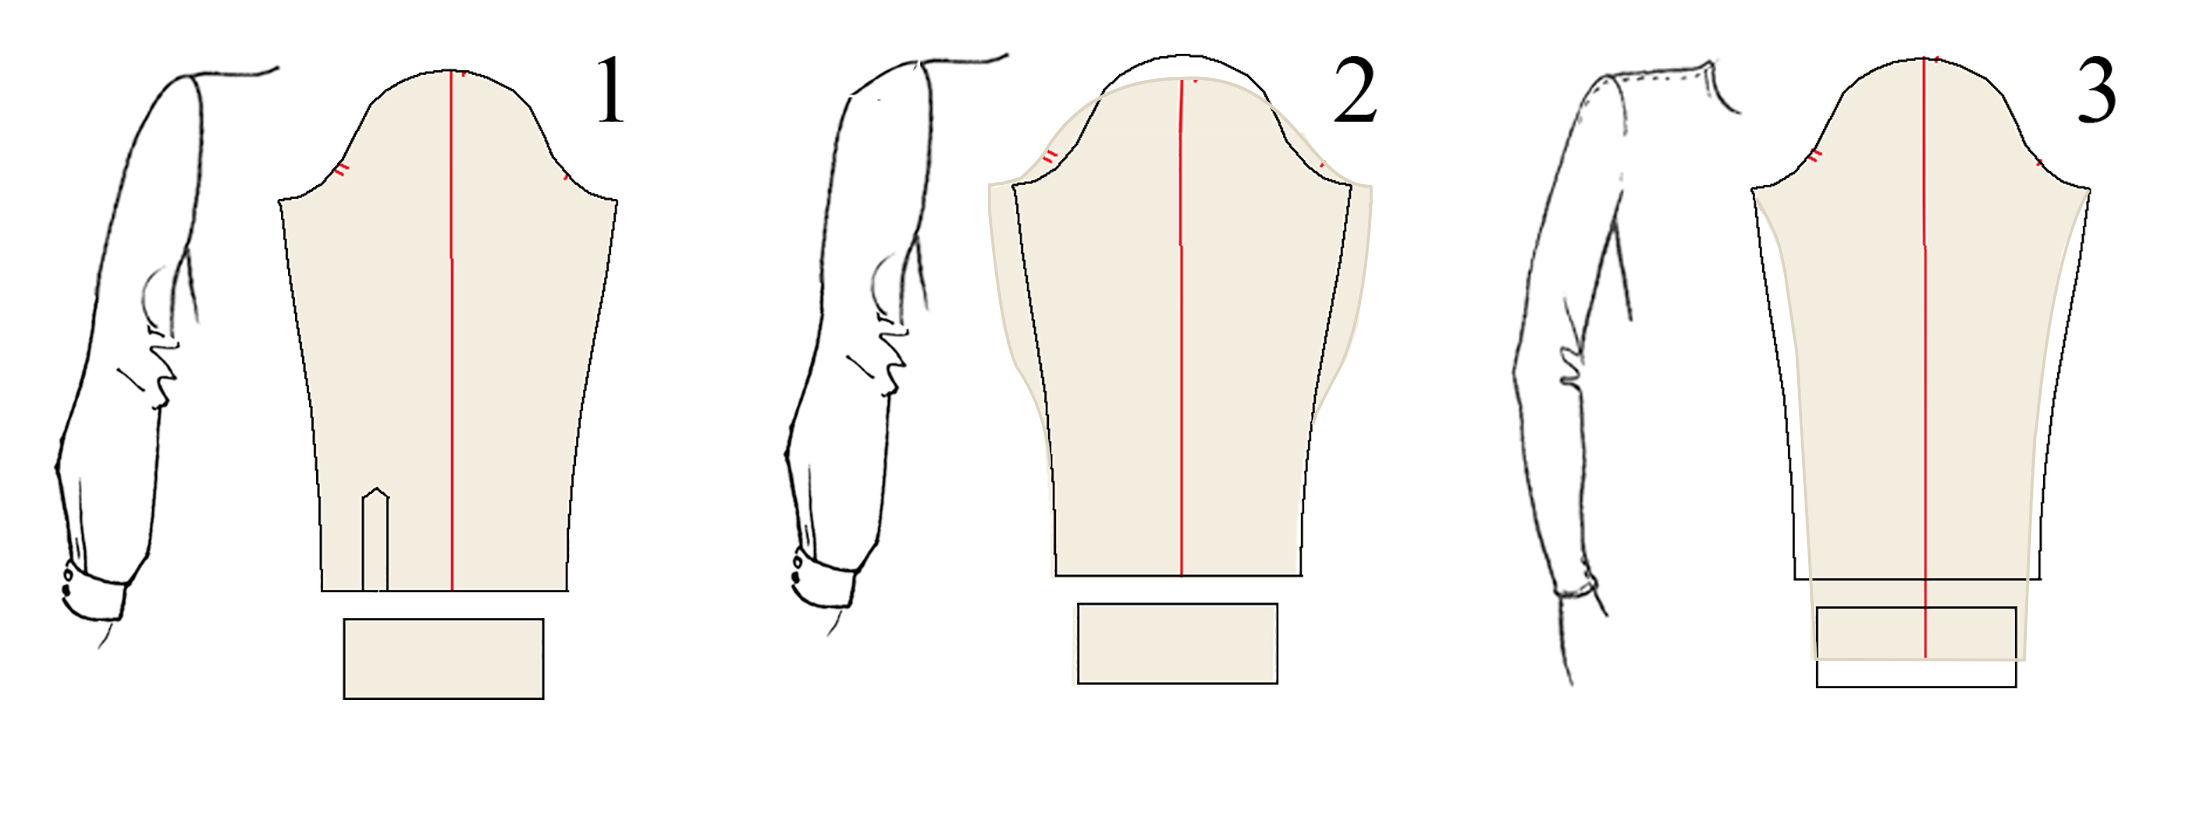
Here’s how to adapt your sleeve block from another garment to stick on your bodice.

Trace off a duplicate of your existing sleeve. Measure from your underarm to the middle of your sleeve hem opening.
Shown is a set-in sleeve with smooth cap. It could be a gathered cap. It could be a cylindrical extension from a dropped shoulder. Here I’ve swung the underarm seams out to give more width.
The lengths of the underarm seams must be the same, as must a line halfway between. If you don’t believe this (I didn’t, originally), play with it in the paper before cutting into your silk shantung.
Scoop the hem up on one side and down on the other. How shallow or deep give different effects. You can also make the curves asymmetric.
Add your seam allowances and a generous strip (bias) to bind the hem.
Lay out, cut, gather up, blah blah blah.