American Duchess is a company renowned for their boots and shoes: expensive and worth it. They published a pattern of a wrap-front cape taken from a museum piece. Errors had crept in when the rub-off was done. The garment has been lost.
They went to considerable trouble to recreate a vintage garment and make the pattern available for free for us. My modifications have been made as a continuation of that generous spirit.
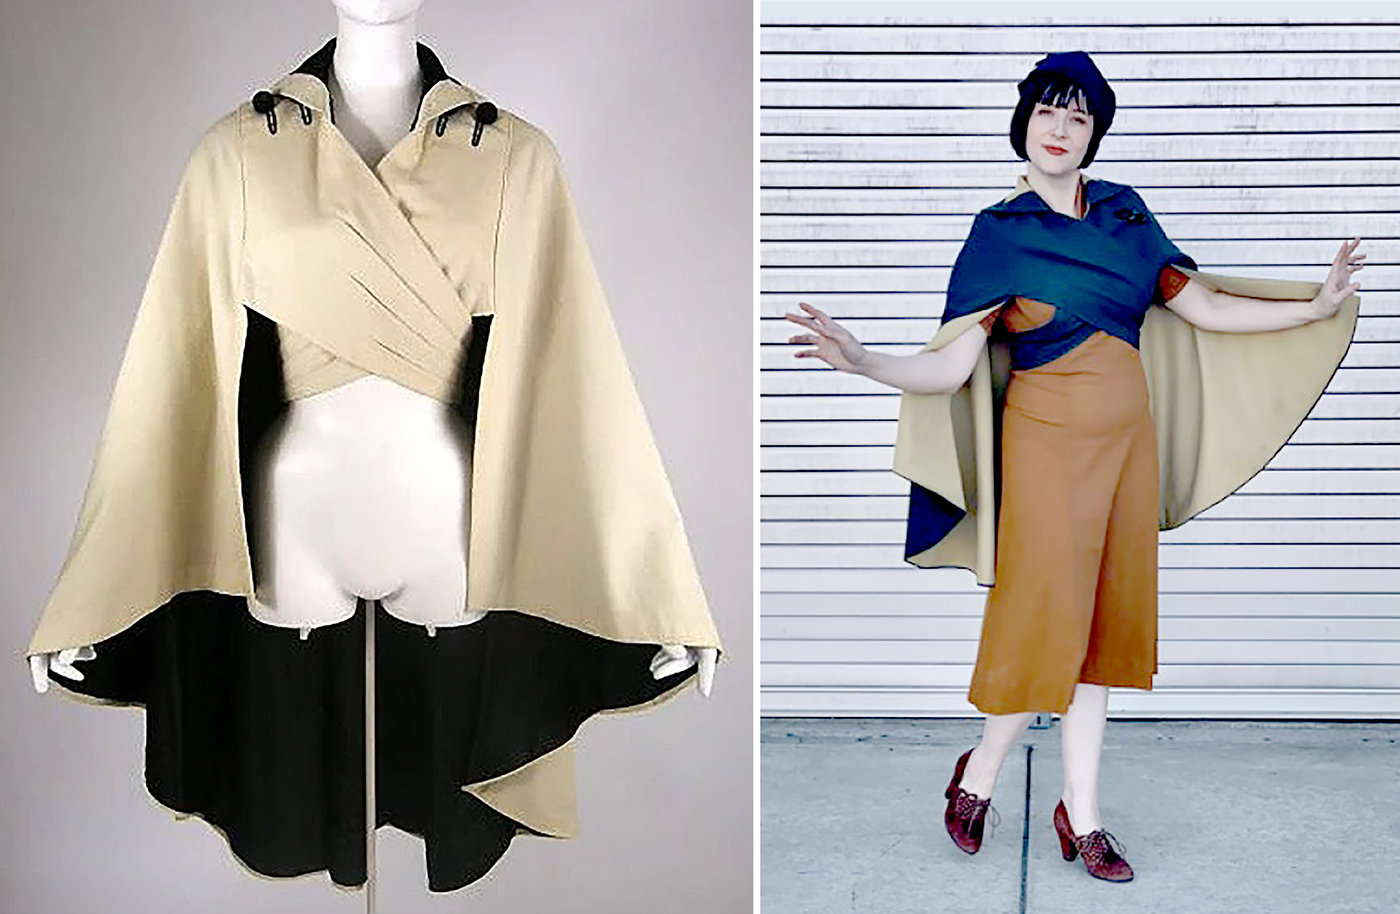
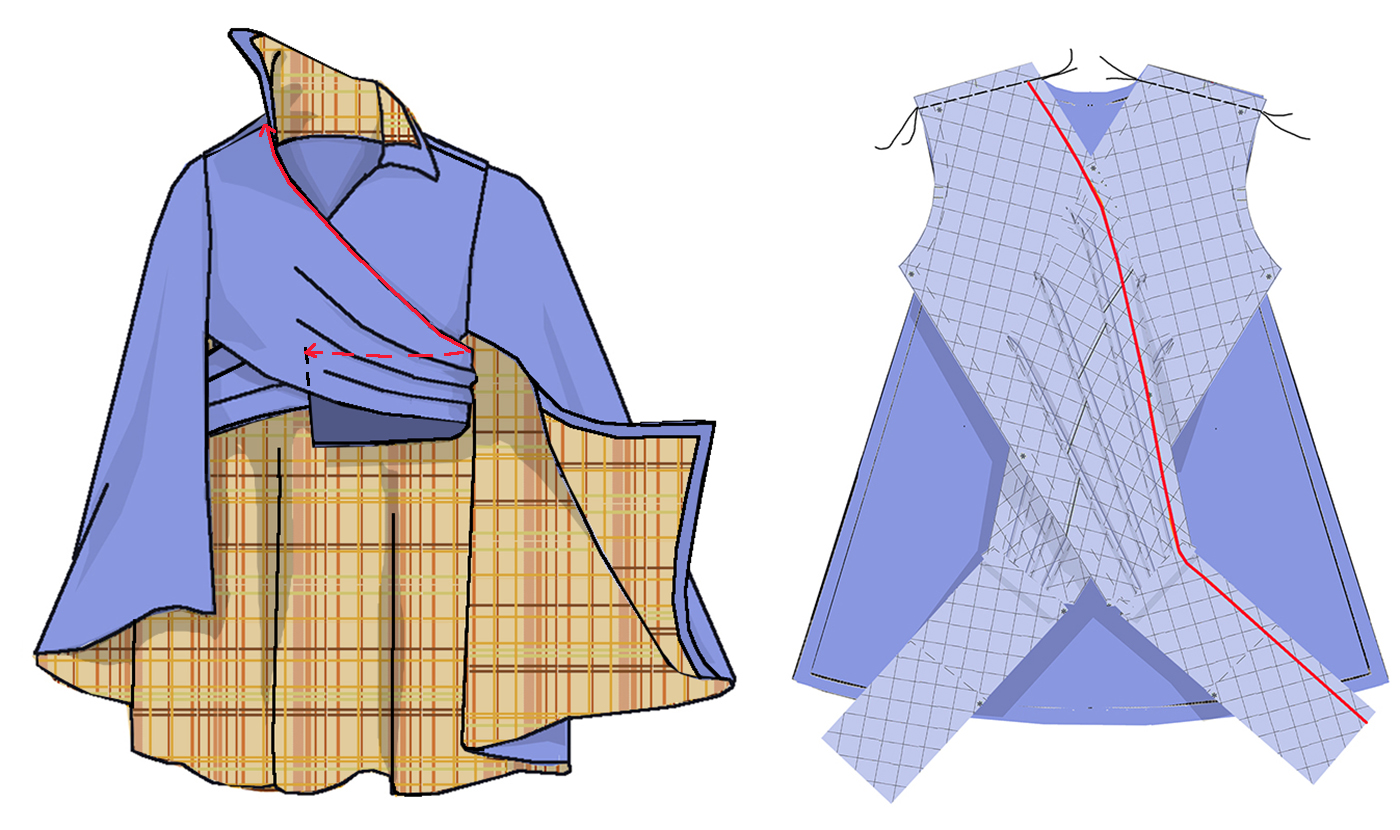
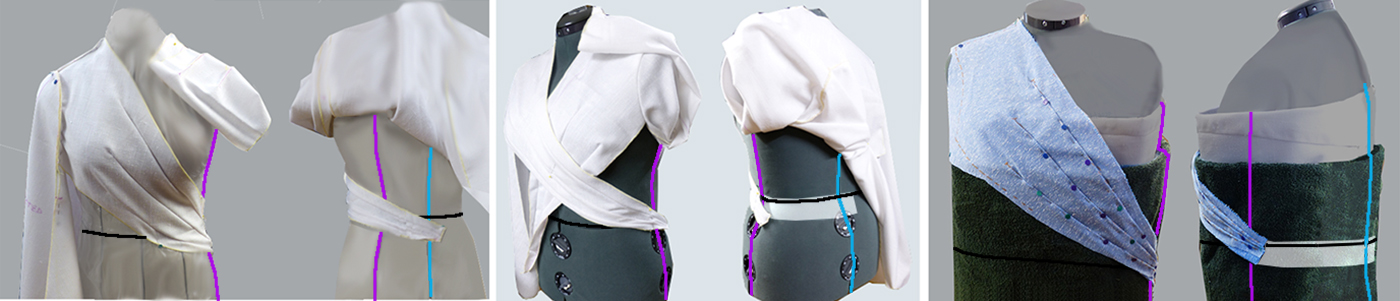
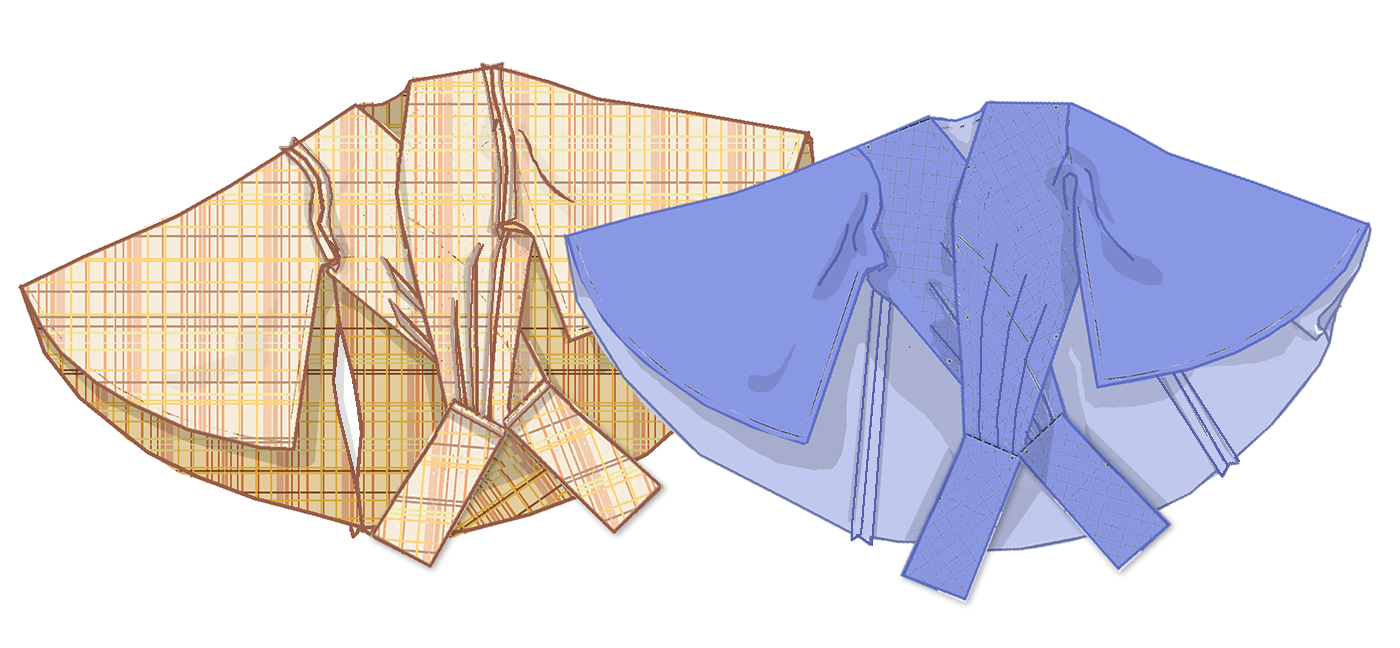
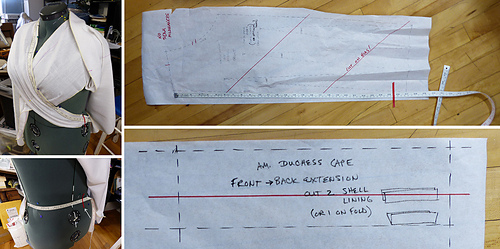
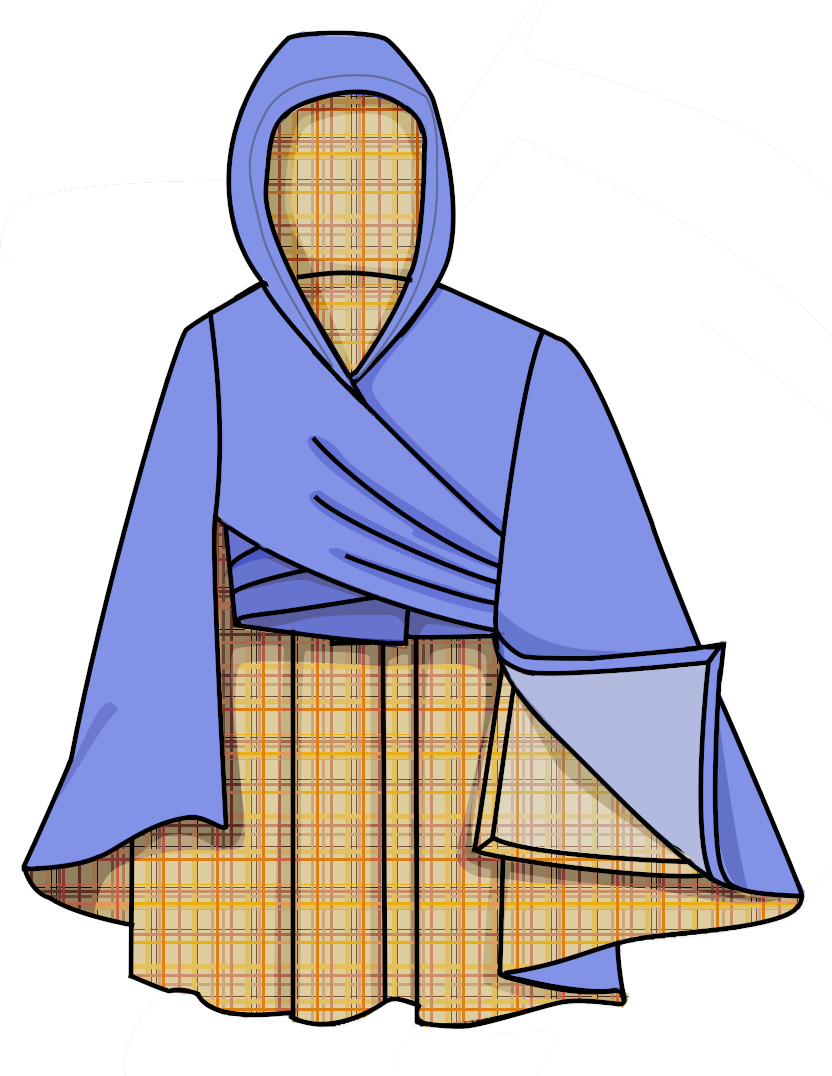
From the American Duchess website. On (male?!) form, presumably the museum’s original (the buttons/loops at the shoulder flaps have to be a design detail; they cannot possibly be functional); and their recreation.
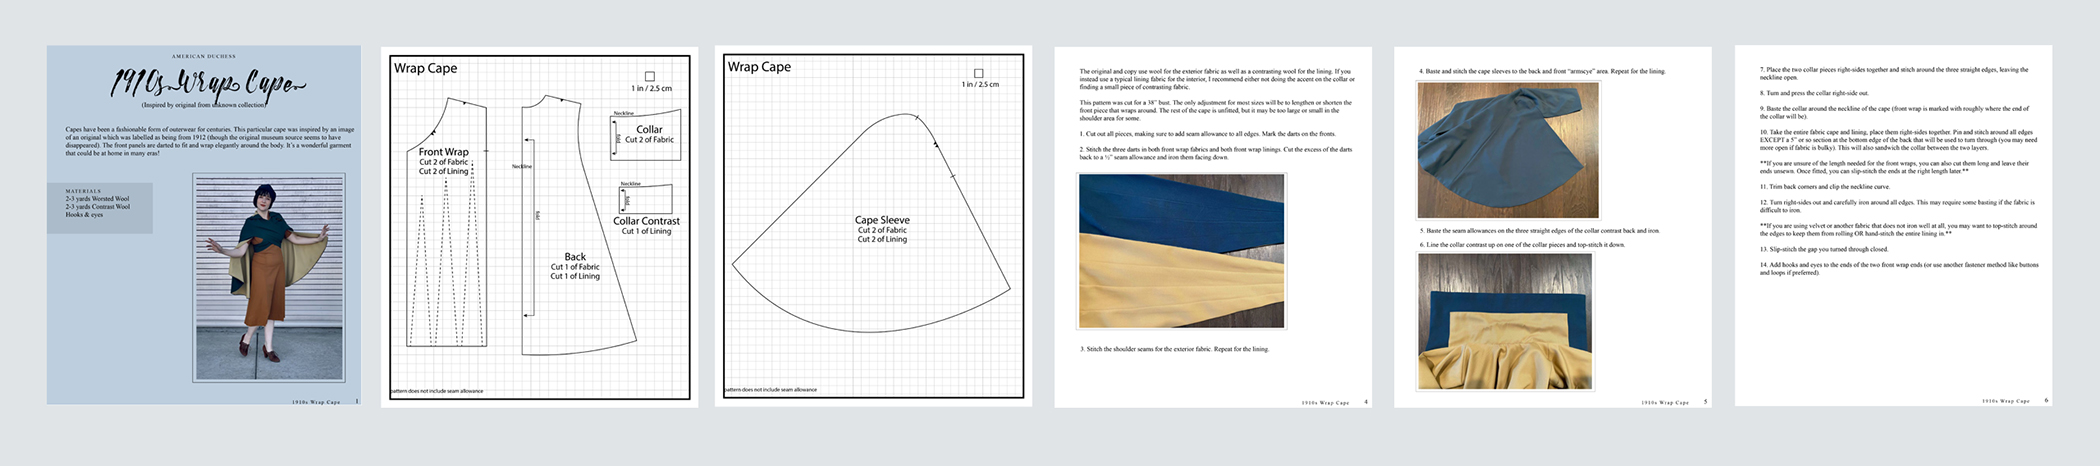
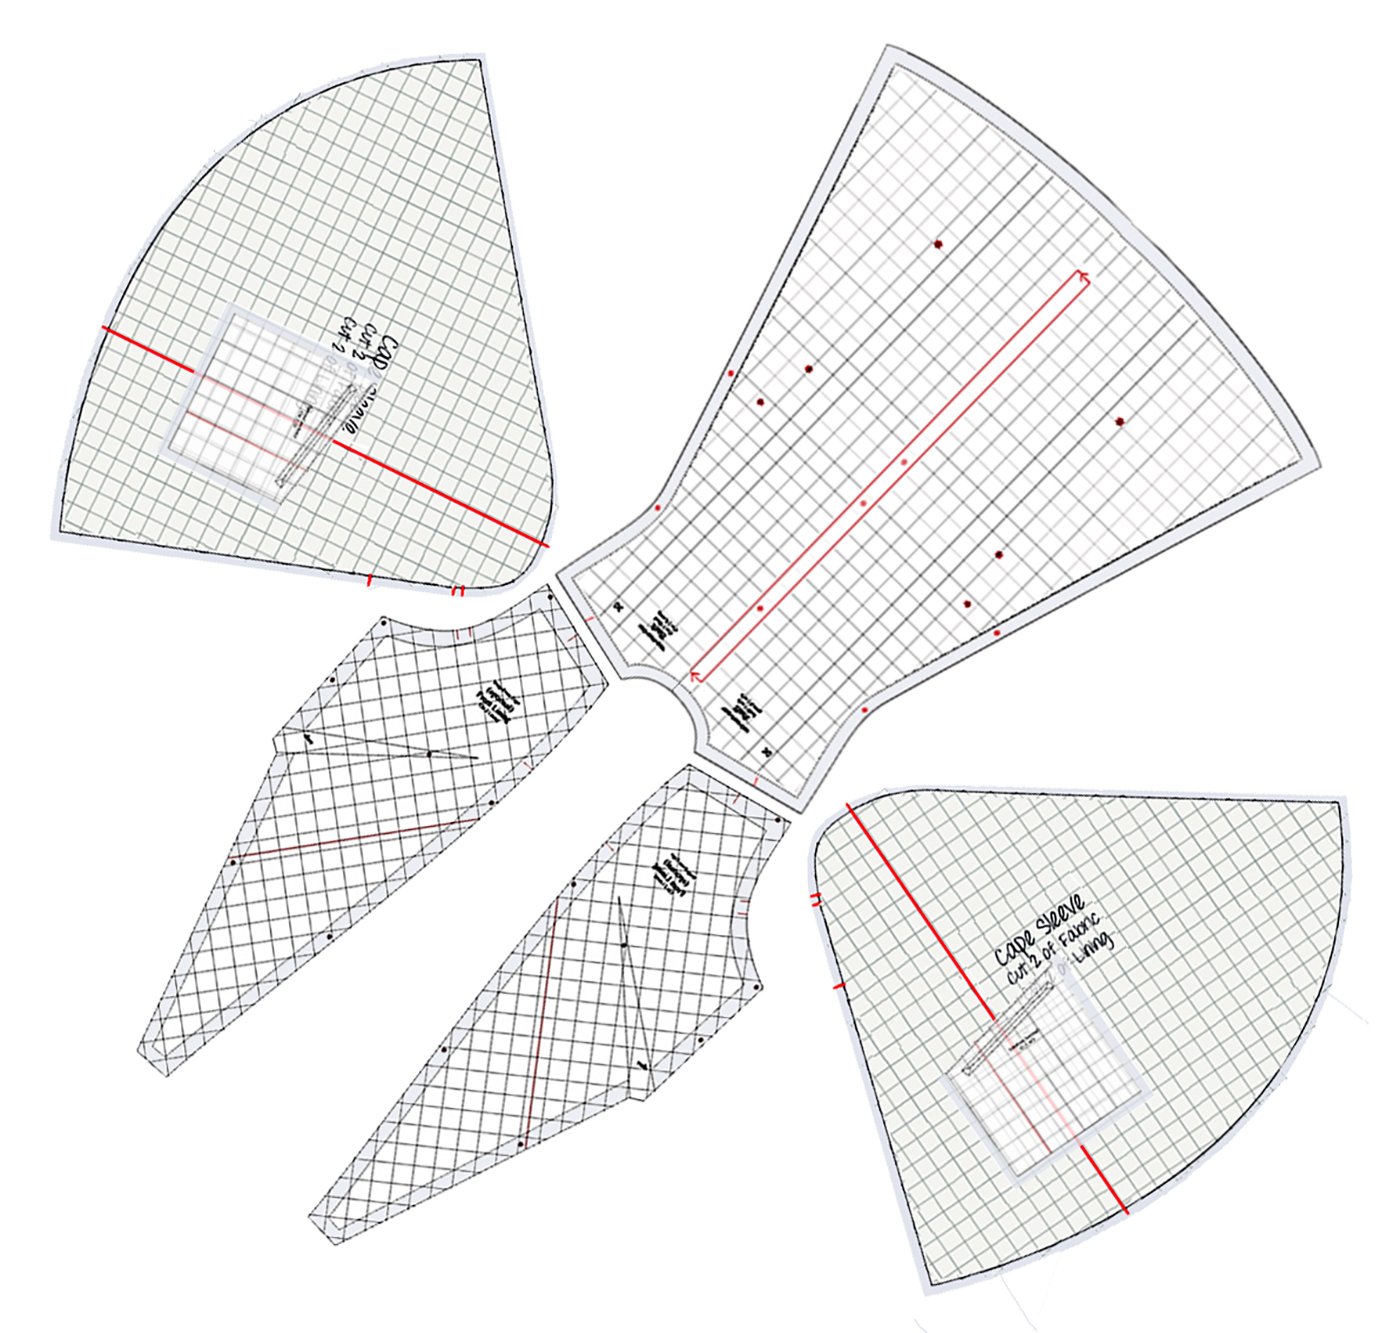
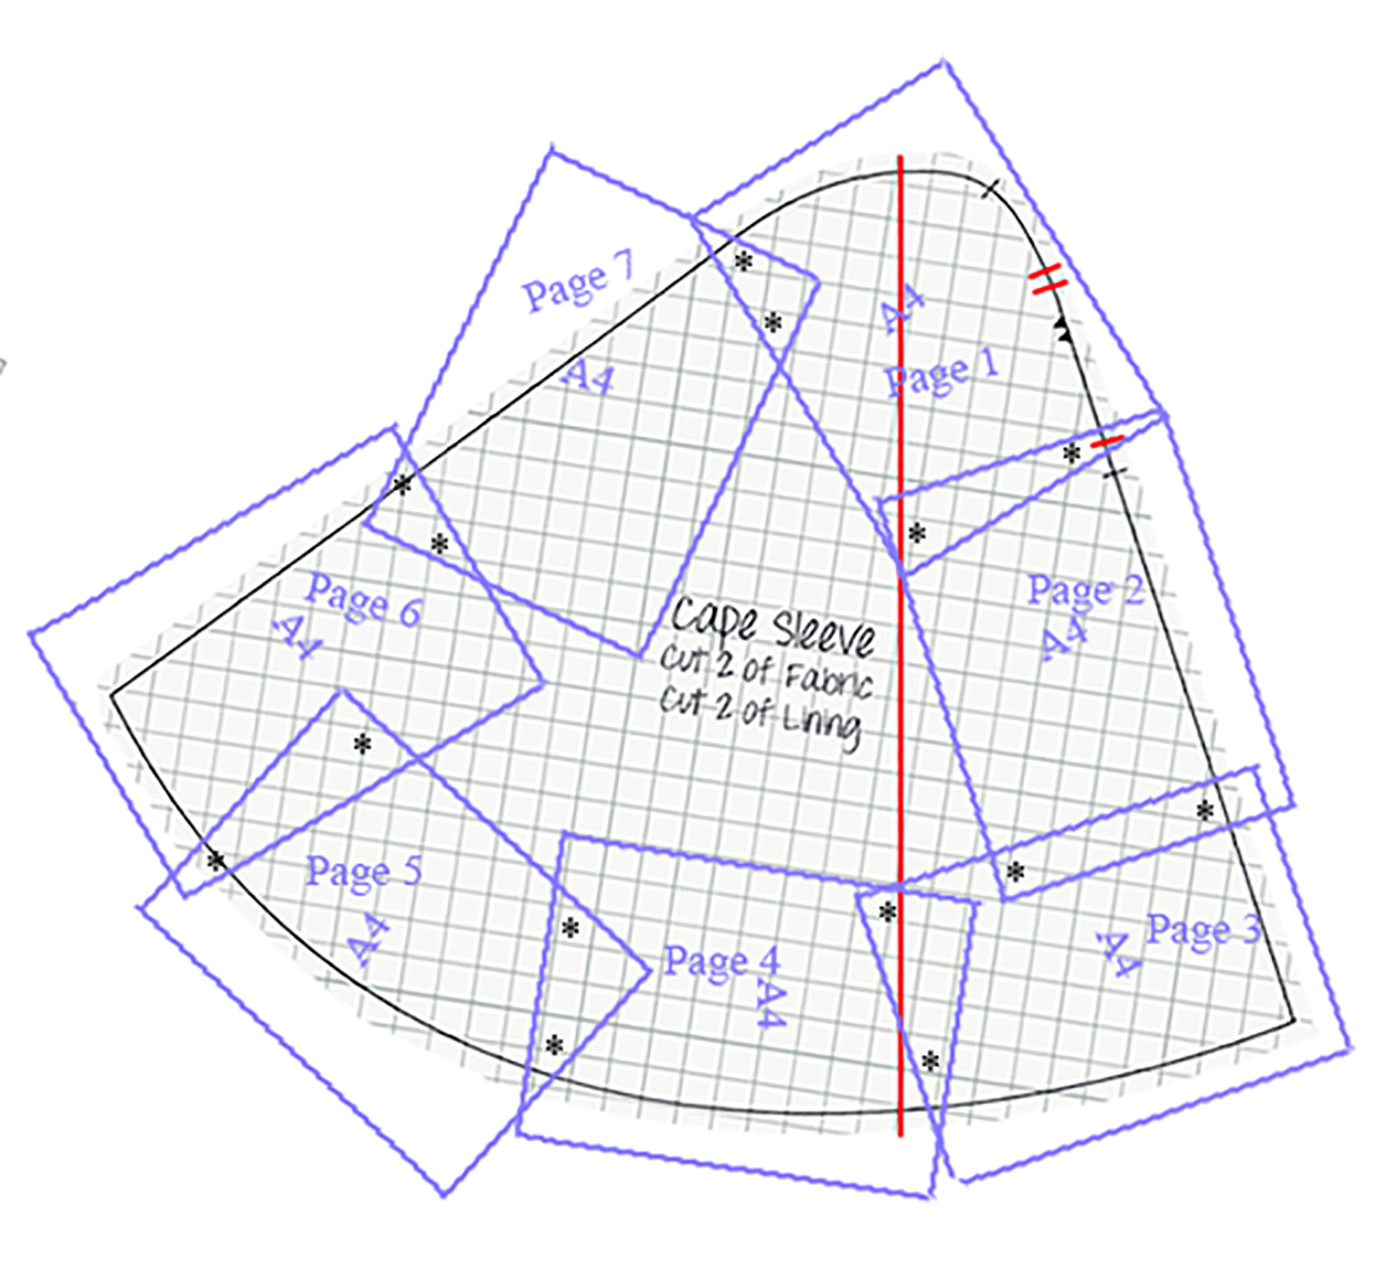
Here are the pages you’ll get from their download.
There is a link to Bernadette Banner’s video of making this at the bottom of this page.
Many people excited about this design mentioned the gap at the front armscye area, that the upper back is wonky, and that the sleeve hangs unevenly. One of the strongest promoters of me taking a look at this was Virginia/arayti, who originated the Team Sew My Wardrobe threads on (old) Ravelry and then Discord. This work is for her.
About me: most of my income pre-pandemic was referred walk-in trade. It dropped to zero, and though I’ve picked up some on-line consultation and illustration work, that’s my sole source of income. A single or ongoing contribution to my Patreon subsidizes free projects like this.
These issues have been corrected with full-scale printouts (including seam allowances) in two paper sizes (U.S. and A4). I added an optional welt pocket on the inside. Alterations for a longer/fuller torso are below the construction directions.
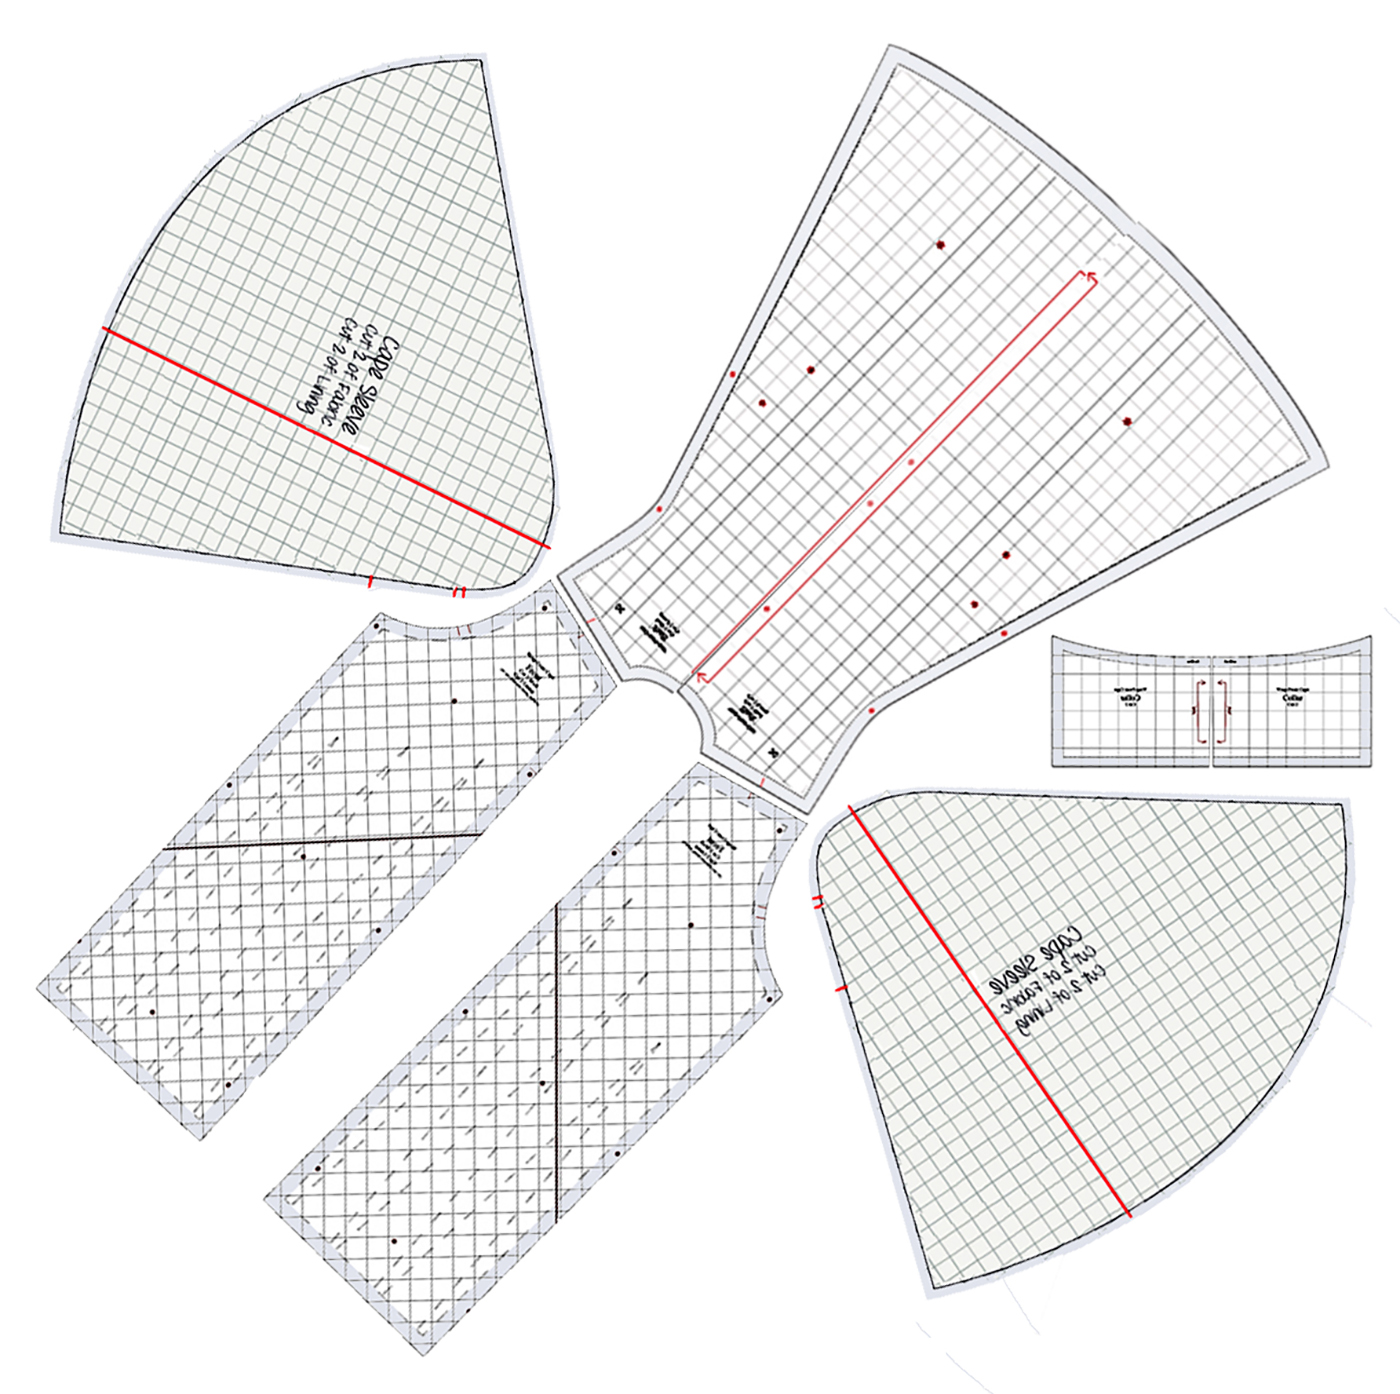
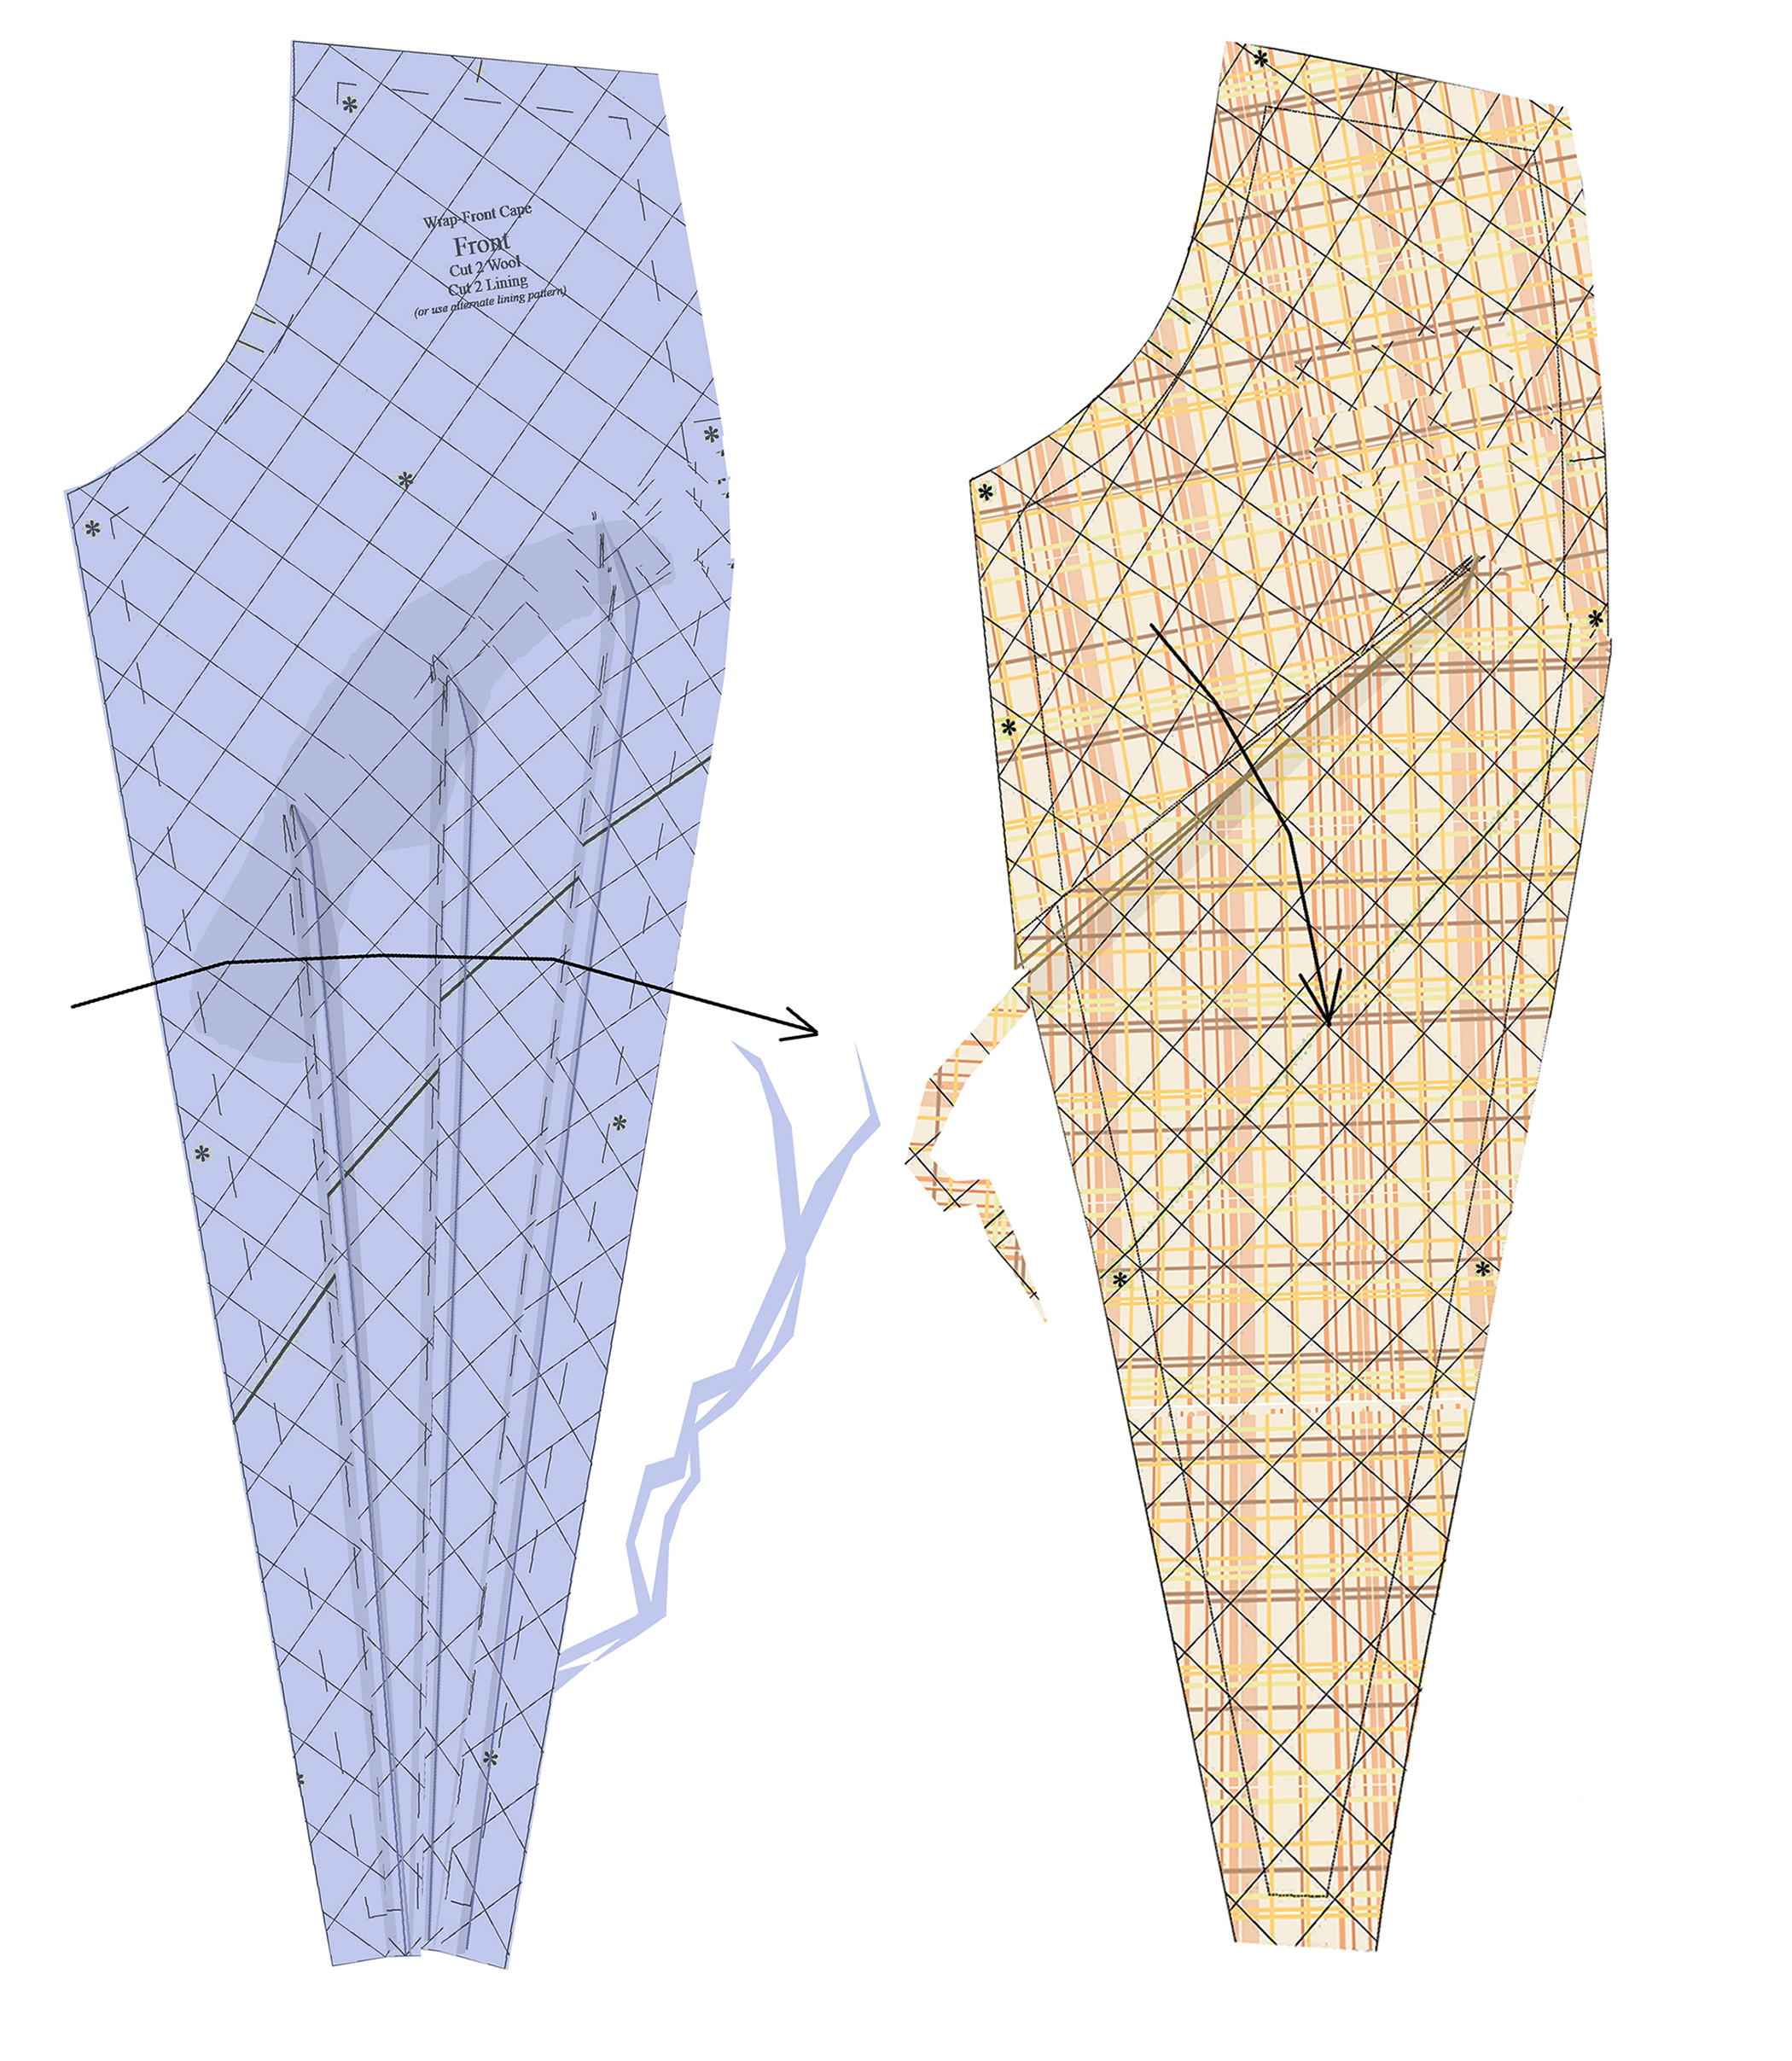
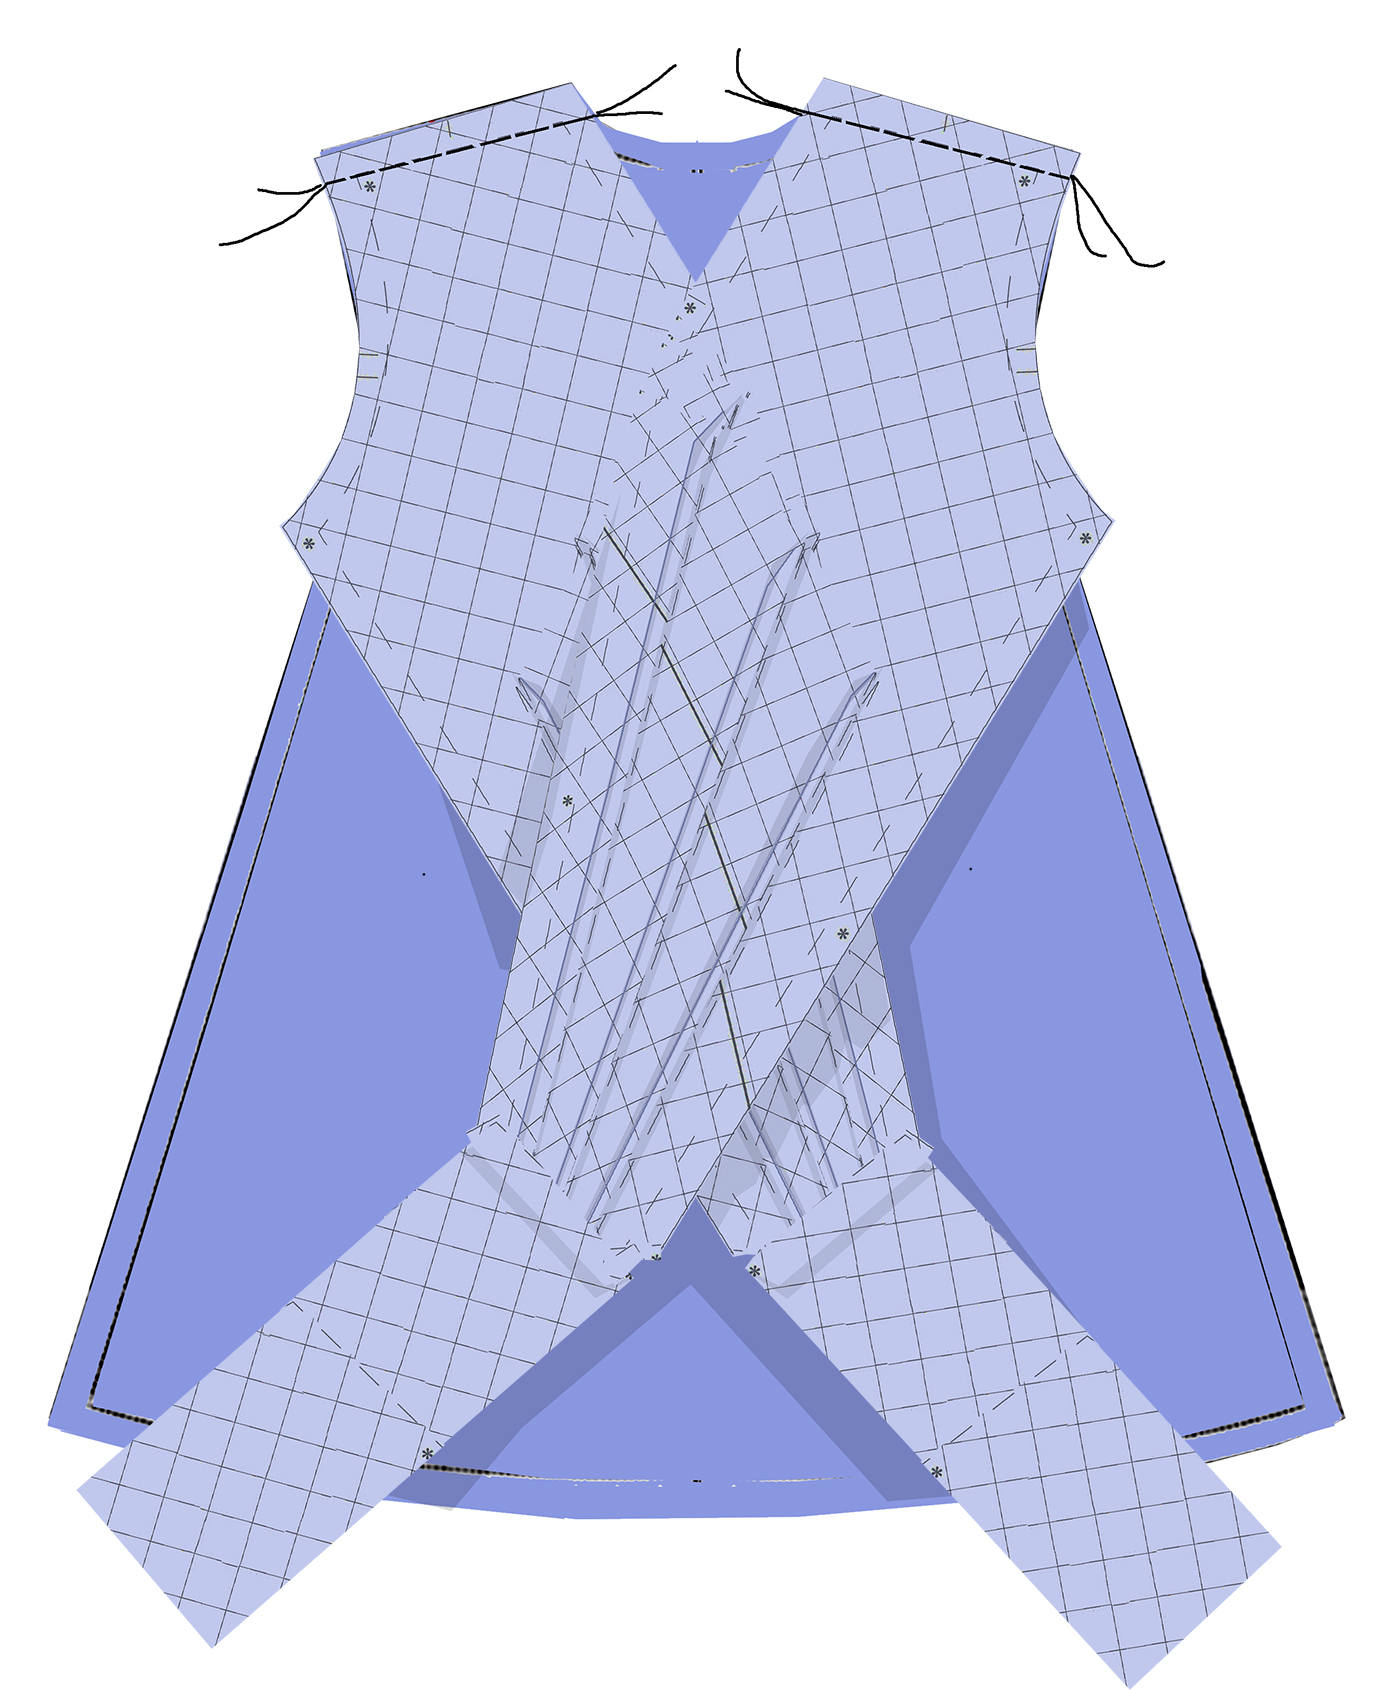
Wool pieces: fronts, back, sleeves, collar.
Lining pieces: (optional) fronts with a single dart, back, sleeves, collar trim (not shown), (optional) pockets with a slanted opening for easy access.
The optional fronts for the lining don’t save fabric, but you have one dart to sew in each rather than three, and it will be less bulky.
Two pattern versions are given: to print on U.S. 8 1/2″ x 1″ paper, and to print on A4.
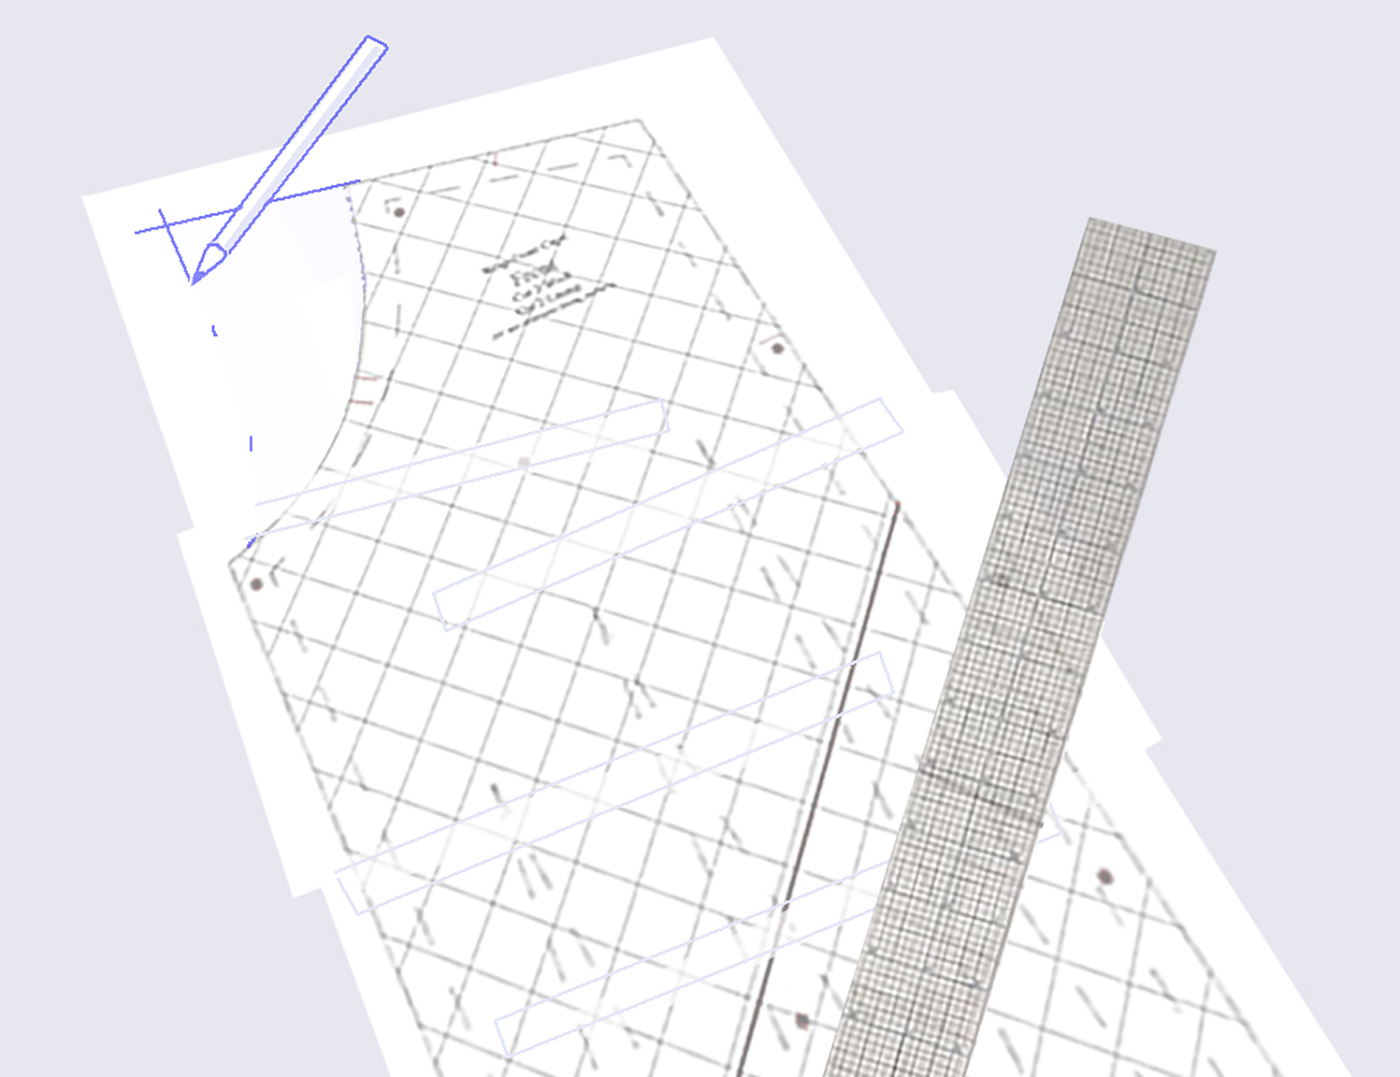
To avoid you having to print stupid blank pieces of paper for the middle bits, pattern pieces have been tipped. The red registration marks are to help you line things up (visible if you print grayscale rather than color).
American Duchess says ”This pattern was cut for a 38” bust. The only adjustment for most sizes will be to lengthen or shorten the front piece that wraps around. The rest of the cape is unfitted, but it may be too large or small in the shoulder area for some.”
“Do I need to alter my pattern?” Here’s a quick way to check, after you’ve downloaded the PDF of your pattern, but before you’ve cut it out.
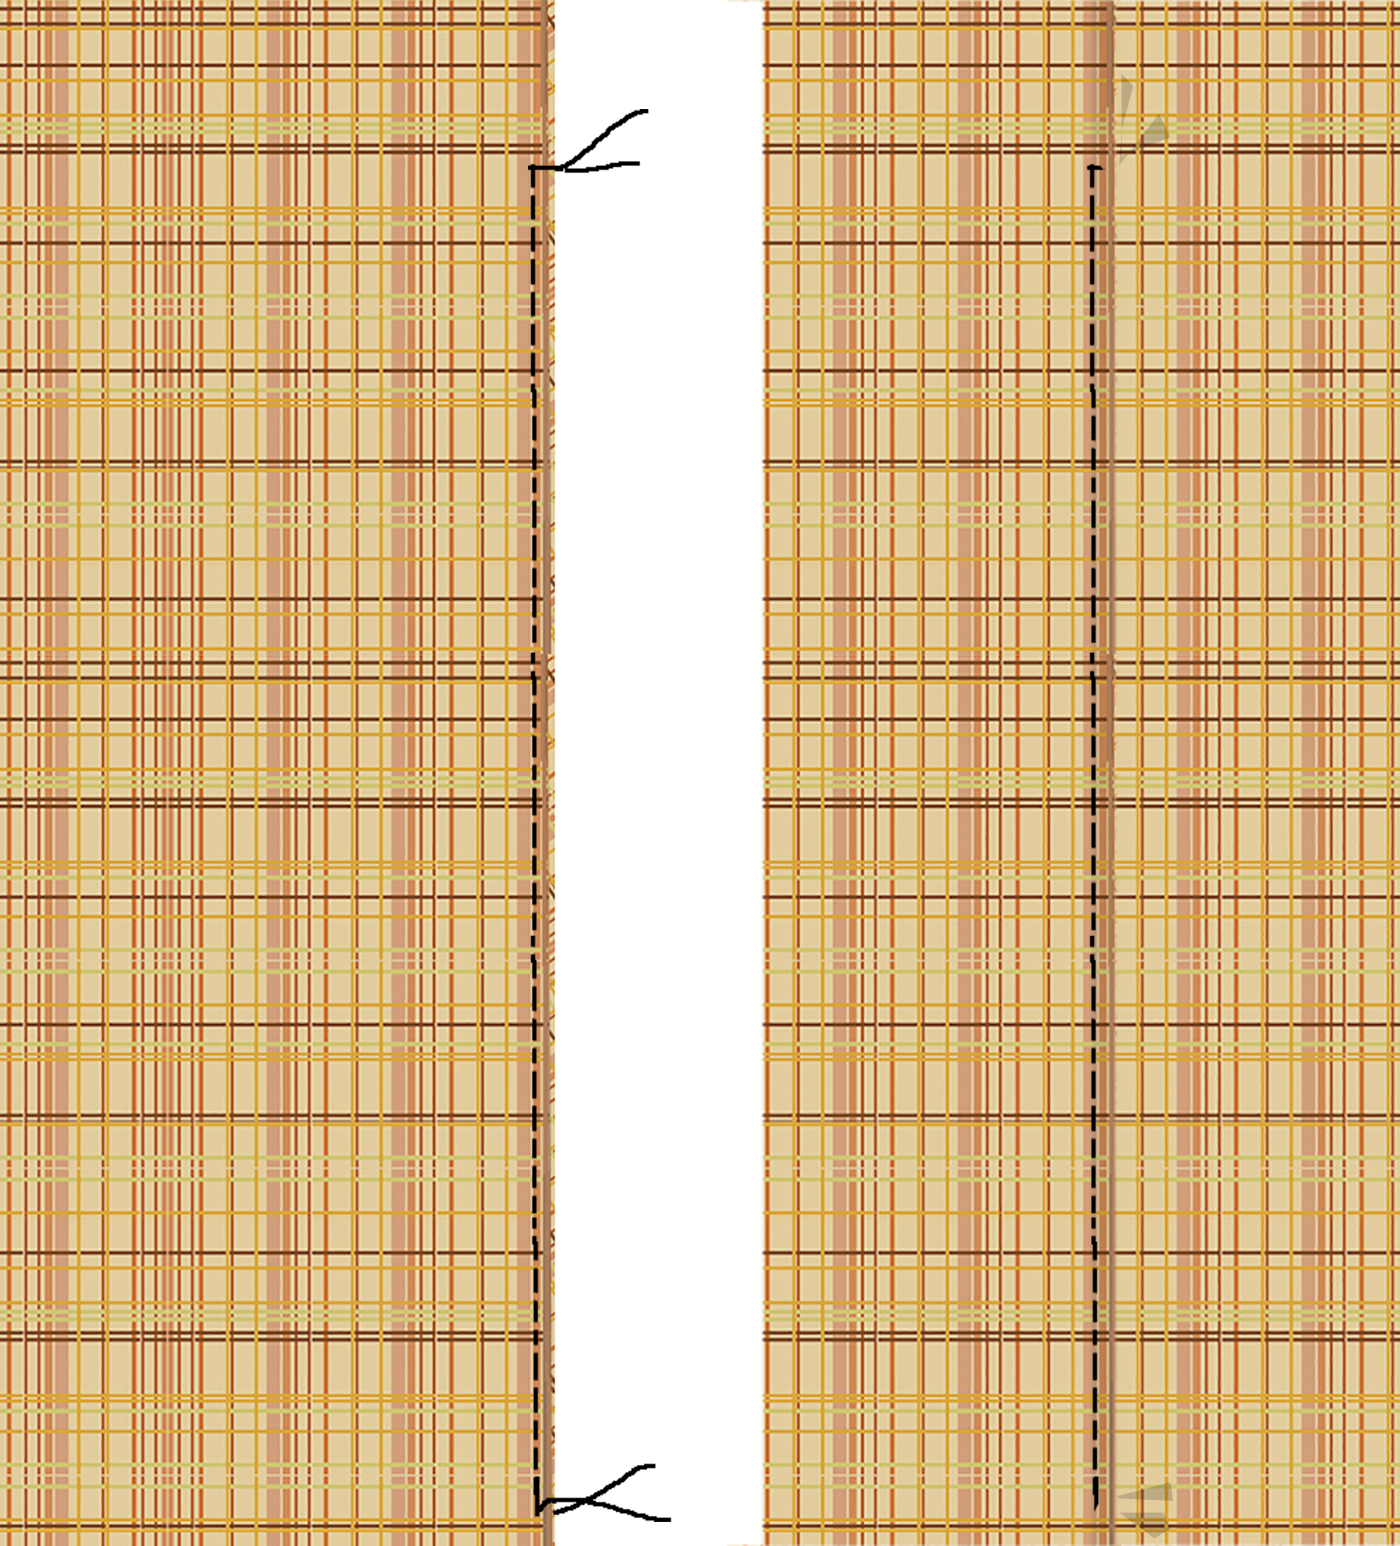
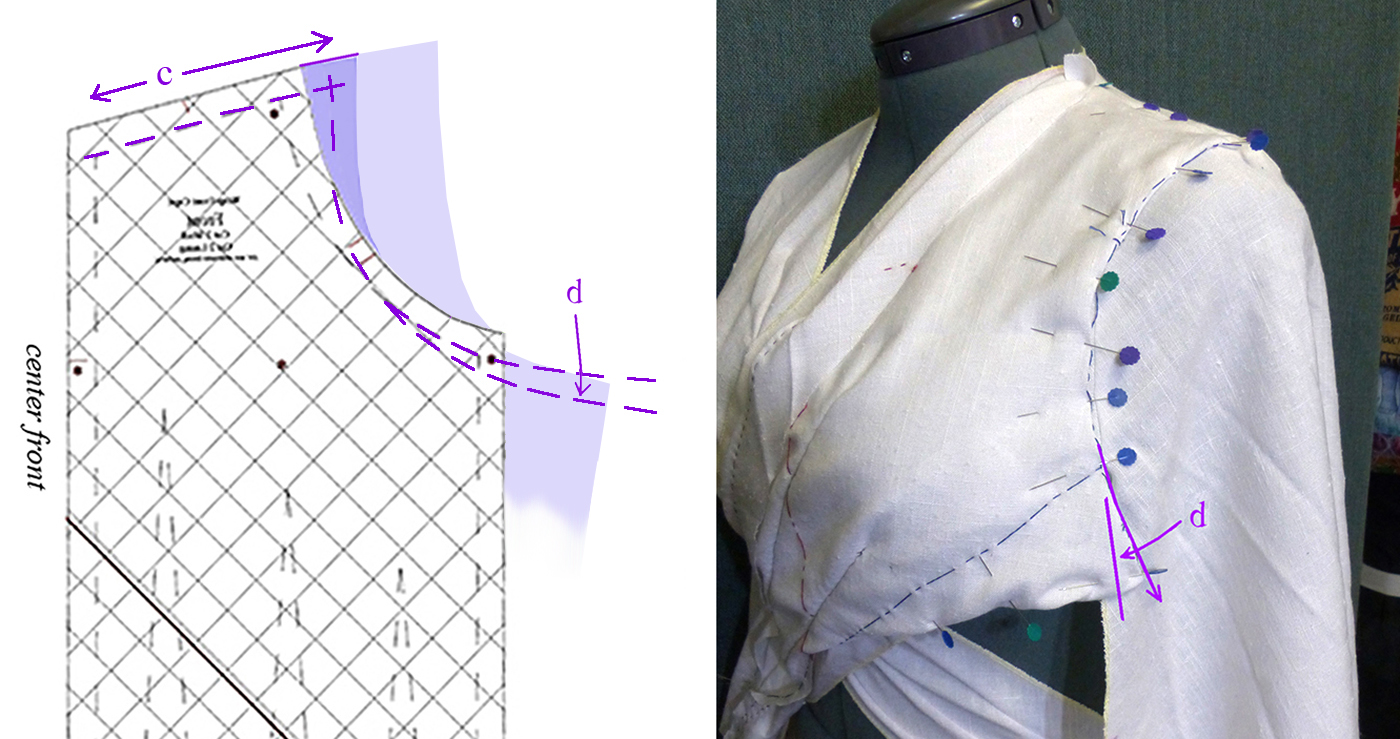
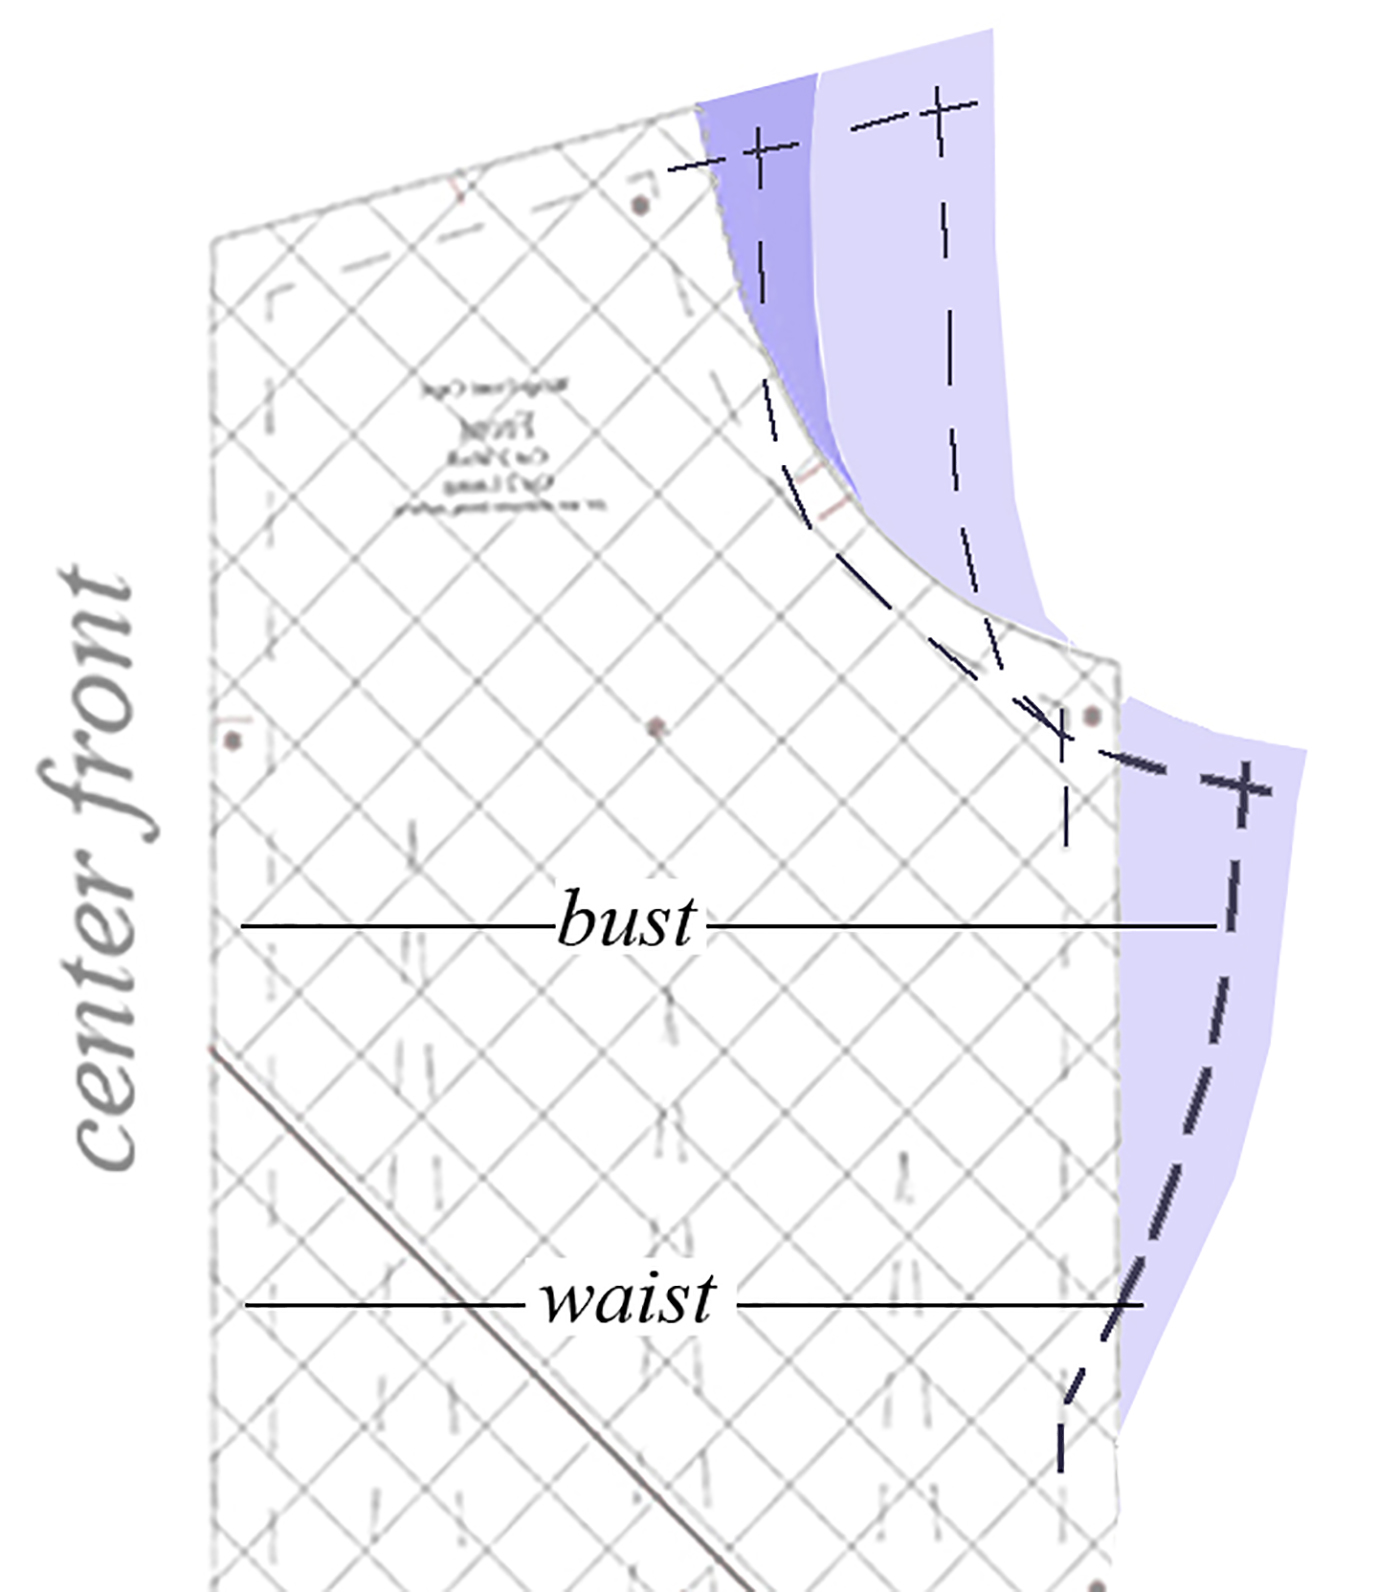
Using a cord or tape, get the length from your shoulder seam on one side of your neck, across your bust, around under your arm to past the mid-point of your back. Compare it to your pattern front piece. The graphic at right has had an extension added.
Here are three sizes of bodies with cape pieces or mock-ups. The black lines are the waist, the magenta lines are the side seam, the aqua is the center back. The middle and right capes need the front wrap extended. You may need to also tweak the shoulder width and the depth of the front arm opening. Alterations are below the main pattern instructions.
Download your preferred paper size of pattern. Trim blank paper edges as necessary and tape the pieces together, using a straight edge to help with alignment. If you are larger/have a longer torso, do not trim to size until your modifications have been made. Seam allowances are 5/8″ // 1.5 cm and (honestly) the dashed sewing lines are guidelines only – I was teaching myself as I went. The cutting lines are accurate; space over from them as your sewing reference. Seam allowances for the hood are 3/8″ // 1 cm.
Make any changes before cutting out your pattern pieces.
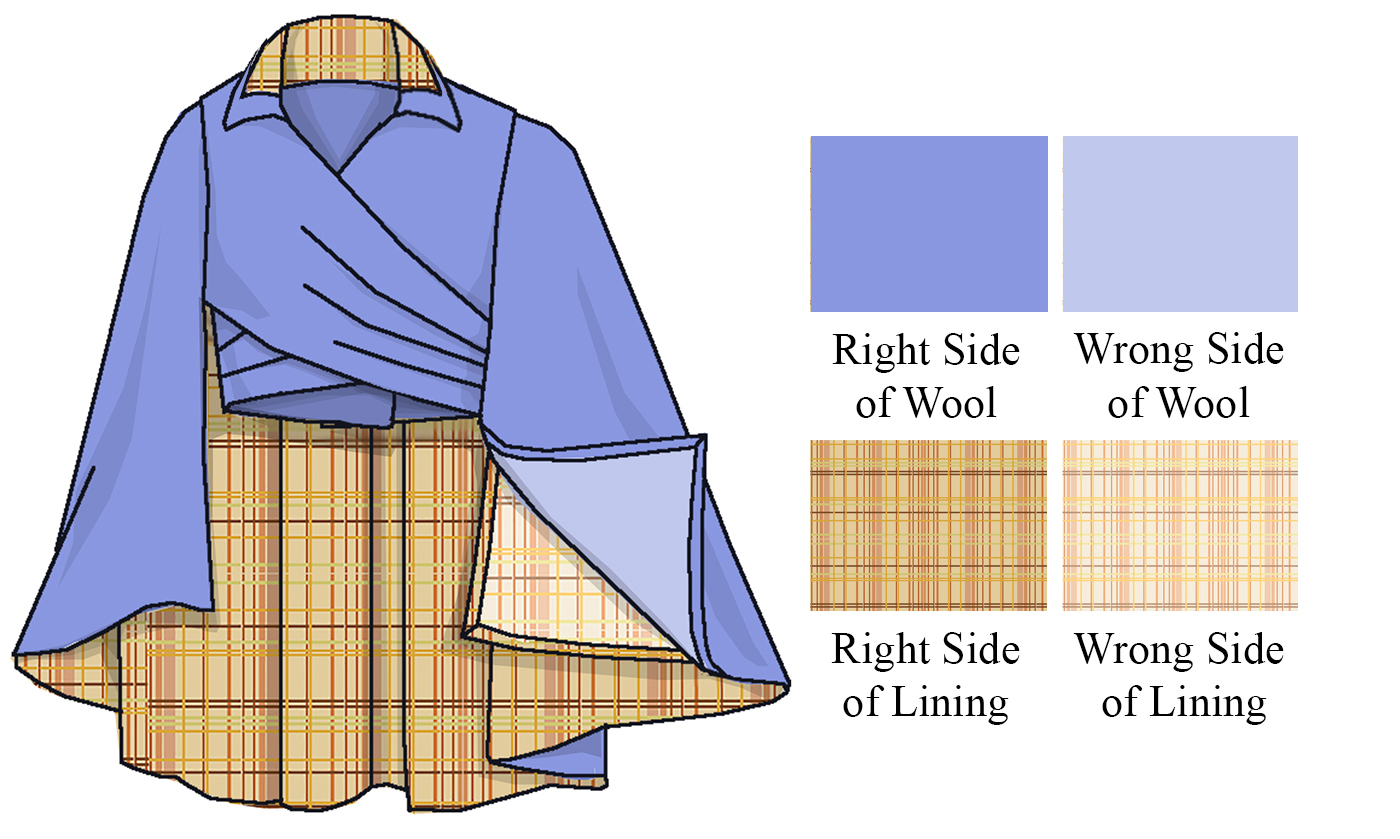
The original uses wool for the exterior fabric and a contrasting wool for the lining. If you instead use a typical lining fabric for the interior, American Duchess recommends either not doing the accent on the collar or finding a small piece of contrasting fabric.
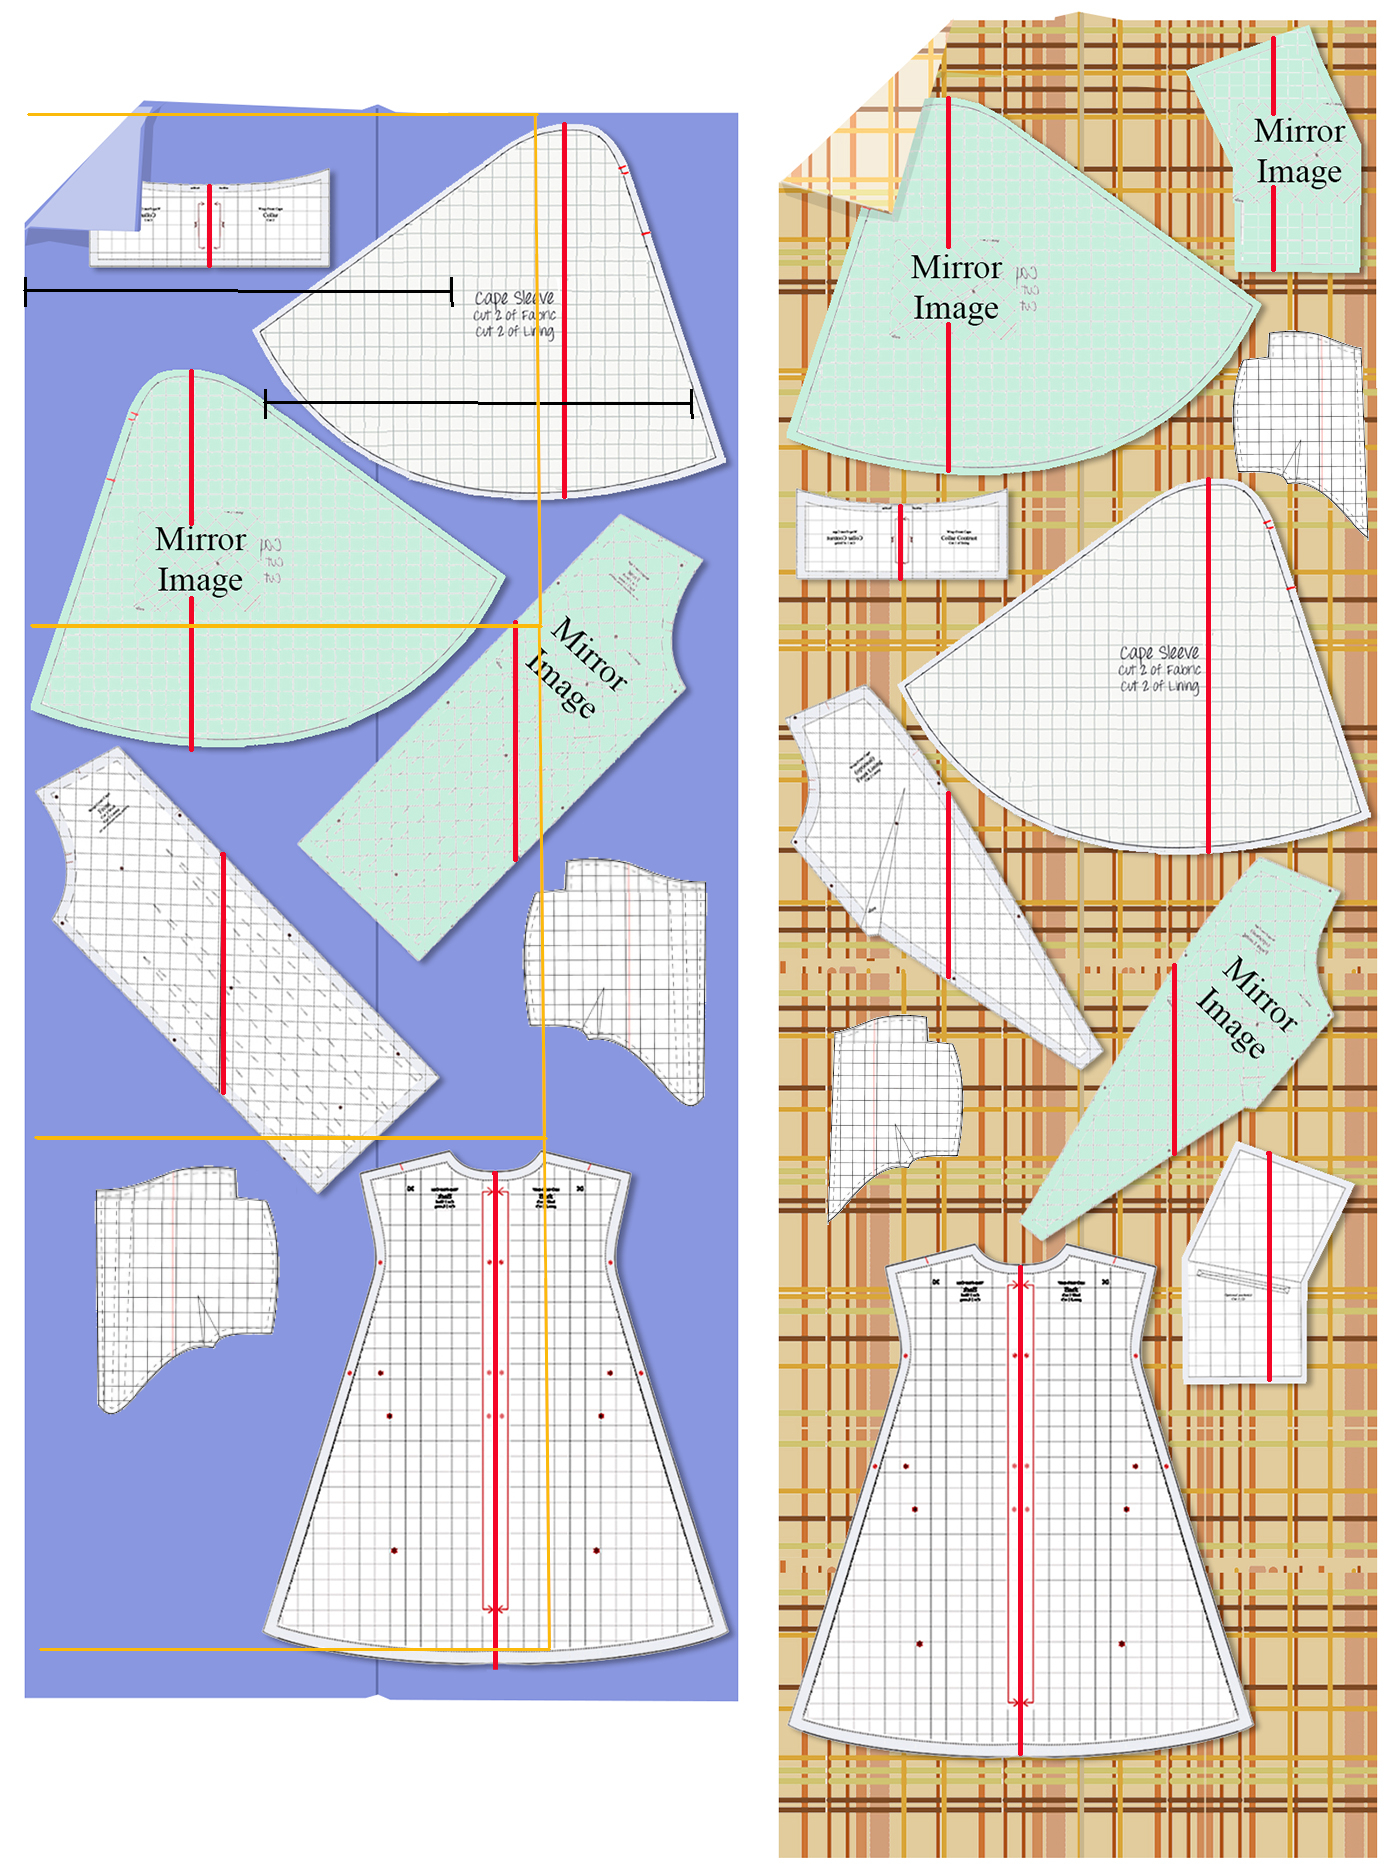
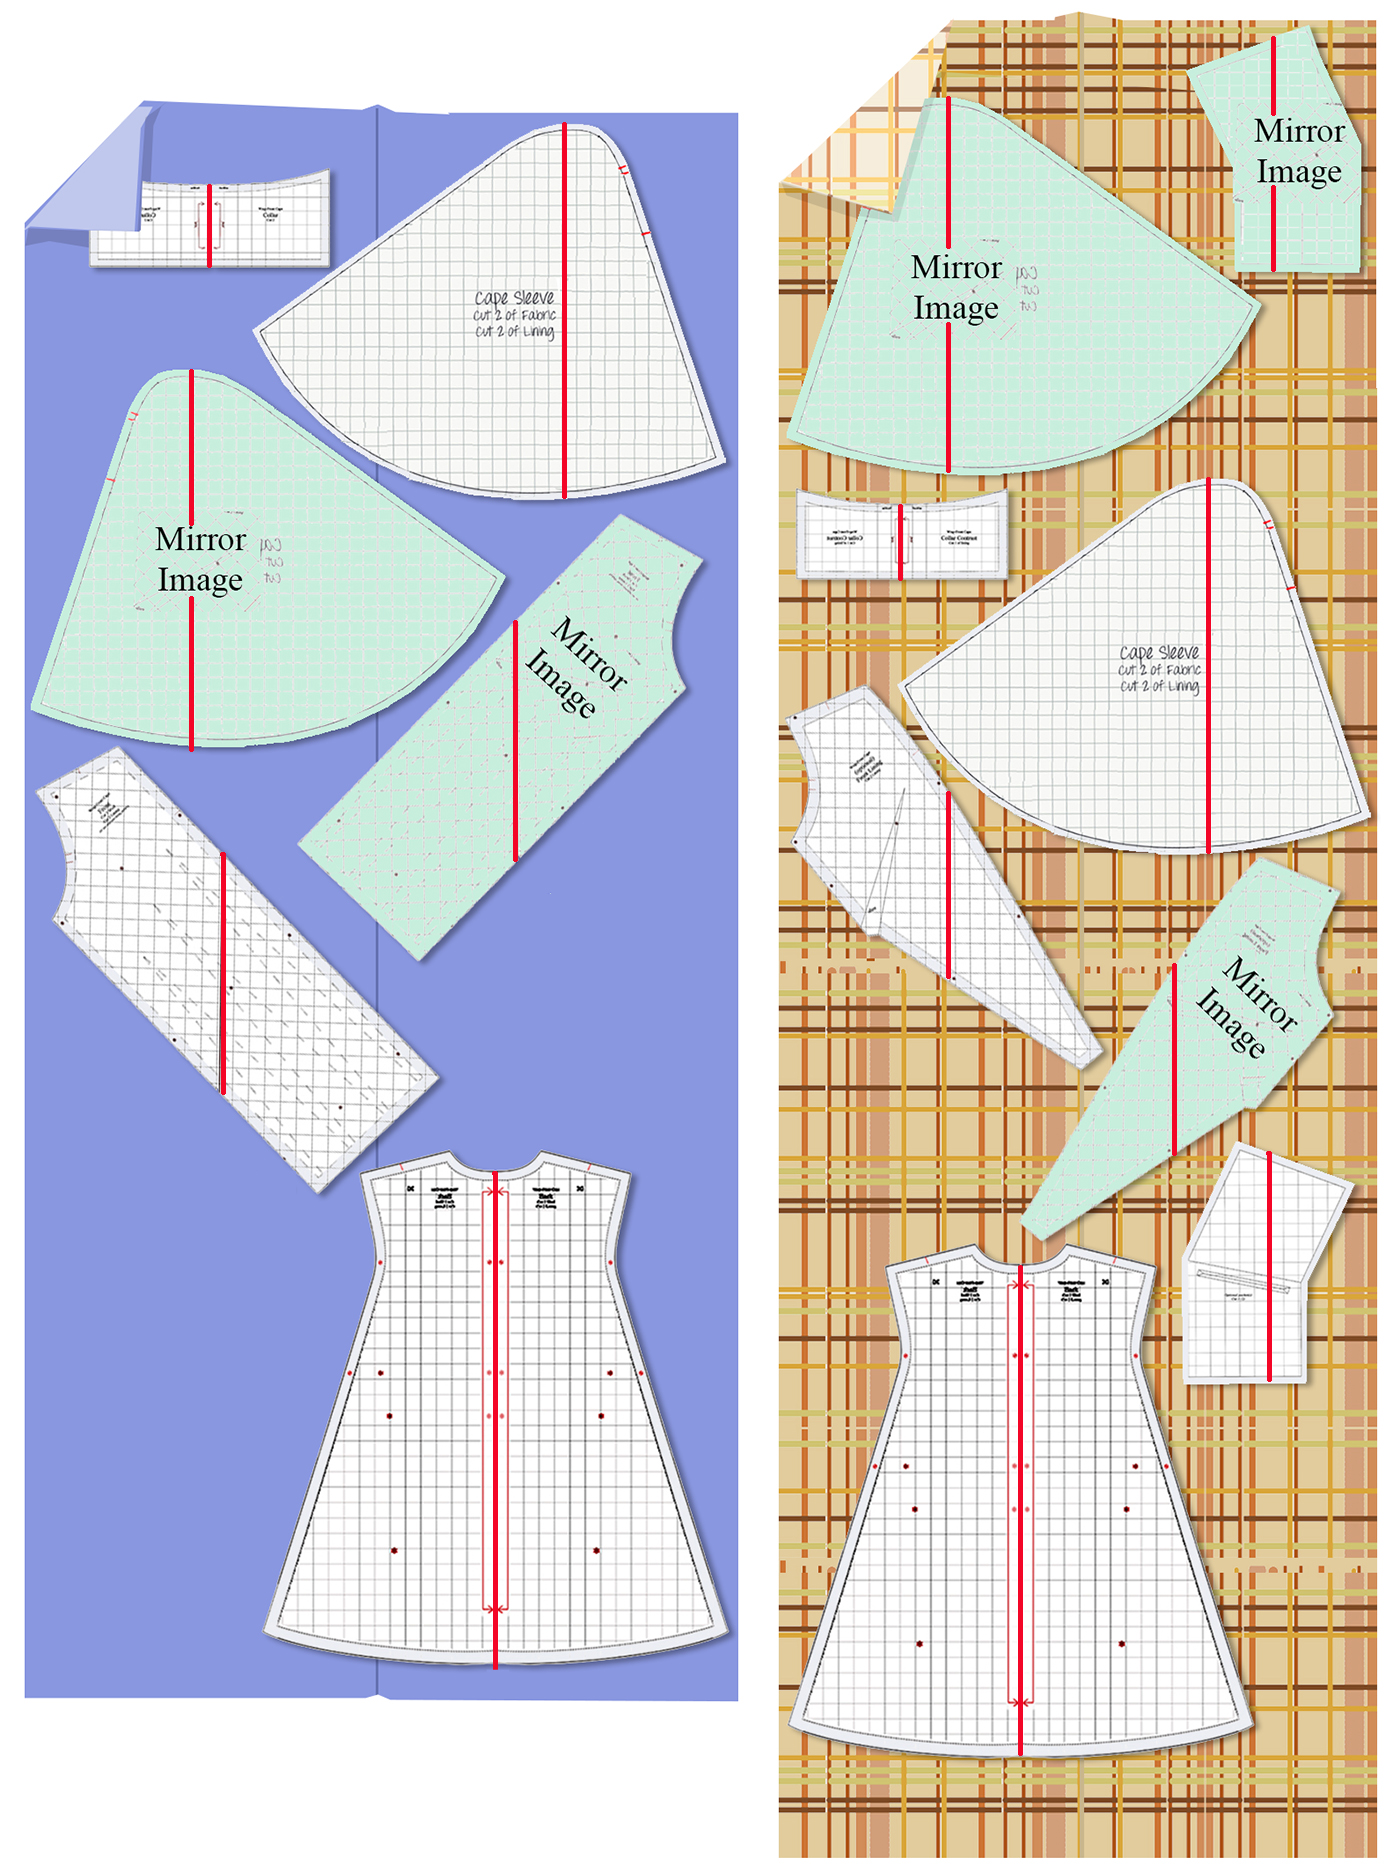
Preshrink (or dry-clean) your fabric before laying out the pattern single layer (not on the fold). Be sure you mirror the fronts, pockets and sleeves (hood if used). Use a nap/directional layout. The grainline is important; if not followed the cape may twist on the body, and the hem will hang out unevenly.
3 yards of 54″ wide fabric (if you scooch the pieces a little tighter).
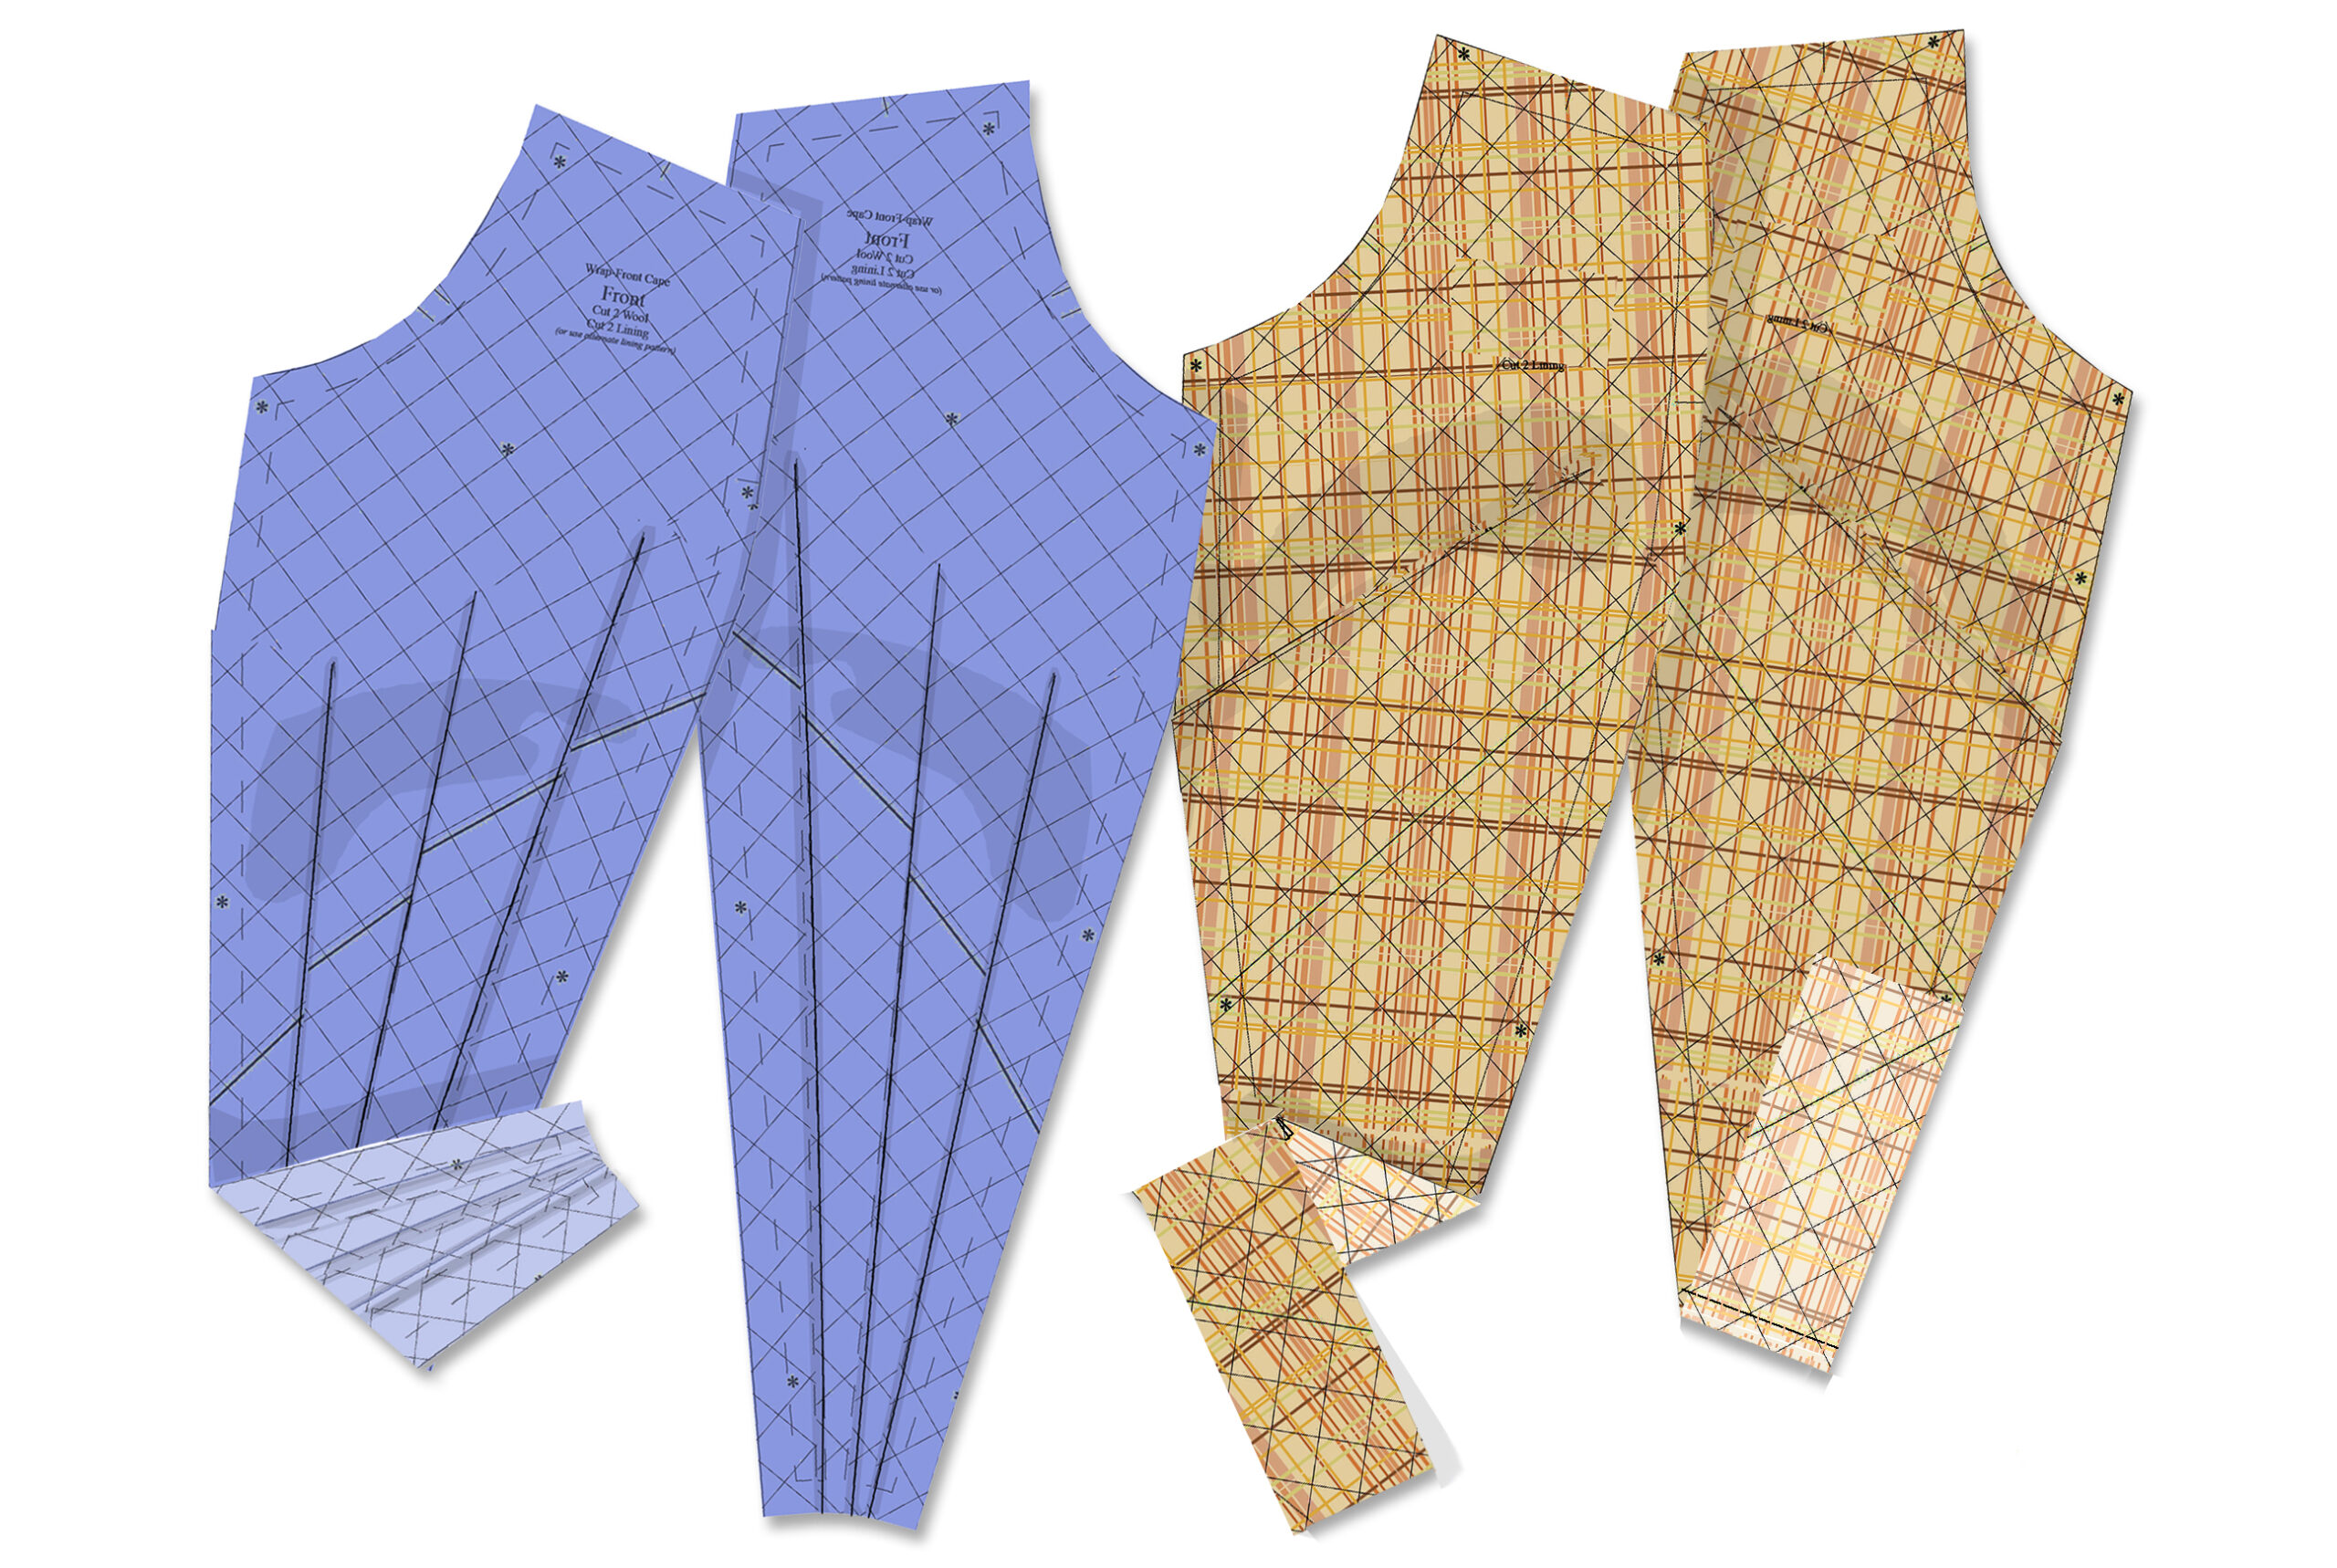
Sample layouts for your wool and lining (use either the wool fronts or the optional ones for the lining)
These widths are 54″ // 137 cm and 44-45″ // 112 cm
This shows that 3 meters are needed for the cape and its hood out of 137 cm // 54″ wide fabric
Overview
Lay out everything before cutting. Large pattern pieces, some of which are on the bias, are going to take more fabric. It may be worth wasting paper to make a duplicate set of pieces (clearly labeled!) Your layouts will depend on the widths of your fabrics and the actual working pieces (i.e. with any modifications).
DO NOT BE TEMPTED to tip pieces to get a tighter layout! It isn’t worth wasting your investment in materials and your time. How many years are you planning to wear your cape?
Be sure your sleeves, fronts and pocket pieces are mirrored. You only need one set of fronts.
Cut out all pieces. You do not need the collar and its trim if you’re adding a hood. Add a front extension if you need it.
Interface collar pieces and the welt area of the pockets with a lightweight fusible.
Press each seam as sewn and then again if the fabric is manipulated further. This saves time as it makes the following steps much easier. It also results in a superior finished garment.
Stay-stitch any curved sections with a shorter stitch a few threads outside the sewing line, i.e. in the raw edge seam allowance. This keeps from stretching out the pieces when manipulating them and from the weight of the fabric. The old school method stitches the back (for example) in two sections from the shoulder seam towards the center back, overlapping a few stitches.
Mark the darts on the front pieces. Sew, starting at the raw edge and angling off the point. Clip the “point” threads at 1″ // 2.5 cm and leave the ends. They’ll be inside the finished cape and won’t unravel.
Trim dart folds to 3/8″/ 1 cm and press down.
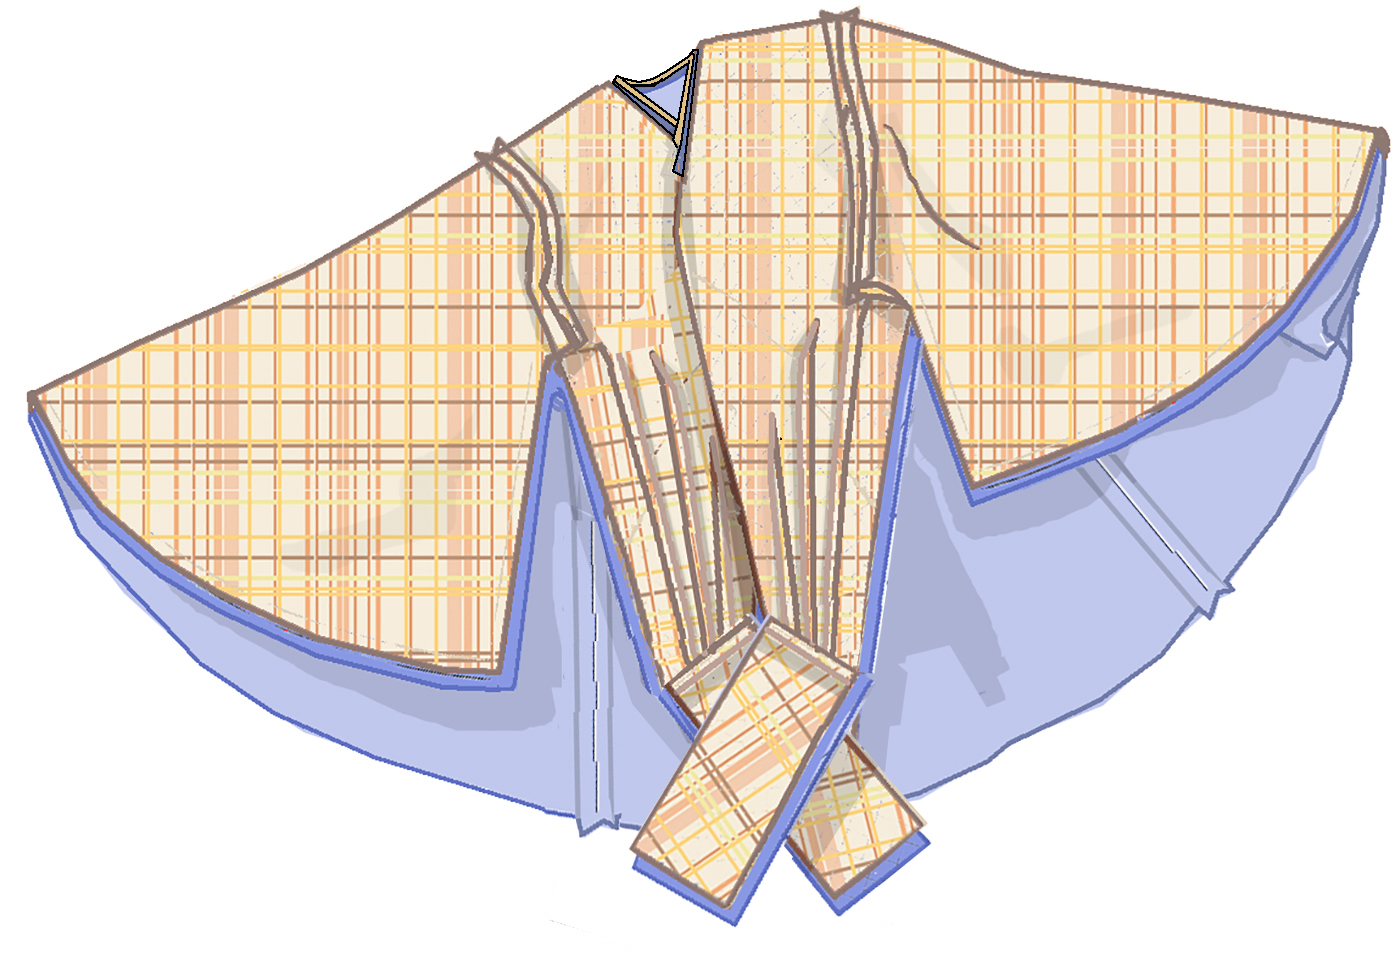
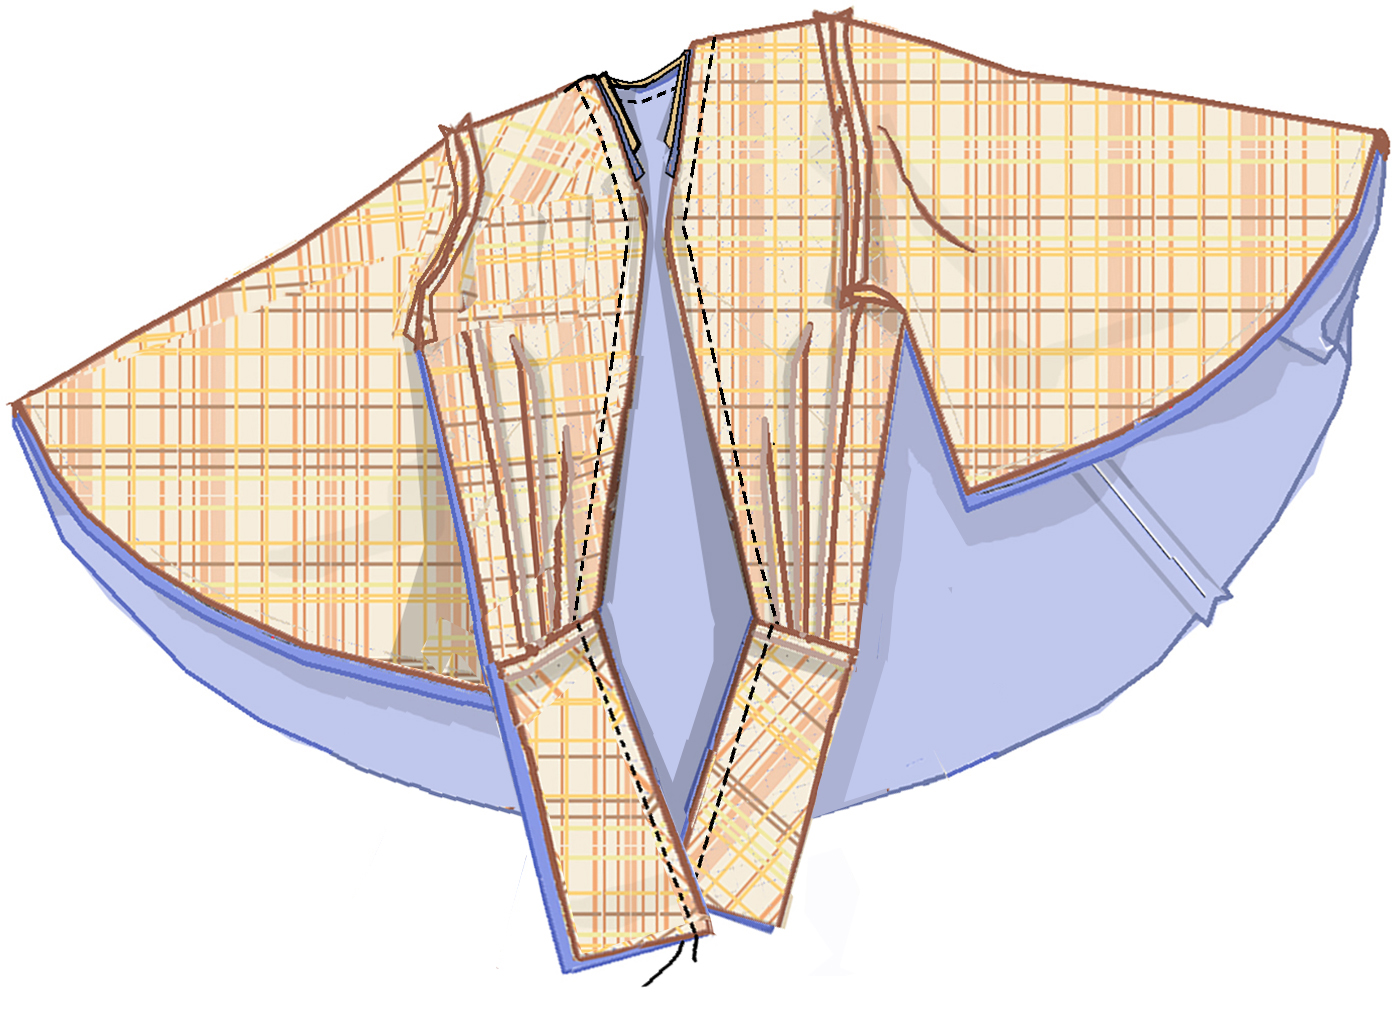
Your four front pieces. If you need the front extension for wrapping around your back waist, add it now (shown in lining). See the alterations section below.
Lay the wool fronts on the back, right sides together. Stitch the shoulder seams. Repeat for the lining.
Interfacing for collar and pocket welt areas
Fuse interfacing (recommended: lightweight tricot) to the wrong sides of both collar pieces, a rectangle over each of the pocket welts (refer to pattern), and on the collar contrast piece. Set aside.
Optional Pockets
This is one of the simpler ways to make a welt pocket; as they’re on the inside in the lining and won’t show, it’s a good chance to learn/practice. A single welt (as for a jacket breast pocket) is made the same way, the only difference is that in laying out the pattern, all of the welt-wrap business comes from the bottom, rather than being split between both sections.
Welted pockets can be any size and shape. These are fairly wide and deep. Note: the allowances are generous as the thickness of pocket fabric will vary. Don’t worry if your raw edges don’t come out the same when the final fold happens: what’s important is the the welt lips are crisp and even. You can trim the extra if you want: it’s going to be inside the pocket and any extra adds stability.
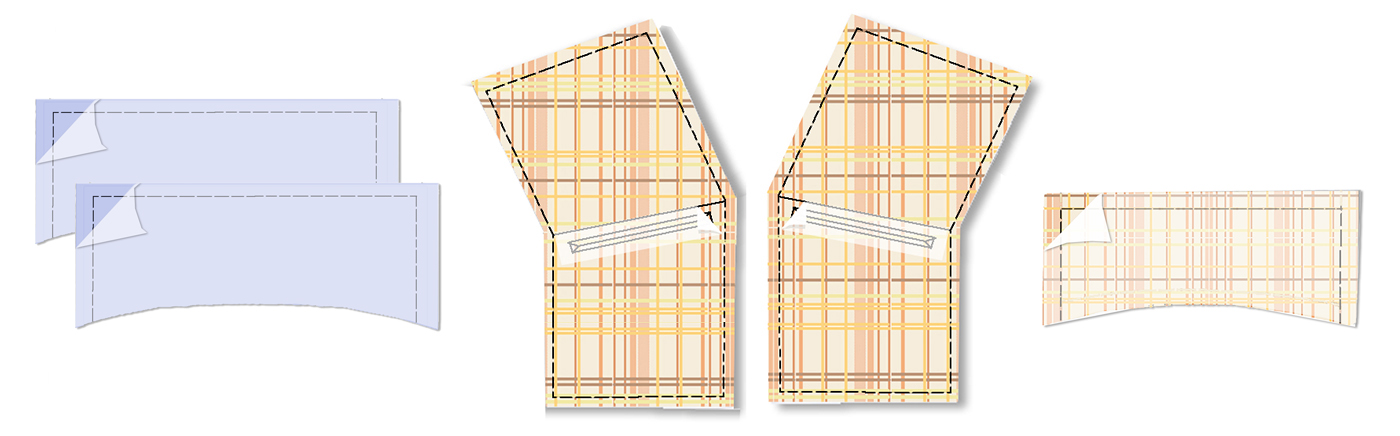
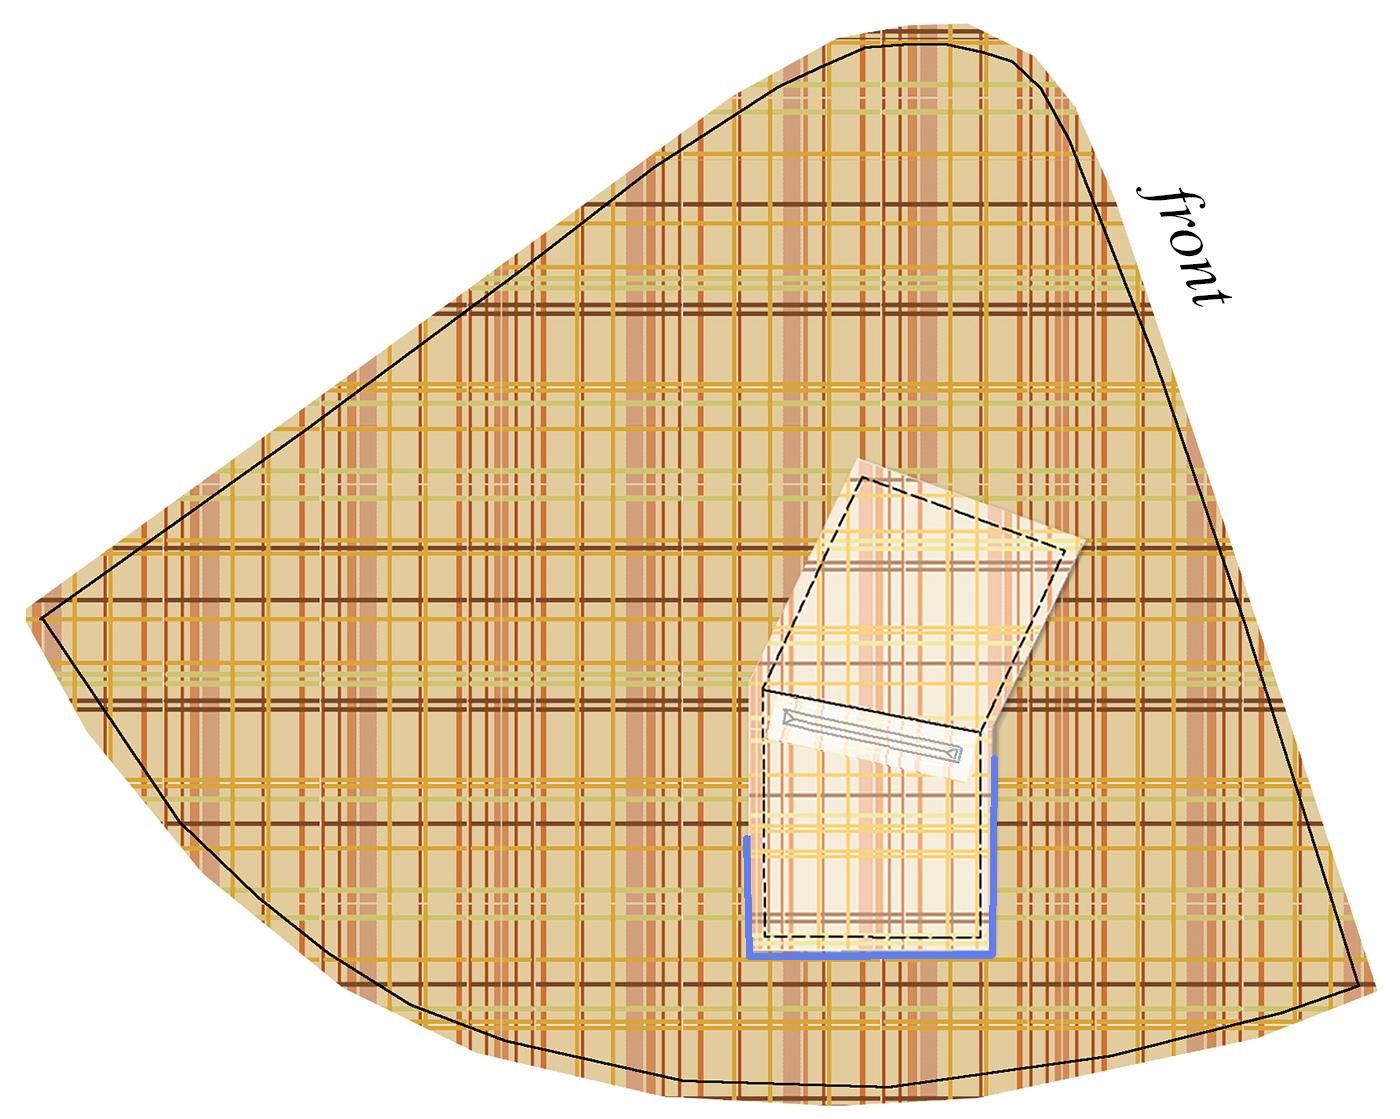
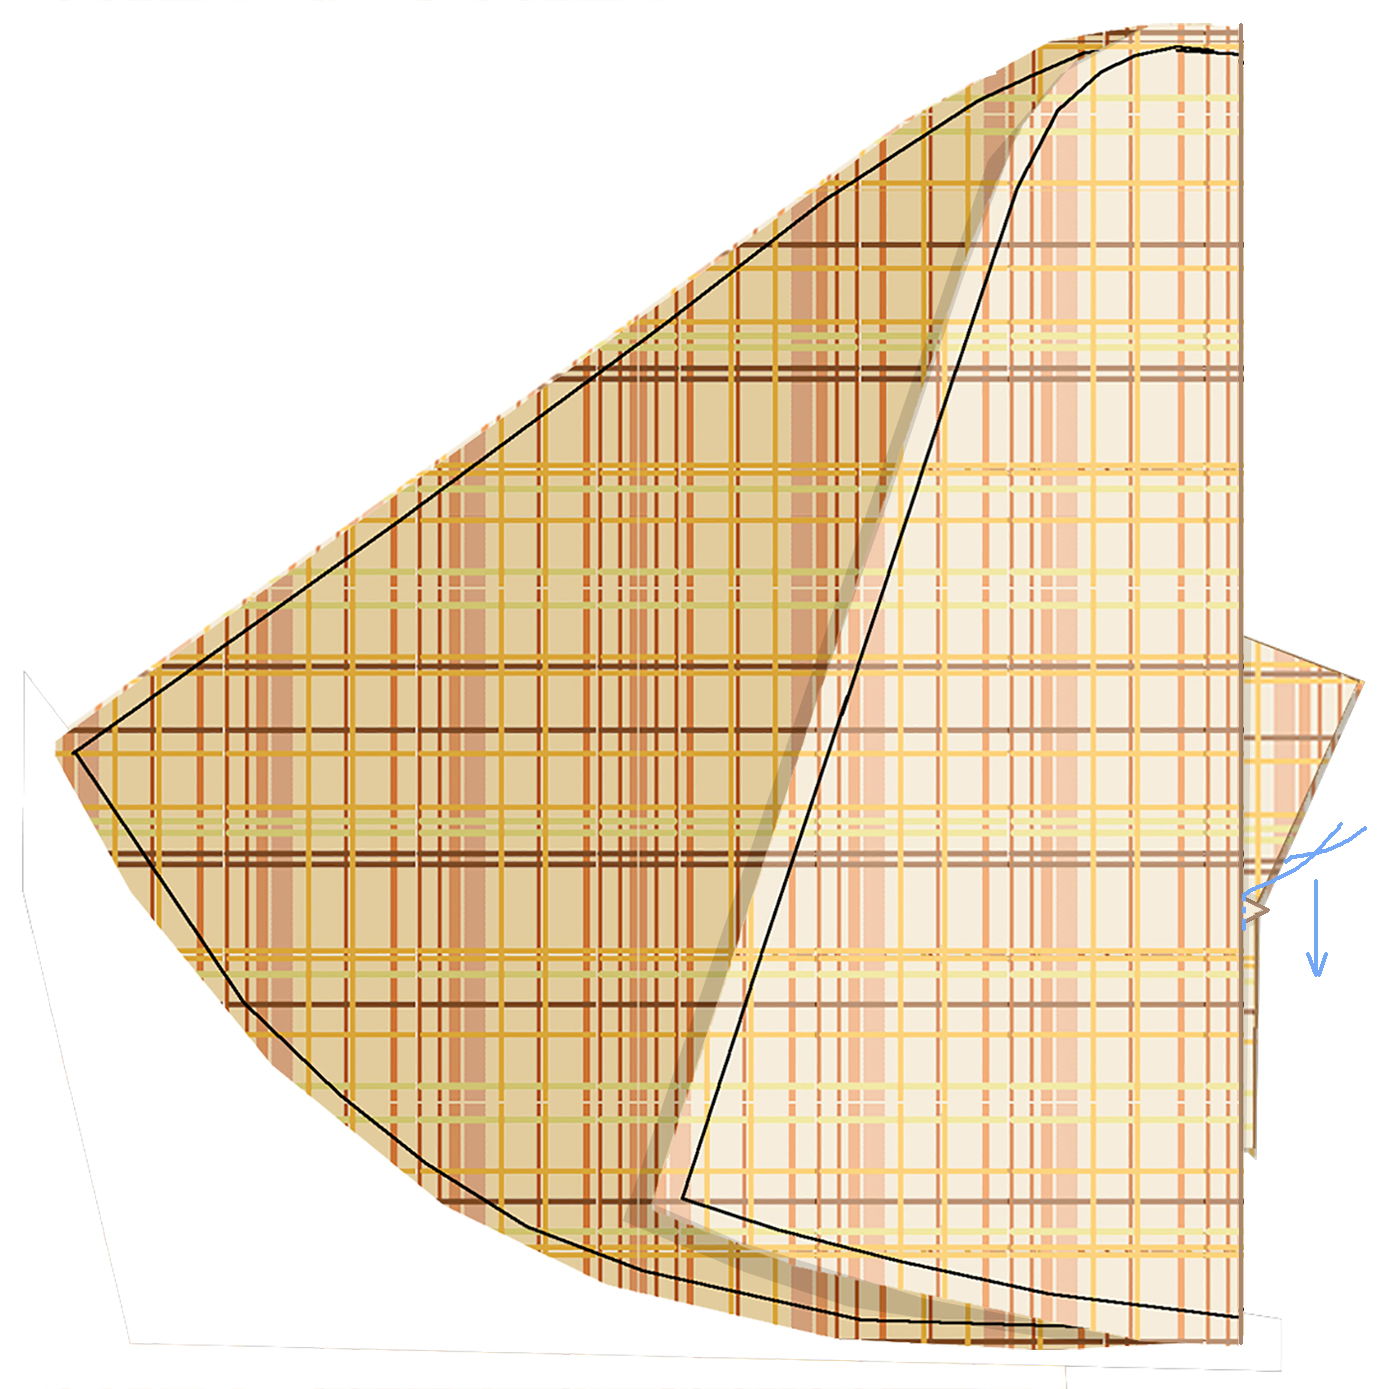
Using the sleeve pattern, chalk (or otherwise temporarily mark) the lower edge of the pocket on the right side of the sleeve lining. Align a pocket piece right side down. The upper diagonal section goes toward the front.
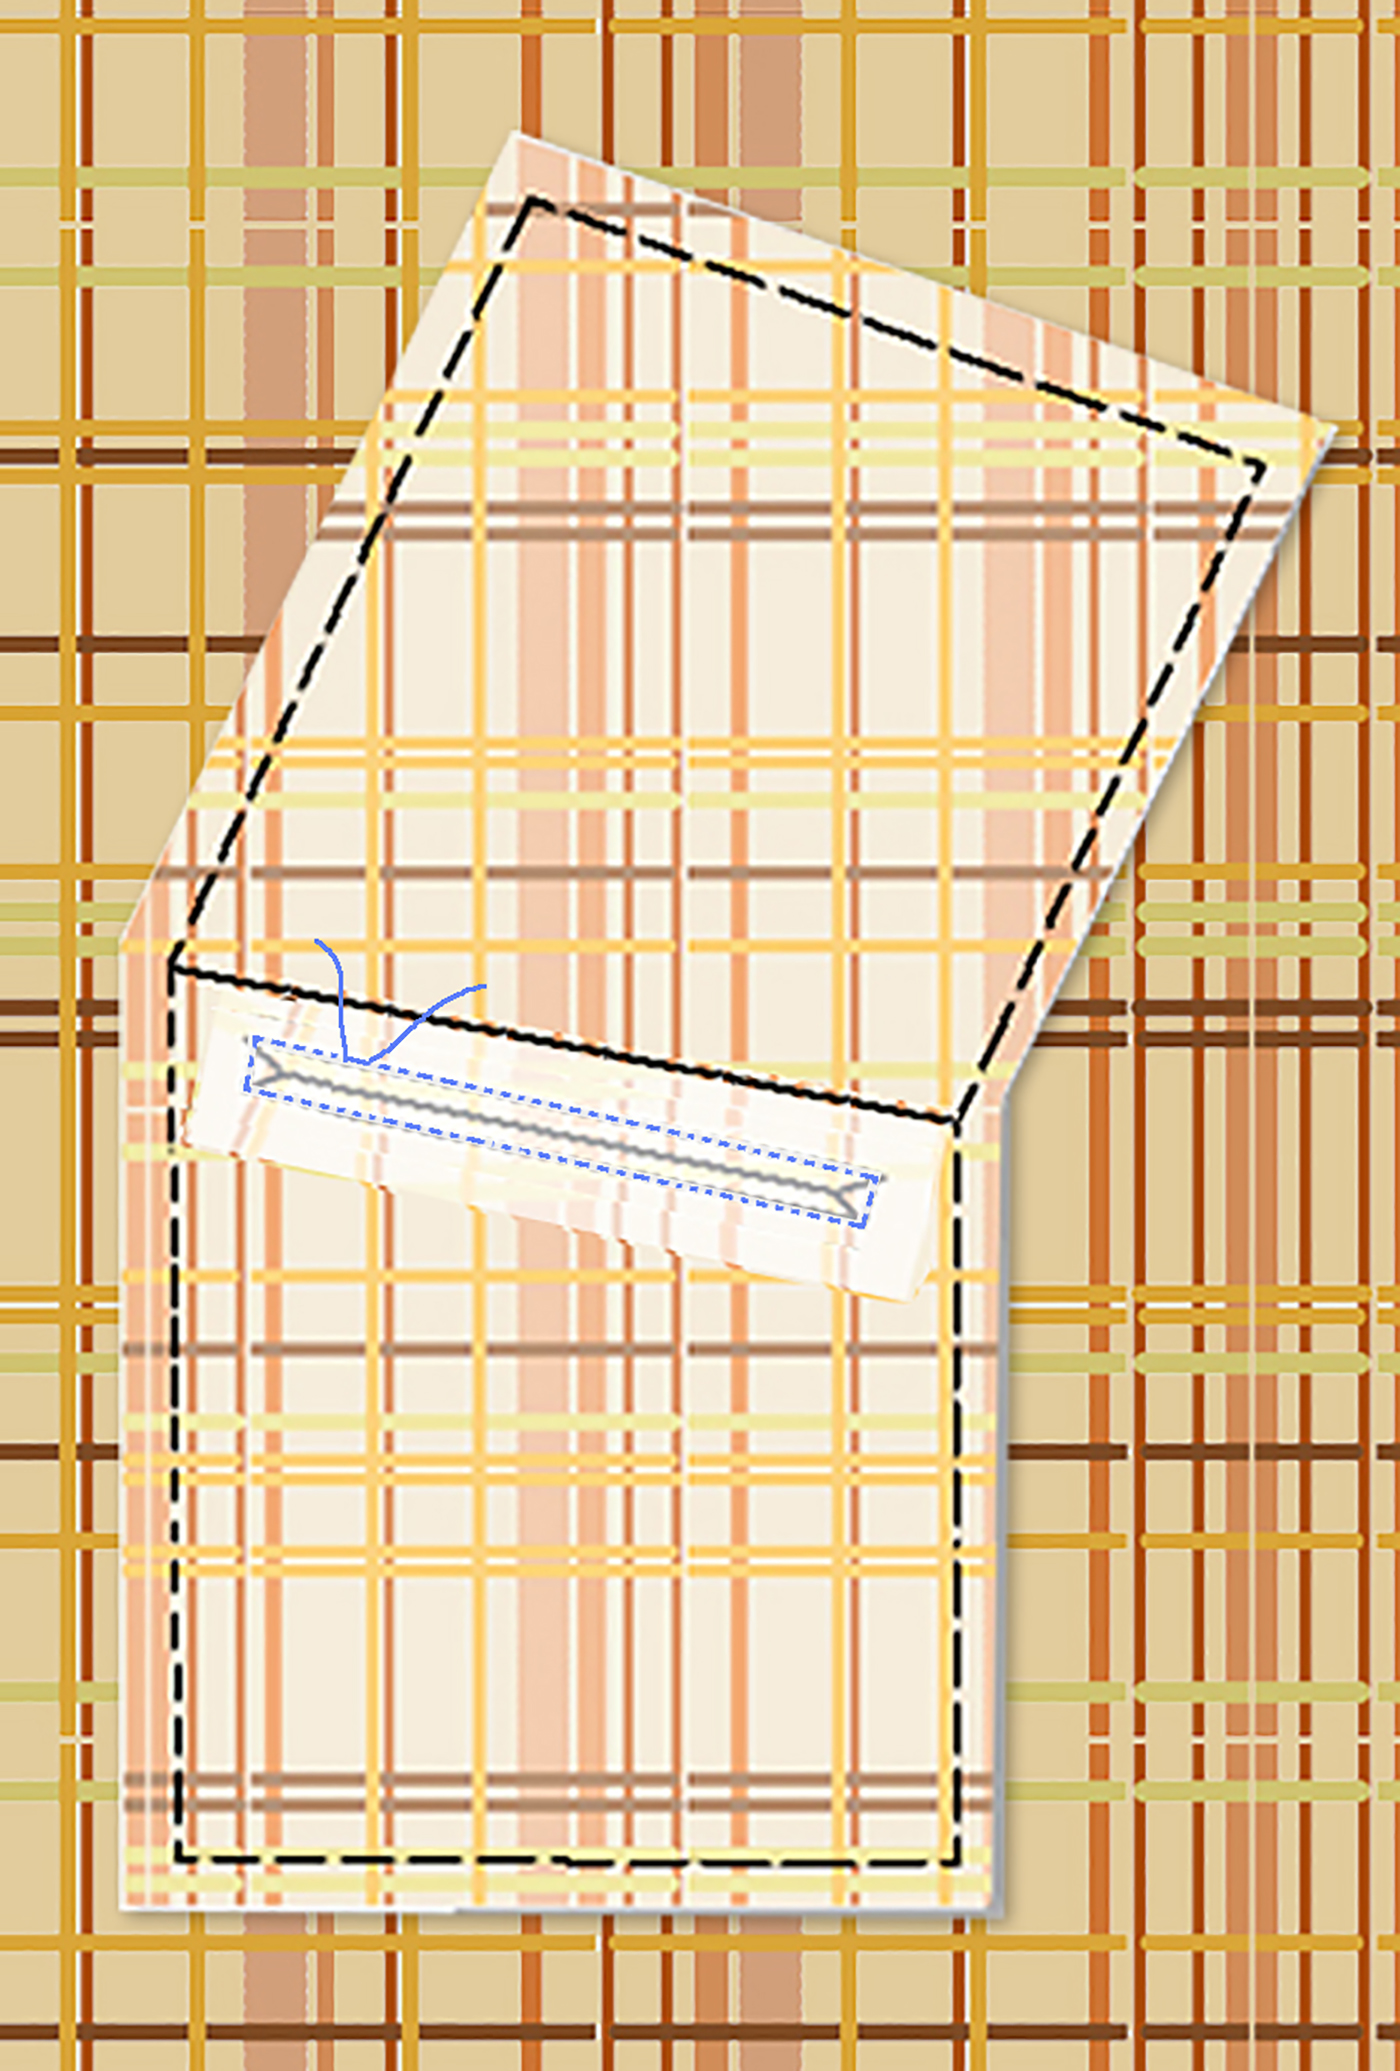
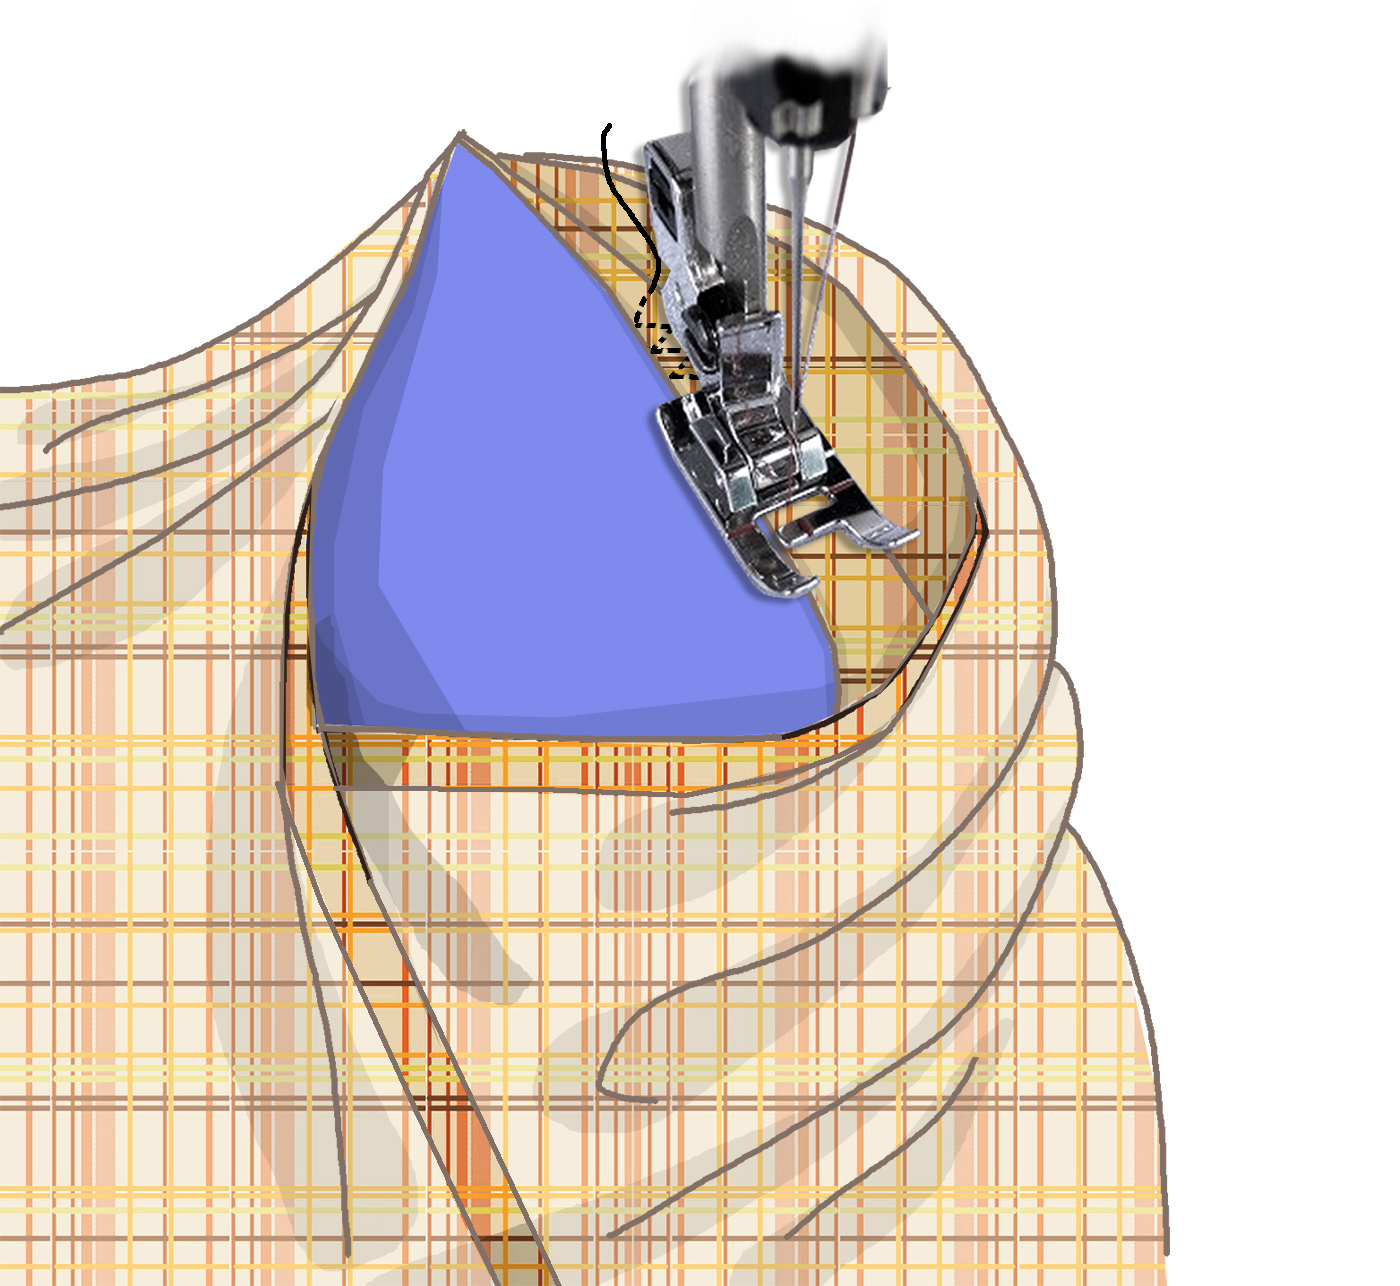
Sew the welt box with short stitches: begin in one of the long sides, sew to the corner, put the needle down, raise the presser foot, pivot; count the stitches across the short end and repeat. Overlap by a few stitches.
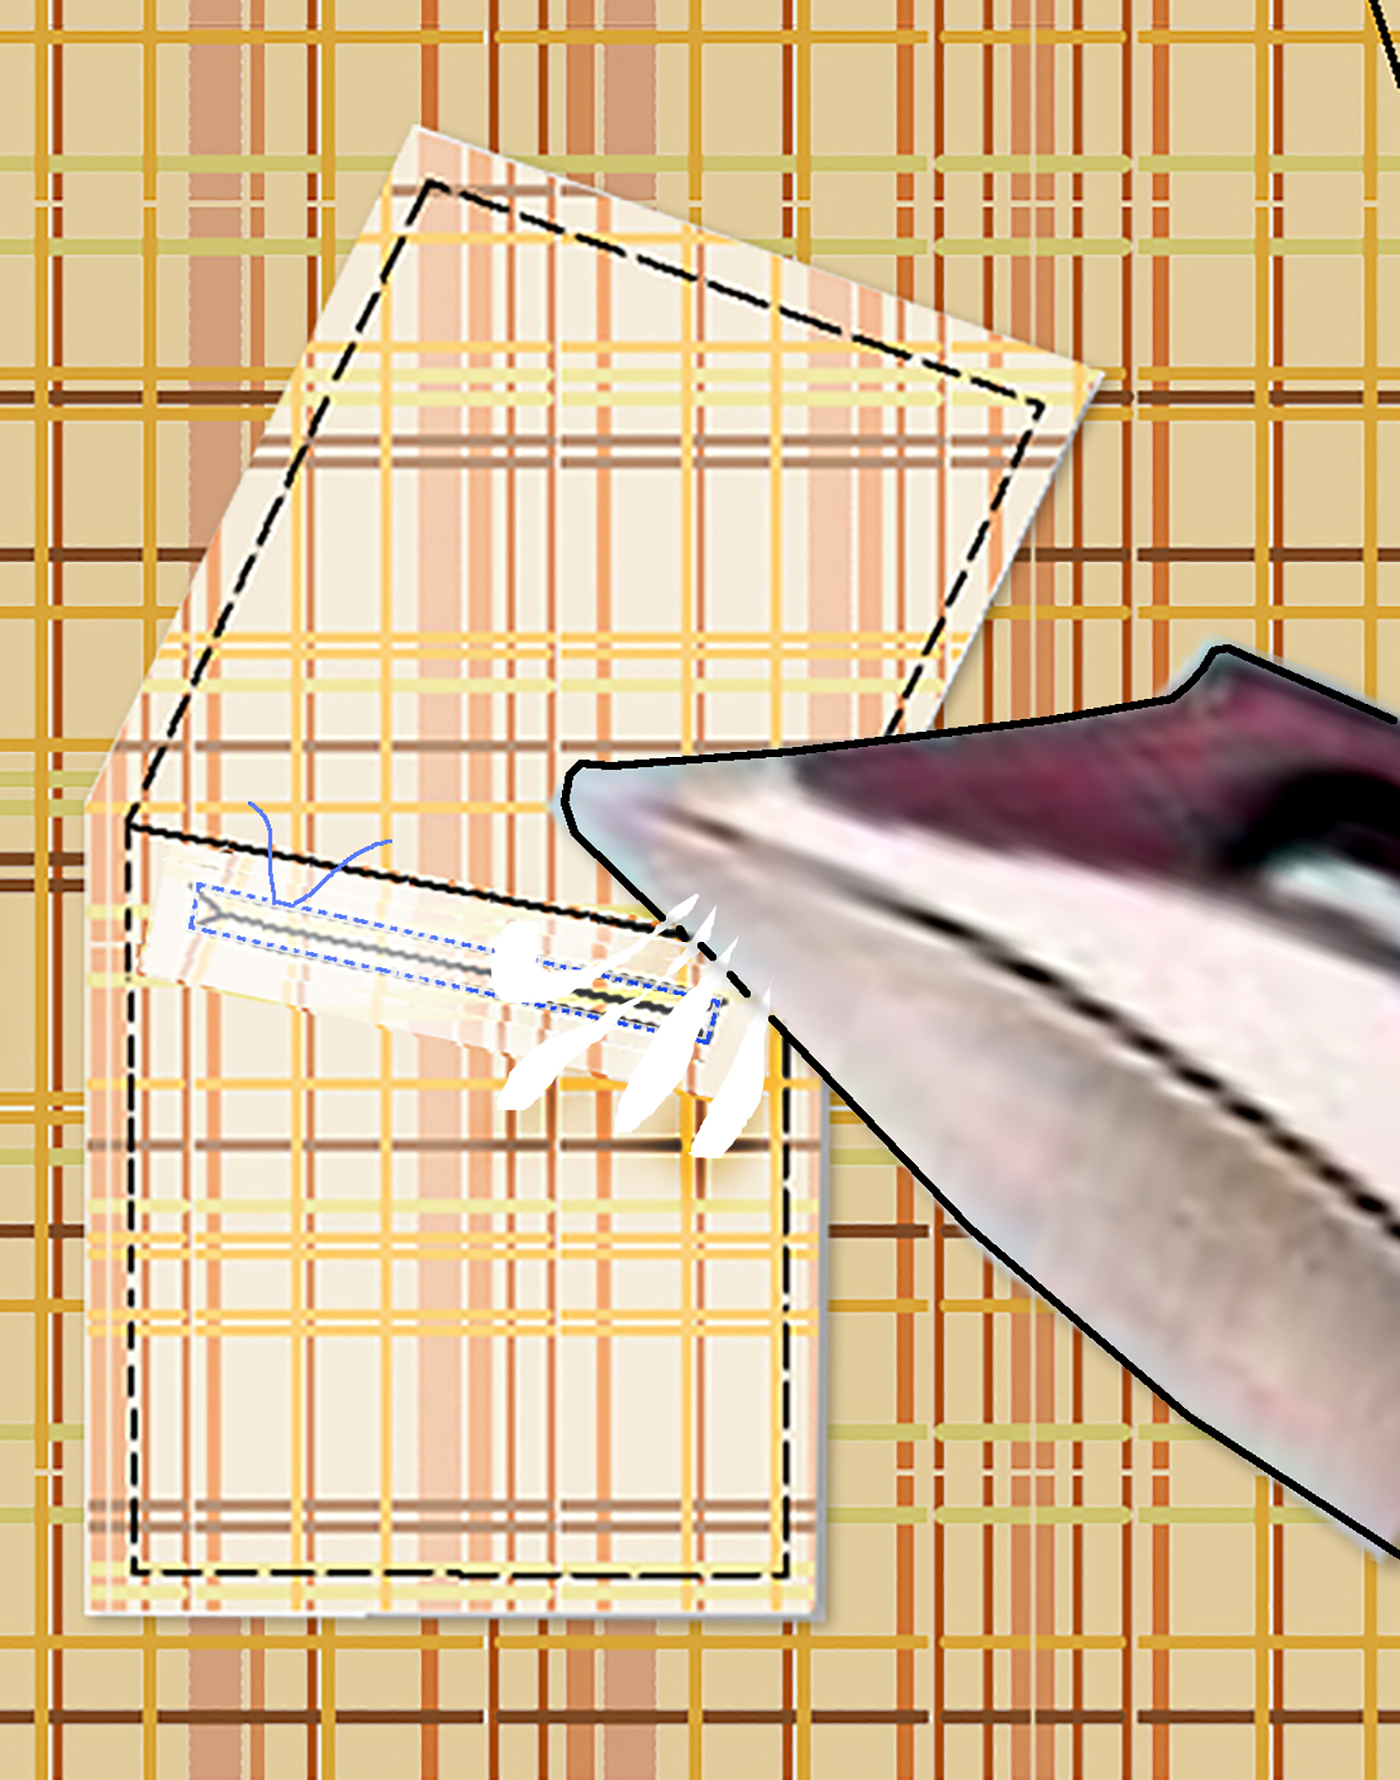
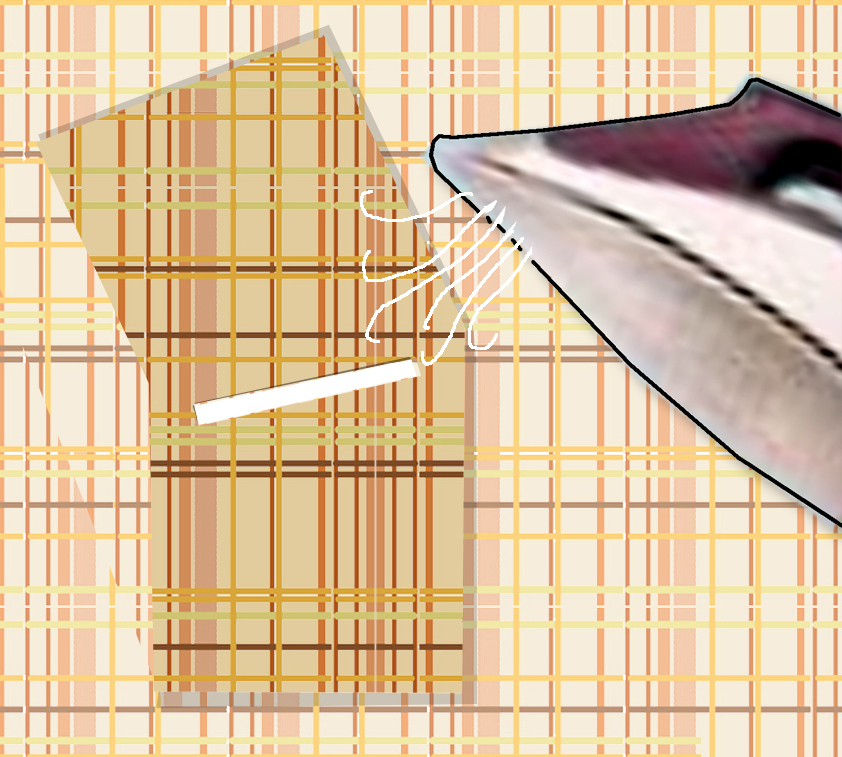
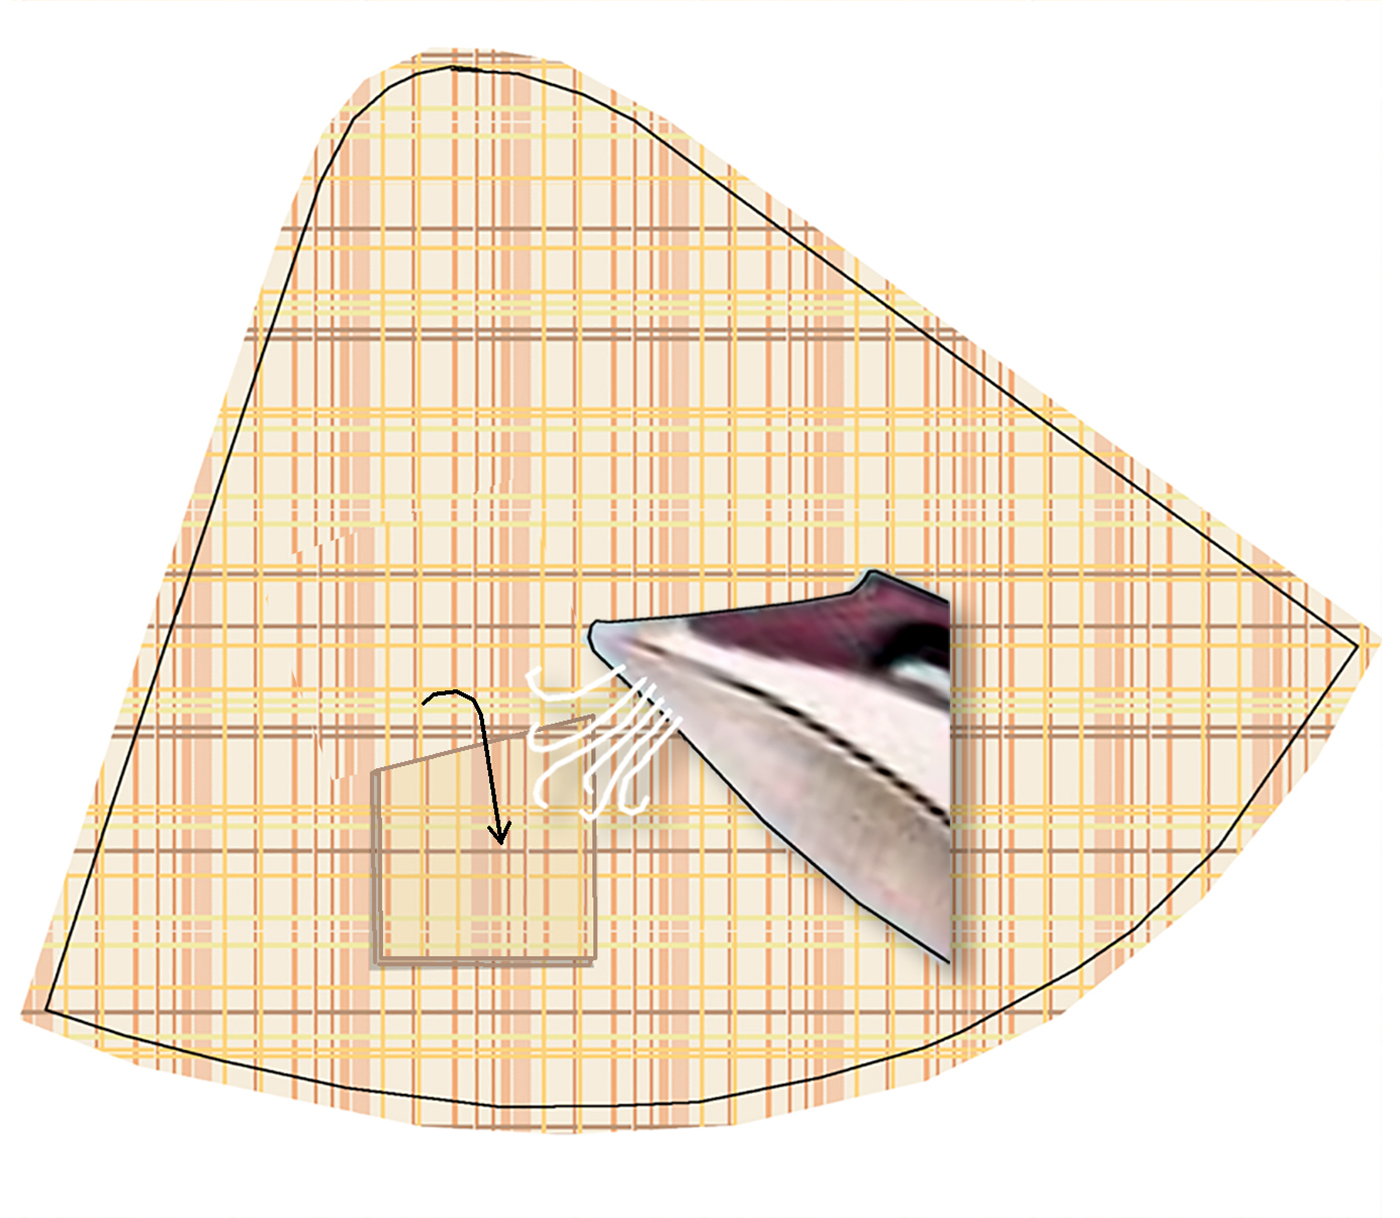
Press the welt to embed the stitches.
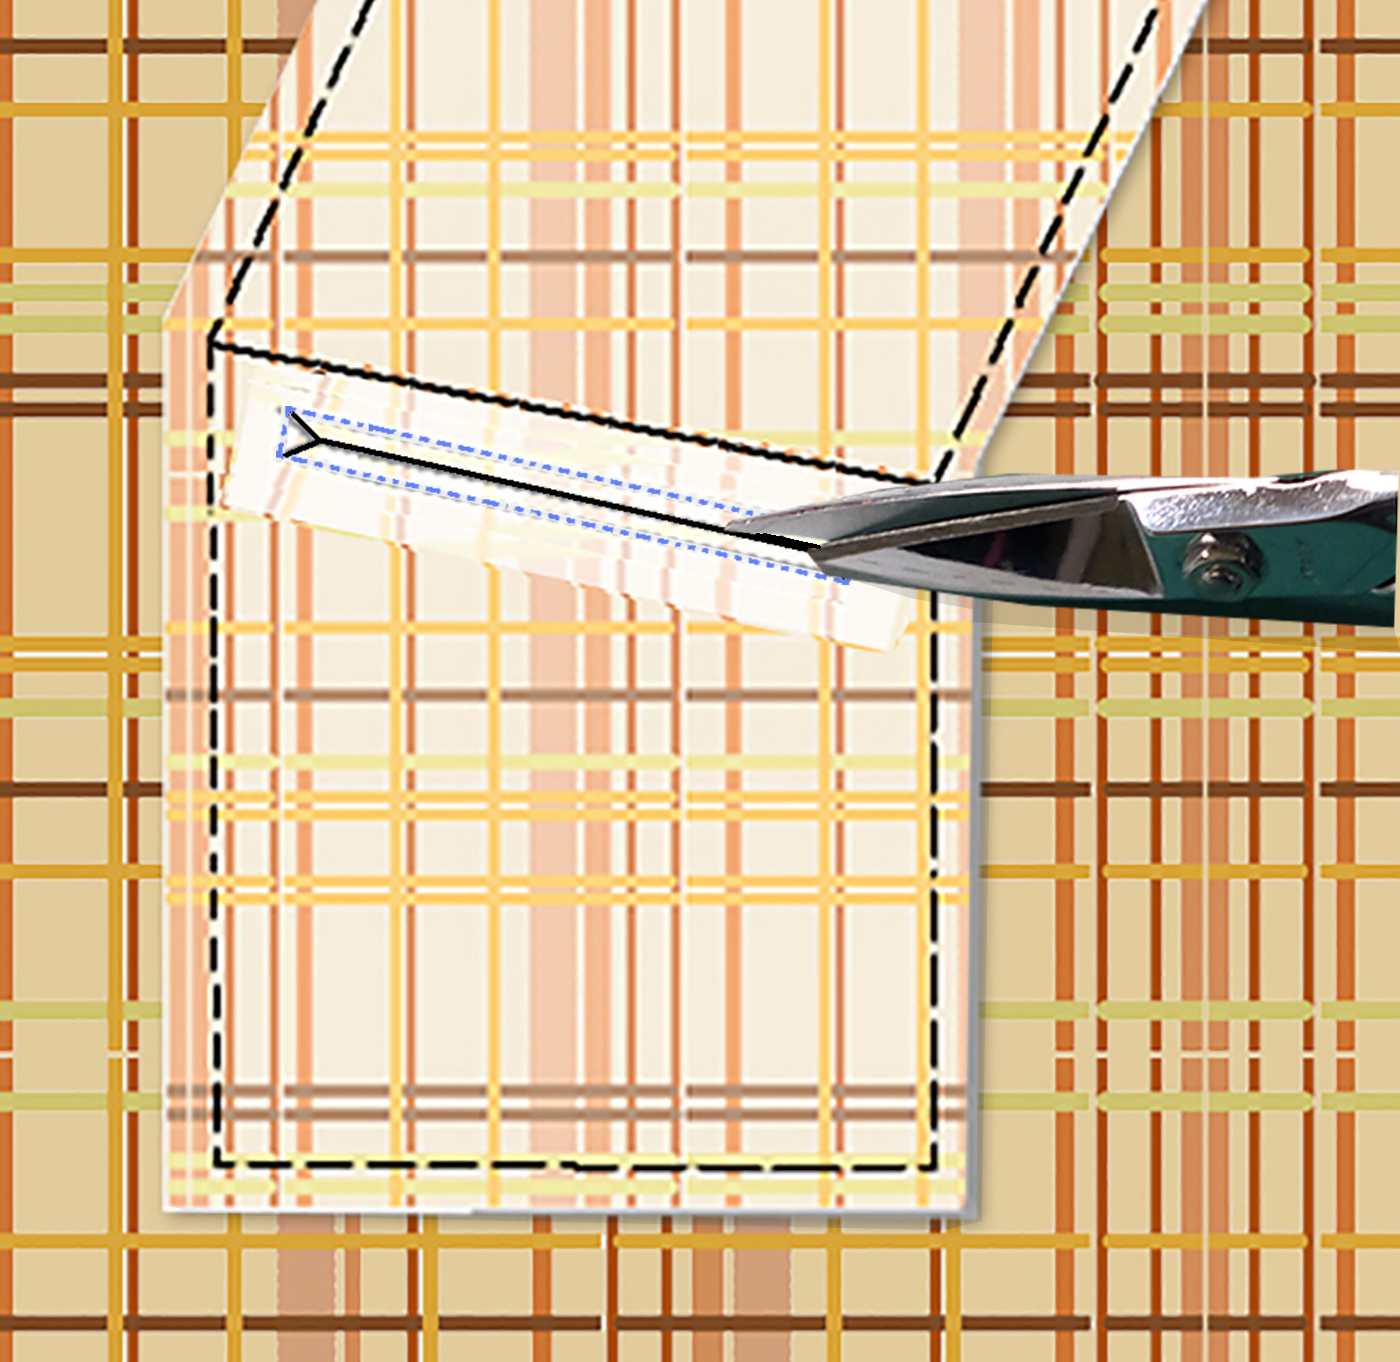
With sharp scissors, cut open the welt, closing the blades at each snip. The center will support the lips of the welt, so get the cut right in the middle. Angle the ends to within a few threads of the stitching.
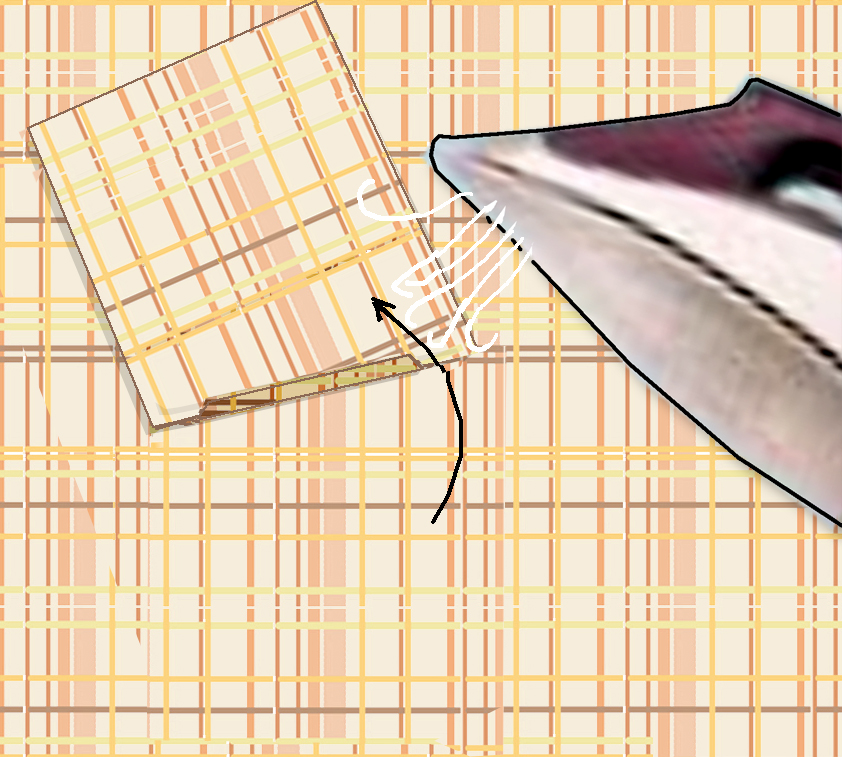
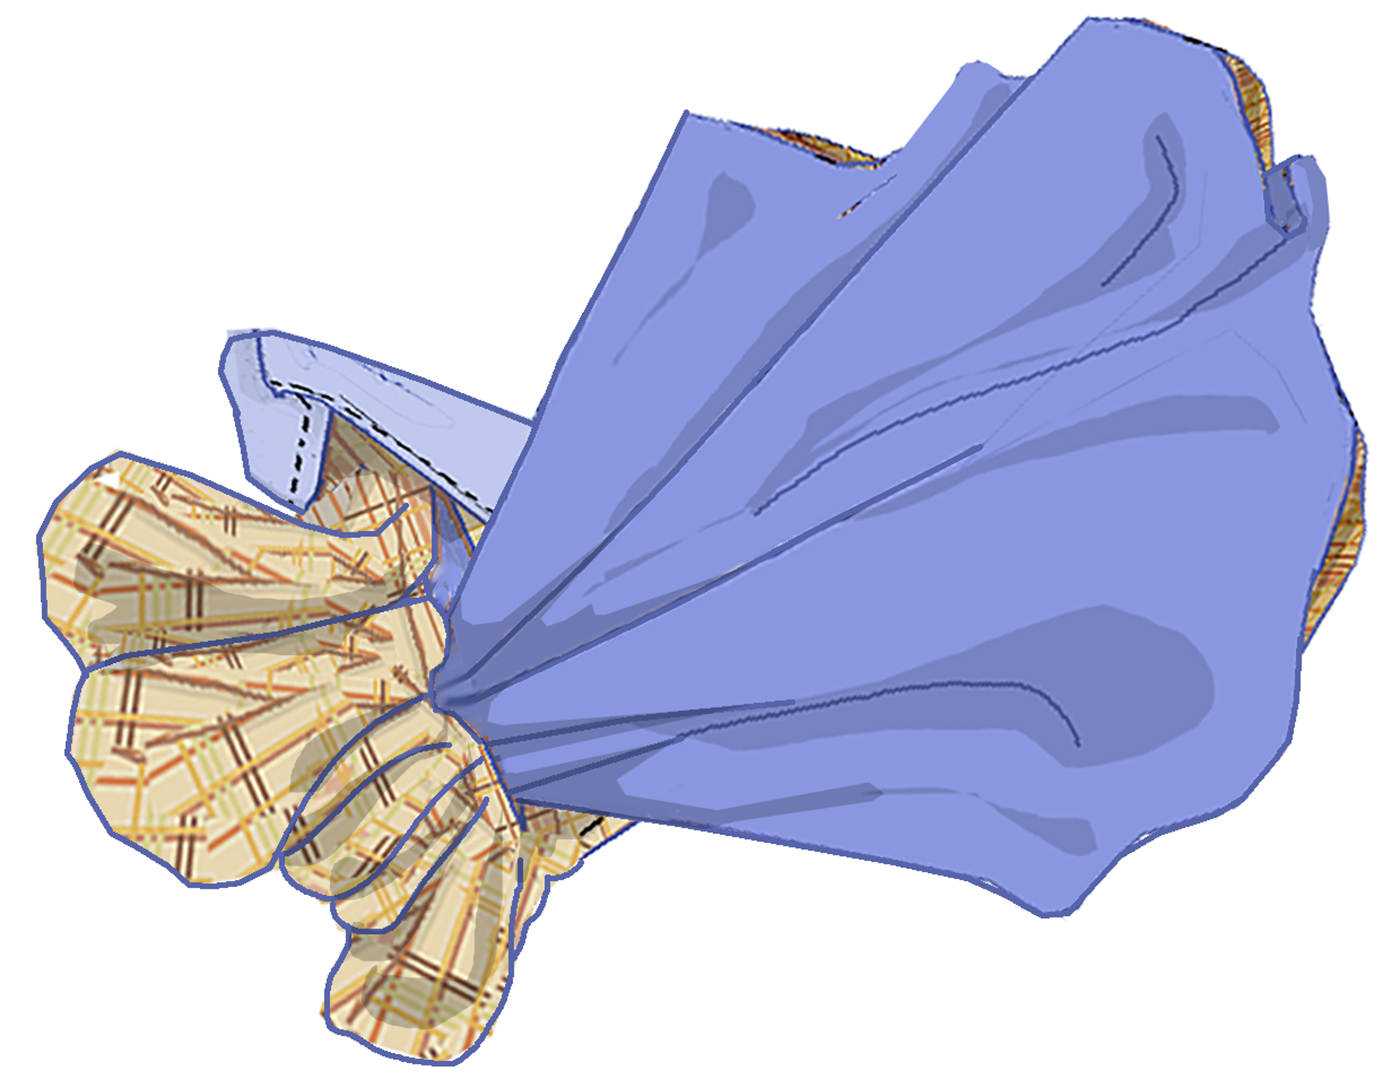
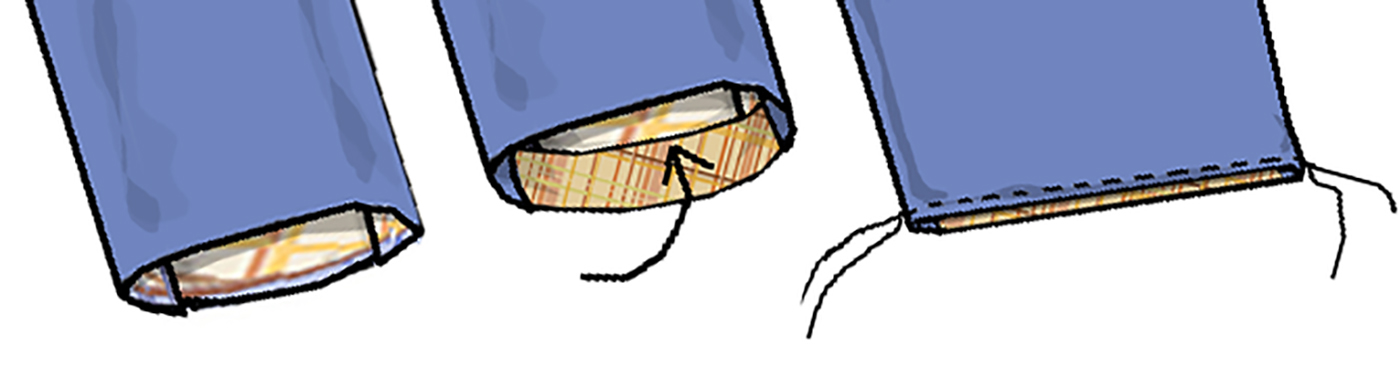
Turn the pocket to the inside of the sleeve lining.
You should be able to finger-press the welt opening flat (left end in above graphic). If you can’t (right), go back and clip a few threads more (but not through the stitching) until it’s right.
Press flat.
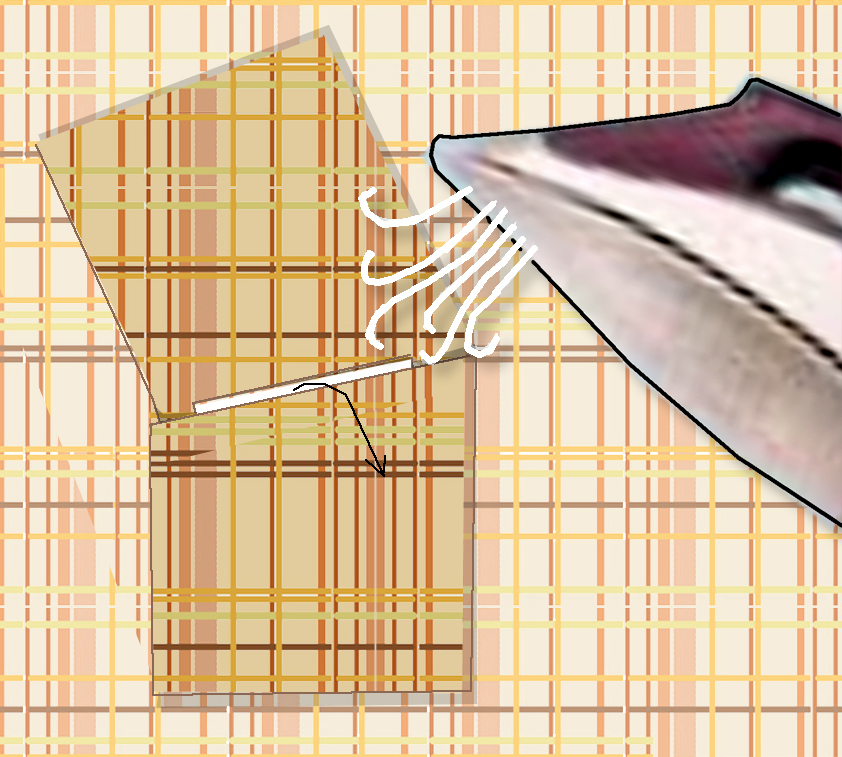
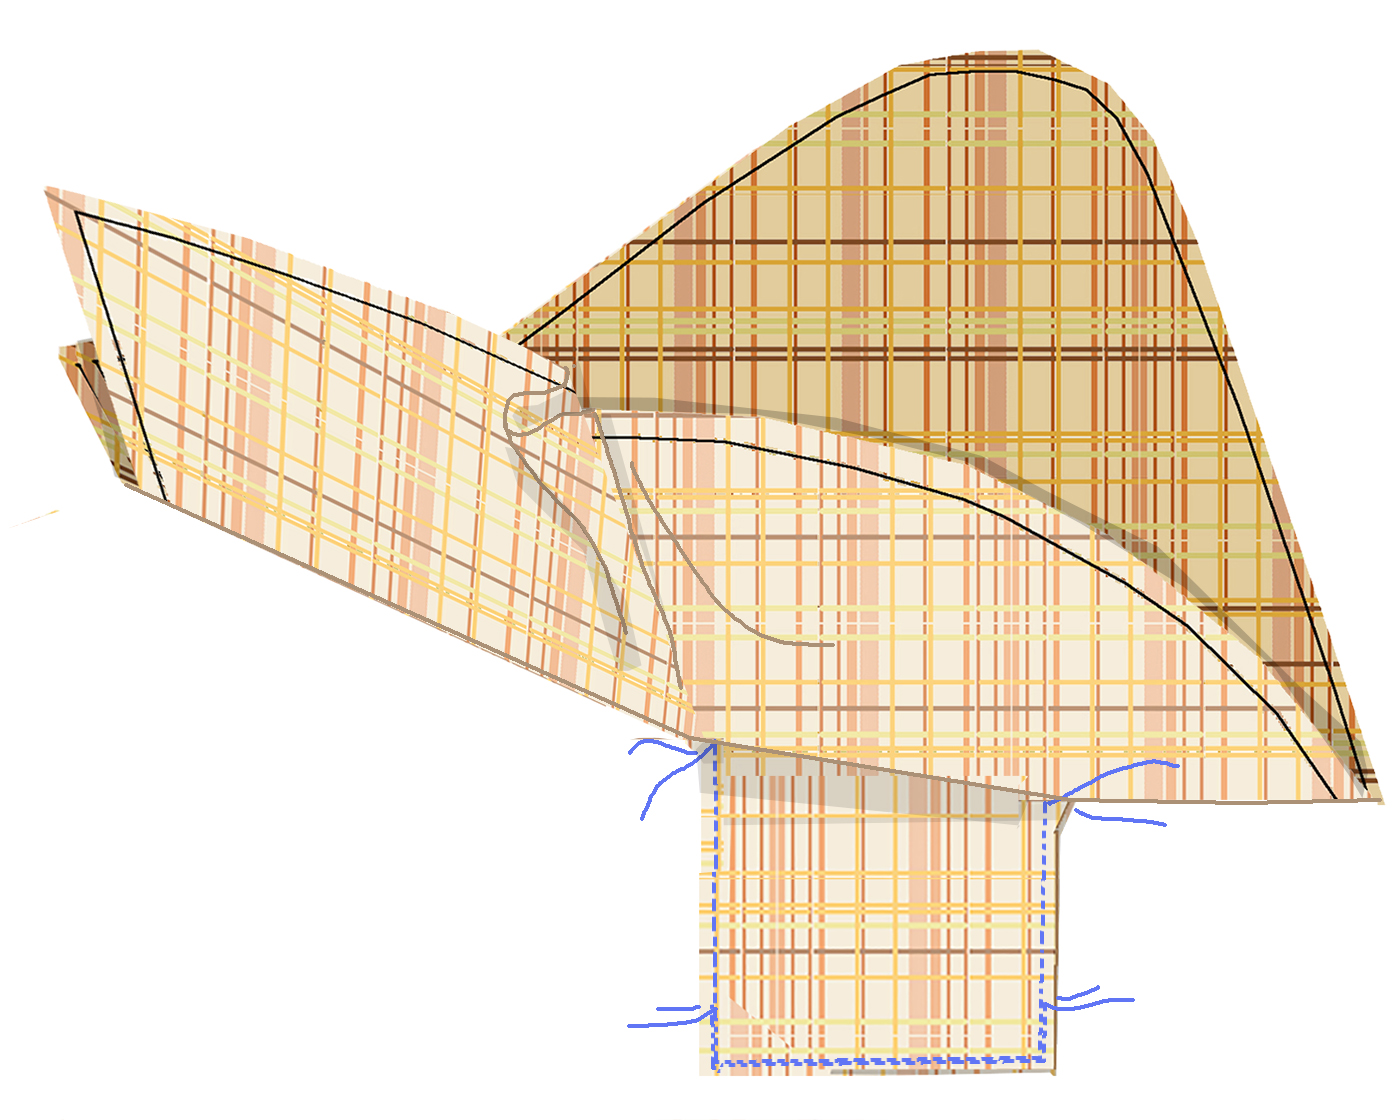
Fold the bottom pocket piece up firmly against its welt stitching and press it and the little lip up.
Wrap this flap around the little edge to make the lower welt lip. Press. Repeat for the upper flap.
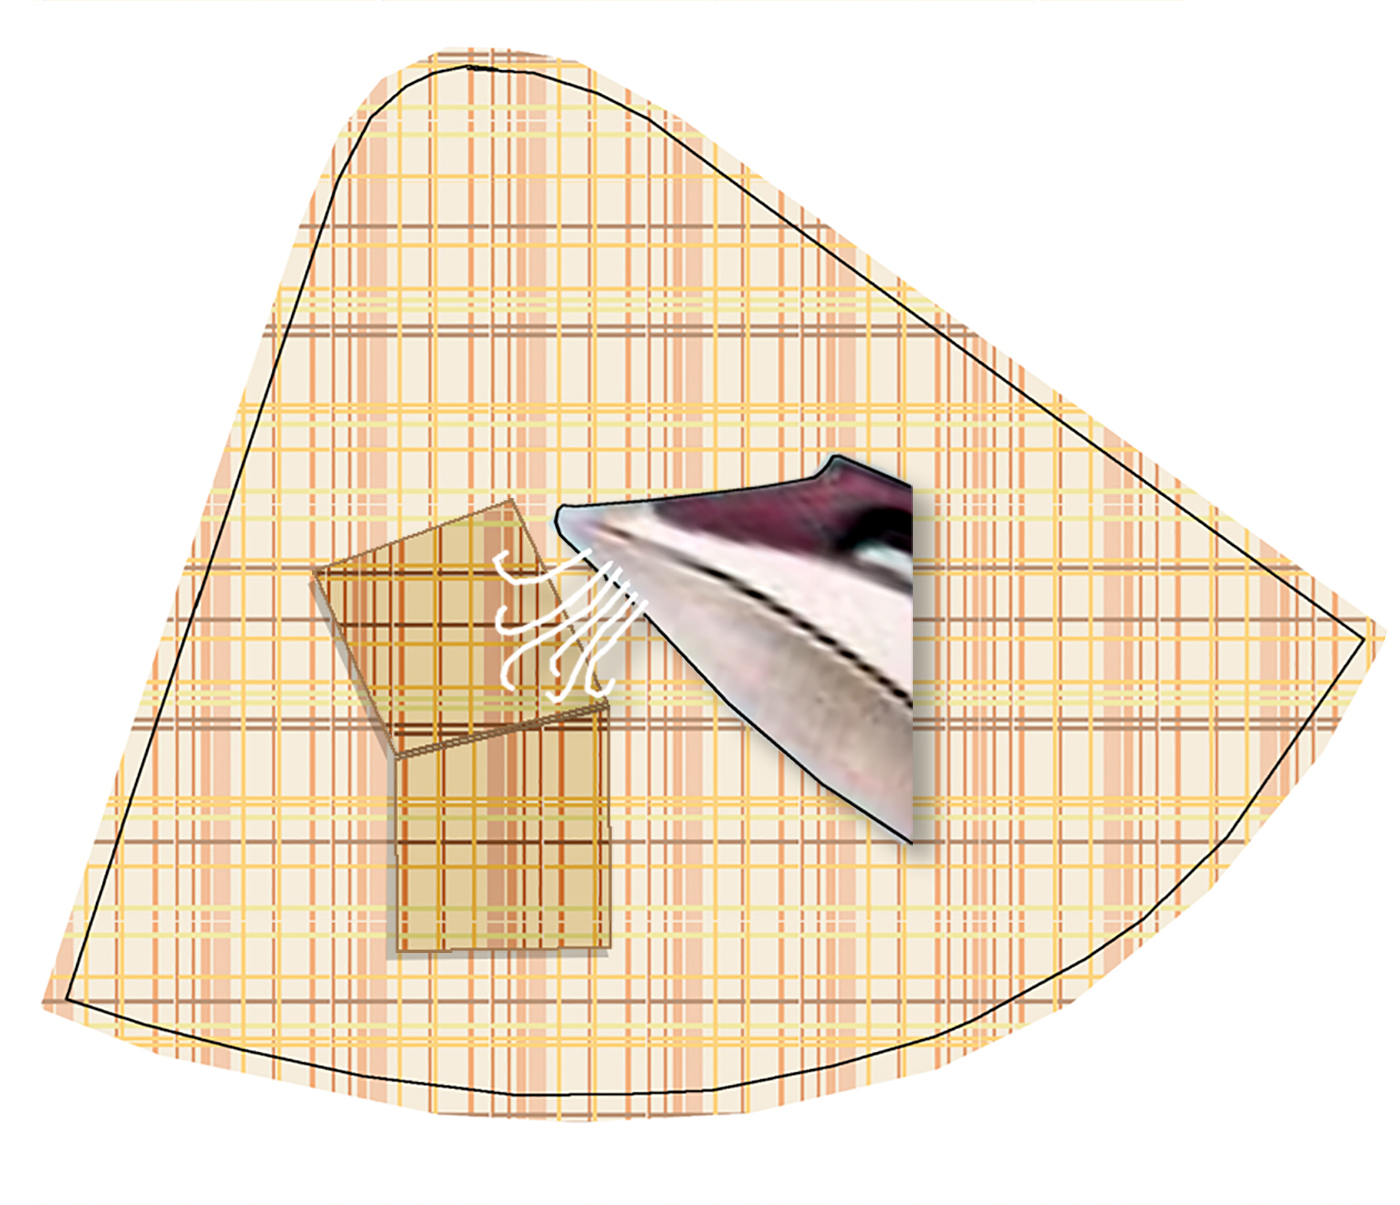
The welt folds should meet in the center of the opening. The triangular ears at each end of the welt should be pressed out flat, away from the opening.
Flip right side up and roll up the front edge of the sleeve to the edge of the welt. Change to a zipper foot (keep it on until the pocket is done). Sew across the short end of the welt right next to the box’s stitching, catching the ear. Continue around the box, sewing again over the first short end.
Make the pocket (whew!) by folding the upper piece down over the lower one (it’s common for the raw edges to be off; the seam allowances are generous so that you can trim them to match). Press all layers flat.
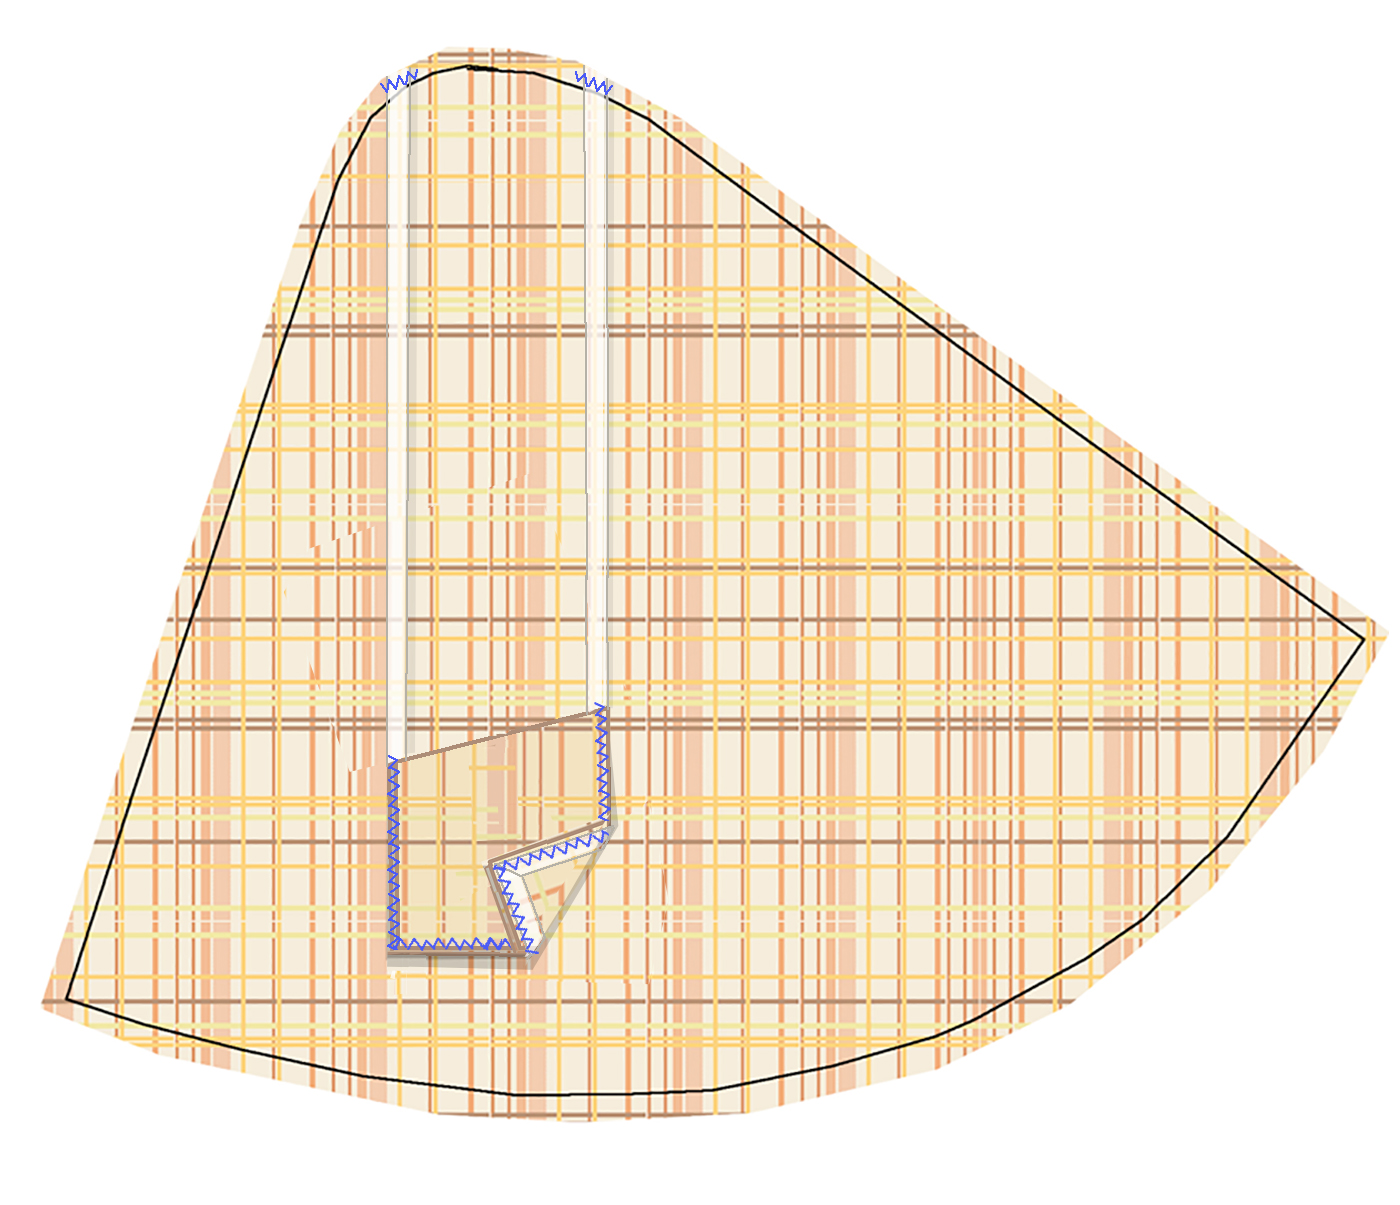
Sew the sides and bottom of the pocket with short stitches. If you think there’s going to be much weight in the pocket, re-stitch the lower sides and bottom. Repeat for the other sleeve.
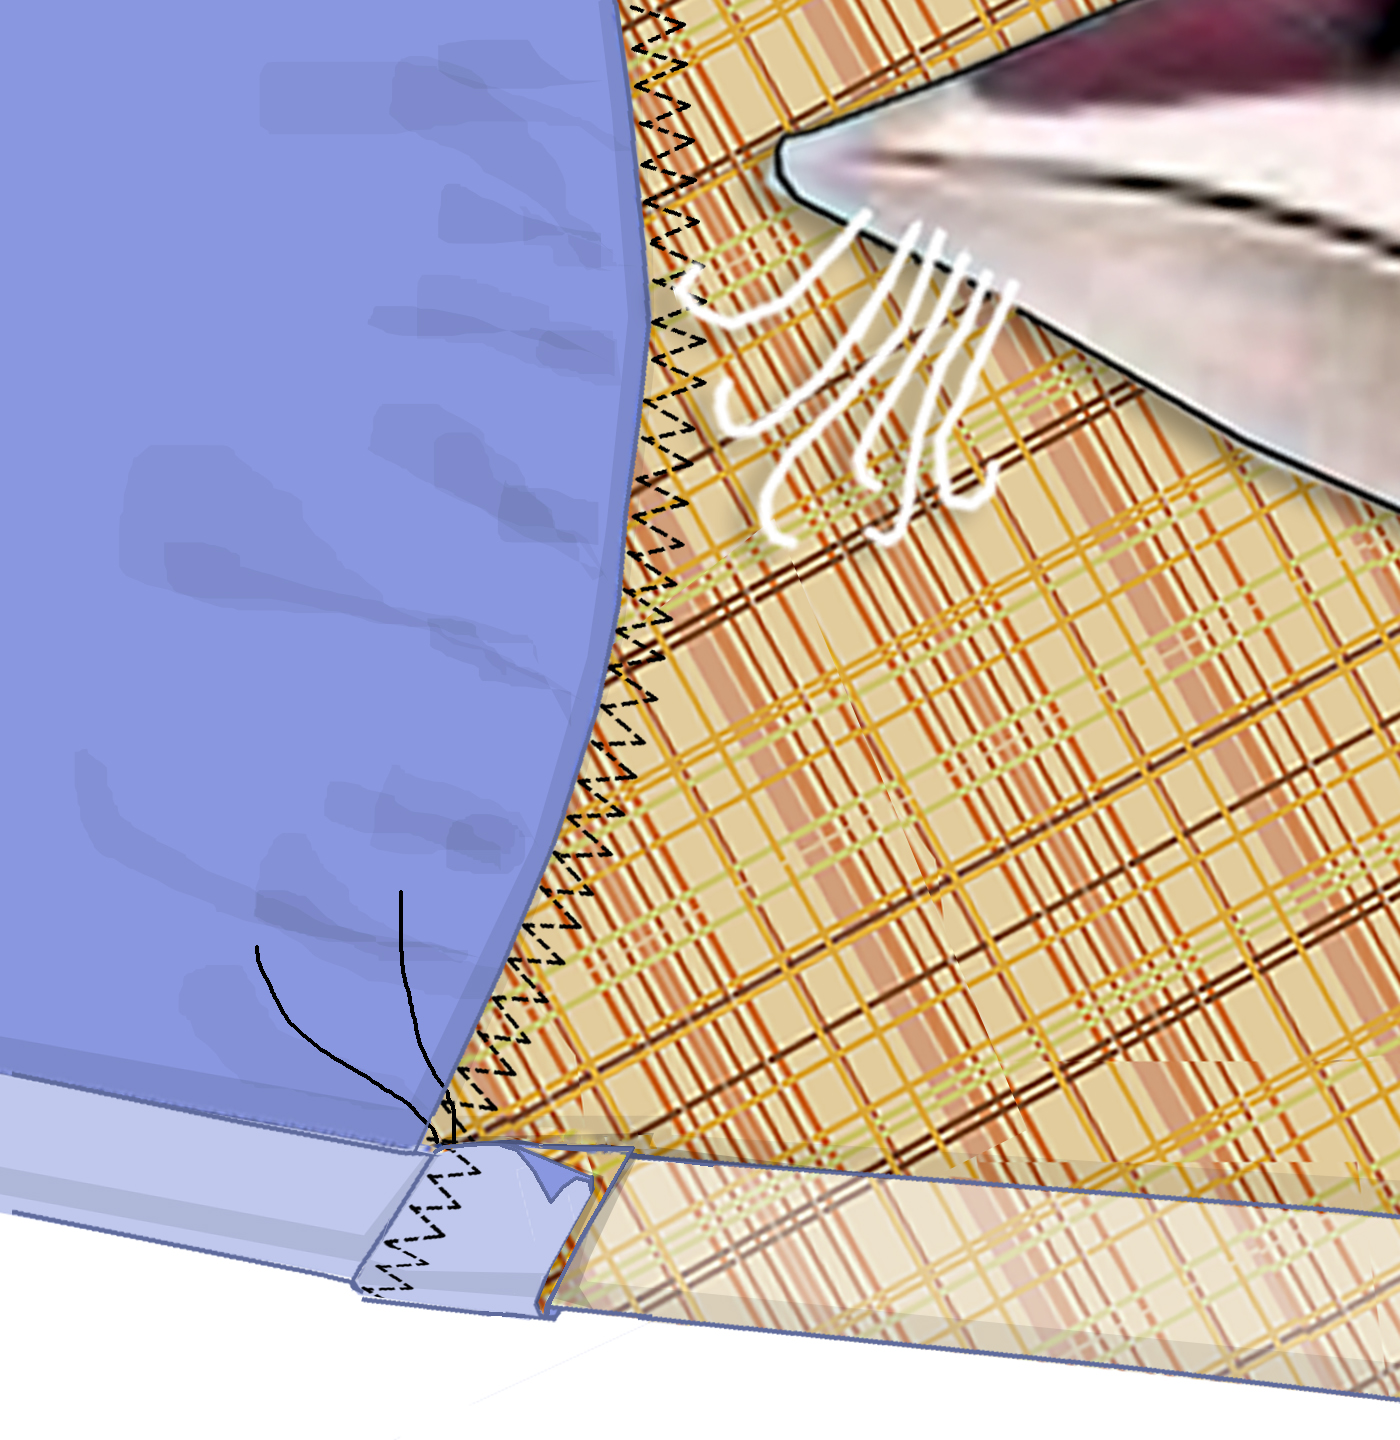
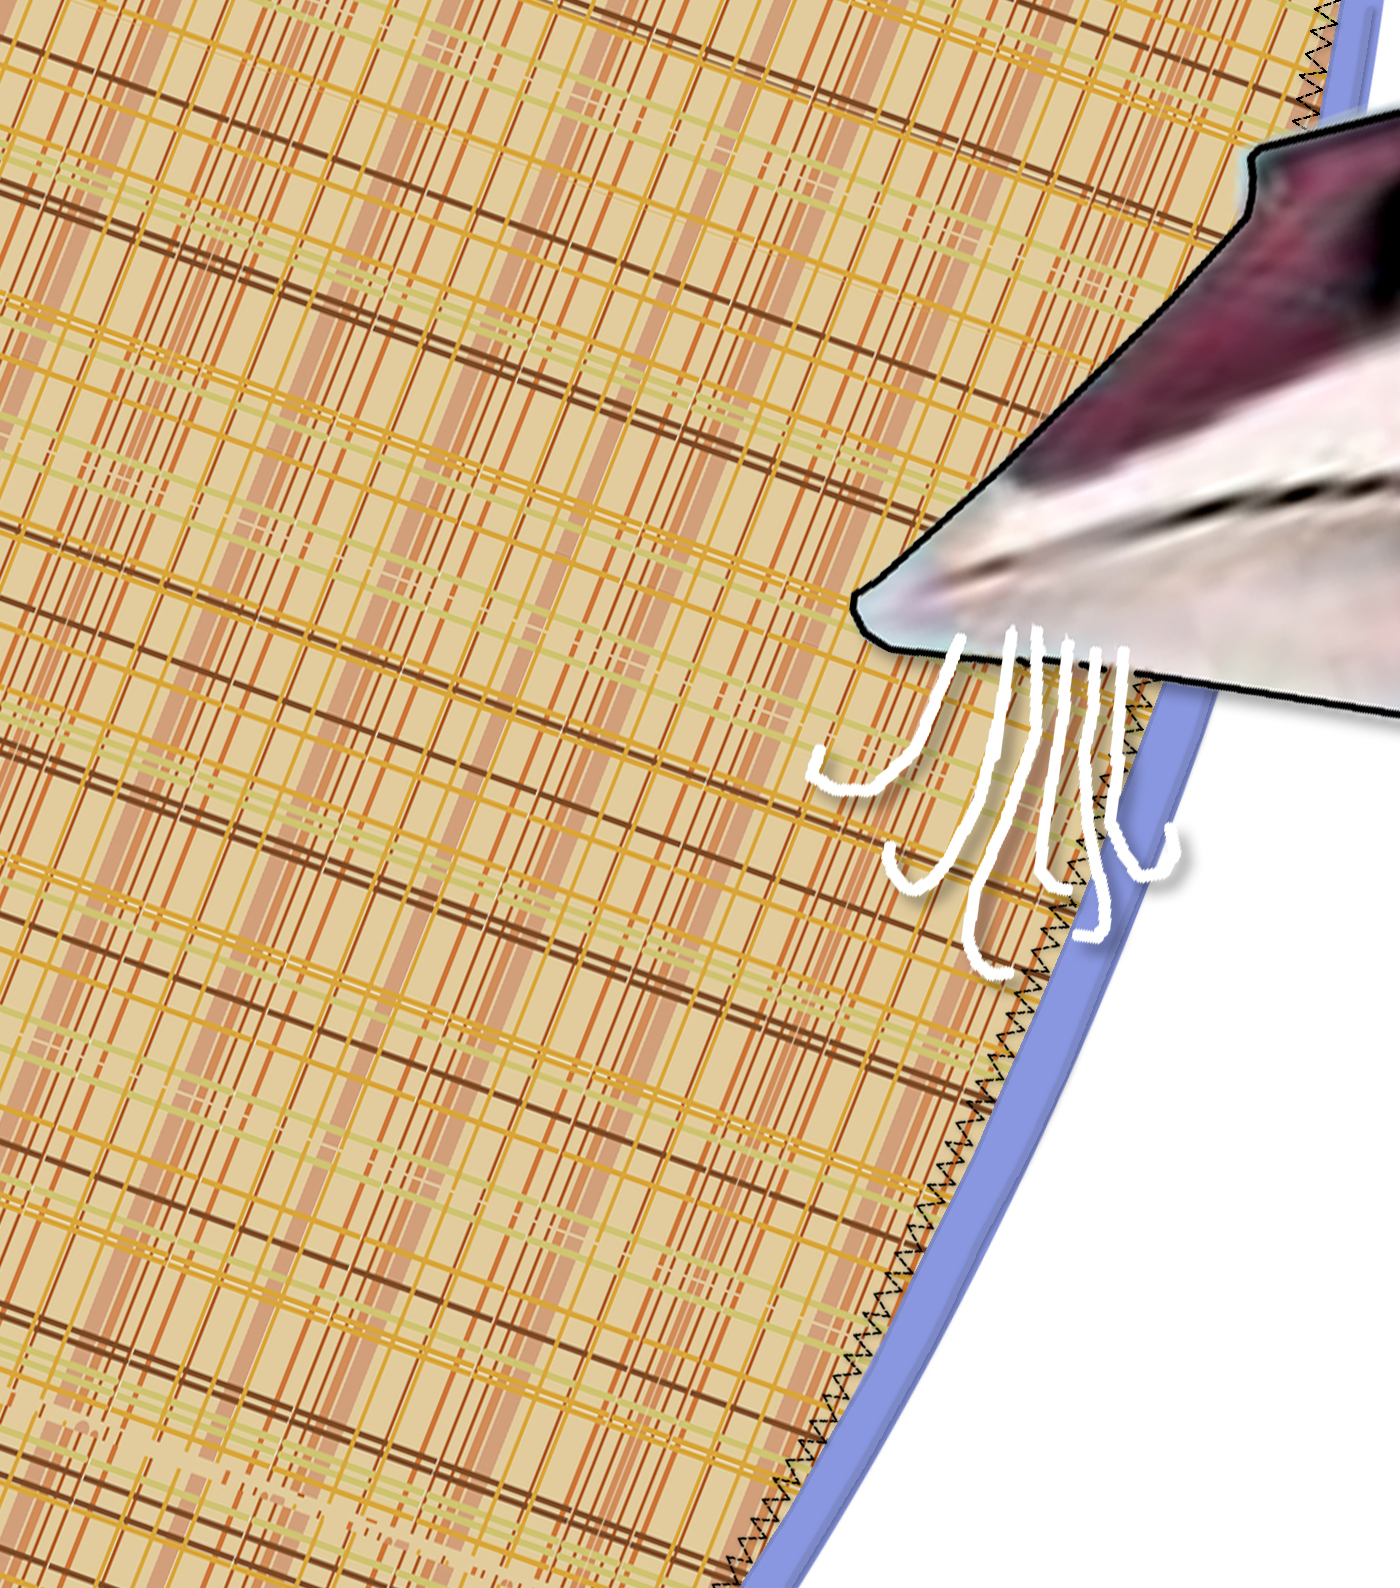
For more support for weight in the pocket, you may run stay tapes up to the shoulder. Any non-stretch tape can be used; twill tape is traditional. Zigzag the tape to the underside of the pocket seam allowance. The upper sections of tape float free: not too tight, not too loose.
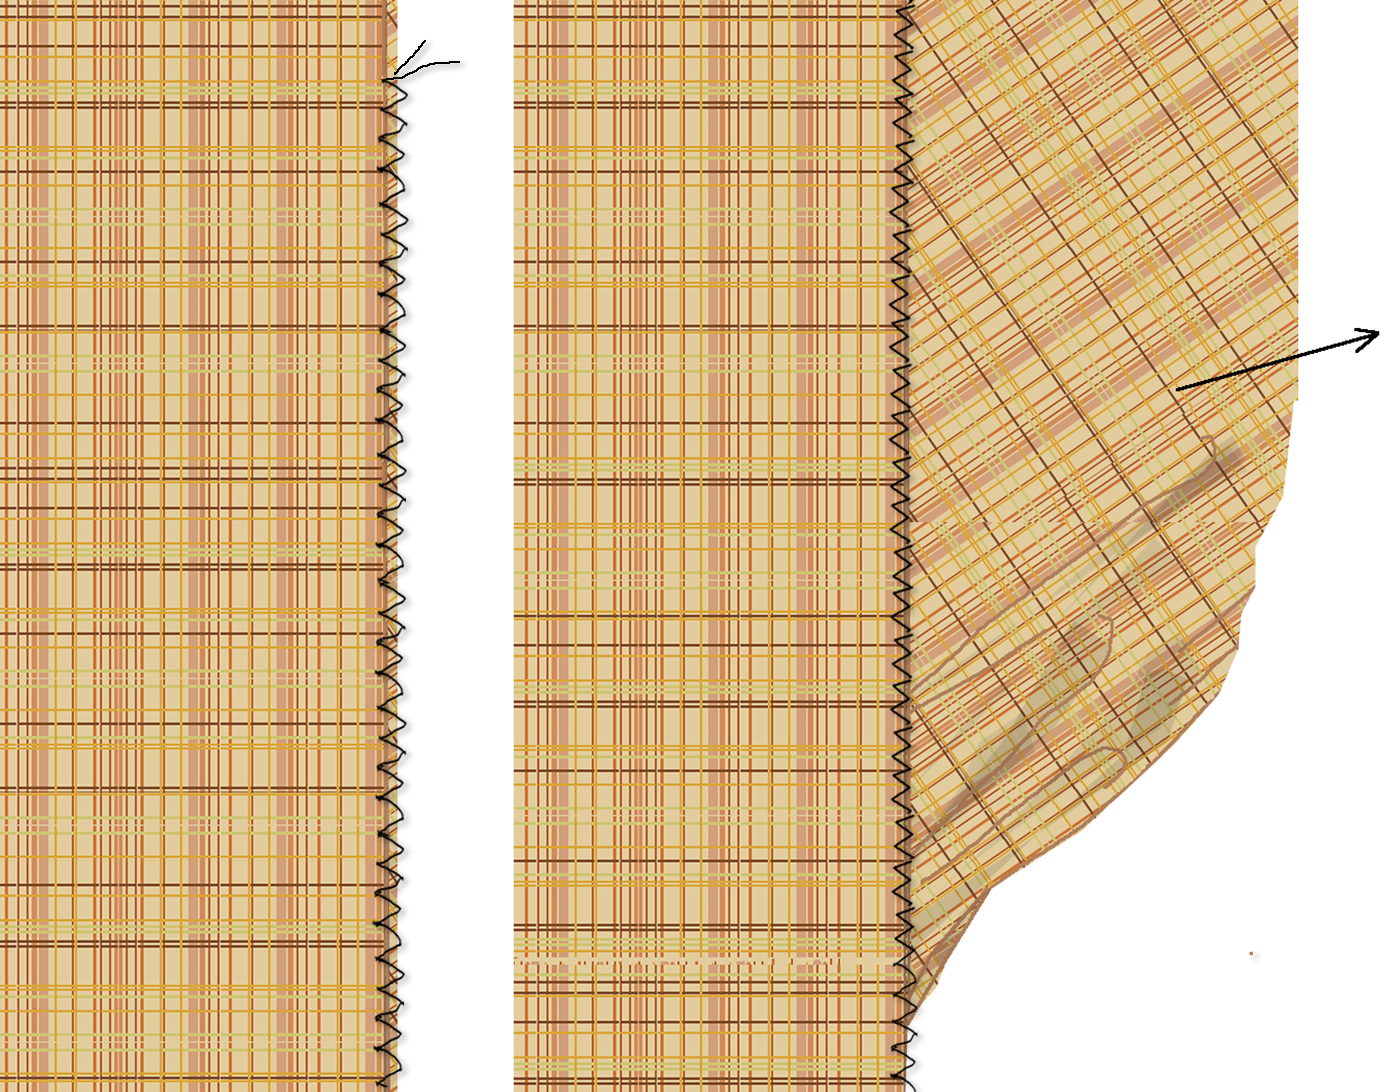
Detail of tape turning the corner.
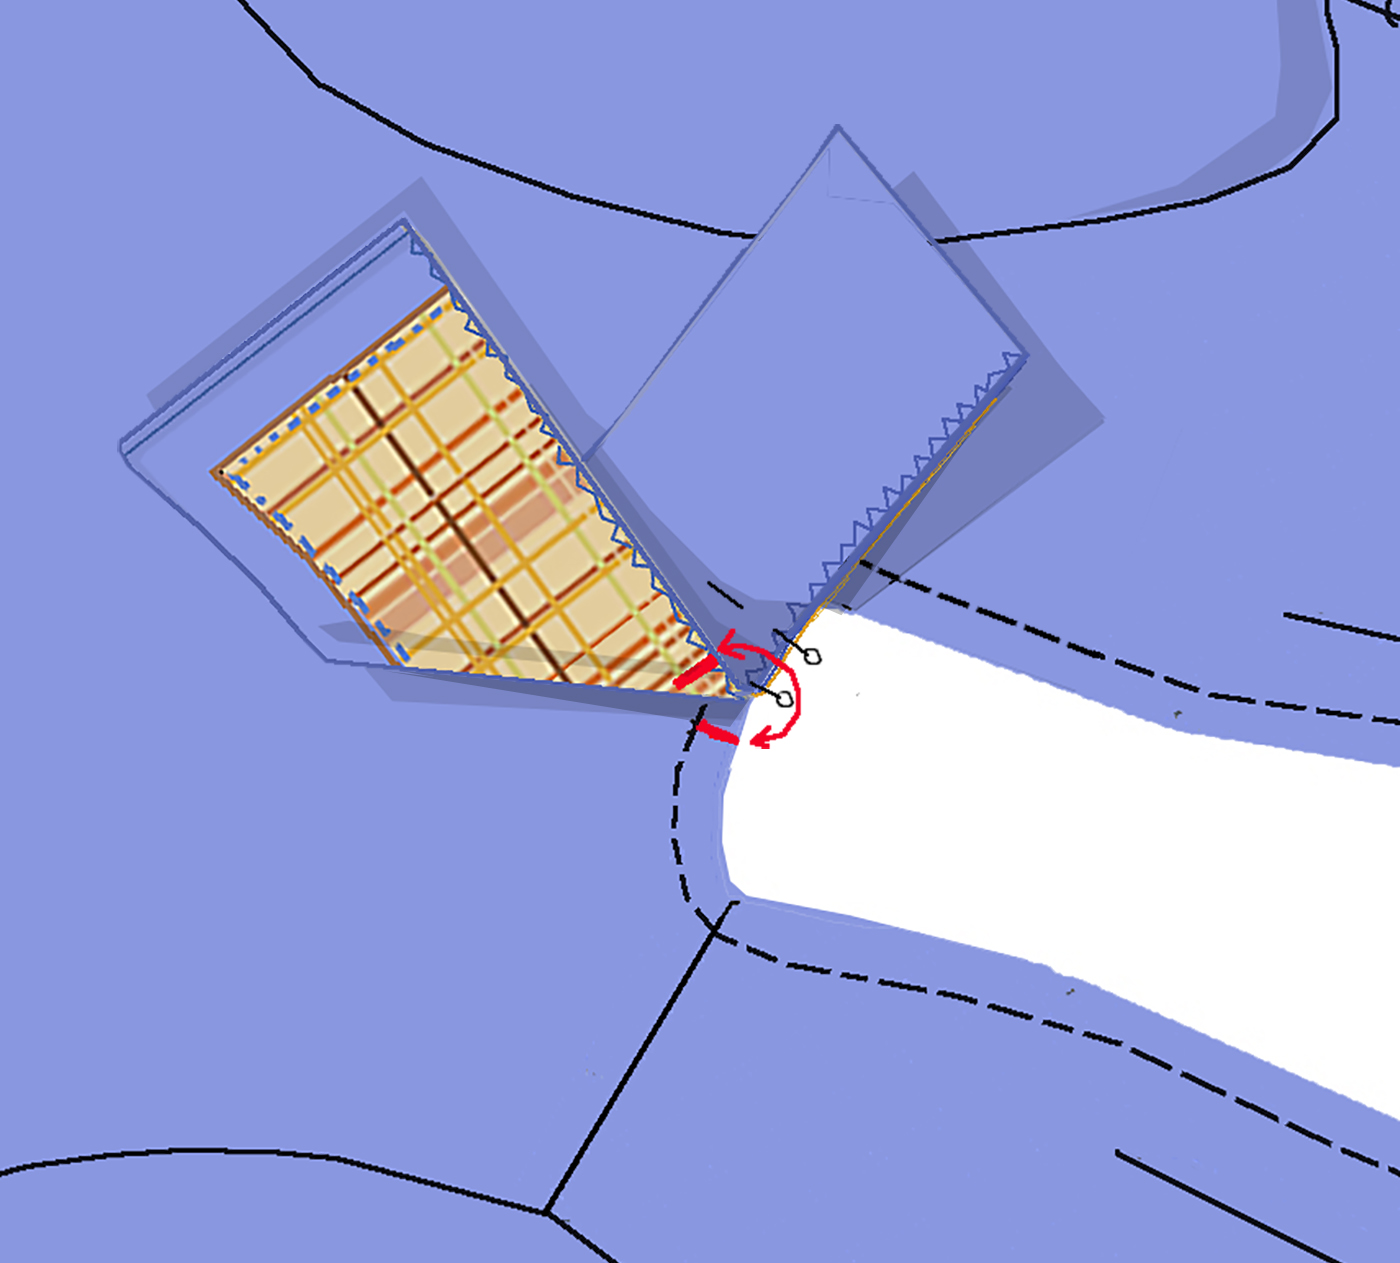
Align the back of a sleeve with the bottom of the back, right sides together. Stitch, repositioning frequently, until you run out of the front curve. The slight jog at the shoulder will disappear when on the body (pivot there, don’t smooth it out). Press seam as sewn, then toward sleeve.
Repeat for the other sleeve and lining, leaving a gap 16″ // 40.5 cm between sleeve and back on one side of the lining. Its length makes it possible to do the finish work by machine.
The collar: 2 Collar pieces of wool, 1 Collar Contrast, all interfaced
If you’re doing a hood, substitute it for the collar here.
Fuse lightweight interfacing to the wrong sides of the pieces if you haven’t already.
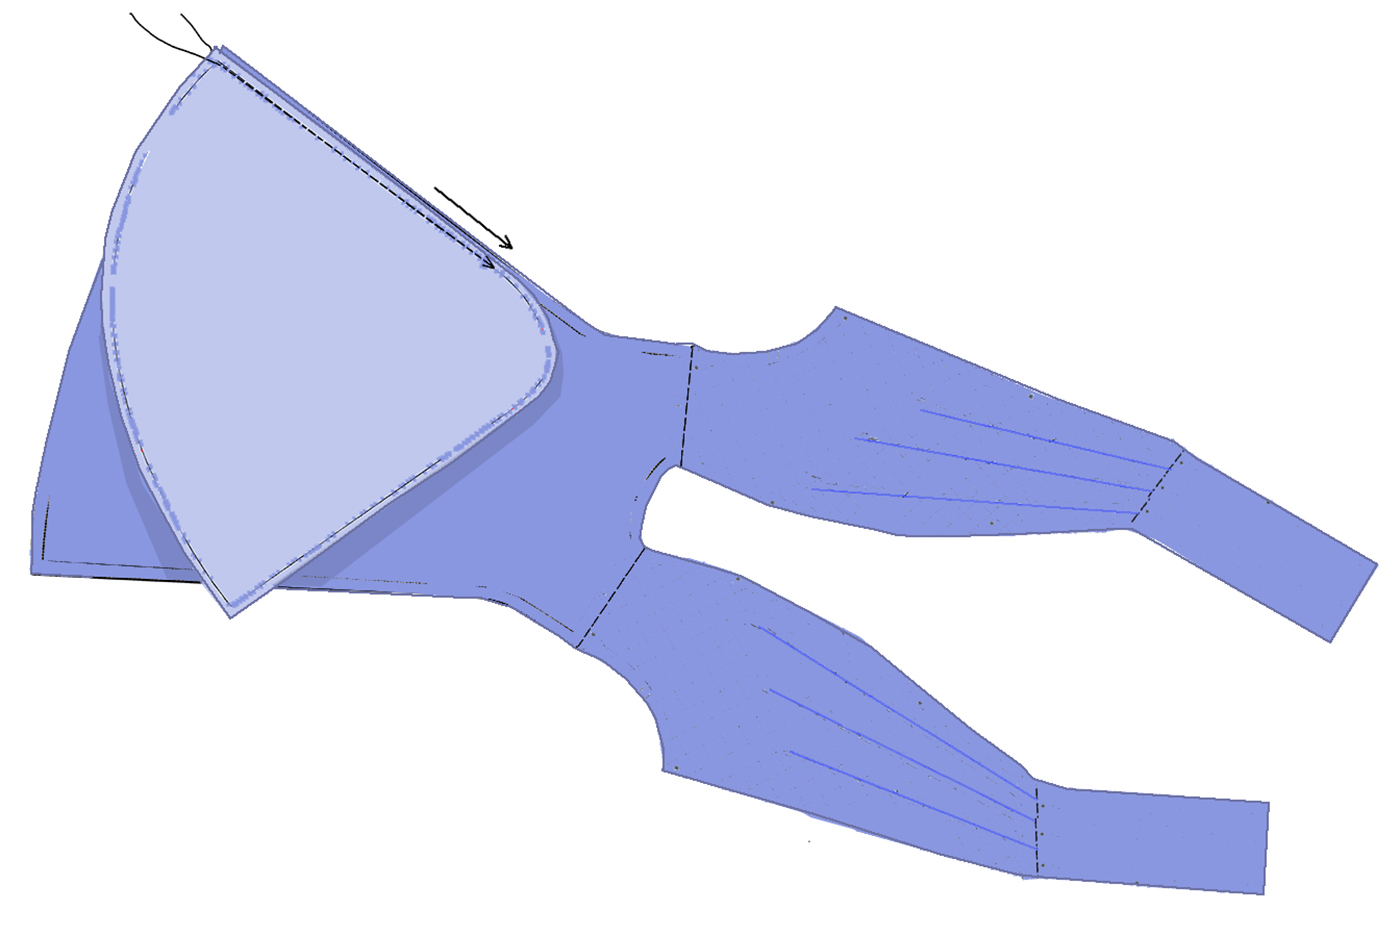
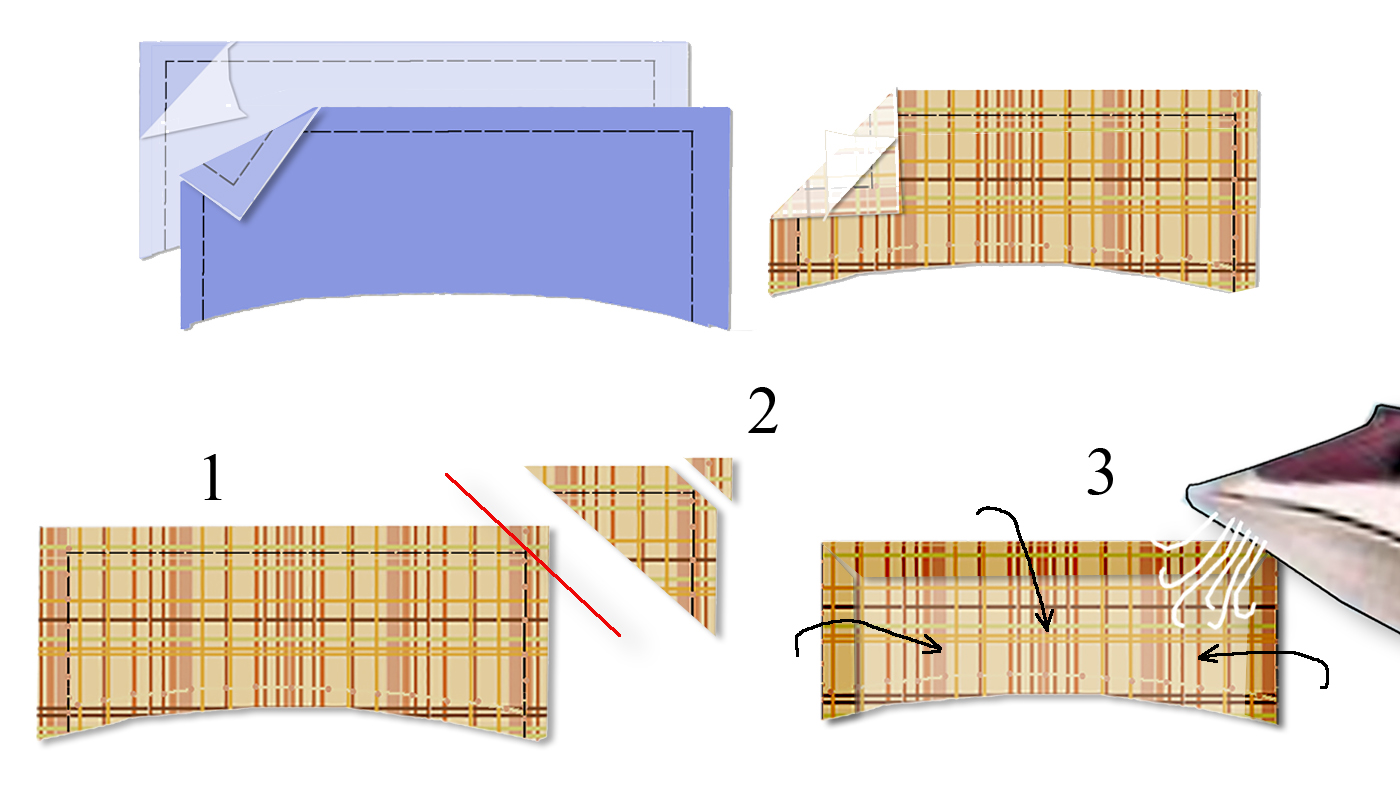
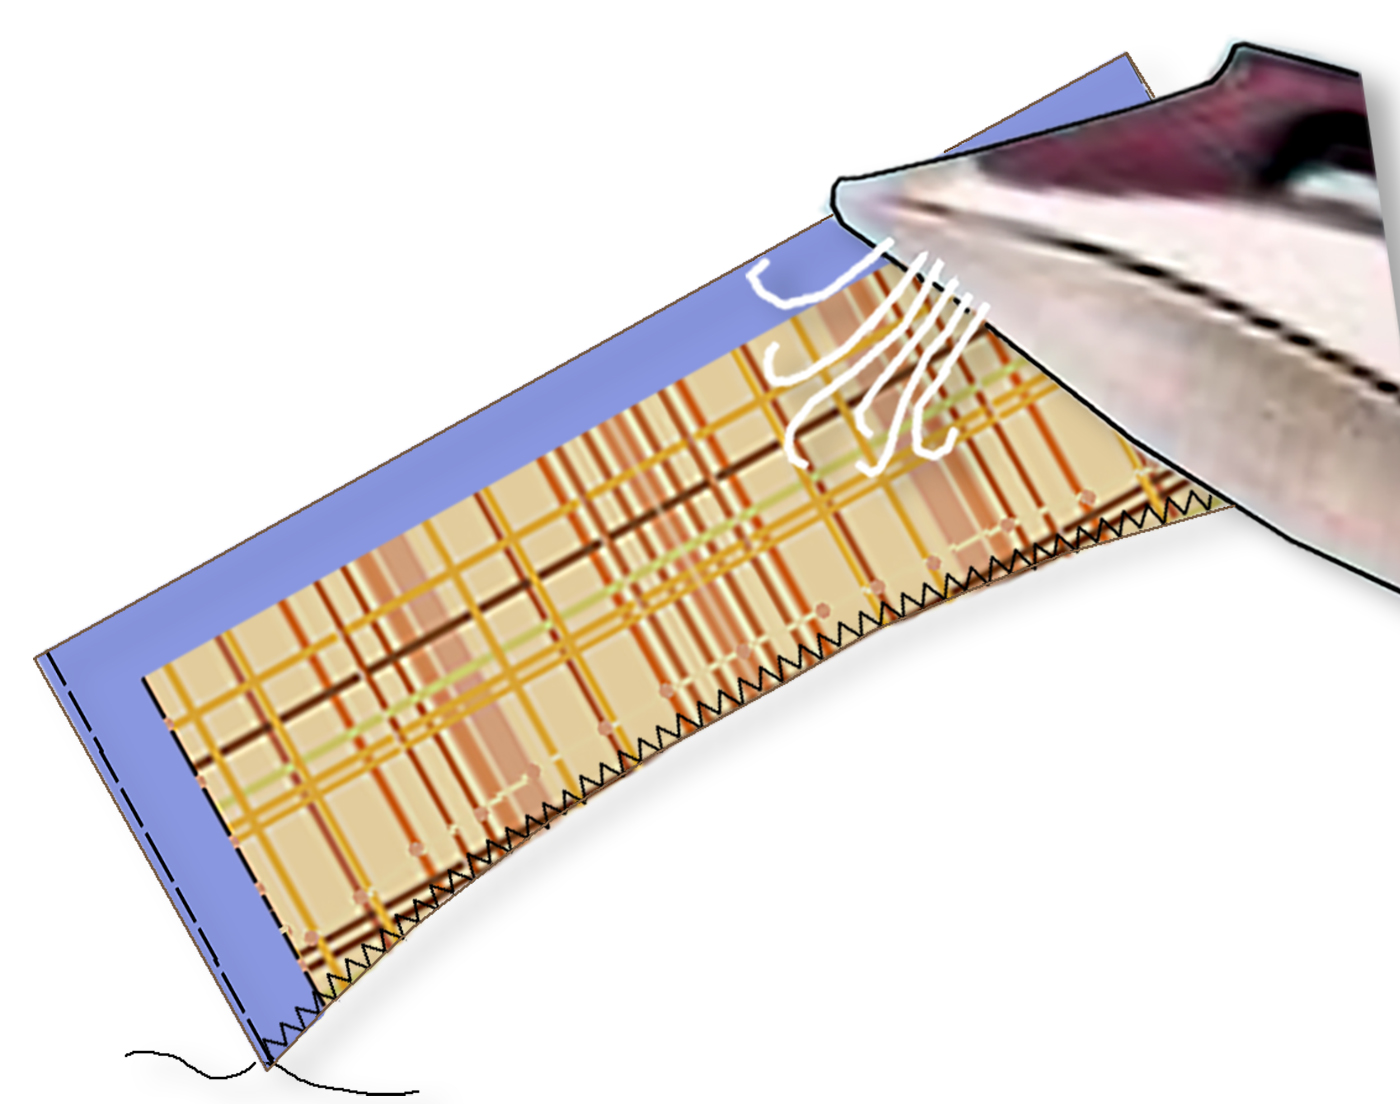
Collar: stabilize each piece with short stitches at the sewing line. They’ll be sewn together after the trim has been added. Collar contrast: 1. Baste the seam allowances on the three edges of the collar contrast piece. 2. Clip the upper corners to within a few threads of the point. 3. Turn the raw edges to the wrong side and press.
(Left) Lay the collar contrast on one of the collar pieces, raw edges aligned. Machine edge-stitch the finished edge (or slip-stitch by hand). (Right) Lay the other collar piece on top, right sides together. Sew. Press. Trim corners as you did for the lining.
Turn right-side out very carefully, being sure not to poke through the corners. Press. Baste the raw edges together.
Fold the collar in half to find its middle and match it to the center back of the wool. Pin together, curving the pieces to fit but not stretching them. Baste together a little outside the final stitching line.
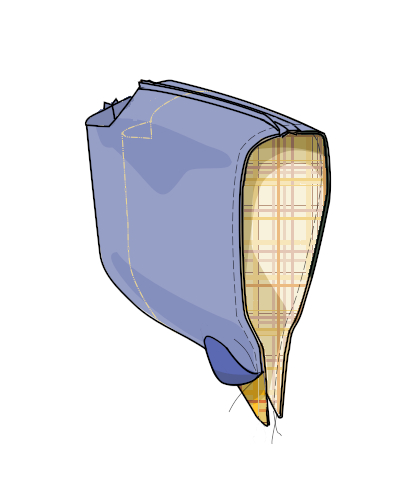
Place cape and lining right-sides together: the collar is sandwiched between the two layers.
Sew the front seam.
Grade collar curve: trim lining to 1/4″ // .6 cm and wool to 3/8″ // 1 cm. Press as sewn.
Press seam allowance over ham or tightly rolled towel towards lining.
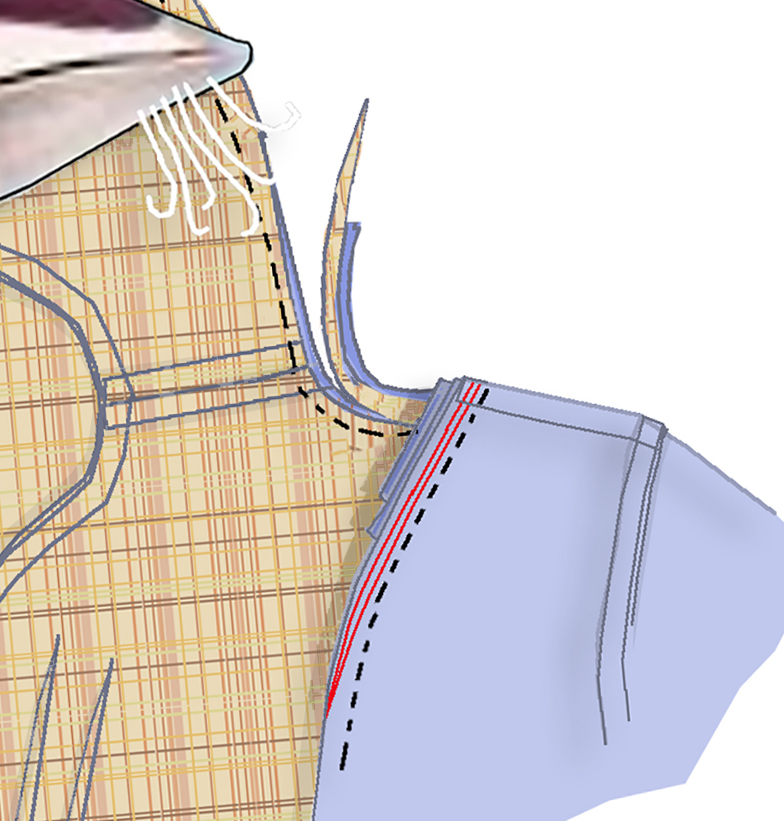
Understitch the seam allowances to the lining (which must lie flat) with a zigzag stitch (multiple if you have it) as close to the seam as possible without catching it. It’s easier to do this with the seam allowances underneath – check as you go. Press as sewn so that the understitching flattens into the fabric. When later pressed into its final position, the seam will roll slightly to the inside, hiding the lining at the edge when worn. If you haven’t understitched before, this will convert you: the result is close to magic.
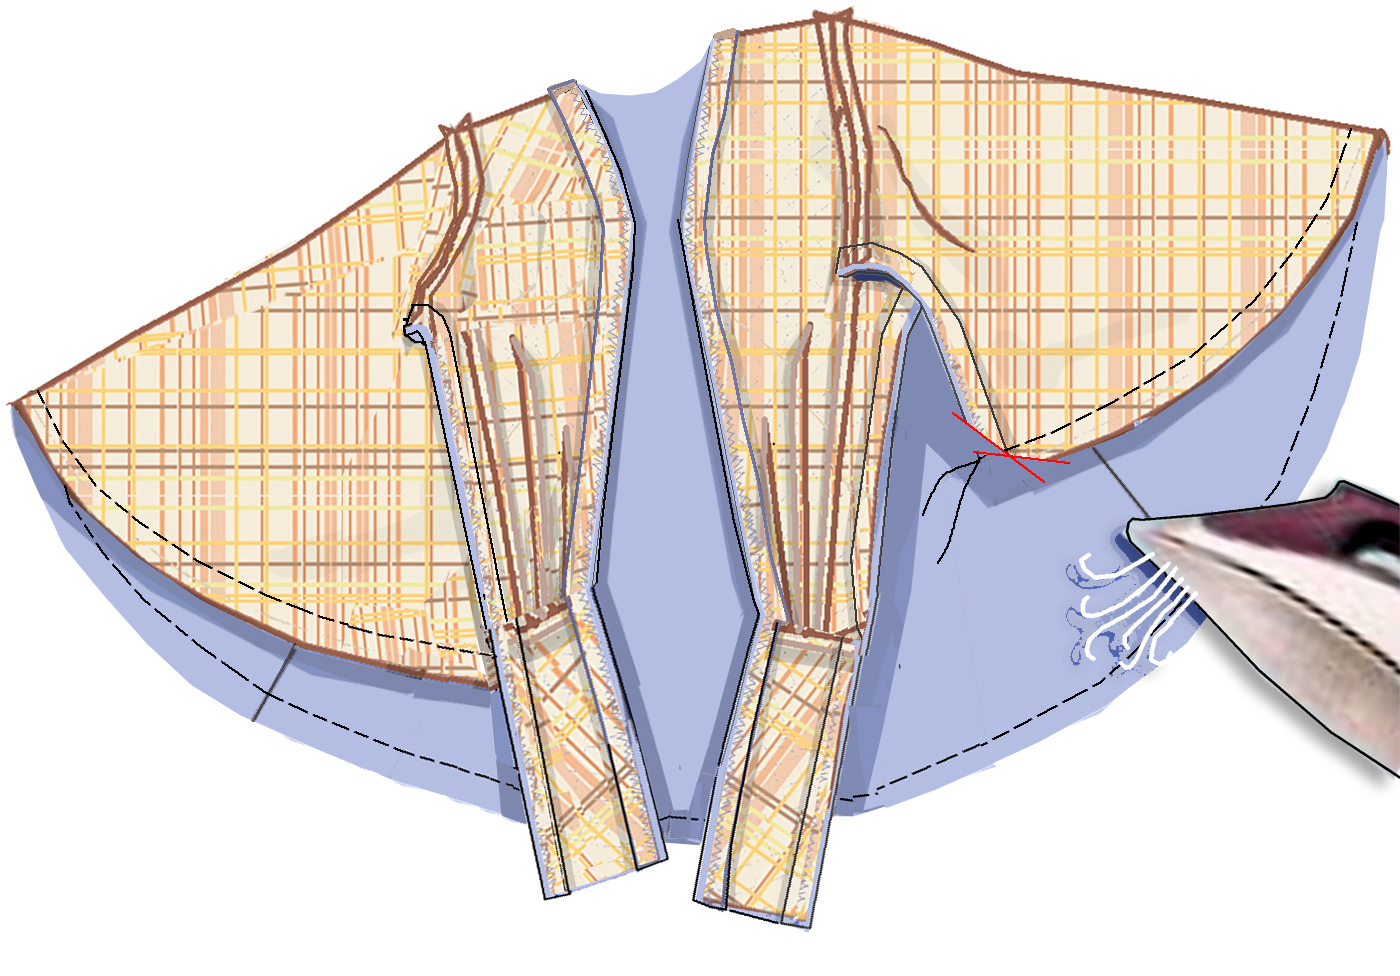
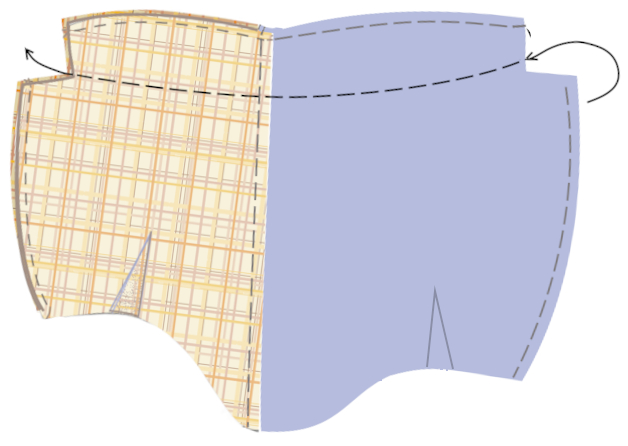
Set machine back to straight stitch and sew each front side/underarm seam, press as sewn, grade underarm, trim extension corners if closed, press SA over ham towards lining. Set machine to multiple zigzag (sure, it’s fussing: would you rather do it by hand?!).
Understitch. Get as far as you can towards the ends of the fronts; they’ll be overlapped behind your body and won’t show.
Sew remaining long curved seam (hem). Press. Trim front corners.
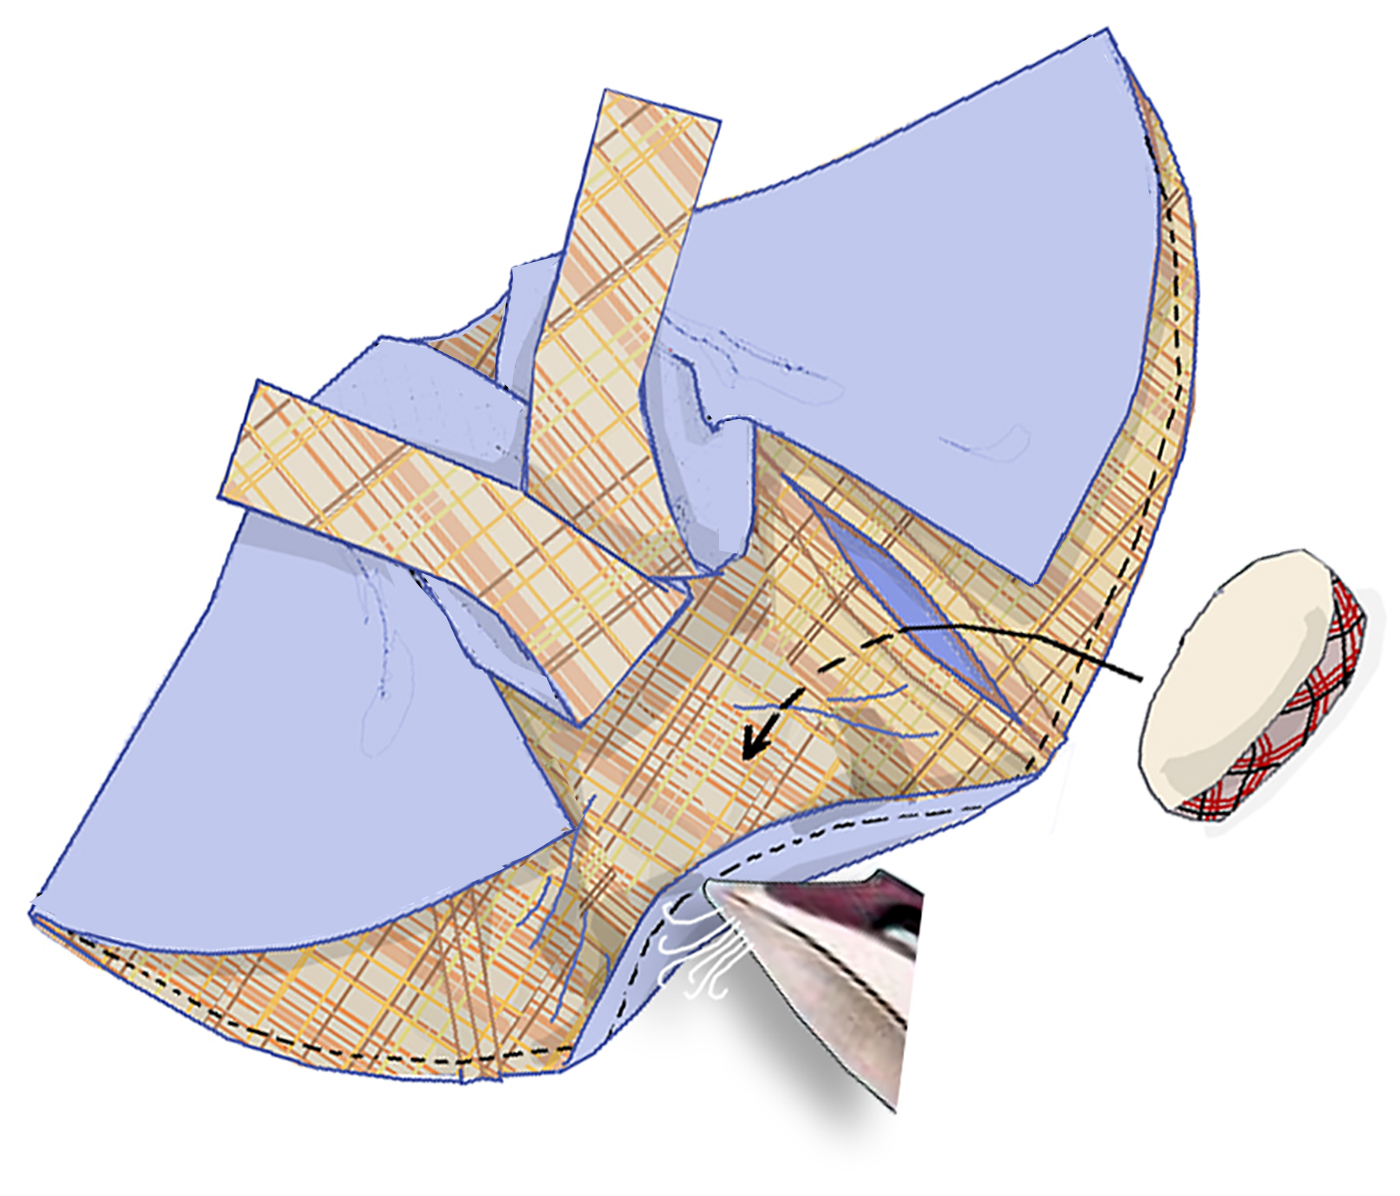
Slide a ham or firmly rolled towel between the right sides through the slit in the lining, and press the seam allowances towards the lining.
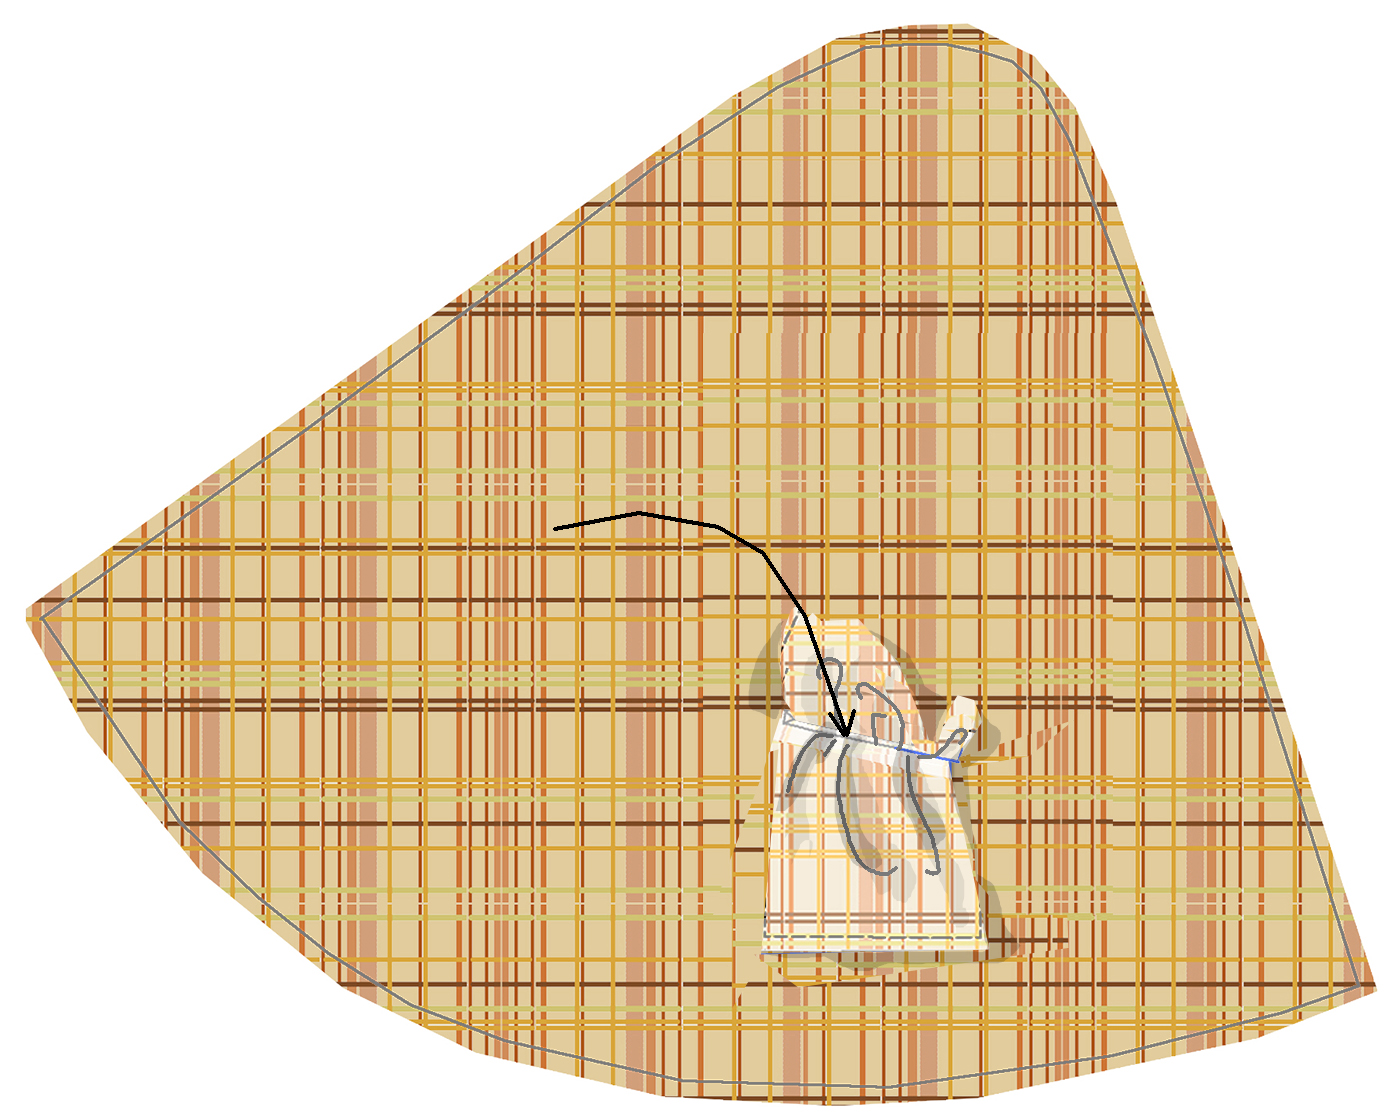
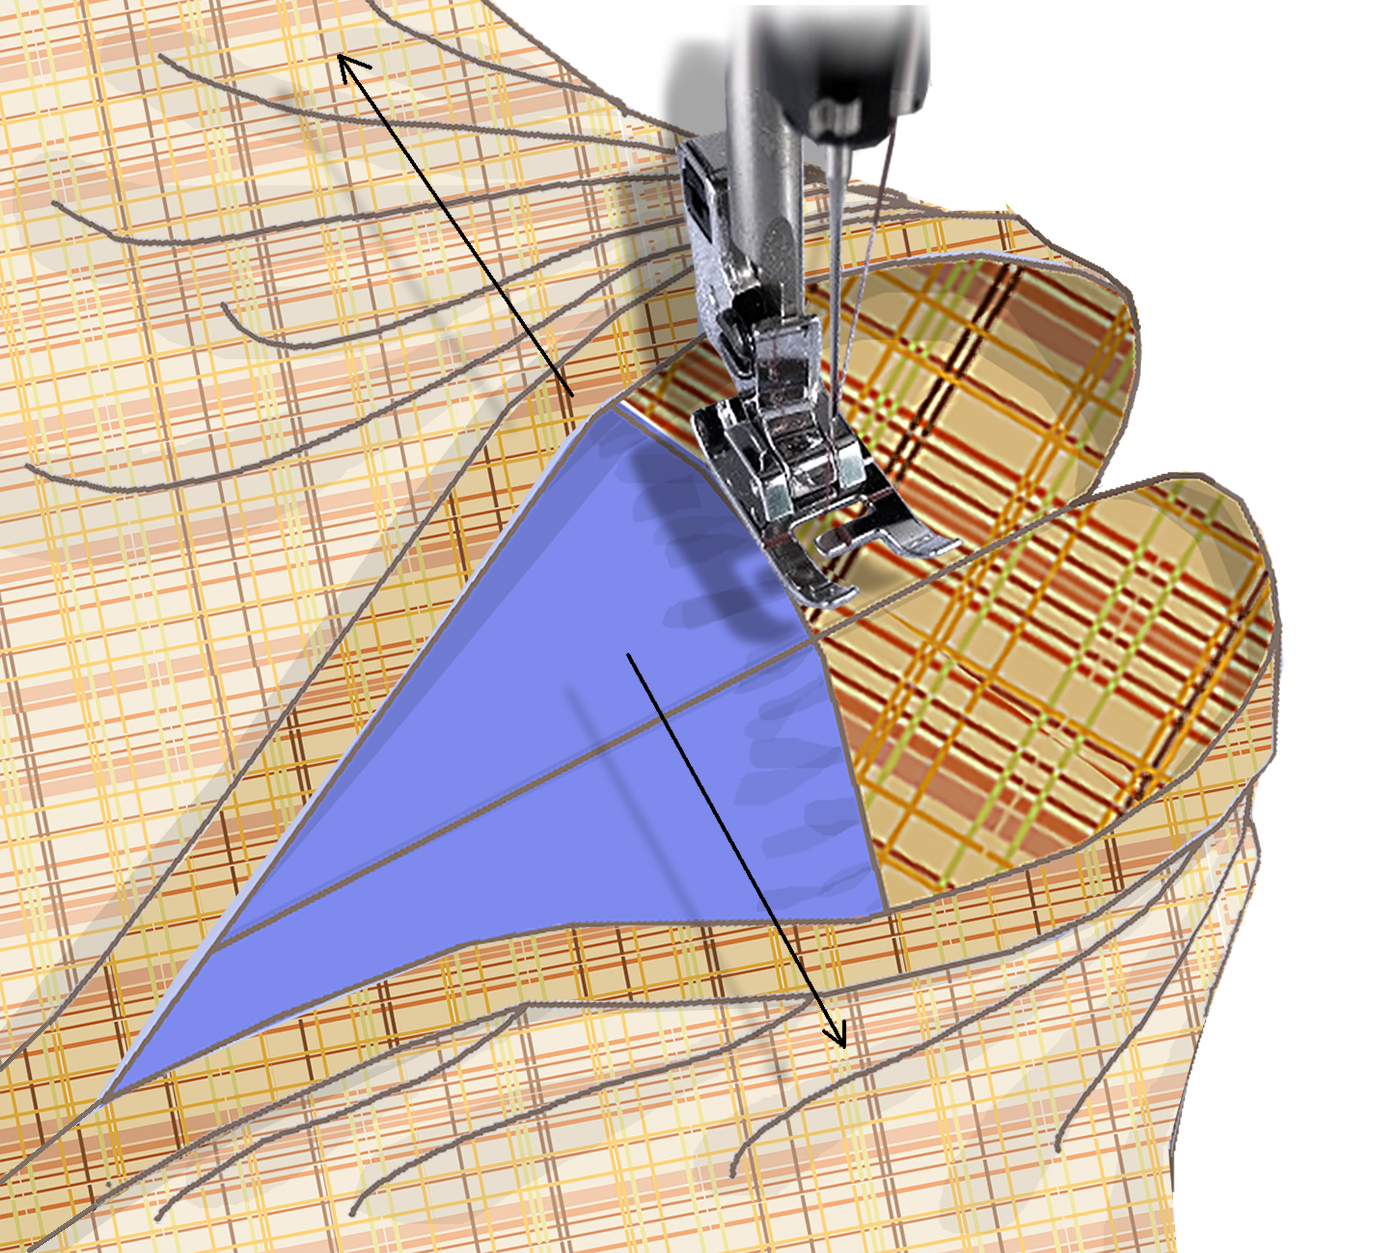
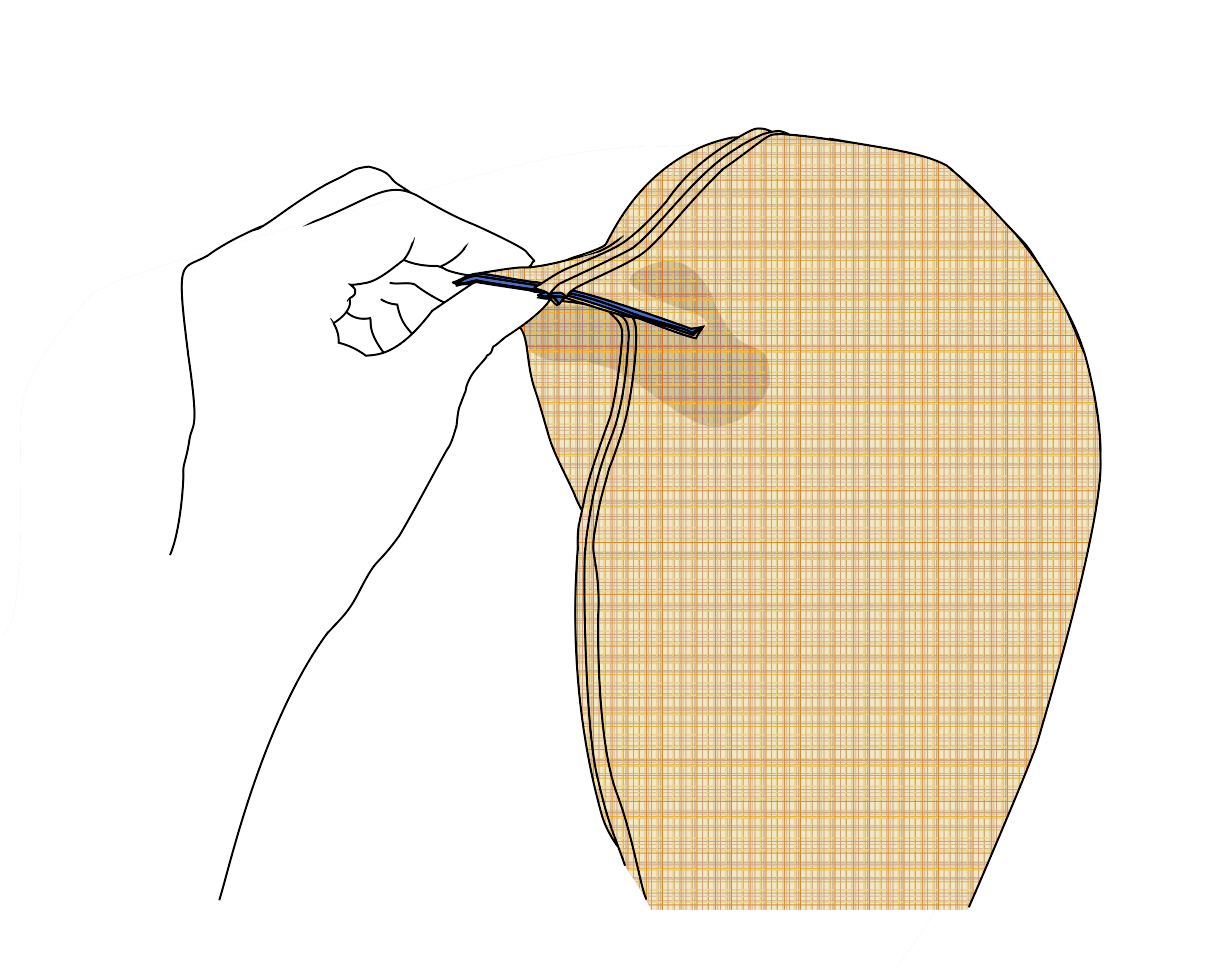
Slide the opening in the lining under the presser foot of your machine. Manipulate the fabric – pull the upper layer back, lower layer toward you – until you’ve gotten as close to the corner as possible (next graphic).
Keeping the lining flat, stitch the seam allowances as before to the far corner using a multiple zigzag, stopping frequently to reposition the fabric.
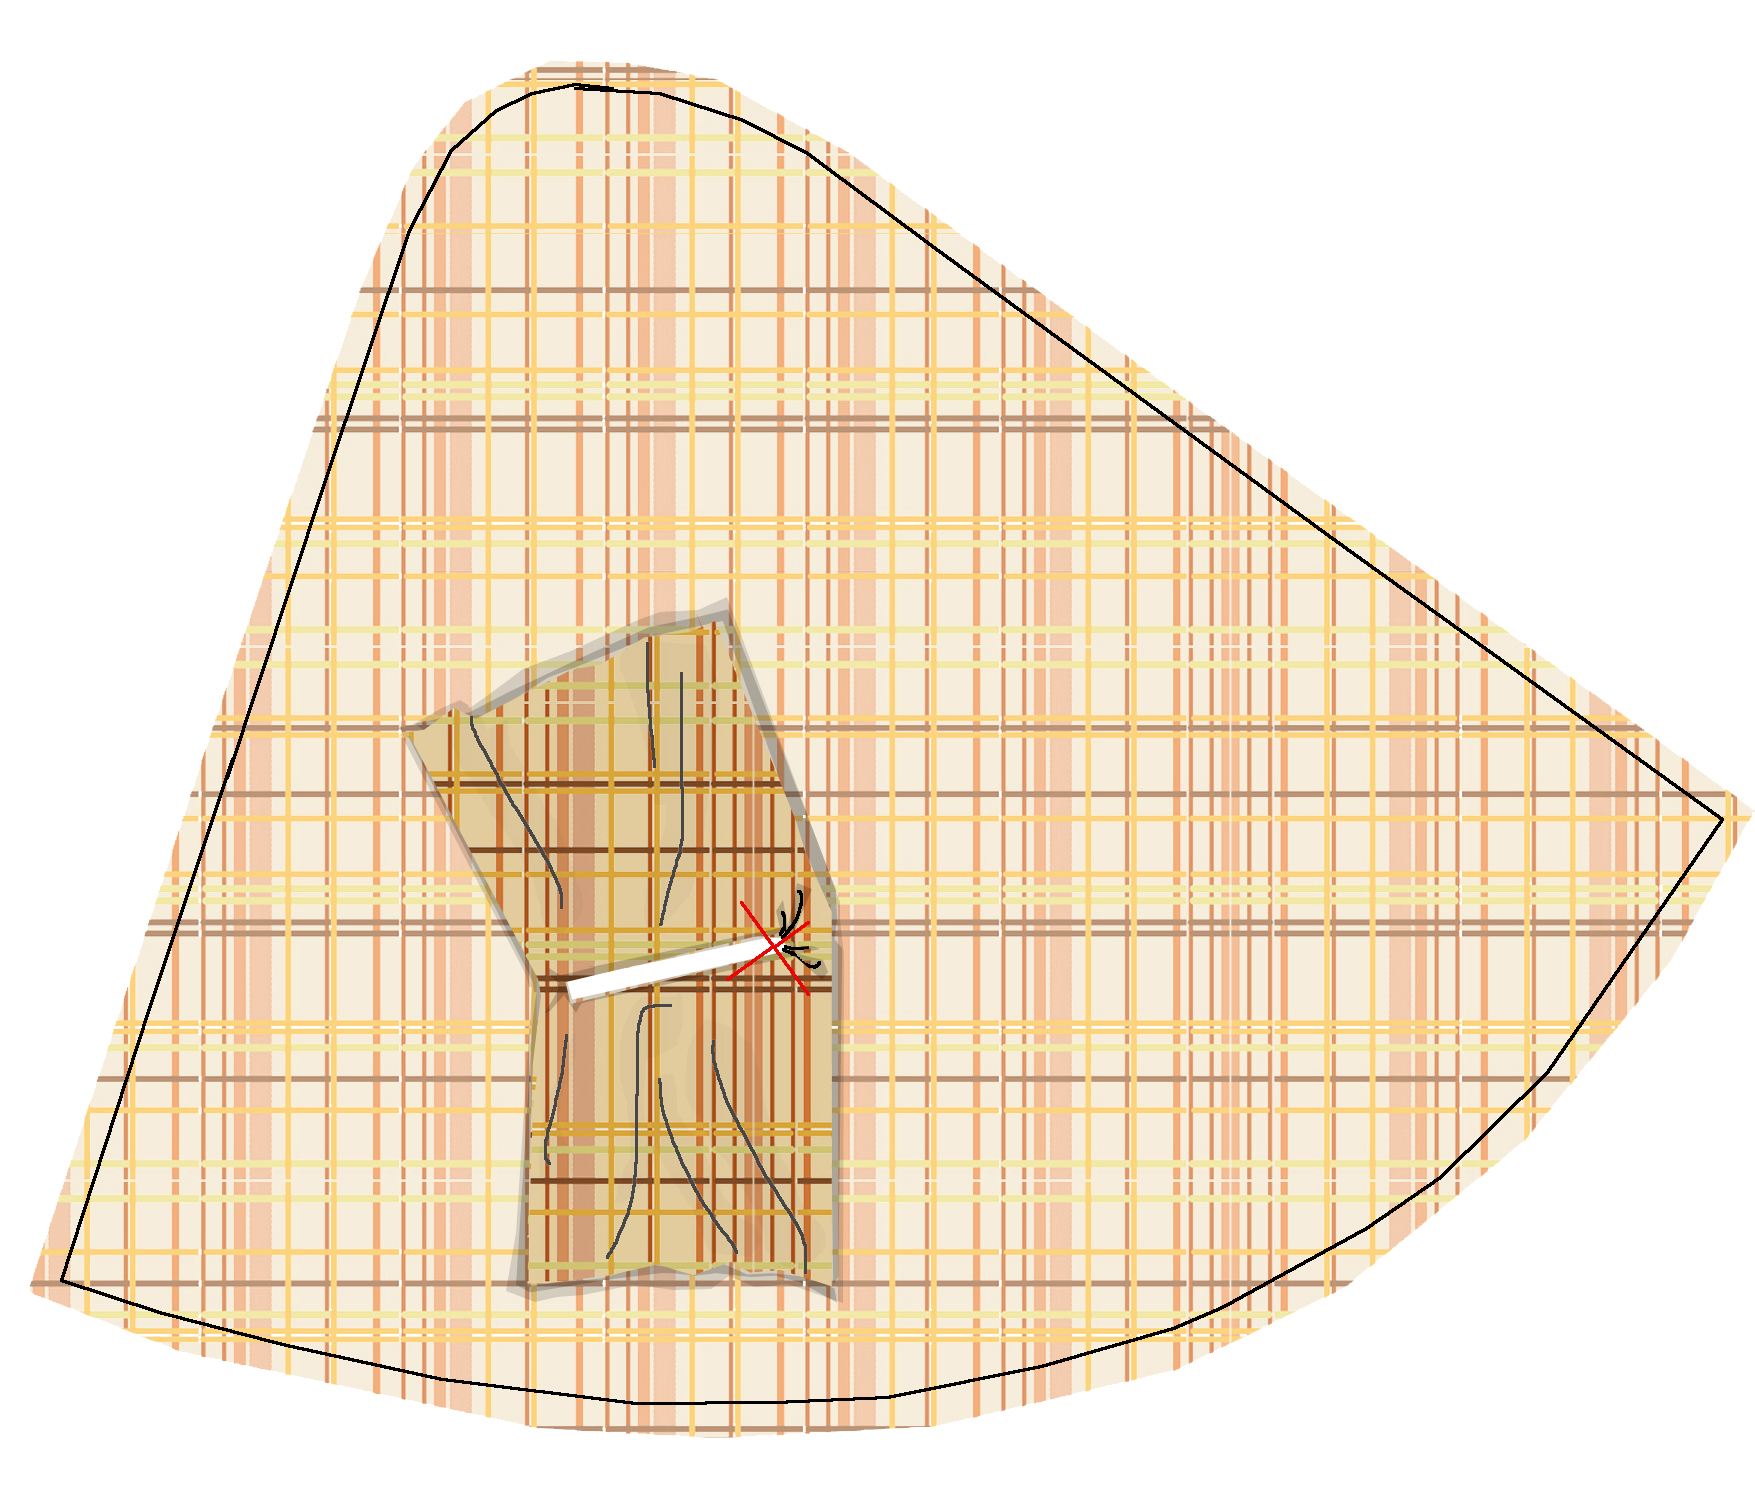
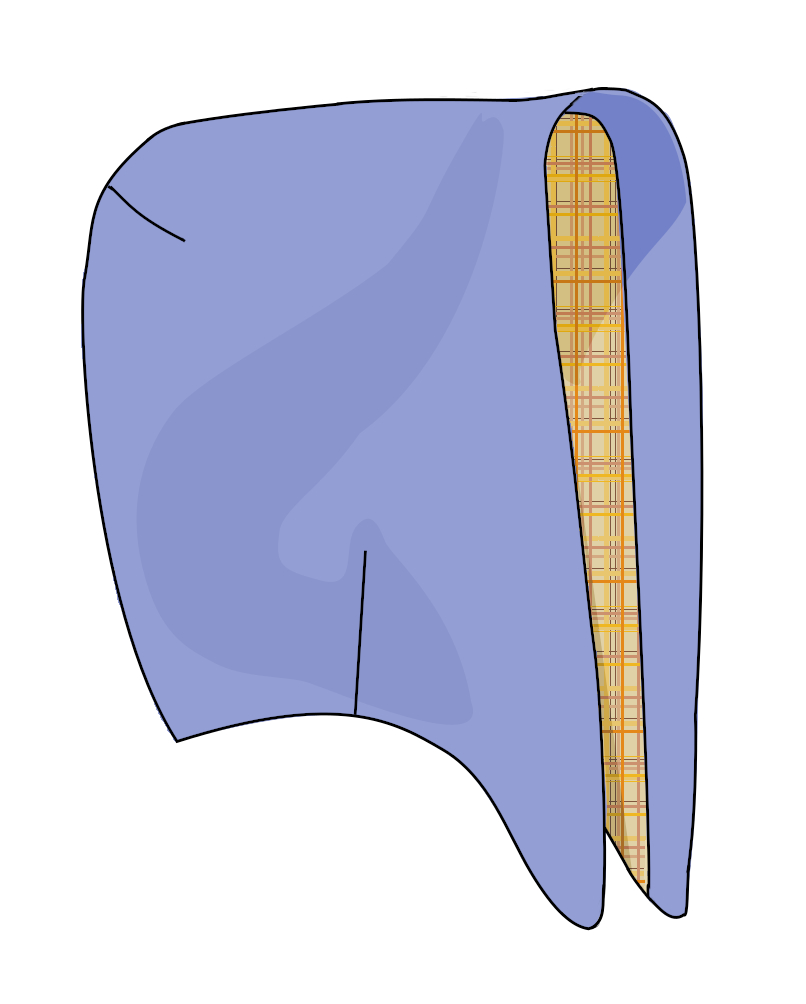
Turn right-side out through slit in lining.
With your hand inside, push the seam out as far as possible. Press (not with your hand there!).
Closing the slit in the lining – recommended method: fold the lips of the opening together. Set your machine to your widest ordinary zigzag and loosen the upper tension (make a sample). Stitch the slit closed with the left stitch catching the two folds of fabric and the right side off the edge. When you open the lining out, the edges should meet neatly. This is the serger technique used for sweatshirt seams.
Alternately, close the opening with a narrow edge stitch. This will leave a slight ridge when opened out. This is how tailors bag a jacket hem, where the seam is hidden inside the sleeve at the upper arm. Or you can slip-stitch the opening closed by hand.
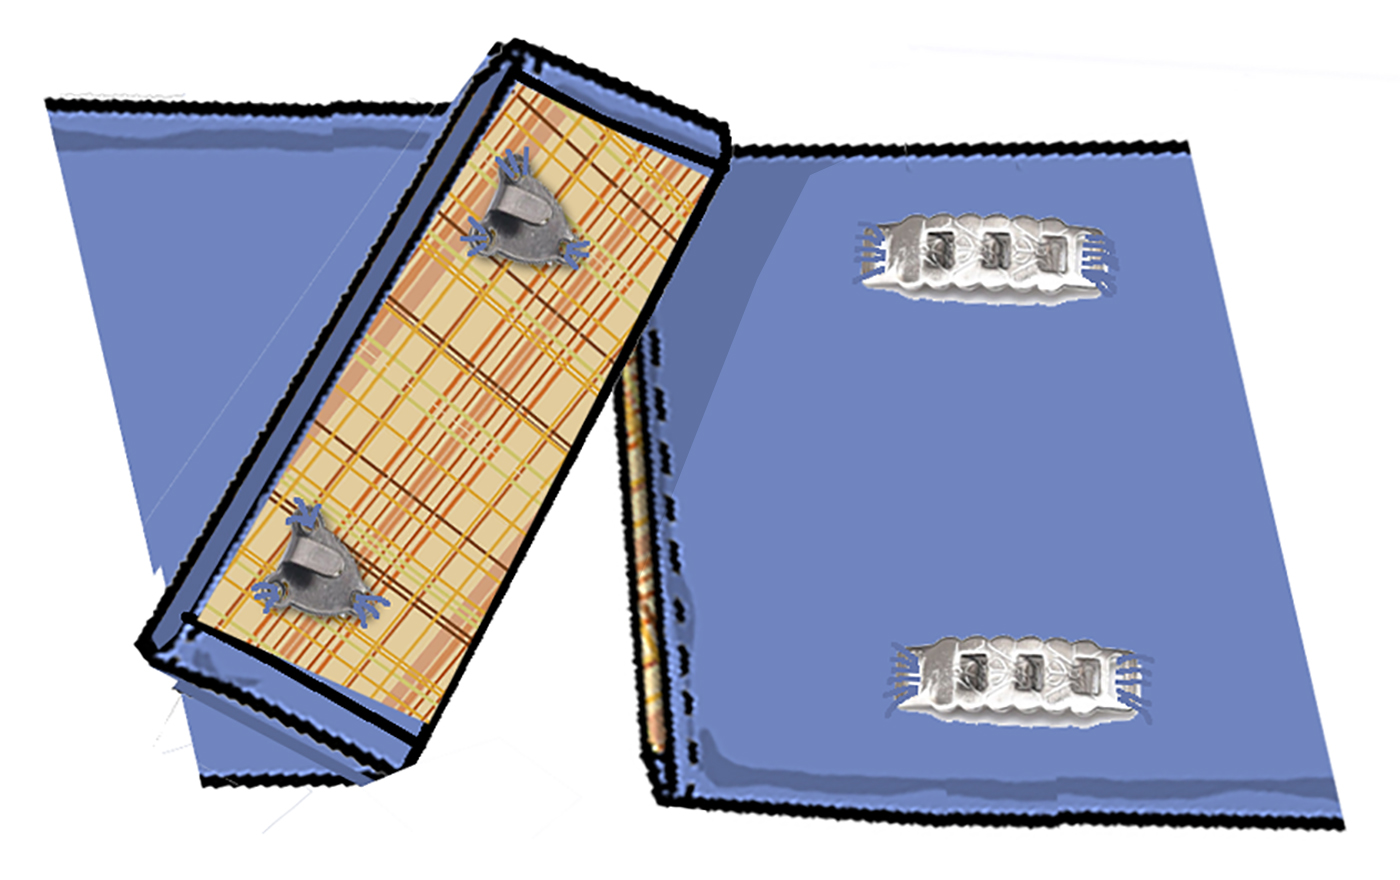
Adjust lengths of front wrap pieces if you’ve left them open. Turn raw edges in and slip-stitch by hand across the ends, or narrowly topstitch.
Add hooks and eyes to the front wrap pieces (or use another fastening method). This is an excellent place to use the adjustable skirt/pants ones.
Alterations for longer torso/greater body circumference
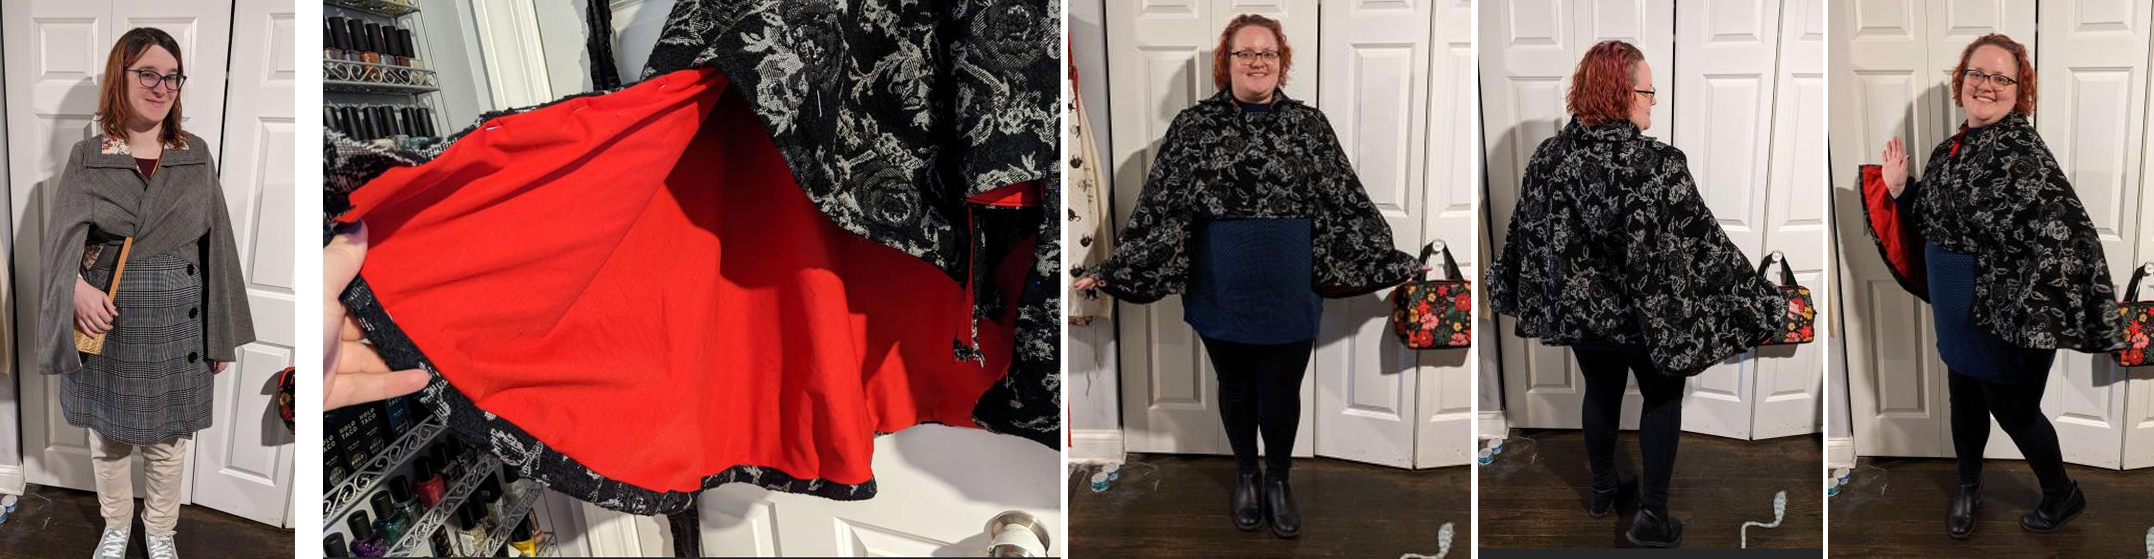
This person, Knitbelove, made the original pattern and “had to make it significantly wider through the back to fit their beefy shoulders.” I sent them my mock-up and notes for their next one (be;pw). Note the American Duchess footwear.
Previous cape on different model; new one finished.
These are duplicates of the graphics at the start of the instructions.
Using a cord or tape, get the length from your shoulder seam on one side of your neck, across your bust, around under your arm to past the mid-point of your back. Compare it to your pattern front piece. The graphic at right has had an extension added.
Here are three sizes of bodies. The black line is the waist, the magenta line is the side seam, the aqua is the center back. The middle and right capes need the front wrap extended.
All that’s needed is to extend the fronts with a rectangle of fabric long enough to overlap. There’s no reason to make the pleated sections longer as most of the fabric at the bottom end is going to be lost anyway, and the join will fall at the side seam. A tape measure is shown to determine the measurement, but you can use a piece of drapery weight cord or string.
It’s easier to fasten if the extension is run straight across the small of the back, with an angle at the side. Another option is to sew a ribbon or cord at the side seam to tie at the back, which makes it adjustable.
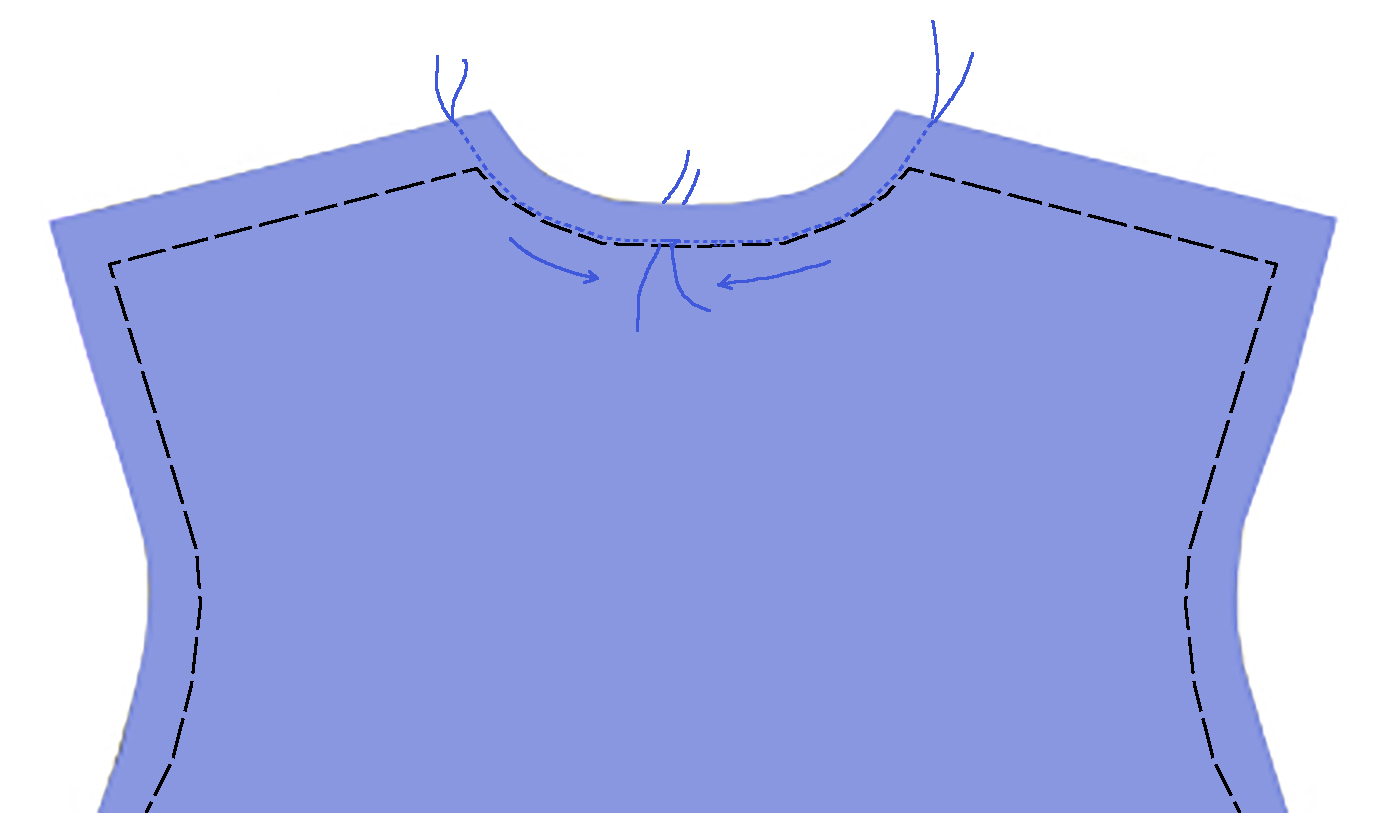
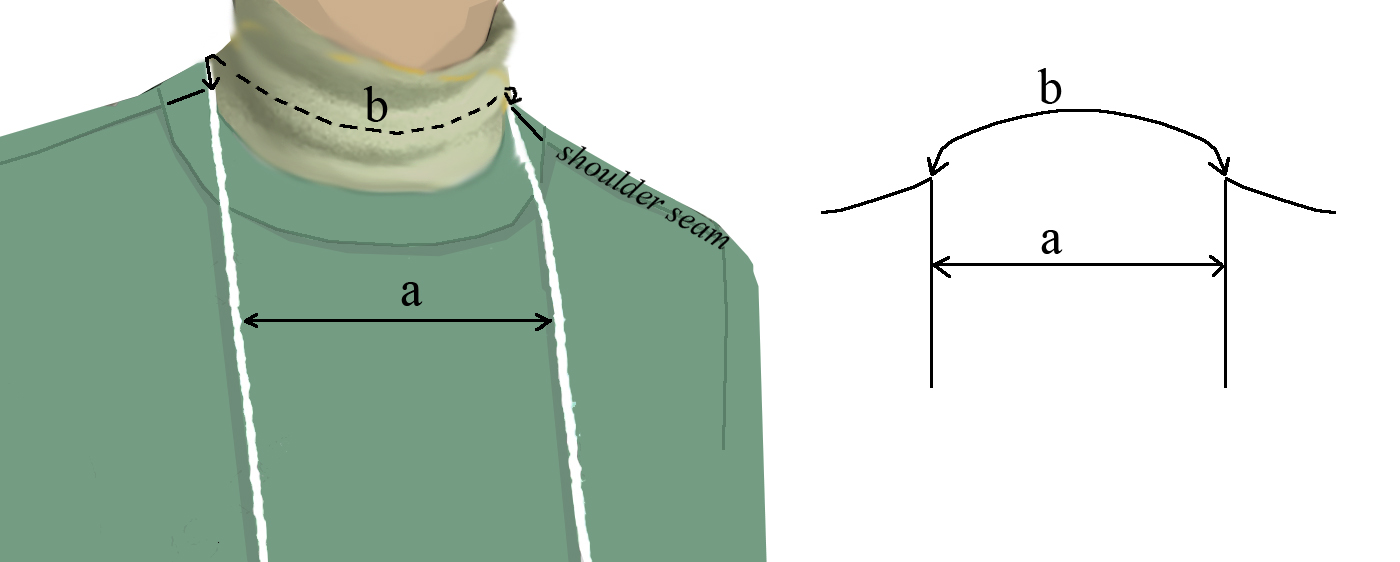
To reshape the neckline, drape a cord around your neck and measure the space between at center front (a). Draw vertical lines this far apart. For the back, grasp the cord where it crosses your shoulder seams. Place those points (b) on your draft and shape the cord between into a curve.
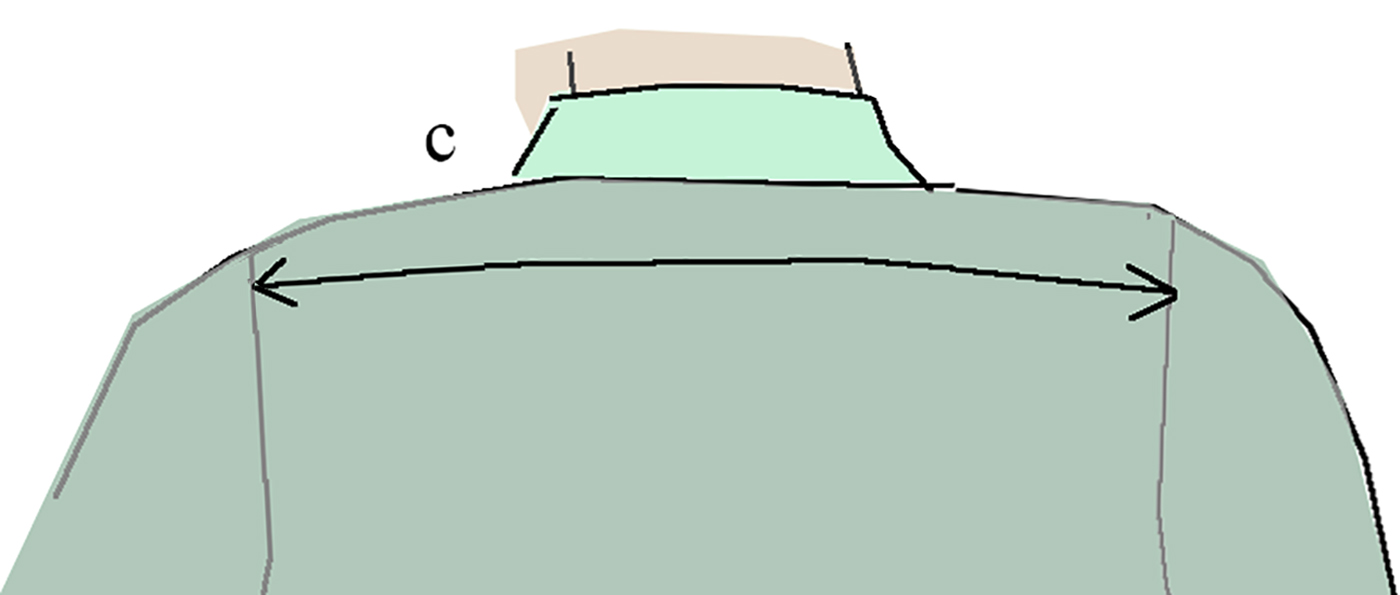
Measure your back width from shoulder seam to shoulder seam (c)
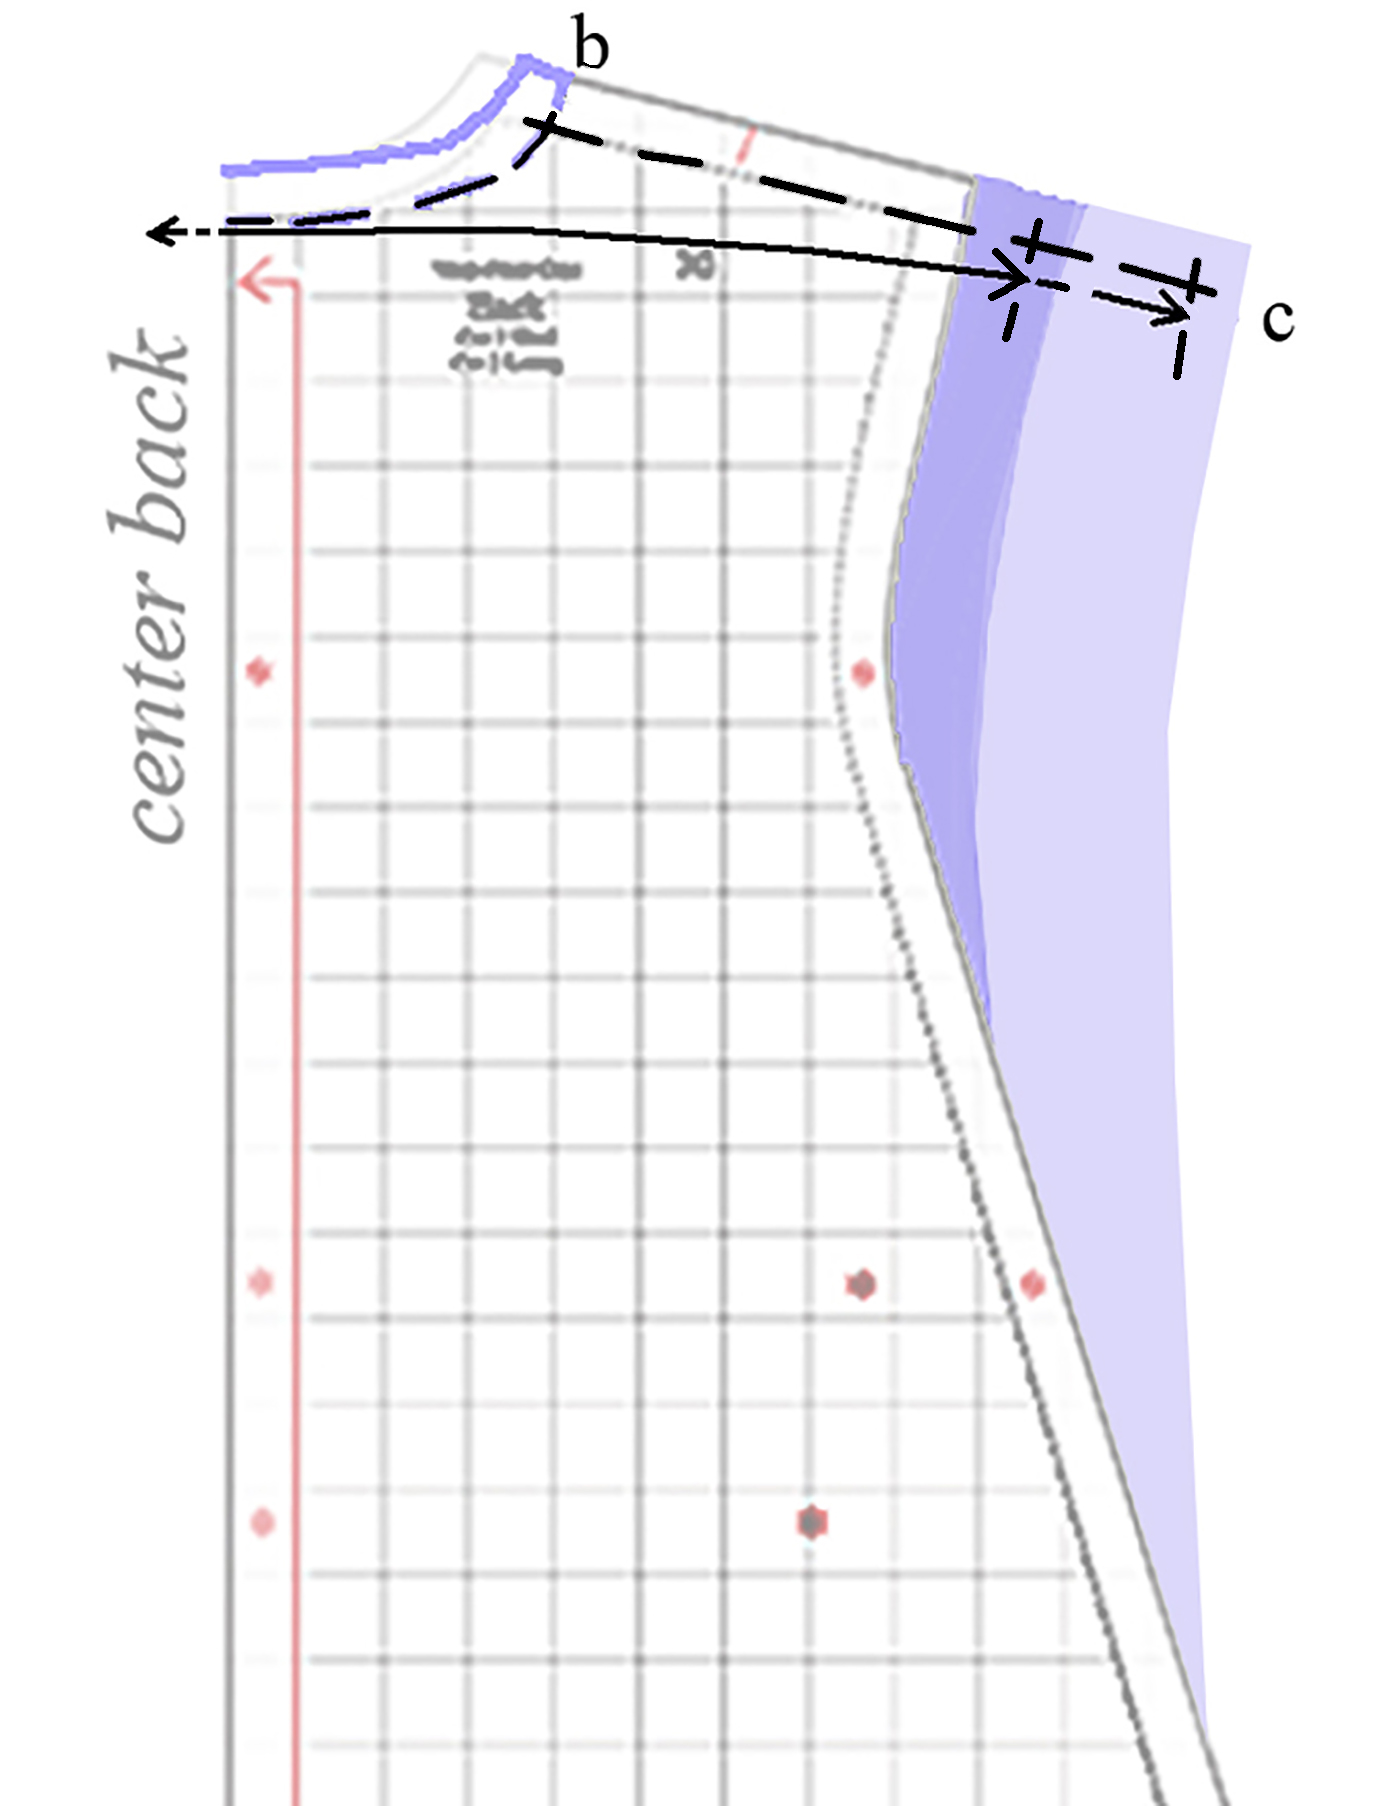
Redraw your corrected back neckline (b) on the back pattern piece. Extend the shoulder seam to match your upper back width (c). Two options are shown. For a broad back, the added section may extend well below the waist.
The front shoulder seam will need to match the back. The length of the front above the slit falls somewhere between the crease of the elbow and a hands’-width above that, depending proportionally on the length of the torso, height of the breasts (particularly if full), and personal preference.
Match the front shoulder seam to the back. Extend the front armscye, straightening it out slightly at the bottom so it doesn’t bubble where it joins the sleeve.
A full bust and a lower start of slit needs a bulge to go over the breasts. Curve the line back in at the waist. This length bears no relation to what’s happening on the back.
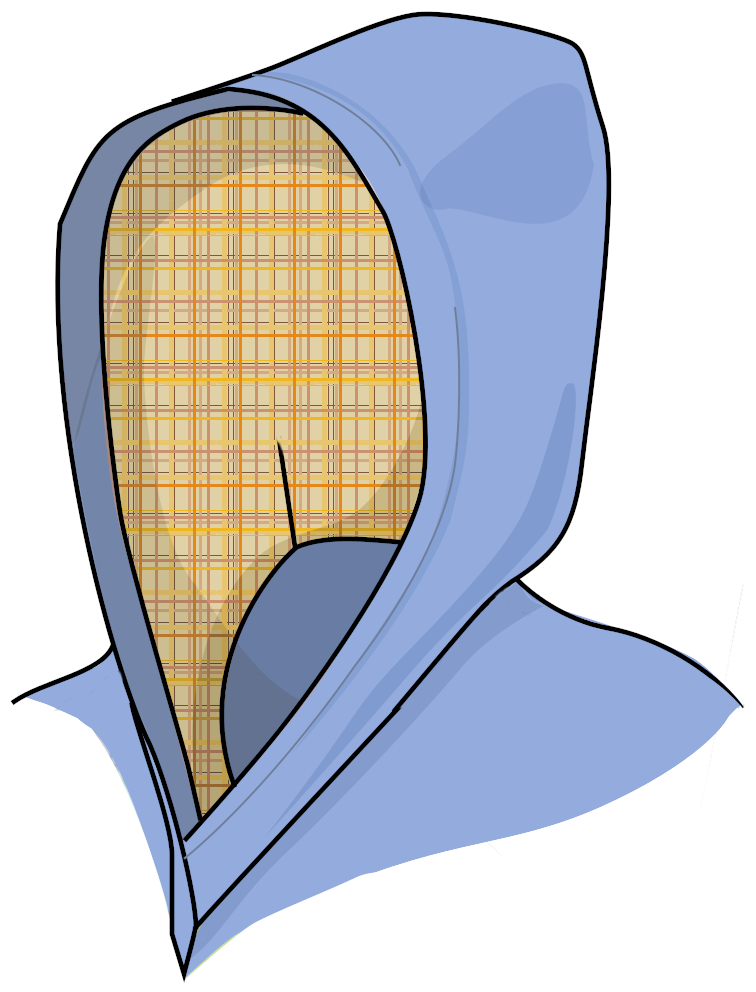
Optional Hood:
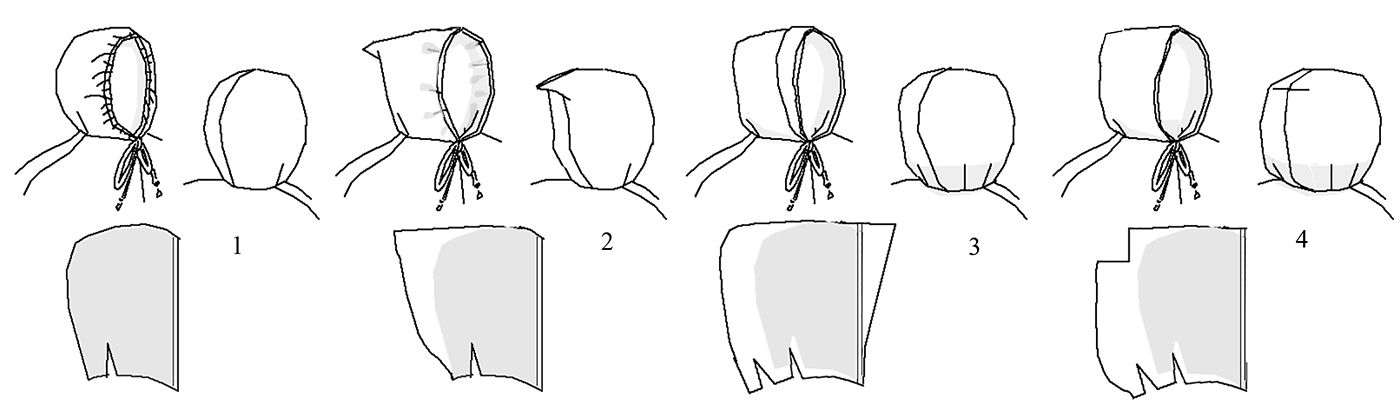
Many hoods that are simple extensions to a garment are too skimpy: turn your head and you’re looking at the inside of the thing. They’re more comfortable to wear if they’re roomier. The back can be pointed, rounded, or squared off. The front edge can be pulled in with a drawstring, have an extension that folds back to keep rain out of the eyes, or both.
Examples of hoods
The hood is designed so that the main fabric turns to the inside, forming an edge with a slight flare to keep the rain out of your face.
The hood patterns (to print on U.S. 8.5 x 11″ and on A4) are up with the main patterns.
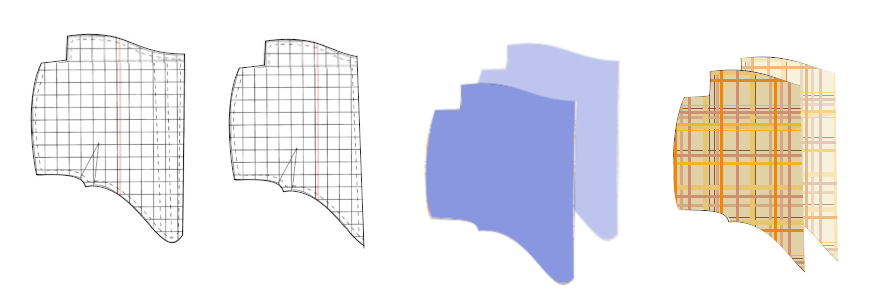
Cut out two pieces of your main fabric and two of your lining. If desired, fuse interfacing to the narrow trapezoids at the front edges that will turn back to the lining. Refer to your pattern; it’s the shaded area.
Sew the darts in each piece; press as sewn and again towards back.
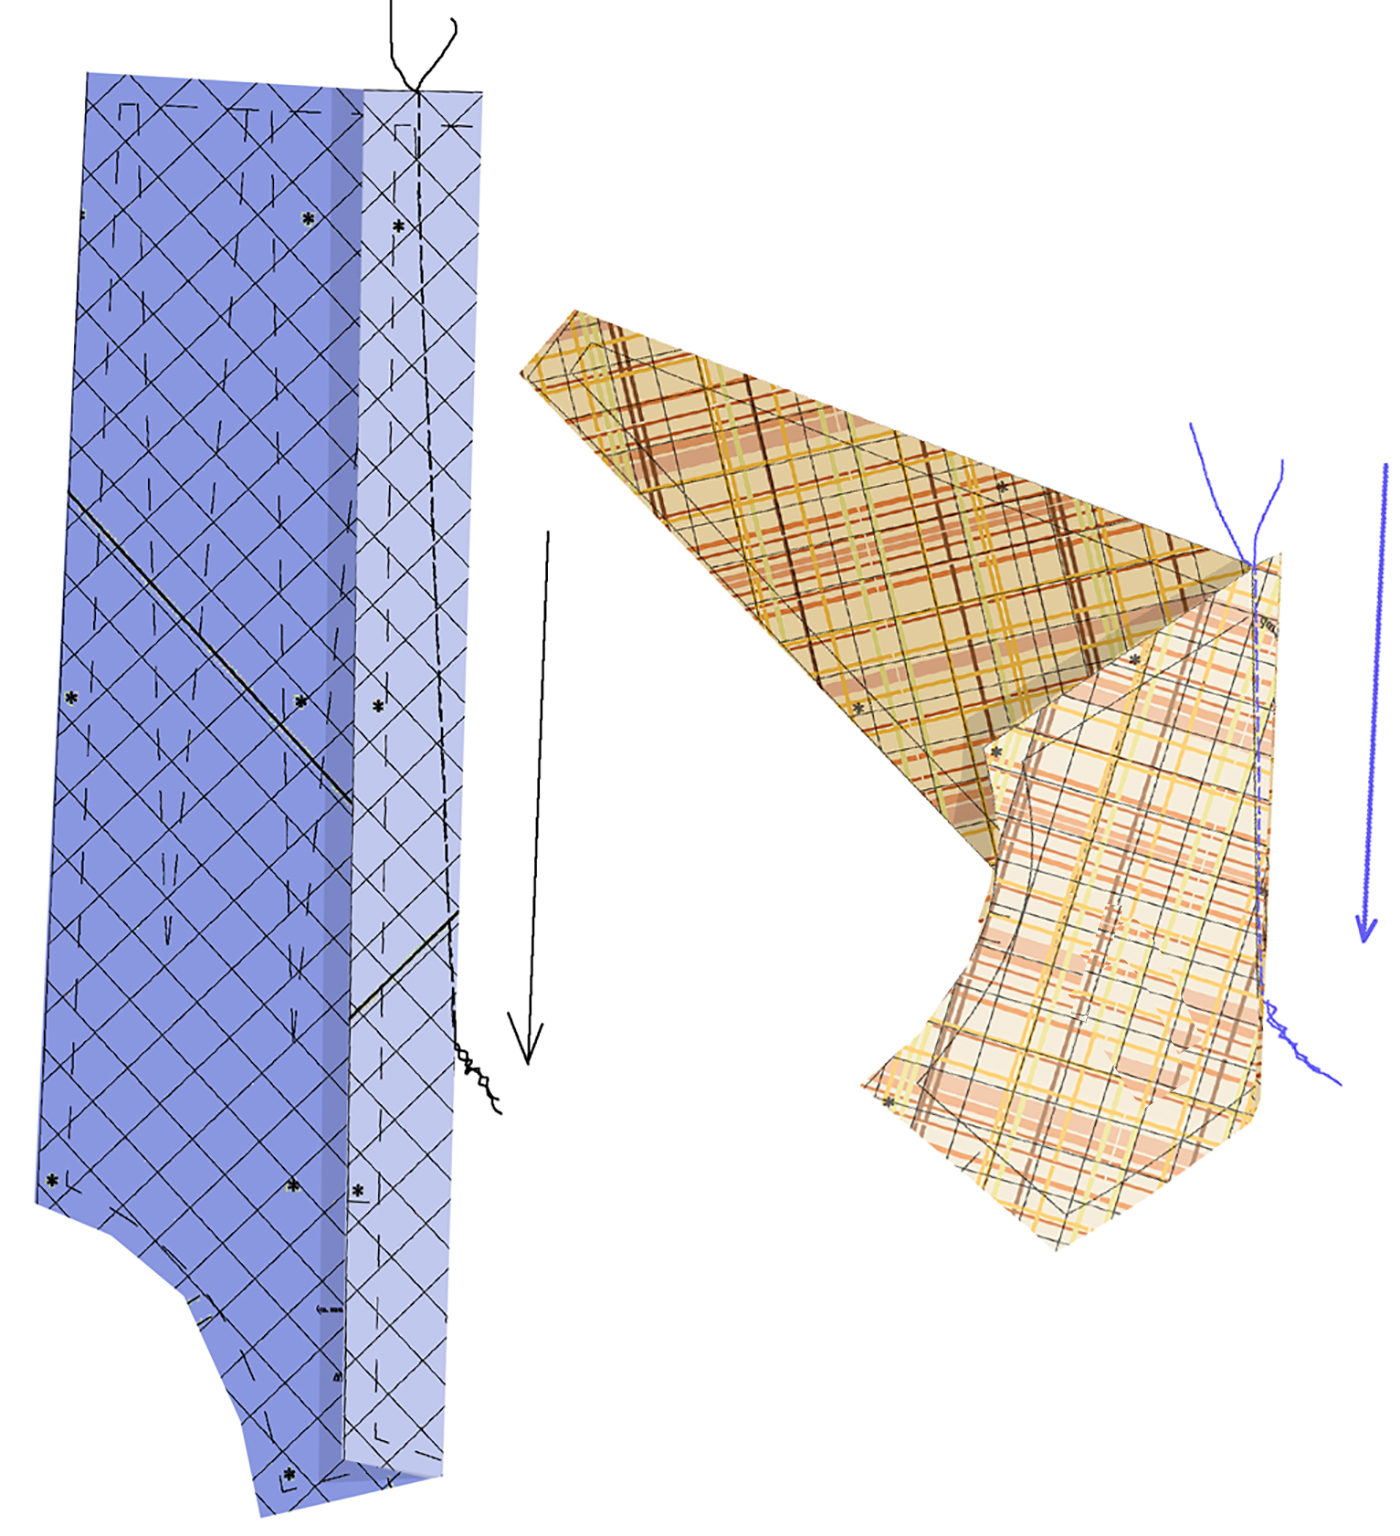
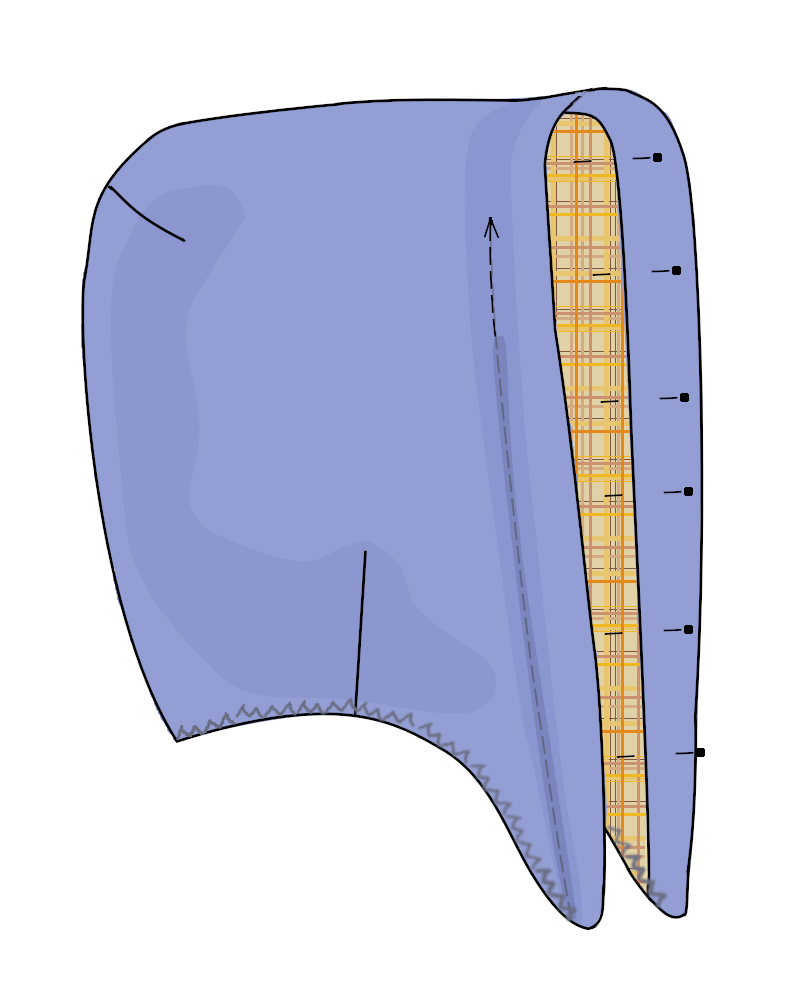
Lay each set of pieces right sides together. Sew the center back seam. Sew the seam over the top of the head. Press.
Slide the lining inside the wool, right sides together (the lining will be much shorter). Sew the center front seam. Press.
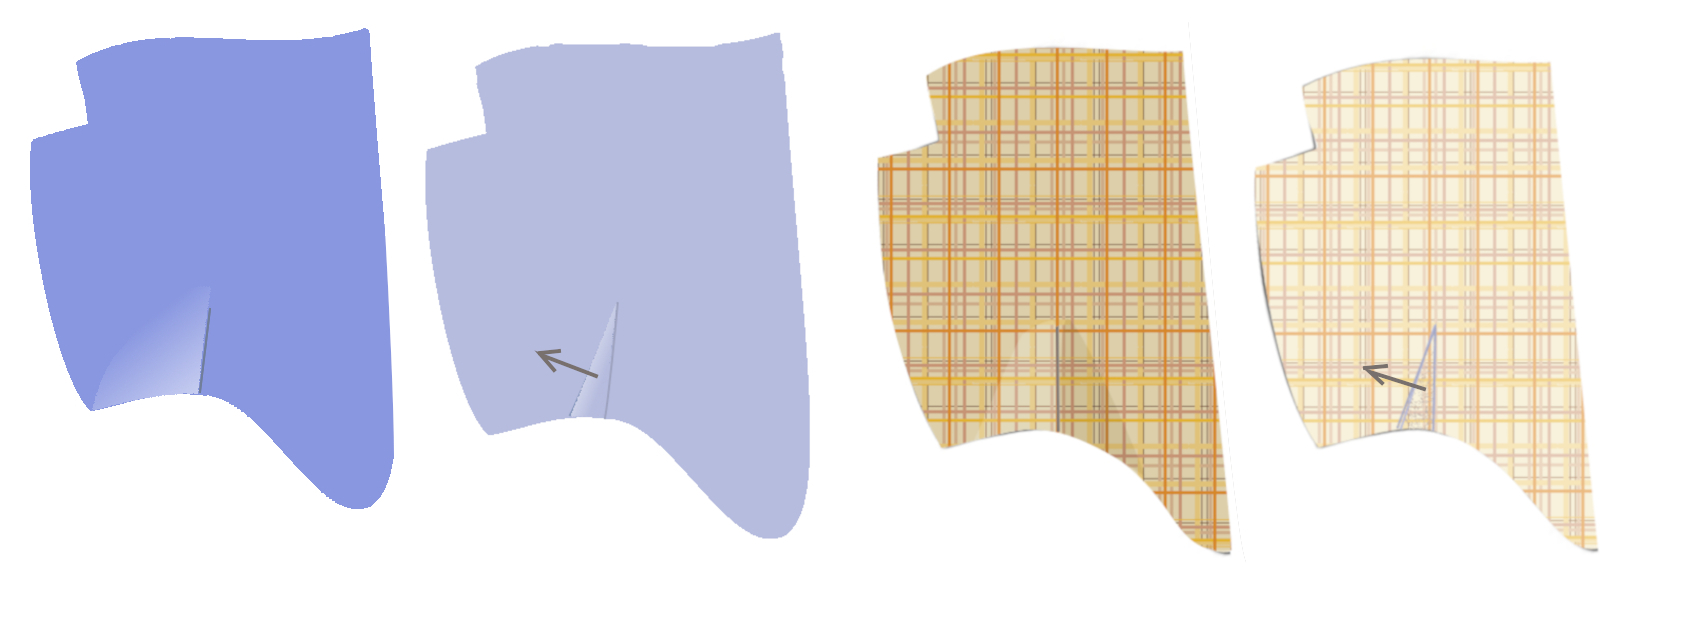
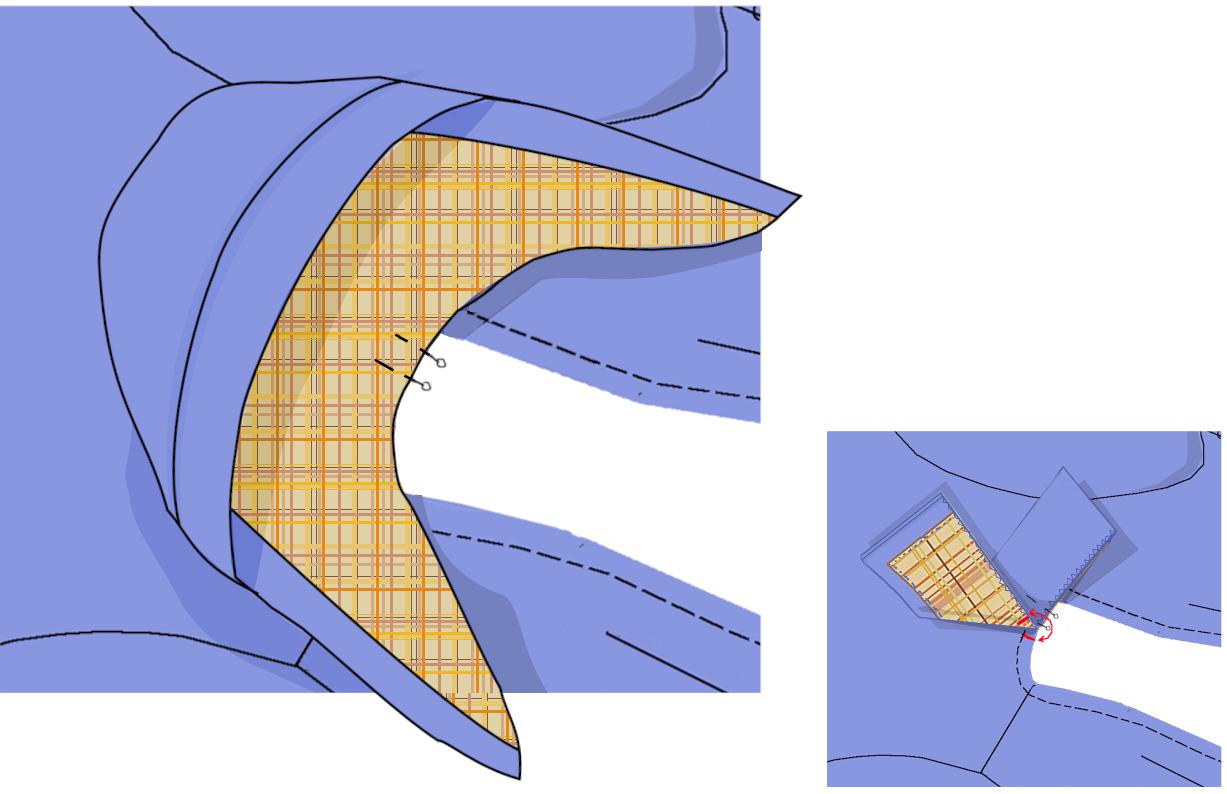
Open out as shown. Reach up through the open bottom and turn the wool to the inside, matching the raw edges of the cut-out squares.
Pinch both layers into a straight line at the top back. Sew. Press. Turn right-side out.
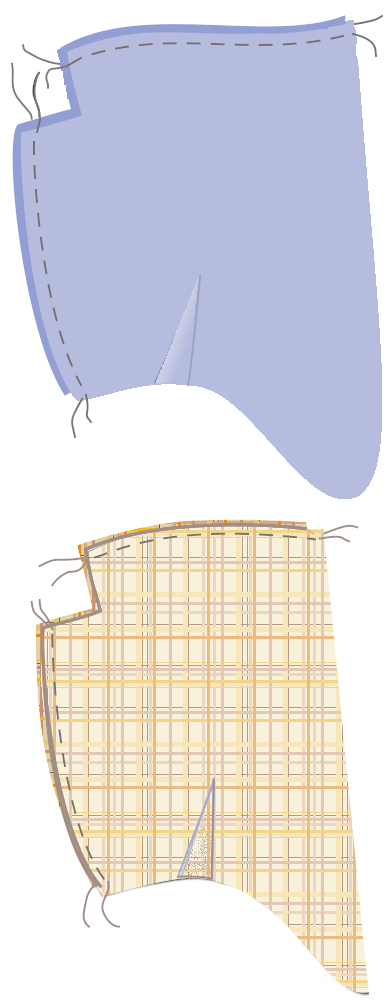
Turn the hood right-side out through the bottom opening and starting at the center back seams, track the layers to the fronts. The wool will wrap to the inside.
Smooth the fold at the front into place and press. Pin. Sew at the join to stabilize. Baste all layers together at lower edge.
Fold the cape back neckline in half to find the center. Lay the hood’s back seam on this. Without stretching, pin hood to cape. Sew. Press. Scroll up to what’s shown in the smaller graphic at right, and proceed with the steps that followed to replace the collar with your hood.