
Woman’s body, man’s grading, counteracting
consolidate/edit
From the Muna and Broad site:
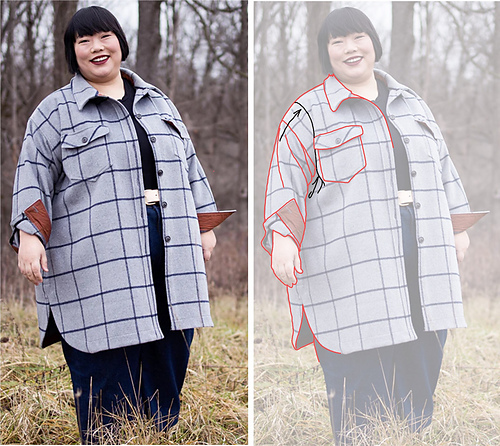
This coat-jacket cries out to have the dropped shoulder moved to more of a set-in sleeve. This would reduce that wad of fabric at the lower armpit and be much more comfortable to wear, which helps a person feel at home in their body.
This is exactly what was done for the Neon Nurse; see below.
This is basic theory/overview. Most sleeve caps/armscyes have more shaping than what you find in a t-shirt.
How to figure to make a block for yourself without the fuss of working up a muslin (or three) that will never be wearable?
Start with any garment that fits you about as this coat does this person. A tee will work as long as it fits loosely enough that its knit isn’t stretched.
Lay it on pattern paper with the sleeve smoothed out from the shoulder and trace around half of the body and the sleeve to the upper arm. There will be a fold at the underarm, that’s expected. Ignore it.
Without disturbing the body of the shirt, slide the sleeve up so that the underarm is smooth and draw that area.
Put on the garment to see how long your shoulder seam should be. Put your opposite hand on your shoulder and raise your arm. Mark a point 1 3/8” / 3 cm out from the crease.

This does not capture seam allowances, which will be added later. The solid outlines here will magically become dashed to be sewing lines.
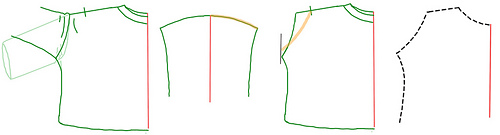
Create your working pattern: trace off the body; trace off and double the sleeve.* The highlighted section is what we must use so that the length of the armscye is unchanged.
While it’s possible to alter that length, it throws off other proportions so is best avoided.
Swing the armscye section from the shoulder to the original width of your front. Repeat for the back. Track every line you’ve adjusted so that seams go together 1:1.
That’s it. Your correctly altered block.
*Note: this sleeve has no ease as the cap is relatively flat. If you’re dealing with a higher cap, or you need more width around your bicep, please go to my web page here, then come back and holler for help so I can fill in what I left out.
My experience has been that the dropped shoulder is an artifact of using men’s grading for women’s bodies. Expanding the chest circumference and lengthening the shoulder seam is what works there.
The inertia in pattern development is massive. “New” designs for the Big Four are based on blocks that had been selling for decades. With the sad tendency to dumb down for the newbies who don’t want to mess with shaping, there’s no incentive to change.
I have met few professionals who have worked with larger sizes enough to know how to do this. I can’t be the first to have figured it out.
The typical gaslighting of “well, no one else is having problems” is less to do with body-shaming or the Heavy Hand of the Patriarchy (though that does creep in) than the “authority” being mortified and defensive about not having a clue how to fix it.
What’s sad and frustrating here is that while, as many have mentioned (phoquess for one), personalizing a block can be endlessly complex, there’s no excuse not to adjust shoulder width on patterns purportedly for women.
This client has a straight, flat back which did not need alteration. It seems weird to have different angles at the side seams, but what matters is that the stitching lines reconcile.
Ignore that she could never get her head through the neck without a placket.
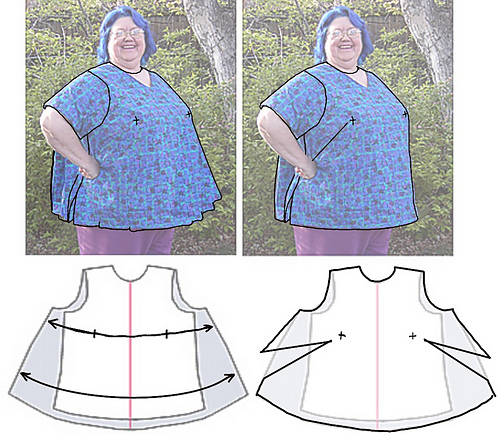
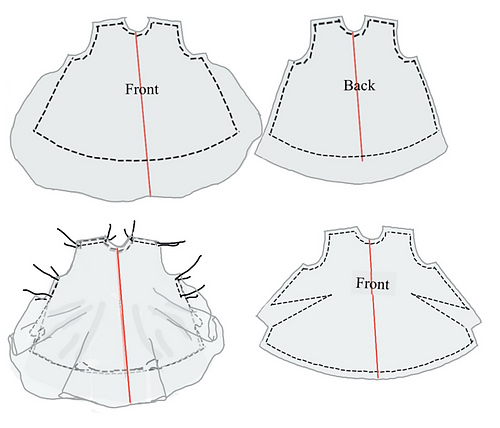
Swinging the side seams out is necessary to make enough room for her breasts and stomach, but it also creates extra fabric between those areas. A solution I often use is the French dart, which starts low on the side seam and stops short of the bust apex.
Where you run it and how much you take out are easiest to determine in the first muslin (which can be of wearable fabric).
You mark the sewing lines and then cut the front well outside the side seams and hem so that there’s room for the upper dart area to swing out. Sew the back and front, right sides together, at the shoulder seams and the tops of the side seams (the neck edge and armscyes can be finished). Nibble at the fullness for the French darts until it looks/feels right*, then sew, trim, and immediately alter your block.
* the hems may or may not align. Truing them parallel to the floor is your last step.
shoulder slope.
length of shoulder seam
front shaping: dart manipulation, the Princess seam
The industrial method for an apparent cuffed hem, sewn completely by machine:
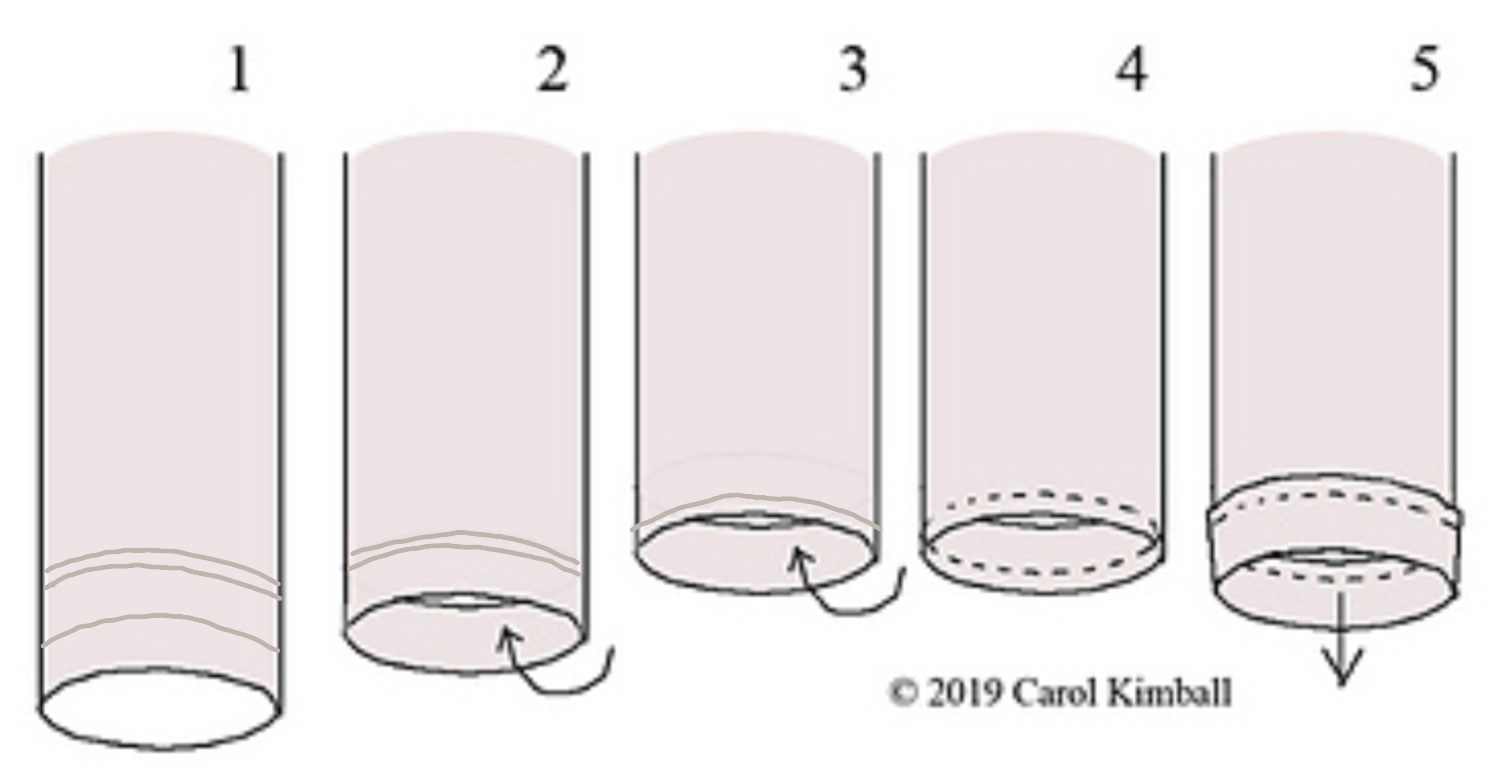
- Take a sheet of paper, make a flat version and fold it to see what length you’ll need. This will vary slightly by how deep of a cuff you want, and the TOC (turn of cloth). After this you can use it on any of your sleeve blocks, or, with adjustment for depth, a pants leg.
- Fold up to the inside. Press.*
- Fold up to the inside again, being sure that the raw edge is tightly in this fold. Press.
- Sew.
- Pull the cuff out, being sure the little flap is going up, and give a good press.
* Don’t skip the pressing! It’s critical for even stitching on the “cuff”.