
- Rotary Cutters
- Scissors/Shears
- Tagging gun
- Yarn caddy/spindles
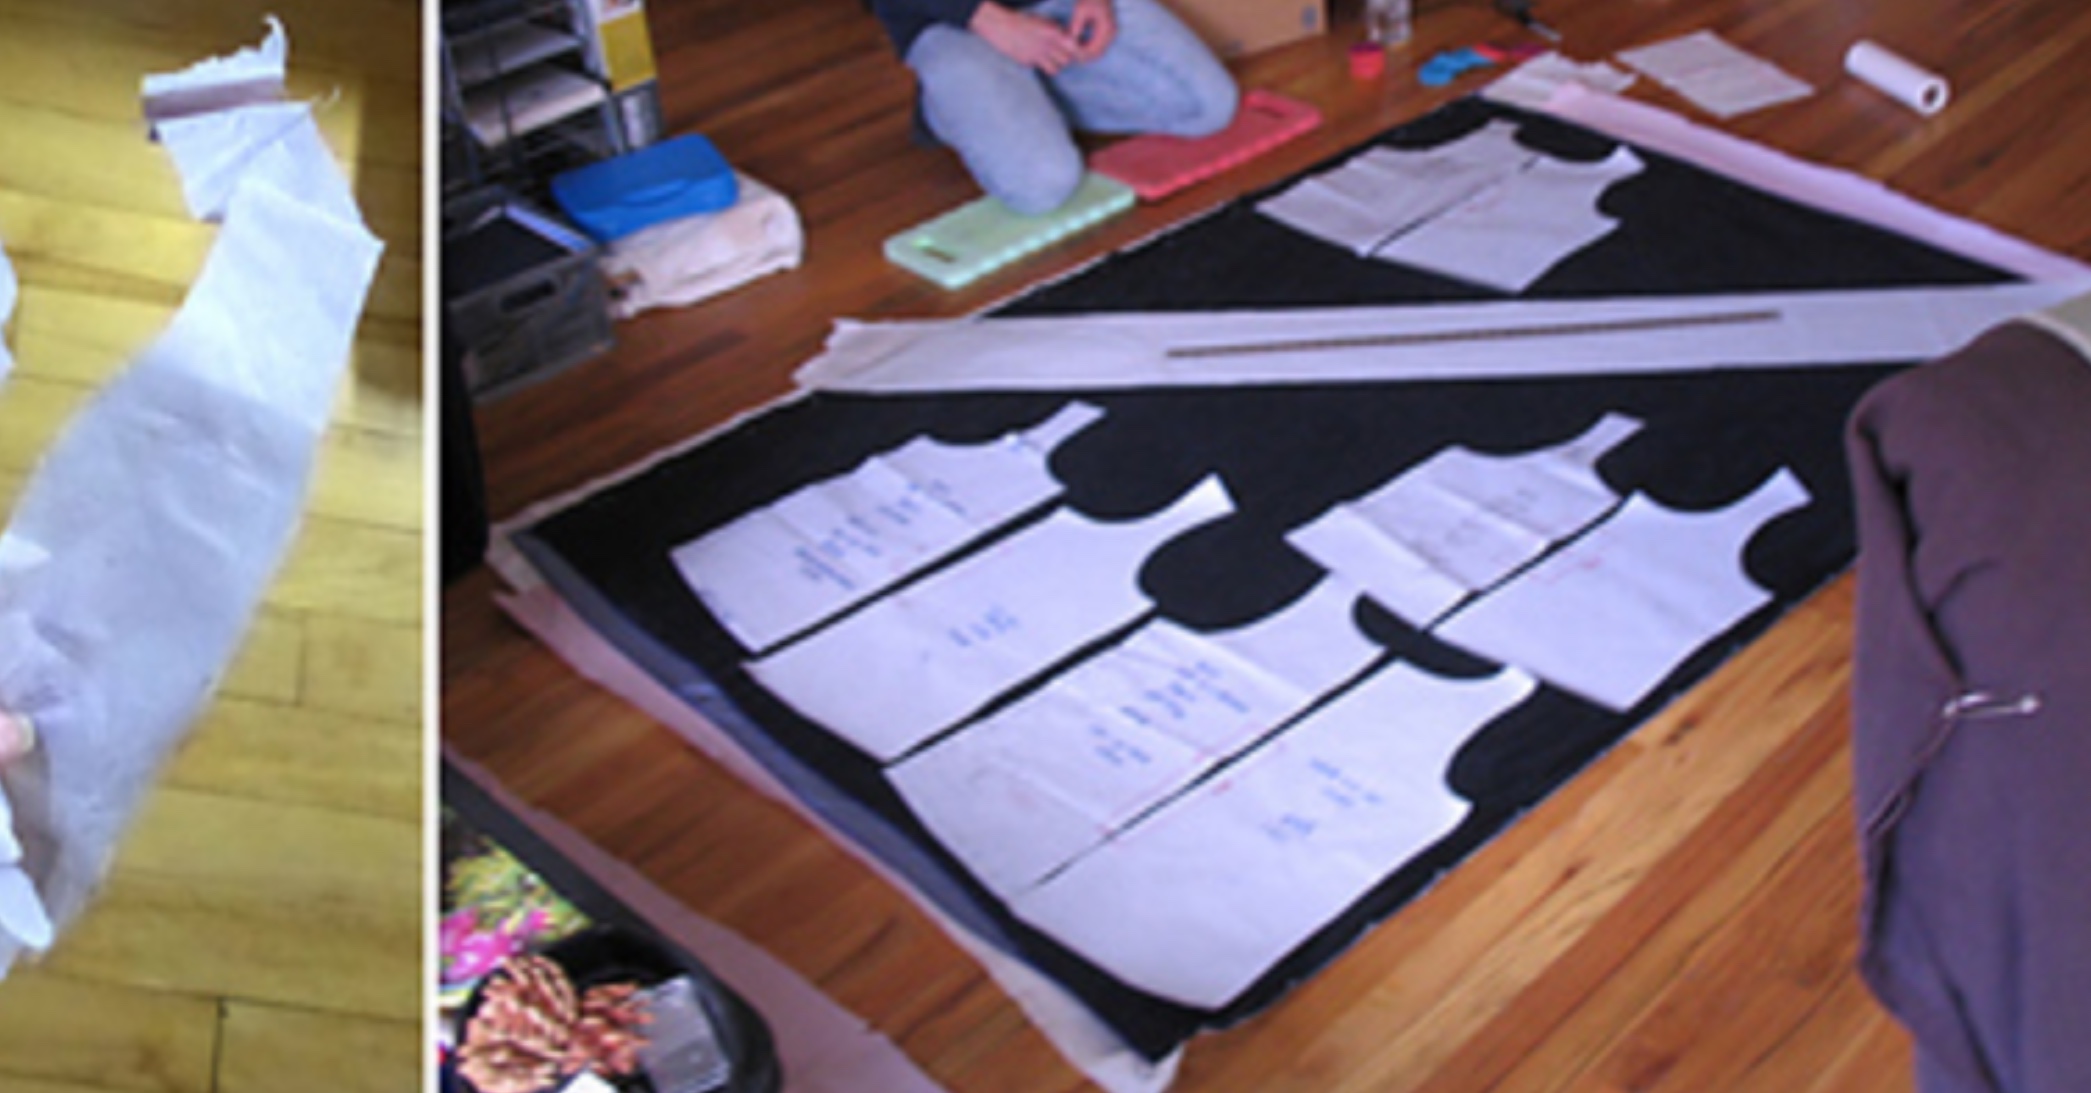
- Pattern-making: drapery weight and physicians’ exam table paper
- Clover Seam Ripper
- ChiaoGoo knitting needles and crochet hooks
- Needle boards (pressing aid)
- Markers (in knitting)
- PVC Niddy Noddy
- Point-Turner from a chopstick
- Ergonomic Sewing Machine Setup
- Double-ended Crochet Hooks
- Glue
- Friction hook for Portuguese knitting (add the one Irene sent)
- Sewing Machine Feet
- Marking on dark fabric
- Waxing thread
- Leather Punch
- Thimbles
- Adding Twist (or plying strands) Without a Wheel
- Embroidery Needles
- Thread Lubricant
- Tissue, flimsy, for stabilizing thin/slippery fabrics
- Exam Table Paper

From an ergonomic standpoint, rotary cutters are much easier on the hands/wrists/arms than scissors.
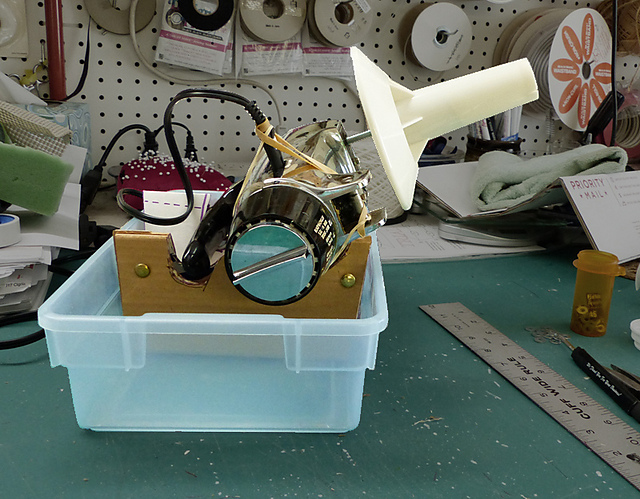
I do almost all cutting with this Chickadee; after the mittens the last couple days (with very little work since spring) I’m not feeling the least bit sore. These are pricey ($485 plus shipping from SouthStar, a good U.S. supplier); mine is a step down from the beefier ones used in commercial production.
People may think that the 45 mm. blade is too big for tiny curves. It does fine with the mitten’s area inside the thumb, which in the baby size is less than 1/2” across.
Roughly twenty years ago my sewing & design professionals group devoted a session to checking out every cutting tool we had: scissors, shears, electric and non-electric rotary cutters, from the cheesiest dollar-store scissors to the Gingher-level-sublime shears for cutting single layers of thin, slippery stuff (in commercial production you layer multiple plies of fine silk with tissue paper). This model of Chickadee blew everything else out of the water.
Every couple dozen pair of mittens I take a few minutes to unplug (duh), disassemble, clean and oil: fast and easy (felted sweaters throw far more lint than fabric*; I wear a dust mask). Partway into last season I used Pine Ridge funds to buy a replacement blade; my original with all its parts from its box is still going strong.
If you can’t afford to pop for one of these, don’t bother with the in-between electric toys: their vibration will have you aching after ten or fifteen minutes. Step down and accept the Fiskars, the best non-electric job.
* this photo was taken when on break before cleaning the puppy – note the lint around the edge of the blade.
ETA: a source for the Chickadee II Now red. Same specs as mine.
What if you’re using the hand version?
Keeping the blade sharp is critical. Your options are to buy cheapo blades and toss them when they get dull, or invest in quality blades and a sharpener (the Chickadee has one built in).
Invest in a pack of five/six quality blades, slip the dull ones to the bottom of the stack in the case, and resharpen them in one whack. You can safely shop by price (upper end) rather than brand name, though I’d go for Fiskars.
The hand-held sharpeners seem to work as well as the mechanized ones.
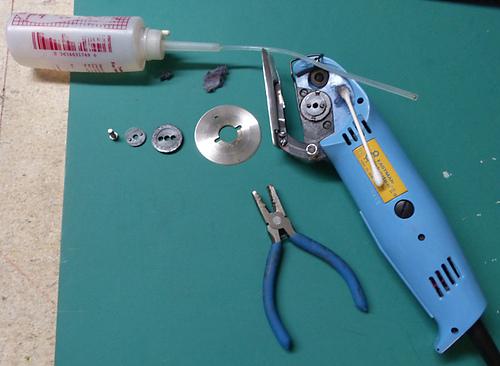
Cleaning and oiling the cutter regularly are important. I have it plugged in through an on-off switch. The switch is off and the unit is disconnected before disassembling the blade. Each piece is turned over as it comes off; a pin is used to get the wads out (two big chunks of felt under the oiling tube) and then a q-tip for the rest of the lint. A drop of oil; reassemble; reconnect, gently test.
Scissors/Shears:
- Get the best quality with the longest blades you can handle/afford. These days, there are many excellent brands.
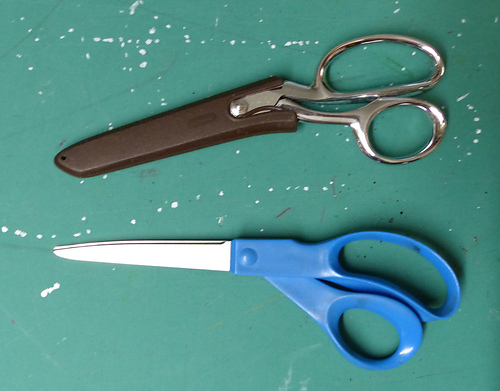
- Have a dedicated pair used only for fabric and scream blue murder if they’re used for anything else.* My studio has several work areas with identical sets of tools, which saves time and fuss.
- We learn as kids to cut on cheap paper that will tear if you close the scissors fully, so we chew through using only part of the blade. This creates a burr which moves closer to the fulcrum over time, so eventually we’re cutting with the only sharp part left, right by the hinge. When you cut fabric, always close the blades completely. If you’re making a short cut, use the tips.
- Polyester/acrylic fabrics will dull blades quickly regardless of their quality. If you’re cutting much of these, consider getting a replaceable pair and changing it out.
* In my studio, paper/non-fabric scissors have colored plastic handles, and are the ones sitting out (i.e. the ones helpful clients/visitors grab)
ETA: if you inherit a good pair, consider sending them to a professional sharpener who will either regrind them slowly or heat/cool them properly to restore their temper. If the blades get too hot (as with most counter-top units), they will not stay sharp. I ship off my good shears/snips when I’m going to be away on vacation every seven or eight years.
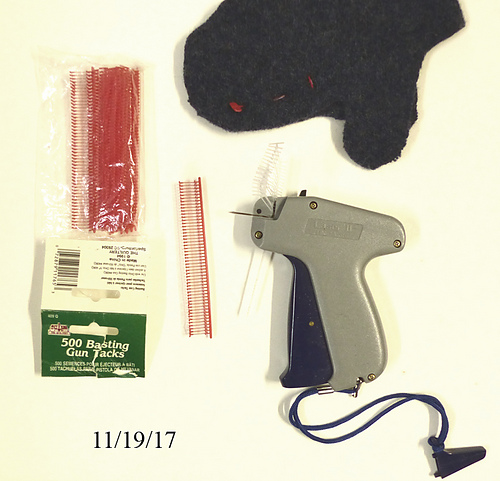
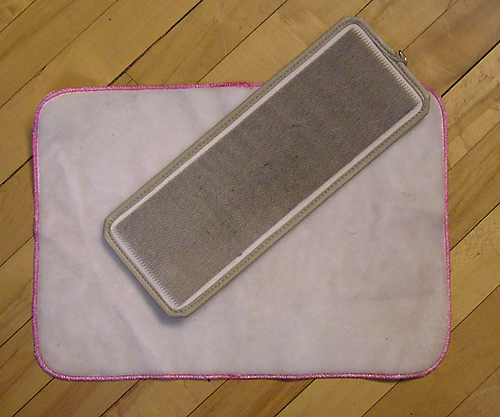
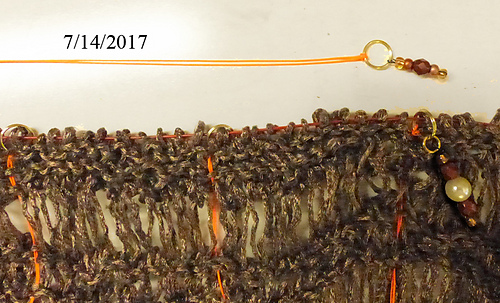
I use a tacking gun for many sewing-related jobs. It would certainly be my first choice for temporarily basting a quilt assembly.
I have two guns, the regular and a fine one.
Initially the fine gun and several packages of tacks/tags came from a big box crafts store (Michael’s?); since then the other one and replacement tacks have come from eBay.
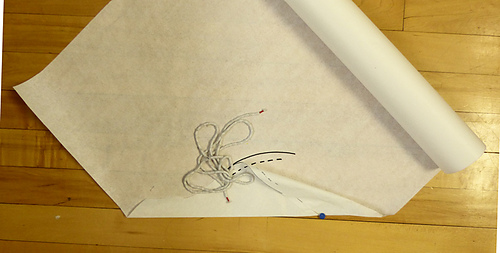
For going straight through several layers I’d use the fine gun and a short tack; alternately you could use long tacks and weave them through, as in the mitten at top (sample only).
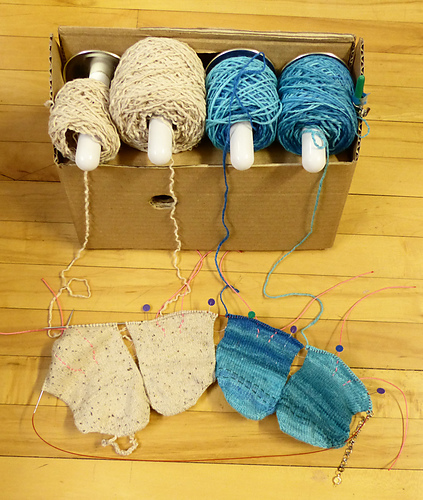
Yarn caddy (and sock bottoms with chain marker)
When I started using a spindle in the middle, even horribly slippery yarns feed evenly, and I find it’s much easier to work from both ends of an uncut length of yarn.
You can buy extra spindles for your ball winder, but this is rarely necessary. Common ones are toilet paper tubes (may have to cut if they’re bigger than your cake winder’s spindle), the holders CD/DVD discs come on, and even a roll of light cardboard or paper.
There’s nothing wrong with working from the outside, either.
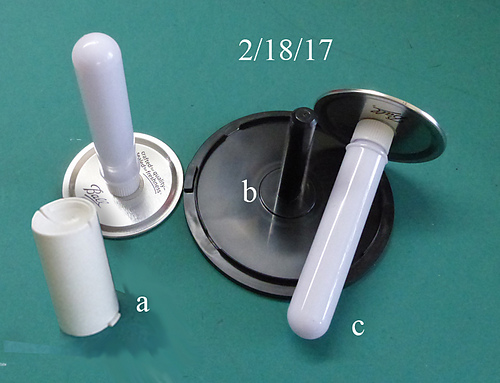
a. spare spindle from ball winder
b. core from CD/DVD holder
c. plastic tube epoxied to large canning jar lid
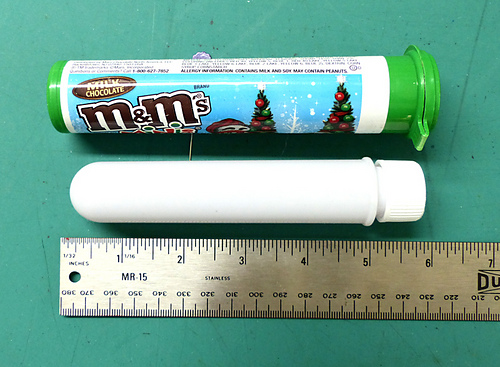
I found cigar tubes on ebay that were, like, US$30. Hah. No thanks.
Ditto holiday candy. There are some in tubes the right size and shape but very, very flimsy plastic.
M&Ms holiday packs have tubes that are okay for US quarters, but slightly larger diameter and square-ended, and still too short for a crochet hook. Also, the candy is terrible and I feel awkward about throwing it out or giving it away, and I’m not about to eat it.
Thread/bobbin storage:
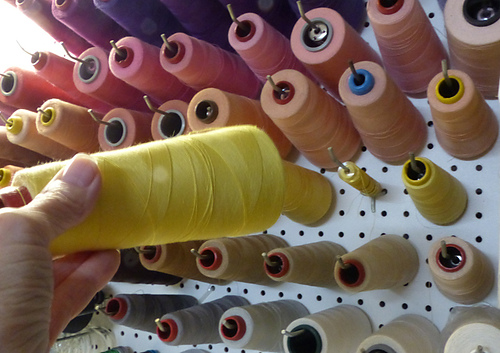
I store my cones on pegboard. The bobbins are directly under each. All my machines take the same bobbin; I’ve got 6-700 of them.
You can tack drapery weight inside the hem to pull it down.This is a couture touch (ooh la la) popularized by Chanel in her ladies’ jackets so that when the arms were lifted (as in the Royal wave) and then brought back down, the jacket wouldn’t hang up on the hips.
The best kind for this is metal pellets in a narrow cotton casing; fabric stores have it in their drapery departments.
Physicians’ exam table paper is strong, light, translucent enough to see through, far less flimsy than commercial pattern tissue, yet folds compactly for storage.
Sure, it’s narrow. Tape it together!

My favorite, after years of flailing around trying them, is this little brown job from Clover*. They’re well-engineered; the handle is comfortable and as it’s flattened, it won’t roll off your work surface. The working tip is thin and extremely sharp.
Seam rippers dull eventually. These seldom need replacing (as you can see, the logo has entirely worn off).
* Clovis is good. I like the Clover better.
Chiaogoo Interchangeable Knitting Needles:
With adapters you can use any size needle with the mini cables. I now use my small and large cables only for WIP storage (much as I loved them when ChiaoGoo started making them); I will use the mini cables with any size interchangeables for active knitting.
The sets come with connectors in their own separate bag, used to join cables into longer ones. Here are corresponding pieces from my Large set. Incidentally, if you ever misplace a connector (or simply need another), there are some lurking in your cable ends. Use your key to unscrew it.
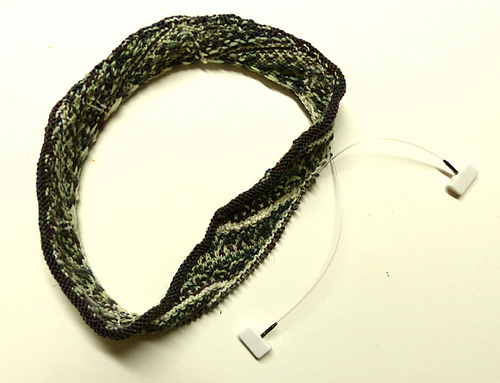
The cable ends are red for the Minis, white for the Smalls, and black for the Large sets.
Small Spin cable with two white end stops holding a piece waiting for winter to go on its sweater.
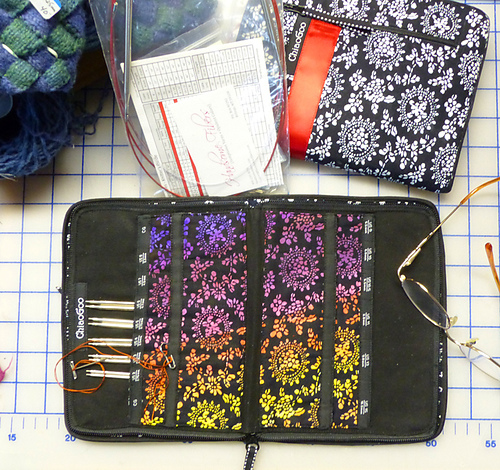
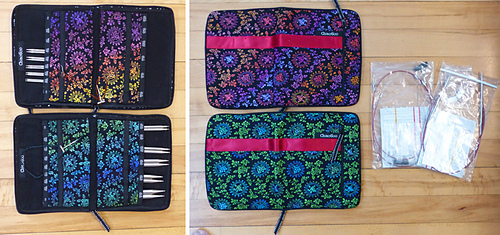
Cases were decorated with permanent markers. Spare cables are in a 5”x 8” ziplock.
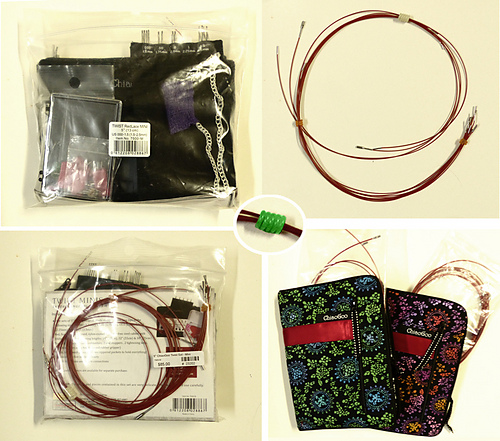
Plastic bags and little plastic coils. I found the latter originally as a knitting supply for keeping needles together; apparently they’re available cheap at Dollar-type stores as hair ties.
It’s easy to pull out the Mini cords and select the length I want (I use them for all work, with adapters for Small and Large needles*). To put it back, I poke the end through the coils; no fussing with rewrapping them.
Left, the original bag with all mini stuff in it.
* I love, love, love the Mini cables! The only thing I use the Small and Large cables for is to hold WIPs that are in time outs.
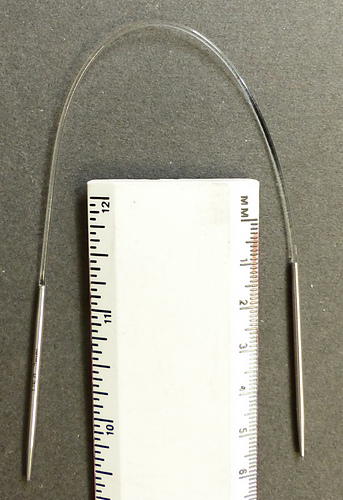
I usually do cables without an extra needle, but when I have to I use this tiny circ from Hiya Hiya.
It’s useless for anything else (for my style of knitting) but superb for this. It functions as if any of the other cable needle shapes.
It may be too limited a market for ChiaoGoo but I’d love to have one.
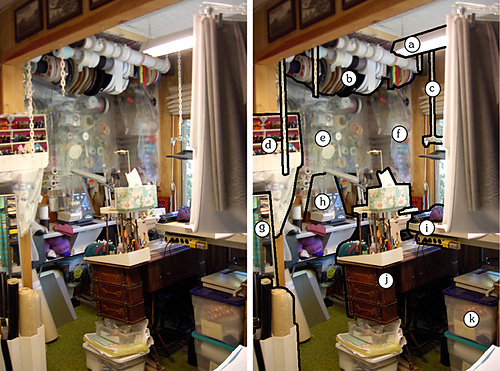
When I lived in a tiny mountain cabin. I suspended everything I could from the ceiling, and had curtains of plastic drop cloths over my vertical pegboard thread storage – “e” here. It worked well. Even the rolls of tapes/elastics weren’t dirty when I moved – dust tends to settle down rather than up.
My 411G is in its pre-ergonomic treadle cabinet. Here’s the Improved version:
Ergonomic Sewing Machine setup
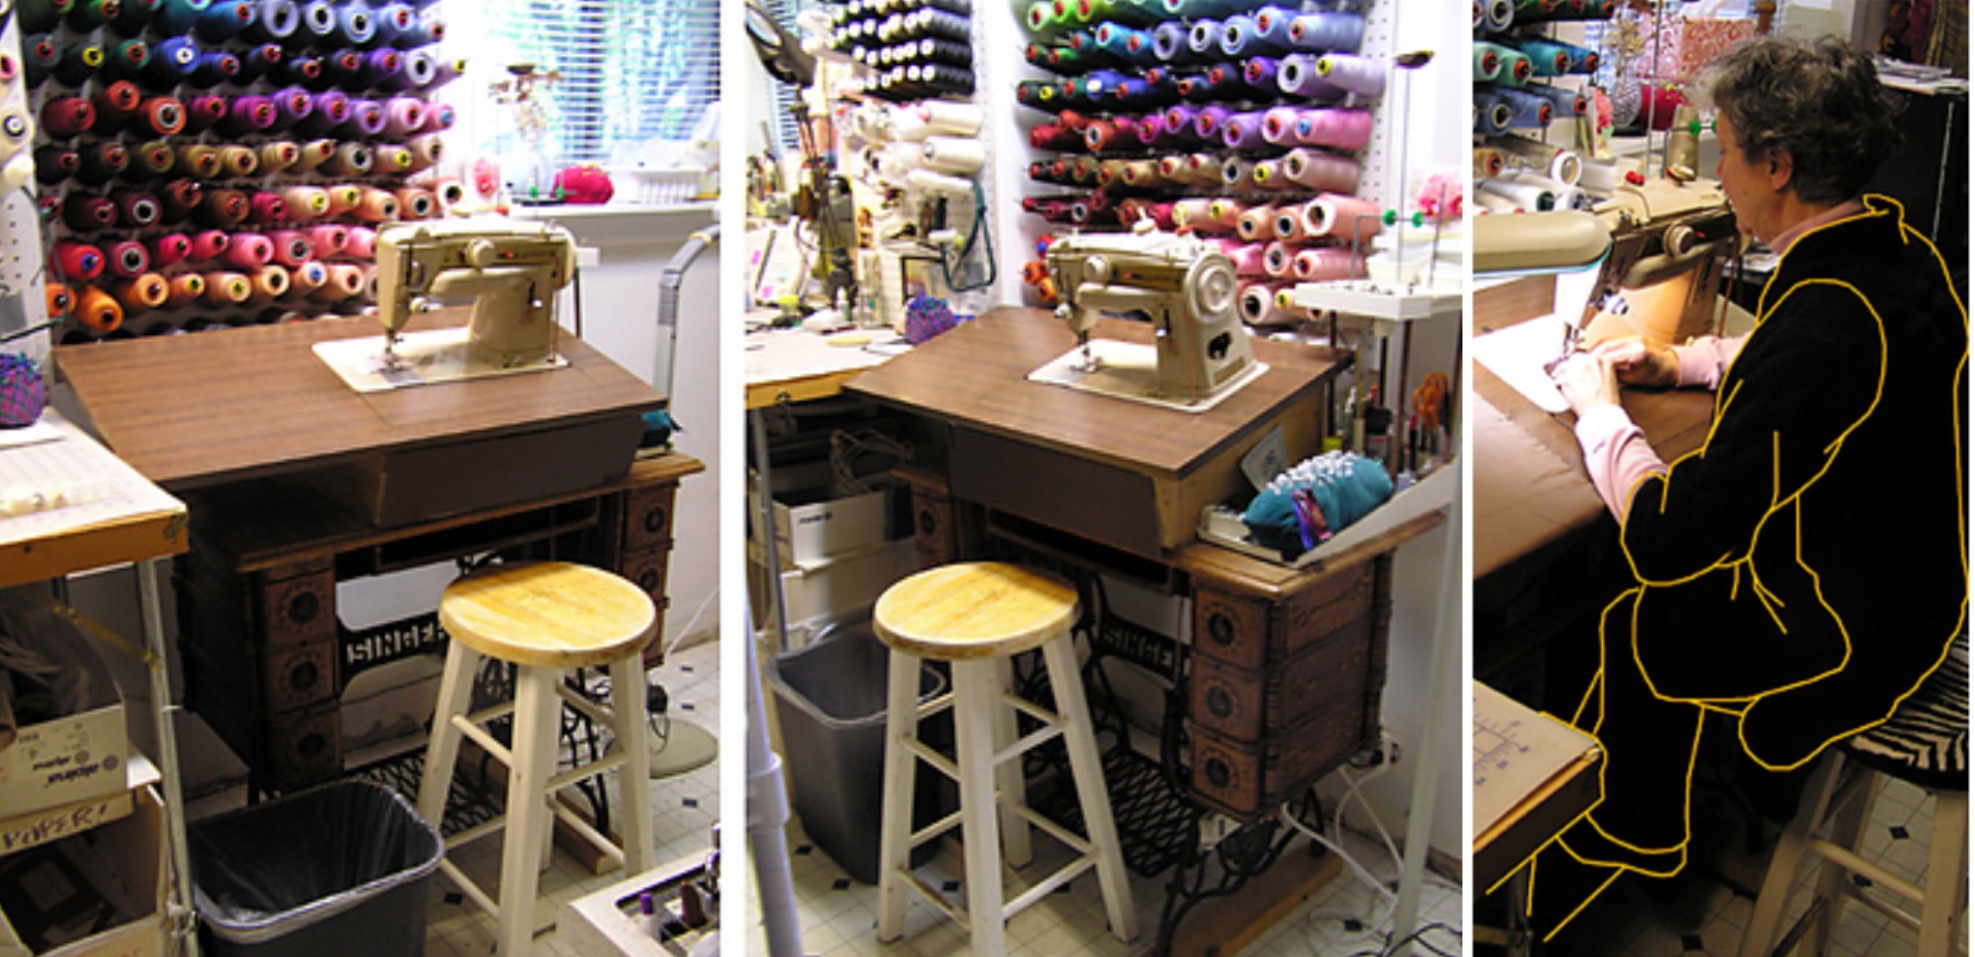
A friend (Courtney Willis) and I cobbled a raised, tilted bed of newer parts on my vintage cabinet*** so my sewing position (the orange outlining is to better see it, because black and shadows) is ergonomic as well as a decent aerobic workout. That’s a sloppily-taped piece of matboard over the upper opening (it didn’t last long). The bed was also shifted as far to the right as the treadle belt would move cleanly so I sit directly in front of the needle rather than slightly to the side.
Fine treadle control, cams, built-in stitches! I’ve also occasionally used the chain stitch option, nice to have.
* I’ve done two 411G treadle conversions
** actually, I’ve had six or seven electric 401As, grabbed whenever I found them and passed along to friends, students, interns, the odd client
*** chunks of veneer and trim missing, no loss
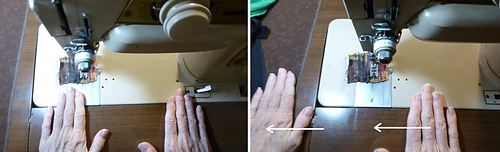
Many orient themselves to their machines square to the opening in the head, where we should be centered on the needle position (badly morphed photos as I can’t figure out how to shoot both hands with the camera held in my teeth).
When my machine was raised and tilted, we moved its bed to the right. Keeping the belt’s path free was critical.
About all you can do with most machines is shift your body and then check periodically that you haven’t drifted over to what your eyes tell you must be right.
It really does make a difference.
Bobbin winder. Many sewing machines can wind bobbins as you sew – check your manual.
It’s important not to wind bobbins too fast if your thread has a synthetic component (poly, nylon) (the gadget pictured has the speed right). The friction through the tension discs will heat the thread and it will be stretched on the bobbin. When you sew with it, it’ll tighten back up and your seams will pucker. There’s no cure but to pick out the seam and resew it. You can fool yourself that you’ve fixed it with determined pressing, but … nah. It won’t last.
I had an intern who helpfully filled bobbins as “efficiently” – i.e. fast – as possible using the sewing machine. Once the problem had been traced back, all of them had to be rewound.
Needle board (pressing aid):
Here’s a needleboard and a “Velvaboard”, for pressing napped fabrics without crushing them. Both collect lint like crazy.
Knitting Markers:
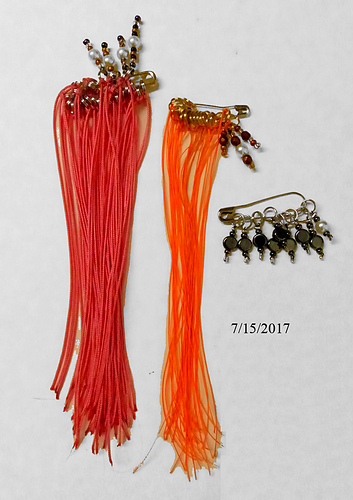
Running markers. The ring at the top goes over the needle and is slipped between working stitches. Particularly useful in laces or other open work patterns.
Their knots are heat-sealed and squished with pliers.
The top photo shows what most people think of as markers, which sit between stitches and are moved from one needle to another as you come to them. These are photoshopped around a “cord” from a photo taken of markers along a finished edge.
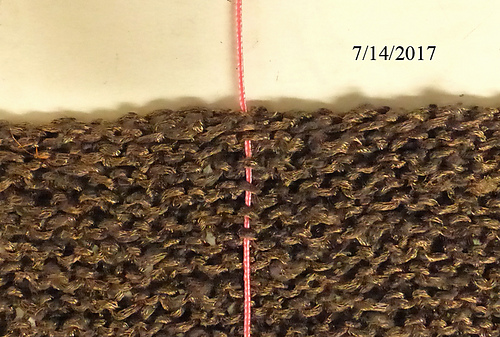
The middle shows a running marker. It’s a piece of contrast yarn or cord that’s flipped from front to back however often the fancy takes you. When you have a pattern that travels (usually with YOs and K2tog) you can either let it follow the edge of a motif or preserve the original stitch count. It gets pulled up as you progress, so doesn’t have to be more than 5”/13 cm. long.
The third shows the combined version, which marries the ring at the top with a running marker down AND also has fancy dangle versions for start of round, etc. Your speshul beads must attach to the ring separately or they’ll catch in the work. I verified this yesterday making a couple fresh sets up (sigh).
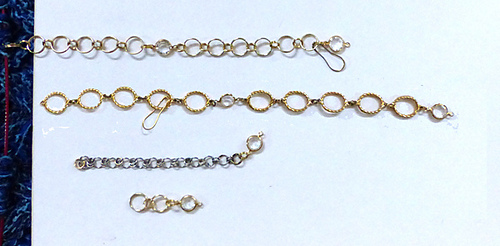
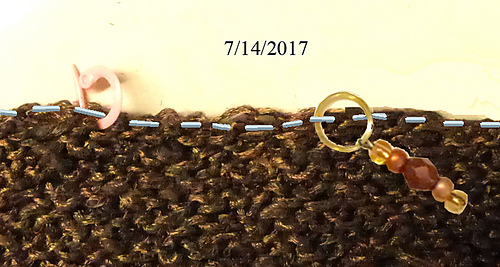
Using chains to keep track of rows or repeats (crossing cables, etc.):
After “unventing” it, I found five or six instances where others had come up with it.
It’s also a pretty, sparkly thing that tells me when I’m coming around to the start point. I made it of ARC costume jewelry and gold split rings* (a miniature version of what you use for a key ring, no rough bits as with jump rings). The “jewels” function as a weight at the bottom as well as dividers. The card pins (lightbulb shapes) can also say “you’re at the fourth round, cross your cables here”.
From top: two sizes of split rings and sparkly bits from ARC necklace
Necklace segment (originally had sparkles and rings alternating – pretty but confusingly long)
Silver rings for sock rounds – two very small rings between each of the larger
Simplest set of two + jewel as a bottom weight: first ring=pattern, second=plain knit
* Spend five or six bucks on split ring pliers to make opening these little suckers easy
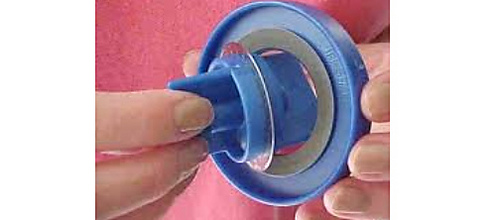
PVC Niddy Noddy:
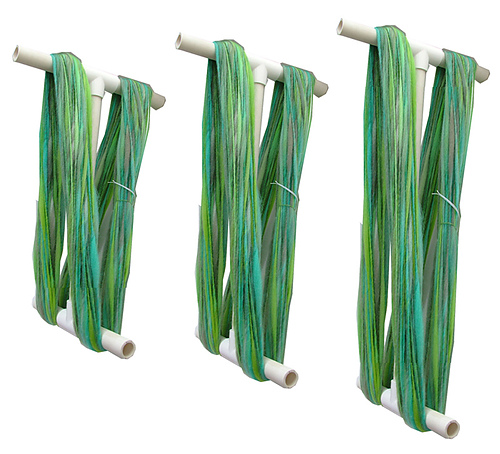
You can make a yarn loop the exact size you want and fiddle cutting down a center pipe until it fits. Don’t forget to allow for the part that disappears into the fitting or you may get it too short (this is how I got a really short version the first time, in my rage and frustration thought I might as well go for a bitty one when the medium size failed).
Sometimes you see people using a niddy-noddy where the ends bars are in the same plane (like an I) rather than angled as shown here. The angles make it much faster and easier to use. Twist it flat to store.
Point Turner from a chopstick:
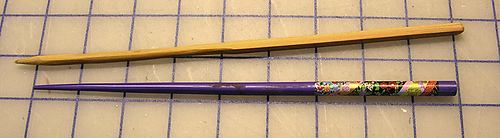
My oldest were the Chinese squared-off style that I stuck in a pencil sharpener almost to a point and then rounded with a nail file (the purple one is Japanese and comes ready as is). I’ve had these stashed by every work station maybe forty years?! What a fine patina of use!
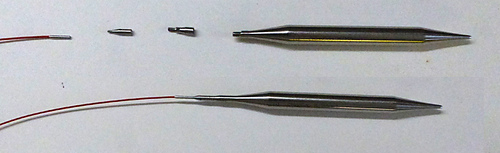
Double-ended Crochet Hooks:
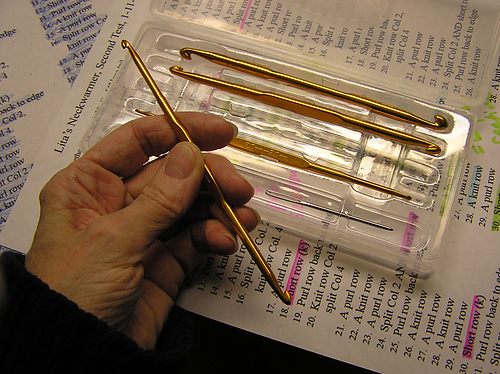
Multiple uses, the most common being dropping stitches down and repairing mistakes in knitting instead of having to frog entire sections.
Glue:
The gel-type SuperGlue is my current favorite for stitch markers.
Flat toothpicks work well for manipulating tiny gobs (professional term) of glue.
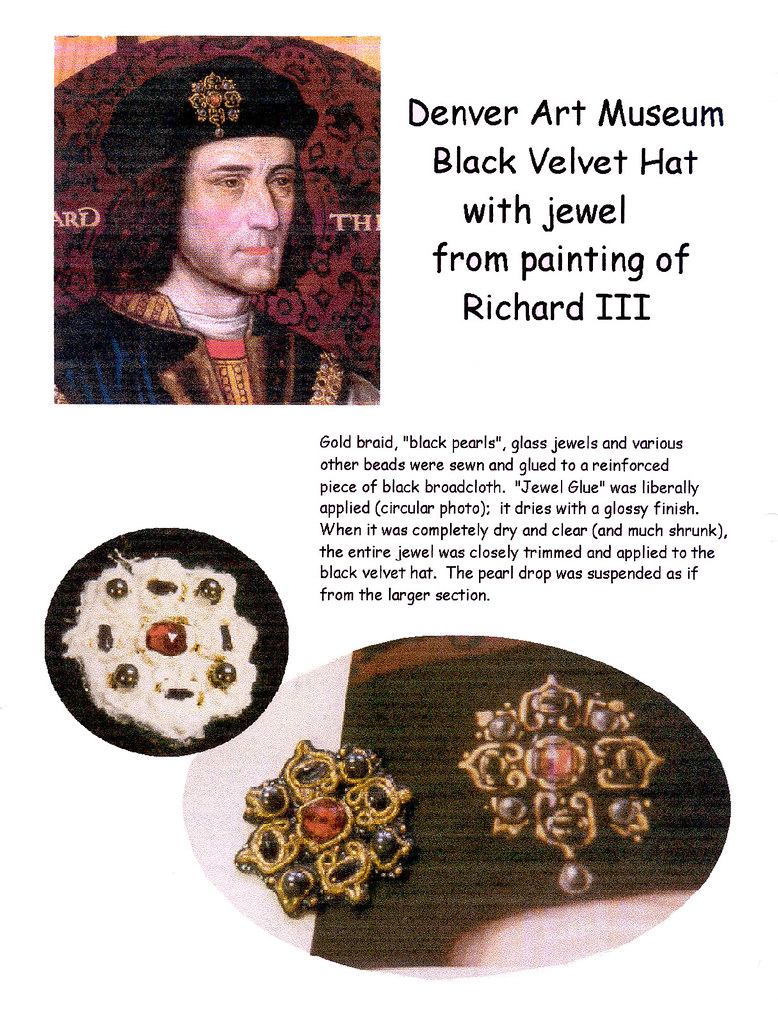
I used E6000? or Jewell-It? on this composite for a historical recreation for the Denver Art Museum in 1998. It had a good three weeks to dry before delivery and is still holding up fine – a slight flexibility was an asset and it hasn’t rubbed off. Usually you don’t need quite so much glue!
Yes, those were the days of Comic Sans: a delight to the unsophisticated.
Friction hook for Portuguese knitting:
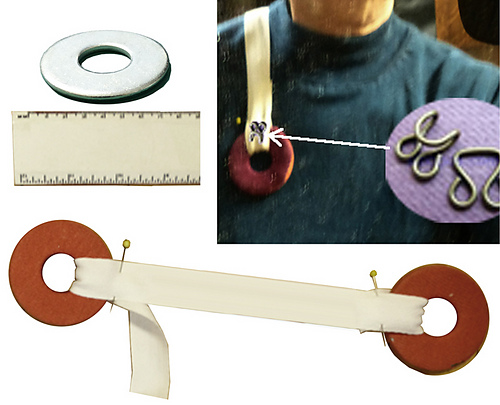
I use covered hardware store washers (2.5”/6.25 cm) as pattern weights, also have a bookmark made of two of them in a leather cover (similar to the one below, about half as long; not shown).
Space a couple of them with twill tape to the desired length.
Cover by sandwiching between a couple pieces of non-raveling fabric or lightweight leather and stitching with a zipper foot against the edges. Trim. Sew on a large coat hook (in the U.S. one for “fur coats”).

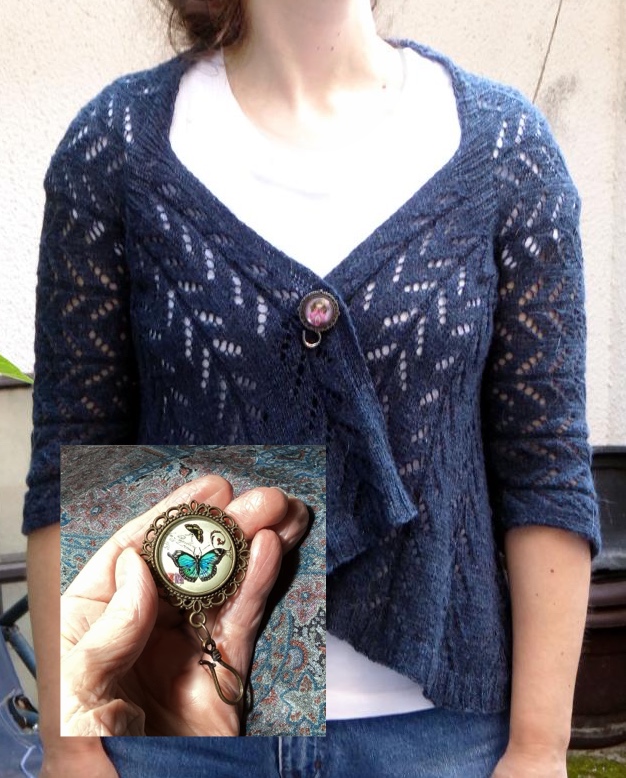
Ones Irene made (she’s wearing one as a broach, in use it would be closer to her shoulder).
Sewing Machine Feet:
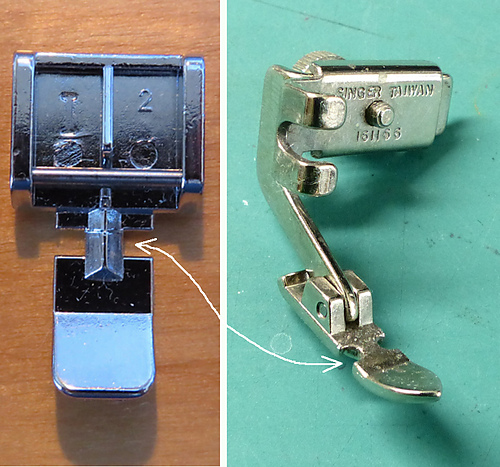
Zipper feet.
This is not the foot that came with my old slant-needle Singer, but finding one like it is worth the investment. It’s a narrow foot that slides to either side of the seam and is on a pivot, great for getting a zipper inserted when you’ve got seams to go over.
The dings on the top of the foot where I didn’t have the needle adjusted properly are not necessary to get or add.

Shirring/Ruching foot: a one-trick pony
Marking on dark fabric:
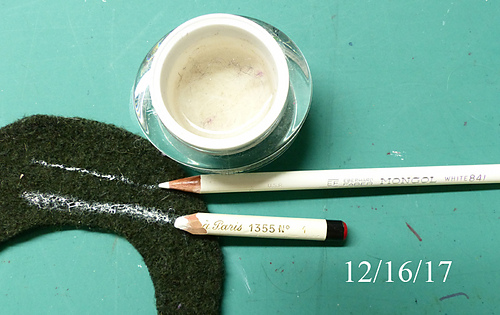
A good marker for dark fabric is a white or light watercolor pencil! I’d grabbed every light pencil/crayon/china marker/chalk I owned and got a “good” wc pencil in by mistake. Before that, chalk pencils dipped in water were the best. WC pencils give a much finer line and don’t need sharpening as often, and those “colors” are the ones rarely used! Here in Denver I can buy them open stock from an art supply store; I’ll bet if you don’t have them kicking around you can ask a friend if they have previously-neglected ones they could spare.
Dipping either of them in water makes them take better on even fuzzy fabric.
Upper: Mongol watercolor pencil (all brands good)
Lower: Conté chalk pencil
Office White-Out, applied as if you were stenciling, in a series of vertical dots, also works.
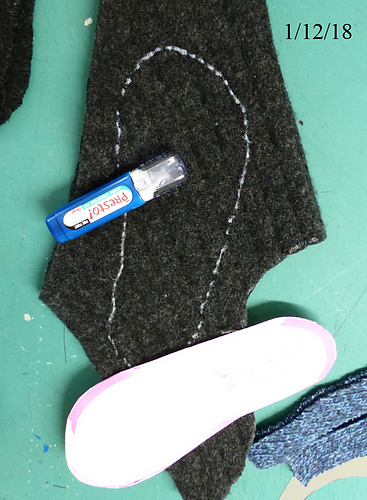
An industrial technique for laying out patterns is to trace around the pieces and then cut off the lines. This keeps you from chewing up your patterns]. It’s faster than messing with pins.
*ETA: white-out will NOT come out!
Waxing thread:
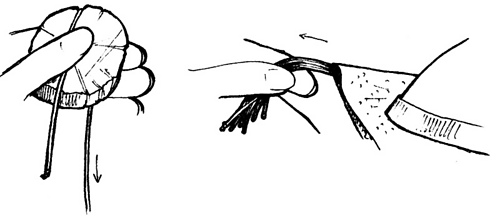
You wax it yourself by drawing it over a cake of beeswax, paraffin (canning wax, not kerosene), or an old candle. The lengths can be longer as the wax also keeps the thread from twisting.
The couture technique is to cut several lengths of thread, draw them over the wax, fold them in a paper towel, put a dry iron on a low setting on top and pull the threads through (the iron doesn’t move). Do it again the other way to coat the other ends. Thread them through needles, knot them and stick them in a pincushion.
You don’t have to melt the wax into the thread. This is yet another case where taking the time to do another step makes the job easier (voice of experience).
Leather Punches:

There are two flavors: one with a rotating set of tips and another that’s a set of hole cutters that screw into a universal handle (often in a flattish case, as for drill bits).
Technically three, if you count a big leather needle used without thread in your sewing machine.
Thimbles:
Default used to be self-sewn leather until a client showed me the Clover. I prefer it to all others by a significant margin.
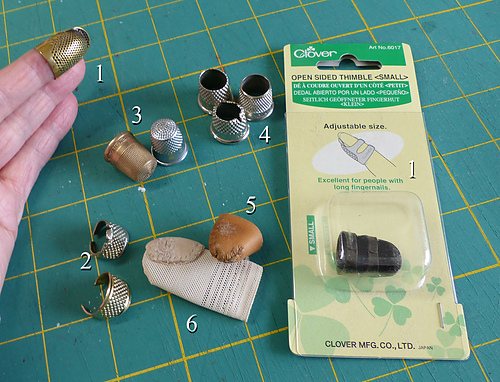
- The Very Best Thimble (for moi), the prongs customized (as are the other metal ones that saw use). Push with the side or the end, or the side-end, where mine gets the most use. The flange not only accommodates a fingernail but gives a pushing spot of particular safety/leverage. It doesn’t give a sweaty finger. No, I don’t sew with it on my left hand, this was for the photo.
- Band thimbles. When I saw sashiko thimbles, this jumped up and said “I could be that for you”. These might be more available in big-box or fabric stores.
- Standard dressmakers’ thimbles. Usually you push with the end. The brass one was Great-Aunt Jessie’s, for those of you paying attention to that.
- Tailor’s thimbles, open-ended. Usually you push with the dimpled side.
- Leather thimble, baseball sewn so all the seams butt.
- Leather patch on piece of spandex (girdle supply).
Adding Twist (or plying strands) Without a Wheel:
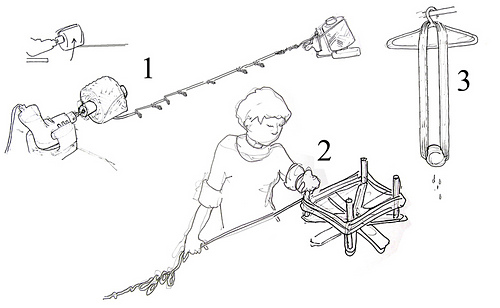
Using a power drill to add twist (not very hard if you’ve got a secure way to clamp the drill)
- Prop drill at slight upward angle, being sure not to block vents at its sides. Feed yarn to winder or swift (both are shown, that’s a bag clip on the winder’s vertical wire) and clamp at that end. Gently spin drill until yarn kinks. The right amount is if you can straighten a section by pulling it out.
- Move to the other end of the yarn. Unclamp, and keeping tension so it’s unkinked, wind.
- Dampen, weight, and let dry.
An entire sweater’s worth of yarn can be processed in about an hour and a half, and you don’t have as many joins as if you use a spindle.
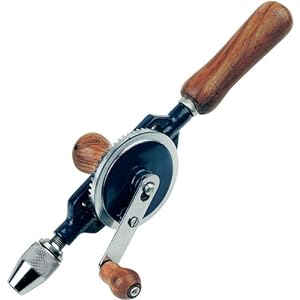
Originally I was trying this with a (crank) hand drill, using a big cup hook in place of the screw bit. That was pretty good. Then (duh) I was working with my power drill and realized it’d clamp in my bench vise…
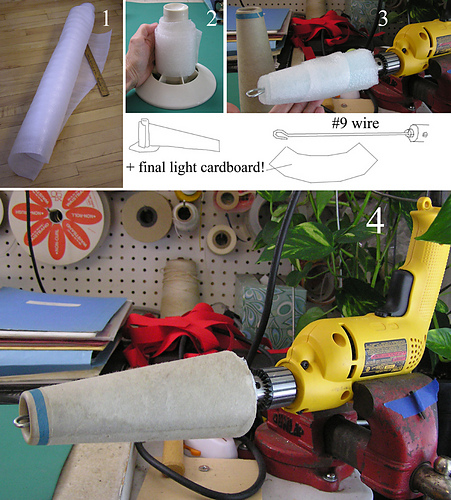
Details of power drill to add twist to cakes
1) cheap, thin, closed-cell foam (parquet underlayment?) from hardware/lumberyard
2) trapezoid of above wrapped around spindle (not shown, arc of heavy paper or thin
cardboard over spindle foam so the yarn won’t snarl moving to drill cone)
3) “underwear” shot of foam assembly clamped into drill
4) empty yarn holder wedged tightly over foam
Notes
Wrap spindle with foam and then paper and crank a cake over it. Slide cake to drill assembly, pulling out thin foam/paper and working the cake snugly over the cone.
Drill must be tipped up slightly so yarn doesn’t unwind/fall off.
If yarn doesn’t come off correctly, reverse drill direction! Be sure power cords are well out of the way (they are not, here – ditto for plants).
The inside closed-cell foam chunks are roughly shaped from the stuff used to pad out electronics, etc. for shipping and filled out by wrapping with more thin stuff. It doesn’t have to be fancy, just fit snugly enough that it’ll hold.
I found a mixer at a thrift store and turned it into a dedicated rig:
Cost: under $20 US. The power cord connection needs cleaning out to seat firmly; for now a rubber band works. “S” or “Z” twist is determined by which beater receptacle the bolt through the spindle goes into.
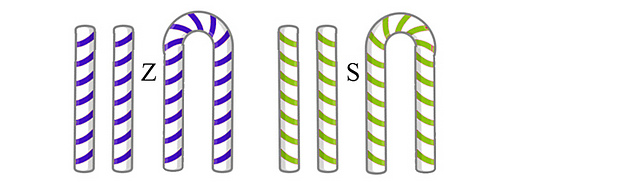
You cannot reverse Z-twist or S-twist to change one into the other.
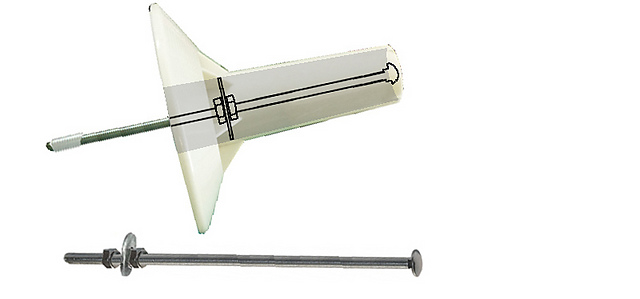
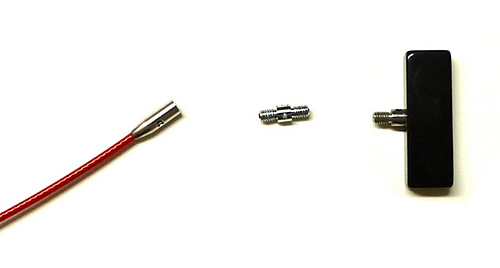
A spare spindle for my ball winder modified with a carriage bolt, washer, two nuts, and pipe wrap. The end of the bolt is wrapped with pipe fitting tape to fit snugly. Once position was right I swabbed globs of E6000 (a jewelry glue) to keep everything from vibrating out of whack.
Embroidery Needles:
More needle poop: The John James needle guide
There are a few discrepancies in nomenclature between sides of the pond: what we’ve been calling milliner’s needles are Embroidery/Crewel on this chart.*
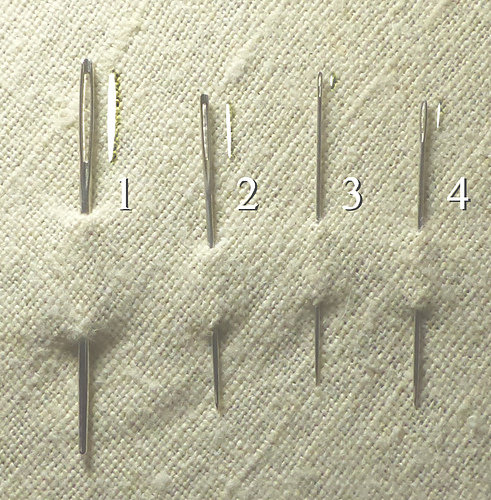
If you ever run across them, I strongly recommend picking up Chenille needles: similar to tapestry but with sharp points. These are the “yarn” needles you want if you’re weaving in ends and want to split the plies.
Above are the ones I use most often (the sharp is for comparison).
Standard tapestry needle (blunt point): the junior version of the traditional yarn needle
- Chenille needle – pointy end (for sticking in your enemies)
- Sharp (tiny damned eye) – pointy
- Milliner’s/Embroidery/Crewel – pointy
* ETA: see also Sashiko needles
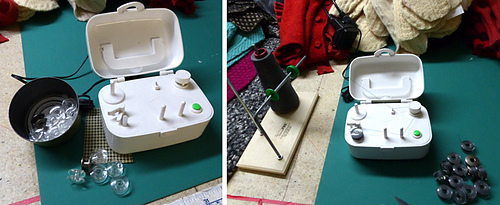
Thread Lubricant:

Is thread lubricant a thing one wants to use on regular machines too?
Absolutely. Here’s what the put-up in the states looks like. This is slightly mis-marketed. Yes, it is a thread treatment, but its greatest benefit is with machines, particularly with higher-speed sewing.
The second shot shows a gadget that’s a smaller, home version of what the industry uses, where they suspend gallon jars that wick into the sponges. Here you squeeze from the bottle onto the gray foam cube at the top of the rig. The cream-colored plastic thread guide rotates cube-up for that part.
Available in 55-gallon drums (joking that any of us will need that).
Tissue, flimsy, for stabilizing thin/slippery fabrics:
Southstar Supply sells a thin, flimsy, tissue paper to the industry. It’s primarily used for separating plies before cutting. I used it to stack-cut a dozen silk charmeuse tops for my sister, and to control the thin bias strips (each of which got pinned to its layer). It’s fabulous any time you’ve got to control something slippery.
I’ve also used exam table paper scraps, adding machine rolls, waxed paper. You can buy wash-out or tear-out stabilizers for mucho bucks.
Exam Table Paper:
Where do you source doctors exam paper from?
I buy it by the carton (24 rolls) from a Denver medical supply company. Students, interns and the occasional client used to help me go through it; that’s trickled down so the half-dozen rolls I have now will last me some time. They’re 21”/53 cm. wide.
It’s also possible to get chiropractor’s rolls (for covering the head support) that are 8.5”/21.5 cm. wide.
There are two types in the U.S.: smooth, the one I prefer, and a more crepey texture.
As that’s overkill for most folks, ask your doctor’s staff if you can buy a roll from them.
Although wider would be nice, the stuff is strong, translucent enough to transfer/see marks through several layers, and it will not give a paper cut*. It folds up without too much bulk into ziplocks – there are three tunic/pants sets of mine in the one standing at left – and is much more durable than the flimsy stuff that commercial patterns are made of.
A friend shared a roll of actual beige pattern tissue with me. I rarely use it unless I need to draft a full skirt or cape, as it’s so much more fragile.
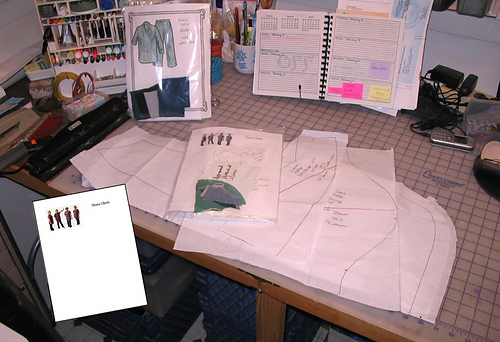
This person’s gallon-size ziplock envelope is sitting on top of the pattern pieces, with scraps from the projects tucked in.
ETA: * Unlike architectural-grade vellum, which even at the student-grade is hideously expensive by comparison. It gives horrendous paper cuts.
Some fabric stores sell what is essentially repackaged exam table paper at a hefty markup. Industrial suppliers such as SouthStar carry a good range of wide paper, including alpha-numeric. Prices do not include shipping, and paper is heavy.
xxx
xxx