Blocks and slopers and bears, oh my:
If I want a blouse like this, I’d better work from the basic-perfect-fitted-muslin (I don’t know the exact word)
Is it a muslin? A toile (French for muslin)? A moulage? Does it have seam allowances? Wearing ease (i.e. not skintight)? I was taught that a “sloper” is a partial step used in fitting; it has no seam allowances. You can find enthusiasts for each of these terms who will fight for their definitions to the death.
We’re skipping that and going with the so-far uncontaminated industry term: block.
A block is a set of pieces to make a specific garment or section of a garment. It is sized for one body, has wearing ease and seam allowances. Bodice block, sleeve block, pants block.
Every new design generates a new block. All of your sleeve blocks fit all of your bodice blocks as the armscyes are the same length. You’ll never again have a sleeve where the upper arm is too tight.
New neckline? Trace a bodice, change that. If it has a princess line with the upper curve running to the armscye and you want a less fem look you swing the line up to the shoulder seam. You can use a shirtwaist sleeve block as is or change from a cuff to a straight hem.
Likewise you can copy and change your pants block from darts to pleats, or the shape and angle of your pocket opening. You can lower the crotch and straighten the vertical seams so that you’ve got 40s Hollywood pajamas where the fronts and backs “skirt” rather than cup your crotch.
Setting up your blocks is a front-end load. Once you’ve got a few in your library, you’ll buy patterns only to learn design/construction details you aren’t familiar with. You’ll make a fresh copy of your closest block and modify that, knowing that you can proceed directly to cutting your good fabric and that when sewn, it will fit.
Block management: it’s helpful to color-code different blocks as well as label them. If you’ve got several princess variations in your bodice block envelope, fold each set together with a fabric swatch.
When you find some great fabric and get the yardage going through the wash, you dump out your pattern blocks and it’s fast and easy to grab the set(s) you want.
Using adding machine tape to space buttonholes:
This used to be a common office supply. Look for it when they go out of business, or at yard/garage sales.
Though this is shown on a sweater (for visibility on my dress form), its primary use would be on a button-front shirt. There is usually a button at the hollow of the throat where the collar fastens.
To prevent awkward gaping, there must be a button at the fullest part of the chest/bust.
- Roll of adding machine tape.
- Mark at hollow of throat and fullest part of bust.
- Two critical marks on the tape.
- Fold the two together.
- This gives buttonhole spacing. Mine is 3 3/16”. It’s much easier to use a piece of paper with lines on it.
Continue folding and marking until you’ve run out of shirt front. The lowest button is often omitted. Your choice.
8-10. What if you’re long-waisted or have a low bust so that the buttons’ spacing is too far apart? Fold the tape in thirds rather than halves at the first step.
Buttons can also be set in pairs: O O….O O….O O….O O
The dots are because Our Beloved Overlords’ script automatically tightened up the extra spaces.
How to gather fabric:
Great-Aunt Jessie rides again: (specifically, tiers of a skirt, but this works any time).
- Sew your length of fabric into a loop. Run a quick hand-basting down the fold (pins fall out).
- Match the basting to the seam and run basting down the new folds.
- Continue until the fabric is quartered. For very long strips, keep going.
- Great-Aunt Jessie’s method: run three close lines of stitching as close as possible to the raw edge. You will grasp and pull up the bobbin threads of all at once. Three because you have two left when one breaks.
- Better: set your machine to zigzag and pull out lengths of the spool and bobbin thread. Keeping tension on the threads, zigzag over them. If you have a cording foot, run the two through that so you don’t catch them in the zigzag.
- For really long strips, zigzag over a strong cord (gimp). Again with the cording foot. I like to get several stitches in and then loop the starting end back into the zigzag.
- IMPORTANT STEP: gather the fabric as tightly as you possibly can. Thank you, G-AJ! Do not trim the threads!
- Layer with the next tier, matching basting threads. Now you can pin them together.
- Gently ease out to your finished length and sew. Pick out any gathering threads that have crept below your stitching line.
This is the method for a broomstick skirt, where the tiers are gathered both at top and bottom. More commonly, the lower edges of the tiers don’t need to be gathered.
Containing stuffing or pellets in a toy:
Containing stuffing or pellets in a knit form with a tube (such as panty hose):
Nah, we’re not talking couture-level lining. It’s enough to twist a section of hose back on itself enough to contain the stuffing (as you would a bread bag* and cram the whole thing into your cacti-tubes. Once stuffed nothing will be going anywhere.
If you get extra shading from the doubled layer it’s going to look even better.
For tiny buds use a rectangle with a blob of fill, or scraps of hose only – no need to have stuffing too.
* bread again
How to keep from knitting the long tail:
As soon as you’ve cast on, loosely crochet up the tail. It’s not foolproof but it can help.
Casting on large numbers of stitches and joining without twisting:
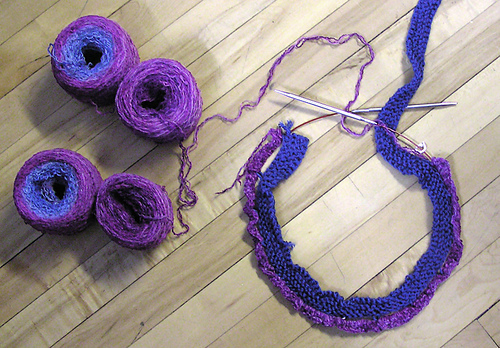
This fabulous cast-on method by PineSlayerDee originally was meant for joining a horrendous number of stitches without twisting, but that I use for any number over, say, fifty, whether it’s going to be circular or back-and-forth.
The (reusable) strip is the royal one here. You pick up a stitch from the strip at the start, cast on stitches (usually 20), pick up another stitch, cast on 20 blah blah blah. When you’ve finished casting on, the strip holds everything straight to join in your circle, or you can work several rows/rounds, slipping the strip’s pickups as you would stitch markers. When you feel you don’t need it any more, simply drop them off the needle as you come to them.
I have several strips of different lengths. Great use of leftover bits of yarn.
After you’ve used it, there will be loosey-goosey stitches along the edge of the strip where they went over the needle, but snap it once or twice and it’s ready to go again.
ETA: not limited to things you want to join in a circle; use anytime you’ve got a whopping number of stitches.
If you’re doing a shawl where you want markers at repeats, put them on as you drop off the strip. Easy to correct if you’ve miscounted. Ask me how I know this.
Blanks for Sweaters, Socks, etc.
https://www.ravelry.com/projects/BreiKonijn/crocheted-blank-tutorial
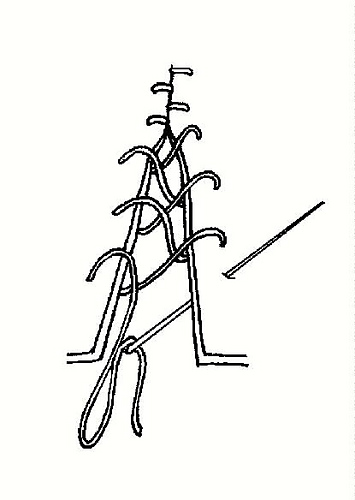
Baseball stitch: for seaming pieces with their edges butted firmly together
How to cut with scissors/shears:
We all know how to do this: we learned it as little kids. Unfortunately what works on paper, where closing the blade will tear the stuff, shouldn’t be the technique used for fabrics.
ALWAYS CLOSE THE BLADE COMPLETELY at each cut. You should be able to hear the snip each time*.
When you chew through using only part of the blades, you’ll build up a burr that will make your hand jump. The functional section will be an ever-shortening area by the hinge.
When clipping little areas, use only the tips. Not only does this preserve the sharpness of the blade, but you can’t accidentally overcut past the thread into the fabric.
Keep your blade perpendicular to your work surface (i.e. when cutting big pieces where your reach is extended don’t tip the shears, as this will make the cut pieces slightly different sizes; reposition your fabric). Pulling back slightly as you cut will also hold the layers together.
Take the time to re-program your muscle memory. As a bonus, your tools won’t need sharpening nearly as often.
* Unless your ears are worn out.
Hemming a Full Skirt:
If the hem is curved, folding up the allowance to the inside is not going to fit well, particularly if this is made of a crisp woven. The cut edge is going to be longer than where it will land when turned up. You’ll get puckers. You can fiddle with trying to press them flat (on cotton sateen?!) but it’s never going to lay as well, and will be more work than a facing ever could.
Adding weight and stiffness to the hem (as the facing does here) is an important part of the look of this pattern.
I’d understitch the facing once you’ve joined it to the skirt, whether the pattern says to or not.
Turning a tube:
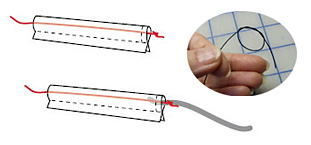
Make a big knot starting with a standard overhand knot, wrapping it through itself several times and pulling it snug. Lay it inside the long rectangle (folded right sides together) that will be your tube. Stitch across the end of the tube several times, pivot, and sew down the length, being careful not to catch the cord.
(not shown, but as in your original instructions) Clip across the corners at the narrow end to reduce bulk.
Pull gently on the cord, and with minimal coaxing the tube will turn.
If a squared, finished end is wanted (i.e. an apron strap), whack off the lump and turn the raw ends in with a pin, toothpick, whatever. Hand slip-stitch or machine-topstitch it closed.
Extra credit: insert filling by laying in drapery cord (or heavy yarn, etc. but prewash anything first!).
Felting:
There are several methods.
The easiest is to take something that’s already felted and cut inserts from it (trace around your foot, duh). I’ve done this, it’s easy. …although the first time I had two right footprints (until I turned one over).
For something similar that’s meant to be a slipper sole, make a good-sized swatch, measure it both ways and felt it. This gives you the scale for how much oversize you need to go (who said learning ratios wasn’t going to be useful?). Hint: make an obvious rectangle, not a square, as it won’t shrink the same each way. This also works with less fuss than these directions suggest.
The most trouble is deliberately going oversize with plans to trim it down later.
Checking yarn for fiber content:
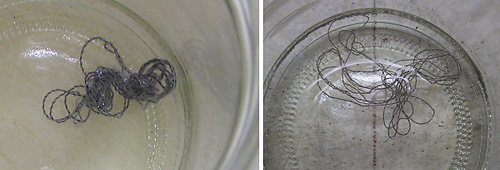
I have a (still) big cone of gray yarn that was touted as 60% wool/40% nylon, which I use for sock bottoms as it wears like iron. I’ve been disappointed in trying to dye it darker – it goes a little but not very much. After the last session I decided to test it – wool dissolves in bleach.
Looks like truth in advertising!
Add Burn Test
Buttons:
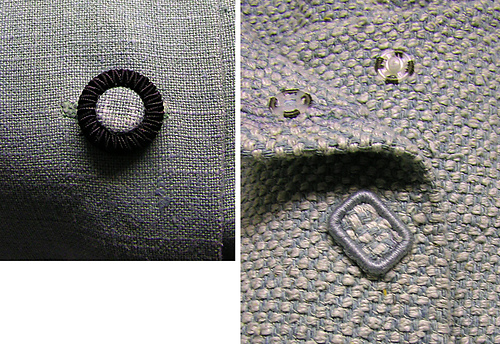
At left, little shirt buttons covered with fabric and layered with a ring with soutache buttonholed around it, and a shank at the back. Epoxy-glued (never use hot glue on fabric!). The suit on the right had the “buttons” sewn right into the fabric and used snaps as closures. I thought this was dreadfully low-rent, but Claire Shaeffer told me it was a couture finish.
Choosing buttons:
A trick learned at a couture workshop is to look at various buttons with what they’re going on held vertically, as if being worn. They catch the light differently.
Knitting/Purling backwards:
Knitting and purling backward sounds terribly difficult, but it isn’t. Fabulous skill to pick up! You can do it with any yarn-holding style, too.
There’s a style of knitting popularized by the Bohus school that uses not only stranded color work, but knit and purl for texture that really pops. If you want a project that can’t be done in the round, backwards really helps.
Hold your work as usual. Start to make a purl stitch by inserting your needle and wrapping the yarn. Turn it to the other side and see how the yarn and the needles are sitting. Flip back and finish the stitch but don’t slip it off the needle. Check again. Try several to be sure you’ve got it right, then tink back and go for it for real.
When I haven’t done it for a while, it takes me several back-and-forths to remember, but it’s worth it.
I used this in my Mission Statement.
French Knots:
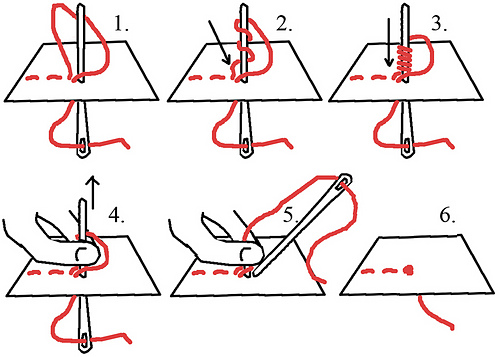
- Where you want the knot, take the needle to the wrong side of the fabric and bring it up again through the loose loop you’ve made. There usually aren’t running stitches to that point but it was easier to show that way.
- Wrap the thread around the needle making sure you aren’t using the “eye” end (this is the classic mistake that leads to tears, occasionally murder).
- Pull the wraps tight and slide them down the needle.
- Pinch the wraps and pull the needle up.
- Return the needle to the wrong side at the base of the stitches
- Voilà. A French knot.
ETA: an important point from Cymberleah that’s shown but not emphasized: where the needle goes down at the end is close to but not the same hole as it came up.
Non-Slip Surfaces:
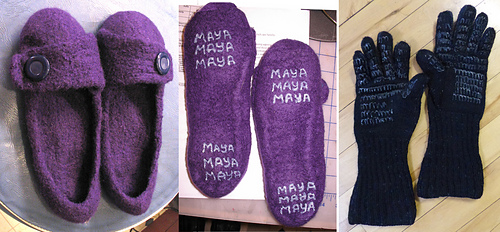
Puffy t-shirt paint examples.
Kiddy-jammie white-dot sole fabric, a paint-on non-skid backing (white only? – contains ammonia), and what looks like puffy t-shirt paint marketed for the sock crowd.
Pressing/Ironing:
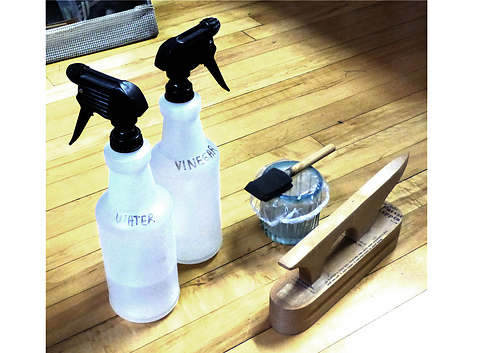
Wrinkles? The above things live in my ironing area.
Sprinkle the fabric with a solution of water/1/3 white vinegar (test for color-fastness), gently roll up and let sit in a plastic bag to equalize. Then iron.
If your fabric is dry, use a spritz bottle to get the solution on it.
The couture version is a little jar and a dedicated bristle or foam paintbrush where the vinegar/water is painted only on the area you just sewed. Using primarily for butterflying seams.*
This is magic on natural plant fibers and silk. I had some dreadful polyester pants that got tossed into the dryer and left uncycled until they’d dried into a solid wad, and this even got the wrinkles out of those.
Also critical: preshrink everything (including your interfacing) and be sure it’s wrinkle-free before fusing or otherwise working with it. Even if you’re sure the object isn’t going to be washed, the warmth/heat/pressure of your hands act like little irons and can cause the fabric to pucker. Not to mention how denim twill can continue to shrink for 6-8 washes!
* spreading open and pressing flat
Hangers:
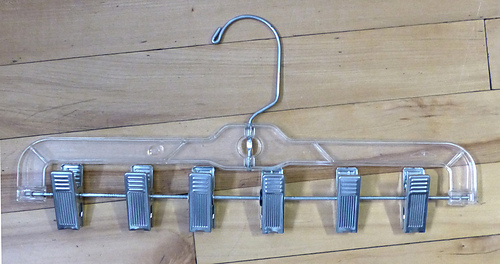
One I made.
The rod was gently torqued until it came out of one of the pockets, then clips from other hangers moved on. Warning: if you try this at home, be ready to move the clip from the old rod directly to the new one. They will want to pop loose, and getting the spring etc. back is a stinker!
A commercial sock hanger. Check Etsy, eBay.
Recommended books:
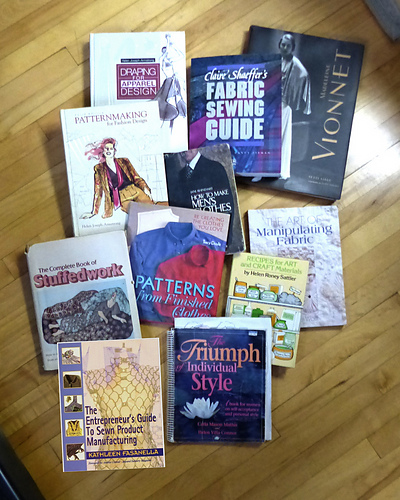
There are forty or fifty books on my shelves I’d consider indispensable (the Janet Arnold series, but I’d have to sacrifice someone’s first-born male child to replace them); these are the ones I pull out most often for my own reference or to wave at people.
Listed more or less in order of recommendations.
The Triumph of Individual Style Carla Mason Mathis and Helen Villa Connor
– Top slot by a considerable margin. Each of six sections alone (and there are more) would be worth the investment.
The Entrepreneur’s Guide to Sewn Product Manufacturing Kathleen Fasanella
– Not a sewing book. Clients wanting to start a line must demonstrate willing by investing in this one.
How to Make Men’s Clothes Jane Rhinehart
– More important than the info (which is excellent) is the mindset/philosophy of the traditional tailor.
Patterns from Finished Clothes Tracy Doyle
– There are other good sources for the industrial technique of making a rub-off without destroying the garment (counter-intuitively, the worst thing you can do to copy a garment is to take the seams apart).
Claire Shaeffer’s Fabric Sewing Guide
– …and a dozen or more of hers, primarily on couture techniques.
Recipes for Art and Craft Materials
– Every teacher needs this: salt clay (a.k.a. homemade Play-Doh), papier-mâché, modeling compounds, finger paint.
The Complete Book of Stuffedwork Toni Scott
– Theory and practice of soft sculpture.
The Art of Manipulating Fabric Colette Wolffe
– Related thematically to Toni’s book; what to do with design ease in sewn garments (mostly).
Patternmaking for Fashion Design and Draping for Apparel Design Helen Joseph Armstrong
– Students have complained that the illustrations are dated. Hey, pleats in sewn cloth are pleats in sewn cloth. Here’s what you need to add them (and everything else).
Vionnet Betty Kirke
– The bible for working with bias.
Bodymapping Kathy Illian (added later, no photo)
– the best book on building patterns on an actual body that I’ve found.
Last but far from least:
Sewing with Nancy, books and videos by Nancy Zieman.
Incomplete video list with notes
I used to recommend picking these up at your local library (or via interlibrary loan) but that’s become more difficult with everything moving to the internet and our book repositories “de-accessioning” so much. Worth a shot, though. Or I’ll happily blather at more length.
Understitching:
This came from a Nancy Zieman tutorial. Essentially, your allegiance is to the piece you’re sewing on – no straightening anything out when you’re working on a curve.
Nancy’s take is that you want as many stitches as close to the edge as you can get. She suggested the stretch zigzag, which became my preferred method. If your machine doesn’t have this stitch, use a regular zigzag. Failing that, edge-stitching, or better, several rows of it.
- Sew the facing to the garment.
- Sew the seam allowances to the facing. Keeping the facing flat and the under-edges turned hard against it is the secret. Nancy suggested using a zigzag or a stretch zigzag here as it puts the maximum number of stitches into the edge, helping it turn cleanly. The facing will roll to the inside just enough that the stitching doesn’t show.
- Detail of (2), with Photoshopping for clarity. Click for bigger view.
- Finished edge, outside
- Finished edge, inside
This is before pressing!!!
Contoured Waistbands:
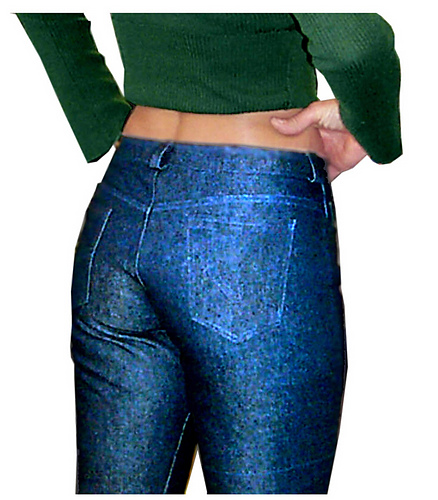
Would I be better off to draft a contour waistband with a side seam? The front and back yoke are curved and the pattern tissue waistband as drafted is a straight line. Would it be better to have a seam at the top of the waistband instead of folding it in half to provide more structure? If I am wearing a waistband, I like it to be on or above my waist and have structure.
Yes. A curved two-piece (inner and outer with seam at the top) waistband will certainly make the fit better. The reason for adding side seams to a waistband is to make altering it later easier; otherwise cut it in one inner and one outer piece.* There are two ways to make one.
Method One: make a customized pattern piece
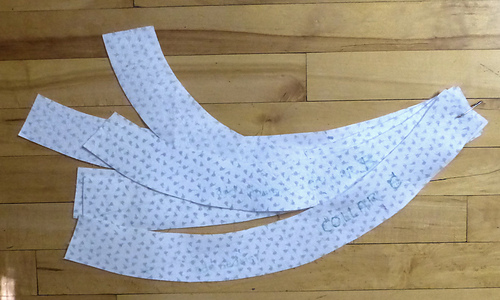
Low-rise jeans made for a client using curved templates. Separate templates are used for the front and back (side seam to side seam: the curves are different), and then the resulting waistband interfaced for stability.
Method Two: cut your waistband cross-grain and steam-shape into a curve.
It’s intuitive to cut waistbands vertically down a piece of fabric as that fits the layout. There are two reasons NEVER to do this. First, as fabric shrinks with washing, your pants’ or skirts’ length will creep upward, but your waistband will get smaller around. Think of your favorite jeans: it isn’t always that you’ve gained weight. The worst possible waistband is cut vertically as one piece and folded. I have never seen one that fits well. Knit fabrics as elastic casings are a different beast.
Second, a correctly-cut waistband will shape itself into a curve with wear. Even better, it can be can be pre-curved before sewing onto your garment. Set your steam iron firmly on one end and pull the other hard at an angle. It’s surprising how well this works.
Drawback: with wear, its width will vary some. This usually isn’t enough to notice.
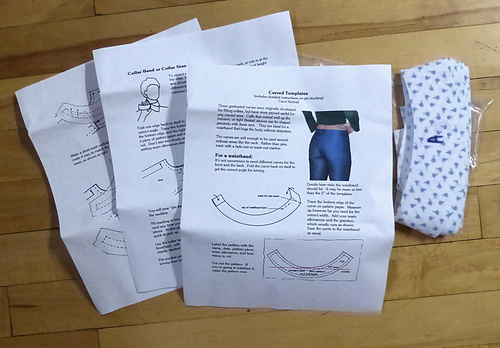
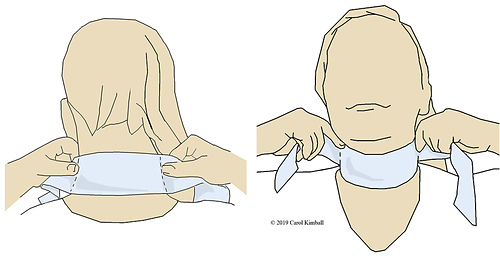
Clients are usually willing to pay for a shaped waistband; I use the cross-grain one for mine. I grab my templates primarily for neckbands/collars.
Skip down to the pin-tracking section for how to create your own shaped template.
* Bespoke tailored men’s pants have a vertical seam center back for ease in altering. For most women it makes more sense to piece at the sides.
A Dedicated Sharps Container:
A little jar reserved for sharps is fine. Mine is an old needles case. When it won’t take any more, tape it so it won’t open and throw it out.
Pin-Tracking/Truing/Reconciling Seam Lines:
Pin-tracking is how to reconcile seams, how you make sure your sewing lines are the same length. It’s not difficult, but does take time and care. This is used to determine how much ease is in a sleeve cap, how to line up a seam in a skirt with the dart in a bodice, where to add that chunk in the drape, etc.
Here we’re creating a pattern for a band/collar stand. They’re identical except that the stand has a collar attached.
The first step is to use curve templates to determine the shape of the front and back neck.
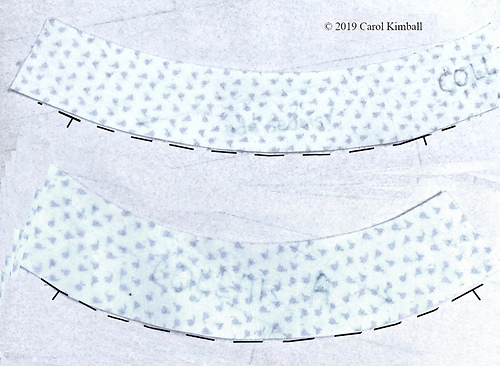
Find or create the two templates that fit your neck, side seam to side seam. Do the following for each. Other than being sure the band is long enough, we are concentrating on getting the bottom curve.
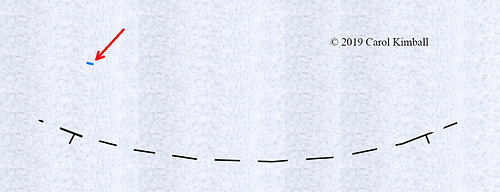
Draw along the wider curve on a piece of pattern paper. Leave ample room around.
Measure up from the curve to the width you’d like your collar stand. Do not include seam allowances.
Fold the curve line on itself several times to duplicate the width.
To connect the marks smoothly freehand, turn the pattern so that your big arm muscles naturally swing your hand in an arc.
Label each pattern piece (not shown).
You’ll need to work on a surface you can pin into.
ETA: how to make your own cheapo-but-perfectly-adequate curve templates:
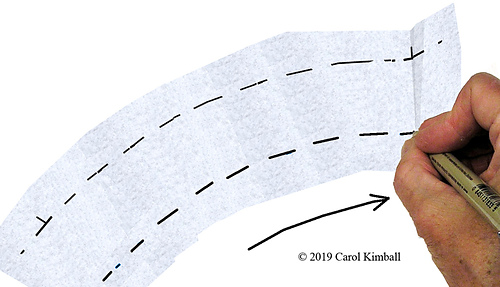
Use a strip of paper such as adding machine tape. If it’s stiff, crumple it up, smooth it out, crumple it up again. Pleat little darts into it and check against the curve of you neck, or waist or whatever, and then tape it into place. If there are uneven places such as at left, slash them with scissors, re-shape and tape.
Including the photography and processing the shots, this took less than five minutes.
Pin-tracking a neck band/collar stand to fit a bodice:
Fold each band back on itself, matching the curves, to get the correct line for the side seam.
- Two straight pins.
- The front band.
- The back band.
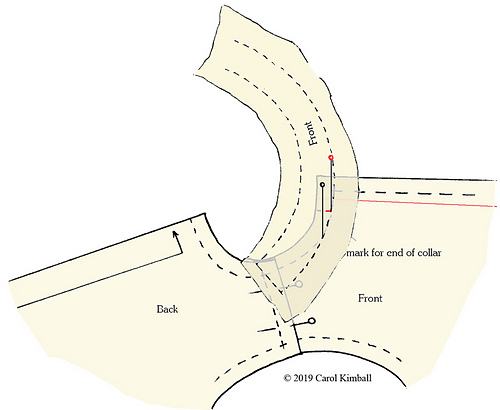
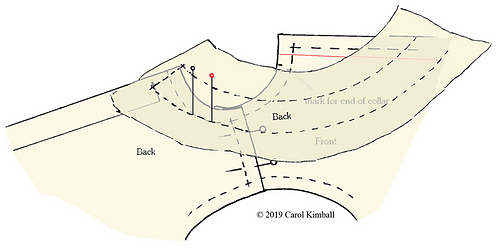
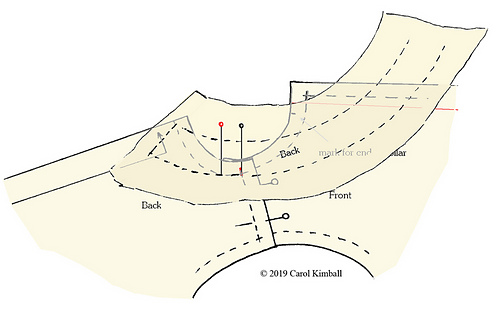
- The bodice front and back, pinned together at the shoulder seam. True up the neckline edge (the back is often slightly longer, to be eased to the front – let extra hang out at the armscye).
Note the mark for the end of the collar band, which is set back slightly from the center front. The red grain line is the CF. When the two fronts are overlapped, the collar curves will meet.
- Work from the center back. Both the bodice back and the band are placed on folds.
- Overlap the sewing line of the band exactly over the sewing line of the bodice back.
- Place a pin at the center back.
- Pivot the band to align the sewing lines as far as you can, and place a second pin at that point.
- Take out the pin at center back.
- Pivot the band on the remaining pin to re-align the sewing lines.
- Leapfrog the first pin to the new end of the matching lines.
When you’ve reached the junction of the front and back pieces (however many pivots you need), mark the band – here it’s the short red line.
Track the front band in the same way from the shoulder seam to the mark for the end of the collar band.
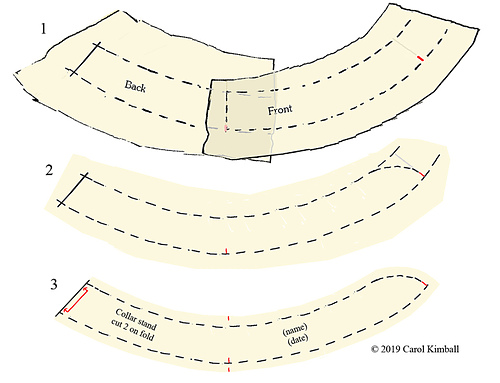
- Overlap the front band and the back band, aligning at the shoulder seam. Trace on a fresh piece of pattern paper.
- Curve the end of the front band. The center of a roll of tape often is the right size for most of it.
- Cut out, adding seam allowances. Mark the center back so you remember it goes on a fold. If you’re adding a collar, mark the top of the shoulder seam.
- Label.
- Rather than throwing out your earlier pieces, fold them together, pin them (as a reminder that they’re not active) and tuck them in your pattern envelope.
Making a Curved Bag to Heat in the Microwave:
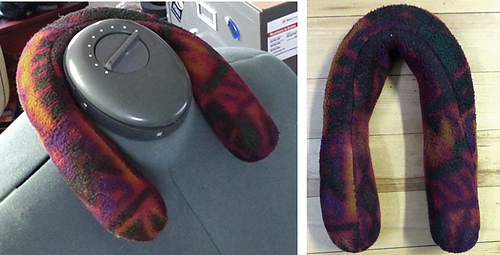
Comfort bags to heat in the microwave can be of any natural (i.e. non-melting) fabric and filled with any grain*, so go with whatever’s cheap. Animal feed is a great idea – you know it won’t have been sprayed or dusted with toxic stuff, as seed to be planted often is, and it’ll be cheaper than human-grade.
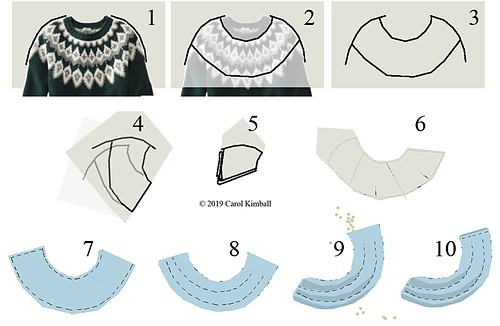
Even better than rectangles are arcs, which wrap around the neck and stay in place better. Here’s a rough how-to:
- Trace the top of a sweater for a pattern on thin paper.
- Lay the paper on top of the sweater and trace the arc you want.
- The finished raw pattern.
- Fold the pattern back on itself.
- (several times).
- Trim it to shape (it will be much more regular than this fast drawing).
- Cut out the pattern, doubled, and sew all but one narrow end.
- Turn the fabric and topstitch channels almost to the open end.
- Fill the bag very full (use the top of a plastic soda bottle as a funnel).
- Turn the raw edges in and stitch the bag closed. Extend the channel stitches to the end.
You can fuss with sub-dividing the arcs, but I’ve found it’s not necessary – the filling will shake into place easily.
* or small peas/beans, but those can be lumpy to lie on. If they get too damp, any of these can mold/sprout, so I keep mine in the freezer. If I want it hot rather than cold, I toss it in the microwave.
Here’s my much smaller version. It’s fine for “icing” or heating, but a tad small to warm the bed.
Cutting Spiral Strips from a T-Shirt:
You can make spiral strips from a t-shirt with a rotary cutter by slipping a cutting mat inside. It’s also easier to cut one layer at a time.
You’ll lose a narrow wedge at the bottom of one side of the shirt establishing the angle.
Once you get the rhythm going you can pull the works toward you and slide the mat up, lifting it a little, pushing/rolling the shirt into position for the next cut.
Make a spacing strip if you don’t have a ruler the right width: it’s faster and safer than eyeballing it.
Reverse if you’re left-handed.
Hook and Eye Tape:
You can fudge your own h&e tape by using your machine’s zigzag (tightened almost to satin stitch) and two pieces of non-stretch tape.
Three commercial tapes: single sets, one set hooks and three sets eyes, decorative oversize.
Make your own by getting the largest hooks/eyes you can find and (a) zigzagging them to a non-stretch tape. You can leave the largest gap possible in the middle (not shown), (b) the minimum, or somewhere in between.
Old-style (pre-zipper) costumes requiring extreme movement (c) alternated the sets, so you wouldn’t come down from a plié and find your costume had, too.
Pay attention to which way the hooks lie; it will depend on whether you topstitch the tape or insert it.

