Copyright 2024 Carol Kimball
repository for stuff currently orphaned
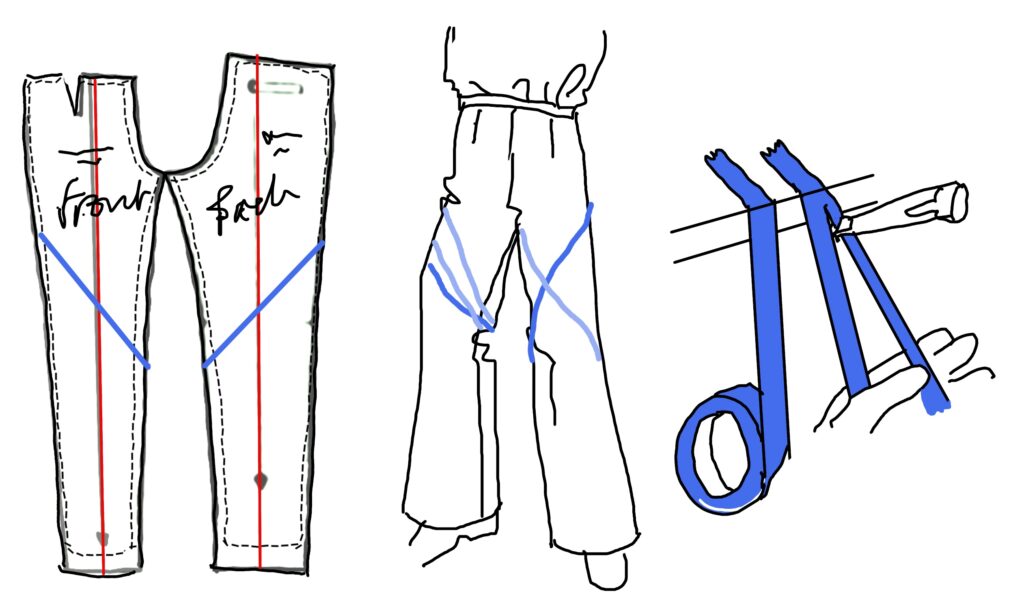
Trace off a copy of your basic pants block.
Split painter’s tape into thirds(?) with a utility knife (or scissors).
Wearing any pants whose legs fit reasonably well, tape lines on both front and back. Try several options: you don’t have to go with the original pattern’s suggestions.
Transfer to your block.
recent orphans to sort later:
https://www.ravelry.com/discuss/lazy-stupid-and-godless/4292233/726-750#728
I am slightly disheartened at how accurate this is.
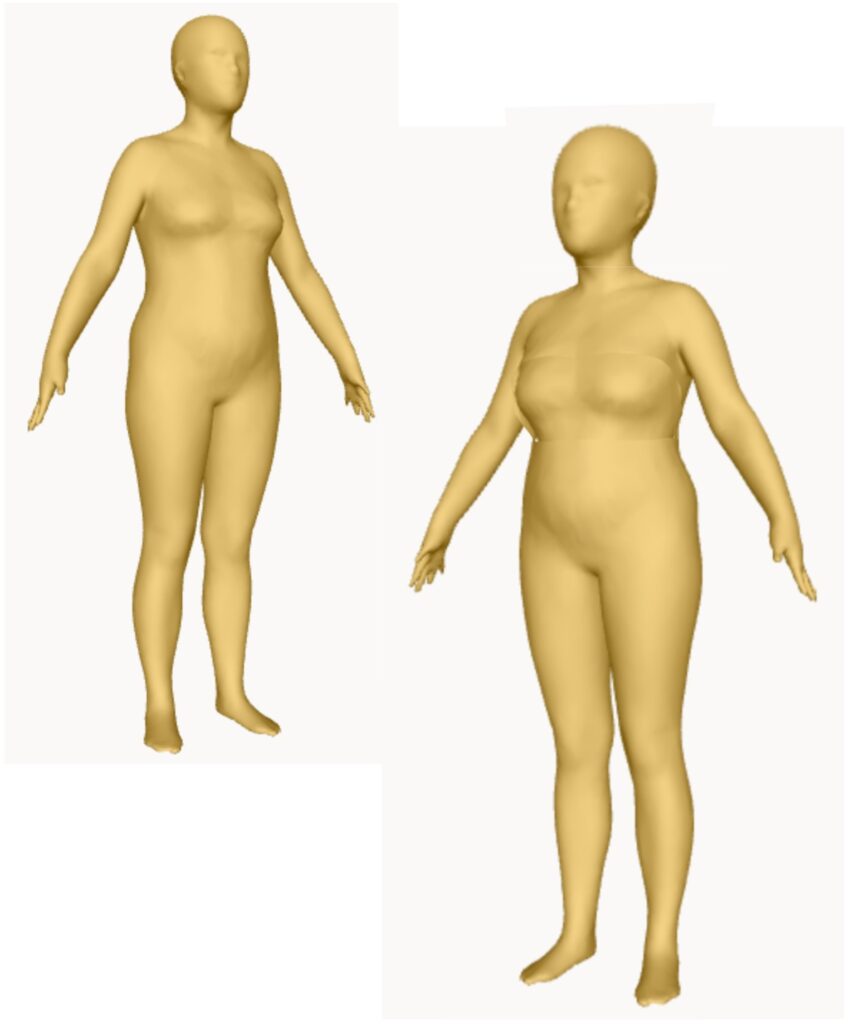
This is everyone’s reaction to a realistic body shape (sometimes called a croquis, krow-kee, though that originally was the designer’s sketch, including fabric swatches).
A useful site!
https://www.shavatar.me/3d-avatars
A couple notes:
You’ll need cm and kg to generate your image. Most tape measures give both. For your weight, use half your poundage to get to kg. This is a tad light.
Unless you’re very slender or still in your teens, they’re going to put your bust too high.
Use a slightly angled view rather than dead-on. There’s a reason models stand that way.
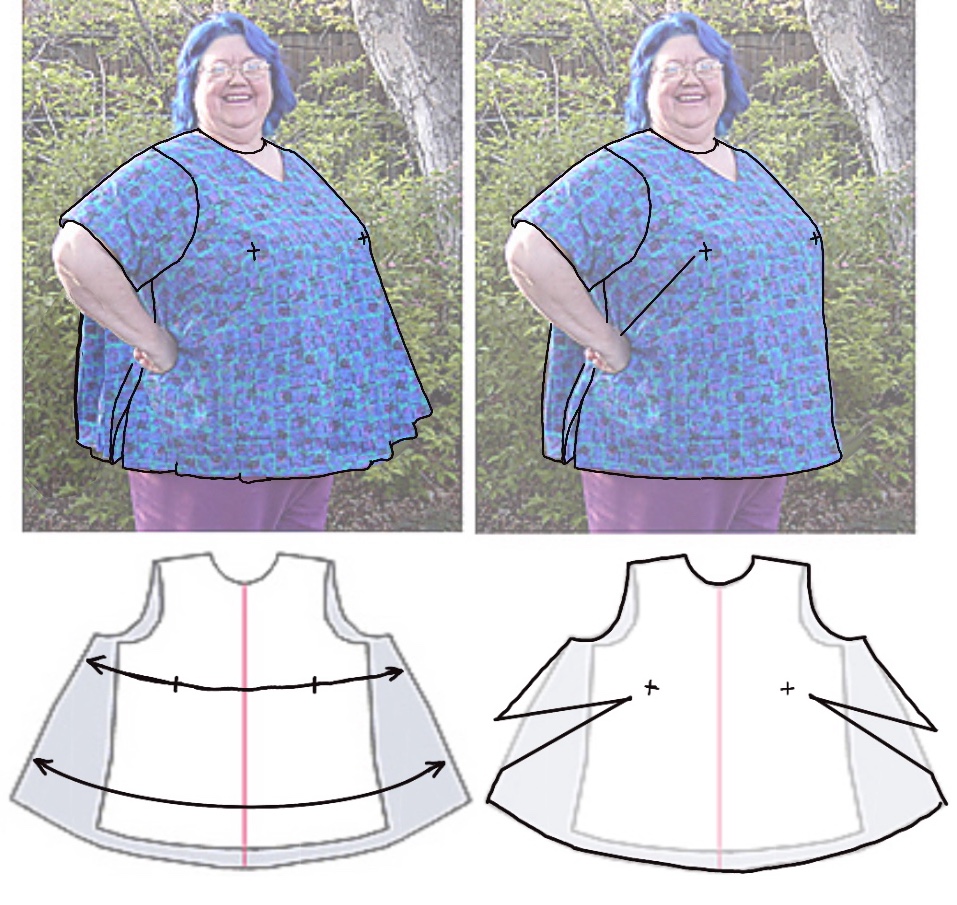
I do think that the extra vertical piece along the shoulder reduces the visual weight of the dropped shoulder I’m going to end up with because my shoulders aren’t as wide as my bust.
This is a classic headache in women’s RTW, as the pattern development came (mostly) from the U.S. Army building uniforms. As men’s shoulders get wider, so does everything underneath. Women’s don’t.
To accommodate a larger bust, you cannot just move the sides out. What works is to pivot from the shoulder seam. As the fabric is going over more volume, the hem needs to be lowered so it doesn’t swoop up.
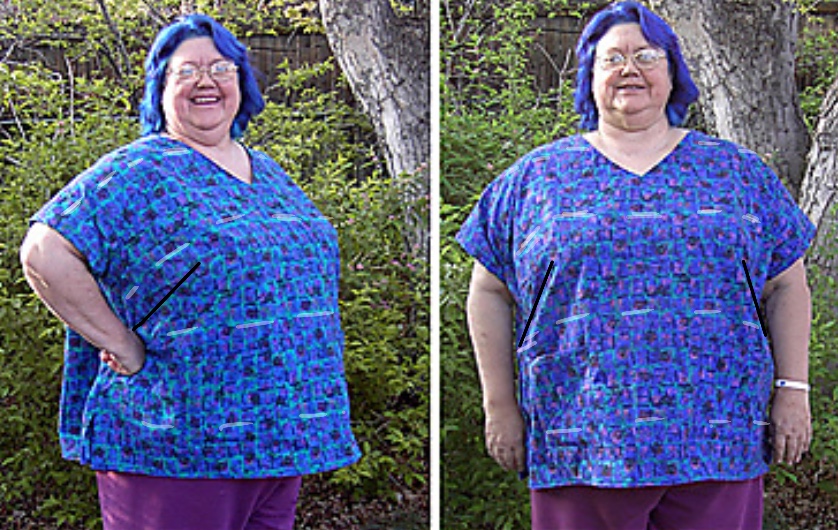
Another series on altering a bodice where the shoulder seam is too long:
Clowance sent more photos, including what happens when she flails her arms about (her term – doesn’t she look like she’s having a hoot?) and her pattern pieces. The set of the armscye definitely needs moving without changing the length of its opening, as the sleeve fits in it well.
re: is it easier to alter the shoulders/armscye by buying for the bust, or vice versa? Not sure that it matters, though it you’ve got a pattern with multiple sizes you can certainly trace off a pattern that grades between them.
Their seam allowances have been taken off, with the current sewing lines as dashes. Their order now runs from center front to center back.
This change is going to make the biggest difference.
- Trace the armscye (the back and yoke have been overlaid to get the line) on small pieces of paper.
- Move and tip. The bottom of each curved piece is moved in about a centimeter (.5”). We’ll fix the side seam next.
- Trace on the original pattern piece.
- Hold the pattern up to the body to check where the line falls. It should be at the prominent bone at the shoulder.
In addition to getting rid of extra fabric hanging off the shoulders, the side seam has been moved higher and tighter.
The front could be a little longer (a common thing with gals with larger breasts); that’s an easy fix.
A stay is something that supports and/or keeps in place.
The hip stay keeps the side seam from collapsing into the hollow.
A waist stay supports the weight of the skirt as well as takes the strain off of side seams.
The stays that were precursors to corsets were the underpinnings that kept the garments above (in the outward sense) organized.
a) a “simple” poofy sleeve
b) sleeve head -doubled up on itself, basted to the main sleeve c) and thereafter treated as one
d) cuff
e) gathering on b) and c)
f) inner sleeve (usually lining)
g) inner sleeve sewn
The inner sleeve is a stay. It’s shorter and narrower than the poofy bit, which would otherwise head down to the elbow crease.
Pin-tracking a neck band/collar stand to fit a bodice:

Fold each band back on itself, matching the curves, to get the correct line for the side seam.
- Two straight pins.
- The front band.
- The back band.
- The bodice front and back, pinned together at the shoulder seam. True up the neckline edge (the back is often slightly longer, to be eased to the front – let extra hang out at the armscye).
Note the mark for the end of the collar band, which is set back slightly from the center front. The red grain line is the CF. When the two fronts are overlapped, the collar curves will meet.

- Work from the center back. Both the bodice back and the band are placed on folds.
- Overlap the sewing line of the band exactly over the sewing line of the bodice back.
- Place a pin at the center back.
- Pivot the band to align the sewing lines as far as you can, and place a second pin at that point.

- Take out the pin at center back.
- Pivot the band on the remaining pin to re-align the sewing lines.
- Leapfrog the first pin to the new end of the matching lines.

When you’ve reached the junction of the front and back pieces (however many pivots you need), mark the band – short red line.

Track the front band in the same way from the shoulder seam to the mark for the end of the collar band.

- Overlap the front band and the back band, aligning at the shoulder seam. Trace on a fresh piece of pattern paper.
- Curve the end of the front band. The center of a roll of tape often is the right size for most of it.
- Cut out, adding seam allowances. Mark the center back so you remember it goes on a fold. If you’re adding a collar, mark the top of the shoulder seam.
- Label.
- Rather than throwing out your earlier pieces, fold them together, pin them (as a reminder that they’re not active) and tuck them in your pattern envelope.
One of my first adventures sewing from handwoven was from a 100% cotton fabric brought in by a client. We discussed options and then she brought up what I’d been afraid to: that the best treatment would be to completely fuse an interfacing before cutting. It worked splendidly! It stabilized the weave (mostly kept it from stretching out) without greatly affecting the hand of her fabric.
This was also the first time I did photo manipulation for a client.

Her gray suit was what she had to use as the base. The woman who’d made it for her was no longer in the business; my client said that one had come out better than she’d dreamed possible. She emphatically did NOT want shoulder pads. She wanted her skirt longer and wider.
The second graphic showed her what she thought she wanted. It was before Photoshop came on the market; I don’t remember the name of the program. (CorelDraw)
She decided on the second option from the left on the bottom.
The other jacket changes she agreed to were to lose the lapels, lower the break (where the roll line ends/how much of her blouse would show), slightly longer length, and angle the pocket flaps.

She had severe scoliosis. The jacket hem was weighted so it didn’t hang up on her hips when she moved her elbows.
There was barely enough of purple asymmetric hand-loomed fabric: a handful of scraps were left. The pattern matched diagonally across the center front.

Mysteries of facings and lining (partially) revealed:

- Possible facings, skimpy.
- Better facings (alter your pattern to this version if you don’t have it).
- Traditional linings that are sewn to facings.
- Easier lining assembly, where the facings are appliquéd on top.
Facings fulfill two functions:
- They clean-finish edges, such as on the neckline and armscye of a sleeveless blouse.
- They stabilize those areas, as in addition to their own weight they are usually interfaced.
Occasionally you see the layout shown in the first set of graphics, where the manufacturer has pared down the amount of material. The trade-off is that this “savings” costs more to sew as there are more pieces to cut out and fuss with.
In 3, our lining makes its appearance. It is sewn to the facing, the seams pressed, and afterwards treated as one piece. Those reversed curves are tricky to draft and sew, and unless you press the seam allowances carefully can make a ridge that shows on the right side.
My suggestion is 4, where the lining is cut full size. I didn’t show the facings but they’re exactly as they appear in the earlier sets.
Once you’ve married your lining and facing pieces, follow your original instructions with the added lining along for the ride.

Bias binding’s seams are sewn on- or cross-grain (so they appear as a 45° angle rather than straight across) to prevent puckering.
Although the extra lines of thread are not drawn, it’s wise to stabilize your raw edges by stay-stitching slightly inside the future seam lines (closer to the raw edge) before starting to assemble your garment.

- Begin binding a neckline with the top right side out. Sewing the bias strip’s right side to the inside of the top starting a finger’s length behind the back shoulder seam. Place a pin at the exact start of the stitching. Stretch the bias slightly as you apply it (if you under- or over-shoot, take it out and re-do it).
- End at the same point. Do not catch a fold of the strip.
- (not shown) Position your ends at right angles to each other and sew, ending again exactly where the seams met. It may be easier to hand-baste first.
- Trim and press flat.
- (not shown) Turn top inside out. Fold bias to the right side and topstitch. If the inside stitching is off a bit, it won’t show.

French cut top


The bump on the side seam is the bust shaping on a French-cut t-shirt. It’s on the front piece only (unless you need it for breasts on your back). Earburning UnplannedCauli.
It’s on the front only.
This presumes you’re using a stretchy knit. It’s not going to work on a woven fabric.
How to figure how much? When you’re cutting out your shirt, first thread-trace the original seam line (illustration) on each side of the front by running a quick line of basting stitches. (I of couture long-short stitch)
Cut out the front with generous bulges. (I)
When putting the shirt together, sew/serge the shoulder seams. (I)
Tack the bodice front and back together at the tops of the side seams. Leave the side seams open until below the bulges and baste them together from there down. (I)
Put the shirt on. Smooth the front fabric over and pin the gaps closed, being sure the side seams remain vertical. The tension on the fabric there should feel the same as below. (I)
Reset the pins through the front only. (I) Take off the shirt. Pull out the basting*, pin the front to your pattern, and trim the seam allowances outside the line of pins. (I) One side will have fit better. Mirror that on the other.
Finish sewing the shirt. Usually the sleeves are sewn in flat before doing the underarm/side seam. Gently ease the front to the back at the bumps.
If a later shirt is of less-stretchy fabric, you may need a bigger bump – i. e. a new front pattern. I attach a small swatch of fabric to each with a note (4” -> 7”). (I)
I don’t have time to do the drawings now. Please holler at me if they haven’t shown up by early January.
* it’s easier to get the shirt off if you can pull out the basting first. You don’t want to disturb the pins.
Do the scoop curve thing to bring the overlap under my boob
Here’s how I’d re-curve the neckline. It takes what seems like extra steps but gives greater control and in the end, is faster and more accurate.
- 1. Make a master pattern by lapping the front and its neck band on their stitching lines (these may have to be drawn in). Trace them together on a sheet of pattern paper that comes a couple inches/5 cm below the bottom of the band.
- 2. Cut out.
- 3. Hold the pattern up against your body and, a little at a time, scoop out the curve until it rests where you’d like it to.

- To draw the band’s width evenly on the temporary working piece, mark a narrow scrap of heavy paper or card and use it as a guide (top left).
- As the pattern’s cut edge is where you want the finished band to fall, you must add a seam allowance when you trace it to a full-size pattern. A narrow one is shown.
- Likewise, add seam allowances to the band.
- Where should the grainline on this piece fall? The original was cut cross-grain, relying on that to stretch it into a slight curve. My preference would have been to cut it on the bias; the drawback is that needs careful handling not to stretch out. The solution is to lightly interface the band with a fusible.
I’d still cut it on the bias (right). If your fabric has a design such as this stripe, as you’re stabilizing it, you can shift how you cut the piece to make that a feature.
would it work to just cut a straight piece like it is already and easing it in?
Not sure if you meant the band or the interfacing, but in either case, no! You’ve got a curvy body, you need curvy front pieces. If you shaped the top of the front piece only and threw a bias-cut rectangle (no interfacing) on top, it would stretch to fit nicely but the band would be visibly uneven right where everyone is going to focus.
For a different look with less work, you can shape the top front as shown and bind that edge with a narrow bias strip. A bias binding of a striped fabric is a fabulous design detail!* You’d need to cut the back and its band as one piece.
Increased space in the rear: pivot the side seam (back only) as shown here.
* It’s a great use for old silk ties, which are made on the bias.


arayti is making a full circle (!) skirt from a sheet she dyed purple and was wondering about a zipper/pockets/ how to narrow the top. All this info has been around for eons: welt, add a shaped pocket to the side rather than the usual drop-down squared one, dart the top of the circle. This combines those.
arayti had been following rough notes I’d sent her, sewing a version while on break at work using napkins, so my clarification also used a paper towel and an ancient airline napkin. What a flurry of PMs!
Samples of any process you’re unfamiliar with are a great idea. It’s also good, once you’ve got the concept, to make a test of your actual fabric from the scraps you’ll have once you’ve blocked out where your good pattern pieces will go. Do you need to interface the welt? There’s where you find out.
First, if you’re unfamiliar with welts, check out this excellent video. Bound buttonholes are little versions of the two-welt kind used for pockets. They also come in single-welt flavor. Note that Judy clips with the very tips of her scissors.
Here’s the paper towel version.
- Stitch a narrow slot. Optional: narrow the stitch length at the bottom to make clipping to the threads less scary.
- Clip down the slot, extending it to an inverted V at the bottom.
3-4. (finger) press the stitching (iron for real job). Here the lips of the welt are folded back; in some cases (buttonholes in particular) they extend to their original center cut. Turn and press again. There shouldn’t be any puckering. If there is, go back to as-stitched and clip right to your thread.
5-6. Fold the skirt back on itself at the welt stitching.
Fold the pocketing back on itself to make a fold a little wider than the welt opening.
Stitch across the pocketing to exactly meet the bottom of the welt.
7-8. Clip below the stitching at the bottom of the welt. Clip on a diagonal to the stitching at the corner. This will be a fragile area until several steps later.
Turn the little flap and press it hard. Pop it through to the front side.
9-10-11. View from back: fold the pocket on itself. There will be a fold of extra fabric that we’ll disappear soon.
12-14. I didn’t follow my instructions and sewed the pocket bag too soon. I’m going to keep feeding you the sequence as you’ll see this mistake shadowing through.
14 shows the pocket in its proper position from the welt.
15-18. Stitch the welt in its ditch. Go back and stitch the pocket bag (its layers only, duh) and trim it. NOW we’re back on track.


19-22. Welt is its own thing but still flapping in the breeze.
23-24. With the pocket safely folded away, sew the bottom of the welt to the skirt.
25-26. View from the pocket side. (Improperly) adding the waistband: you’d do it in several steps so that the raw edges wouldn’t be hanging out.
27-28. “Finished” welt with its waistband. You can see how this could be the fly front for a zipper if the waistband had two clean-finished ends above. Rather than the fabric going over for a pocket, a section would wrap the zipper and its raw edges. We’ll get to that another time.
29-30. To take excess fabric from the top, you split the pocket and sew each half to the skirt. I’ve helpfully cut out the skirt’s upper area.
When you’ve finished your pocket you’ll have a folded chunk of skirting hanging there below the welt flap.
Sew a curved dart* from the bottom of the welt to the edge of the skirt.
I didn’t show the diagonal clipping (back to the same fragile spot) but you know where it will need to be.
- * duplicating the shape of your hip
Figuring how to cut a tiered/darted yoke/circle skirt using your waist measurement:
- Measure your waist with a piece of non-stretch cord (I use drapery weight*), including a bit of ease. 1/4 – 1” / .5 – 2.5 cm is standard. You’ve got to be able to move and eat.
- You’ve got to have a seam with its seam allowances. For a circle skirt with a zipper, one slot.
- For a circle skirt with a back zip and two side pockets, three slots.
- For a darted yoke with a zipper, a space for each dart. The zip goes into the back seam.
- For a gathered strip, only the seam allowances on either side of the seam.
- Circle skirt using one slot for a zipper.
- Circle skirt with back zip and two side pockets. Note: due to Photoshopping, the center “circle” has turned into an oval. Shape the tape into whatever you please as long as the distance from the tape to the hem remains the same.
ETA:
Useful hint: figure how much space you’ll need to allow for the spacing/seam allowances and pin that much out at (for example) your side seams and back zipper spots. More is needed here for the pocket welts at the sides than for the zipper. Once you’ve got the total marked (pins at the CF join, here, not shown), release the extra between the pins and center on your skirt blank. Be sure to add your seam allowance above the tape.
* which is just as precise and far less fussy than using a measuring tape. Who cares that your waist is xx.138 units? It also is much easier if you’re adding spaces for darts, welts, etc. as in the second graphic.
*****
Here’s a quick-and-dirty floaty swirly skirt.
Using a string (here, drapery weight), get the circumference you want: your hip measurement plus however much ease.
Transfer it to a piece of pattern paper (go bigger than you think you can possibly need or be prepared to tape).
Shape it into an arc.*
Draw the curve.
Fold the line on itself to get a workable section.
Measure down several places.
Cut the pattern piece, adding seam allowances at the edges.
Use the same length of cord to figure the length of your waistband. Add its seam allowances.
Seam pieces into circles, duh.
Sew the waistband rectangle to the top section.
Use either a rectangle or (as seen here) a shaped chunk for the lower skirt**. Gather the big piece to the yoke.
Insert elastic into the waistband and adjust to fit your waist.
Use the same method for a half- or three-quarter-circle skirt.
* How much of a curve? Up to you. The tighter the circle you make of your string, the greater the flare of the skirt.
** A rectangle that isn’t long enough will make a weird boxy shape.
*****
I made myself a long trumpet-shaped gored skirt in the 70s. Remind me to dig it out for you.
Notes to self: PMs with arayti this date
Pockets
Dropped shaped WB/yoke
Grain lines
Hang before hemming
Hem length by oneself by using line below fullest hip
People shy at pattern pieces that don’t mirror changes, but as long as the sewing lines are the same length you’re fine. The classic example is the princess seam.
When sewing was taught in schools (in the U.S), bands with reversed curves were part of the advanced program. You can see them in striped silk pajamas in old movies. They’re not all that difficult once you grasp that they take time and about three times as much pinning.


- Pulling a pattern and compensating for gap in striped shirt with bias trim.
- Possible modifications for mock-wrap top.
- How to determine the sleeve armscye in a stretchy fabric.
- How to determine stretch in an existing garment.
- How to test potential fabrics for stretch.
- Layout of working pattern for striped shirt.
- Rough master for mock-wrap top.
For those of you who’ve spotted gaps, yes, there are significant ones. Full documentation will be posted anon.
Why can’t we use a pattern from a knit garment for a woven fabric? Depends on how much you’re relying on the stretch for shaping.

Firm, stable fabric will tent across the breasts, with a noticeable gap at the center front. So will knits if not stretched. Put tension on it and it will curve over the body.
Arayti has a lovely fabric that’s technically a knit, but with little stretch. One of her options is to marry the mock-wrap with the princess lines from her striped shirt.


In addition to a robust support system (which was solved*), the shell pieces themselves must be skewed sharply up, as the weight of the breasts will pull them down.
If you’re using a commercial bra pattern and the cups are distorted up, this is why. Don’t correct that!
ETA: this was a prototype which is why the bottom hem wasn’t squared off.
* When shoved the dress form did not fall forward, though the bags of poly pellets were slightly heavier than actual breasts. We were playing with it like toddlers with one of those inflatable clowns with a weighted base.
Pockets:
- “My teardrop-shaped pockets pull down and bulge out at the side seams.”
- “I want to add an afterthought pocket but I don’t want to mess with the waistband again.”
- “I don’t like the extra bulk at the side fronts; I’m self-conscious enough about my stomach.”

- Teardrop pockets flopping around (particular problem with flowing knits).
- “Put your hand in your pocket” to get the right size and positIon.
- Drafting a pocket on an existing pattern (same technique for afterthoughts except add seam allowances). Note that the pocket’s top line is a mirror of the pants front so it will extend into and be caught when the waistband is added.
- A strikingly good idea: running the pocket to the center front where it’s tacked to the zipper seam allowance. Stupidly, the pocket isn’t deep enough. Easy to fix. I have known women who cut their pockets of stretch Lycra with this method for additional stomach control.
- For an afterthought pocket without involving the waistband, take out a little notch and then tack it to the WB seam allowance once it’s folded into place.
https://carolkimball.net/wp-content/uploads/2024/03/image-13.jpeg
*****
Pants to skirt
I have a pair of linen/rayon pants and the thigh area on both legs has badly worn through. I tried to patch them a while back but that didn’t last long.
My thought now is to cut away the bad parts and cut up the leg seams and add panels to the front and back and make a skirt. I want to keep the existing legs intact because there are lots of nice pockets. It would basically be a cargo skirt if it works.
Here’s what I would do.
- Original pants
- Pattern pieces (note that from here on pieces are shown without seam allowances)
- Worn sections
- Pieces taken out of pants
- Pieces rotated so centers are together
- Crotch areas trimmed away
- Assembled skirt
- Skirt with panels flared a little more
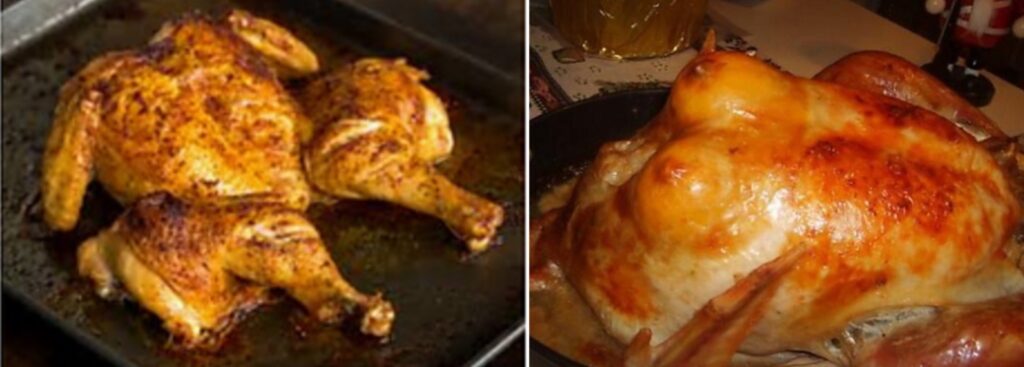
If you’re starting with a whole chicken, spatchcock* it: start by cutting it up along the backbone. I am scrawny and don’t have the strength in my hands of yesteryear, and can easily do this with kitchen scissors. Then lay it on a board and flatten it by pressing hard on the breastbone.
Your flattened bird takes all the resulting treatments more quickly and easily. You can do this with any recipe for any fowl.
* an LSG term were there ever one; learned this from Julia Child, May She Ever Reign in Glory
ETA: this is also a great technique for showing guys that they’ve got power over the bird.
For a truly LSG festive occasion, use lemon halves.
Series on Phoquess’ bodice:
https://www.ravelry.com/discuss/lazy-stupid-and-godless/3935669/926-950#927


