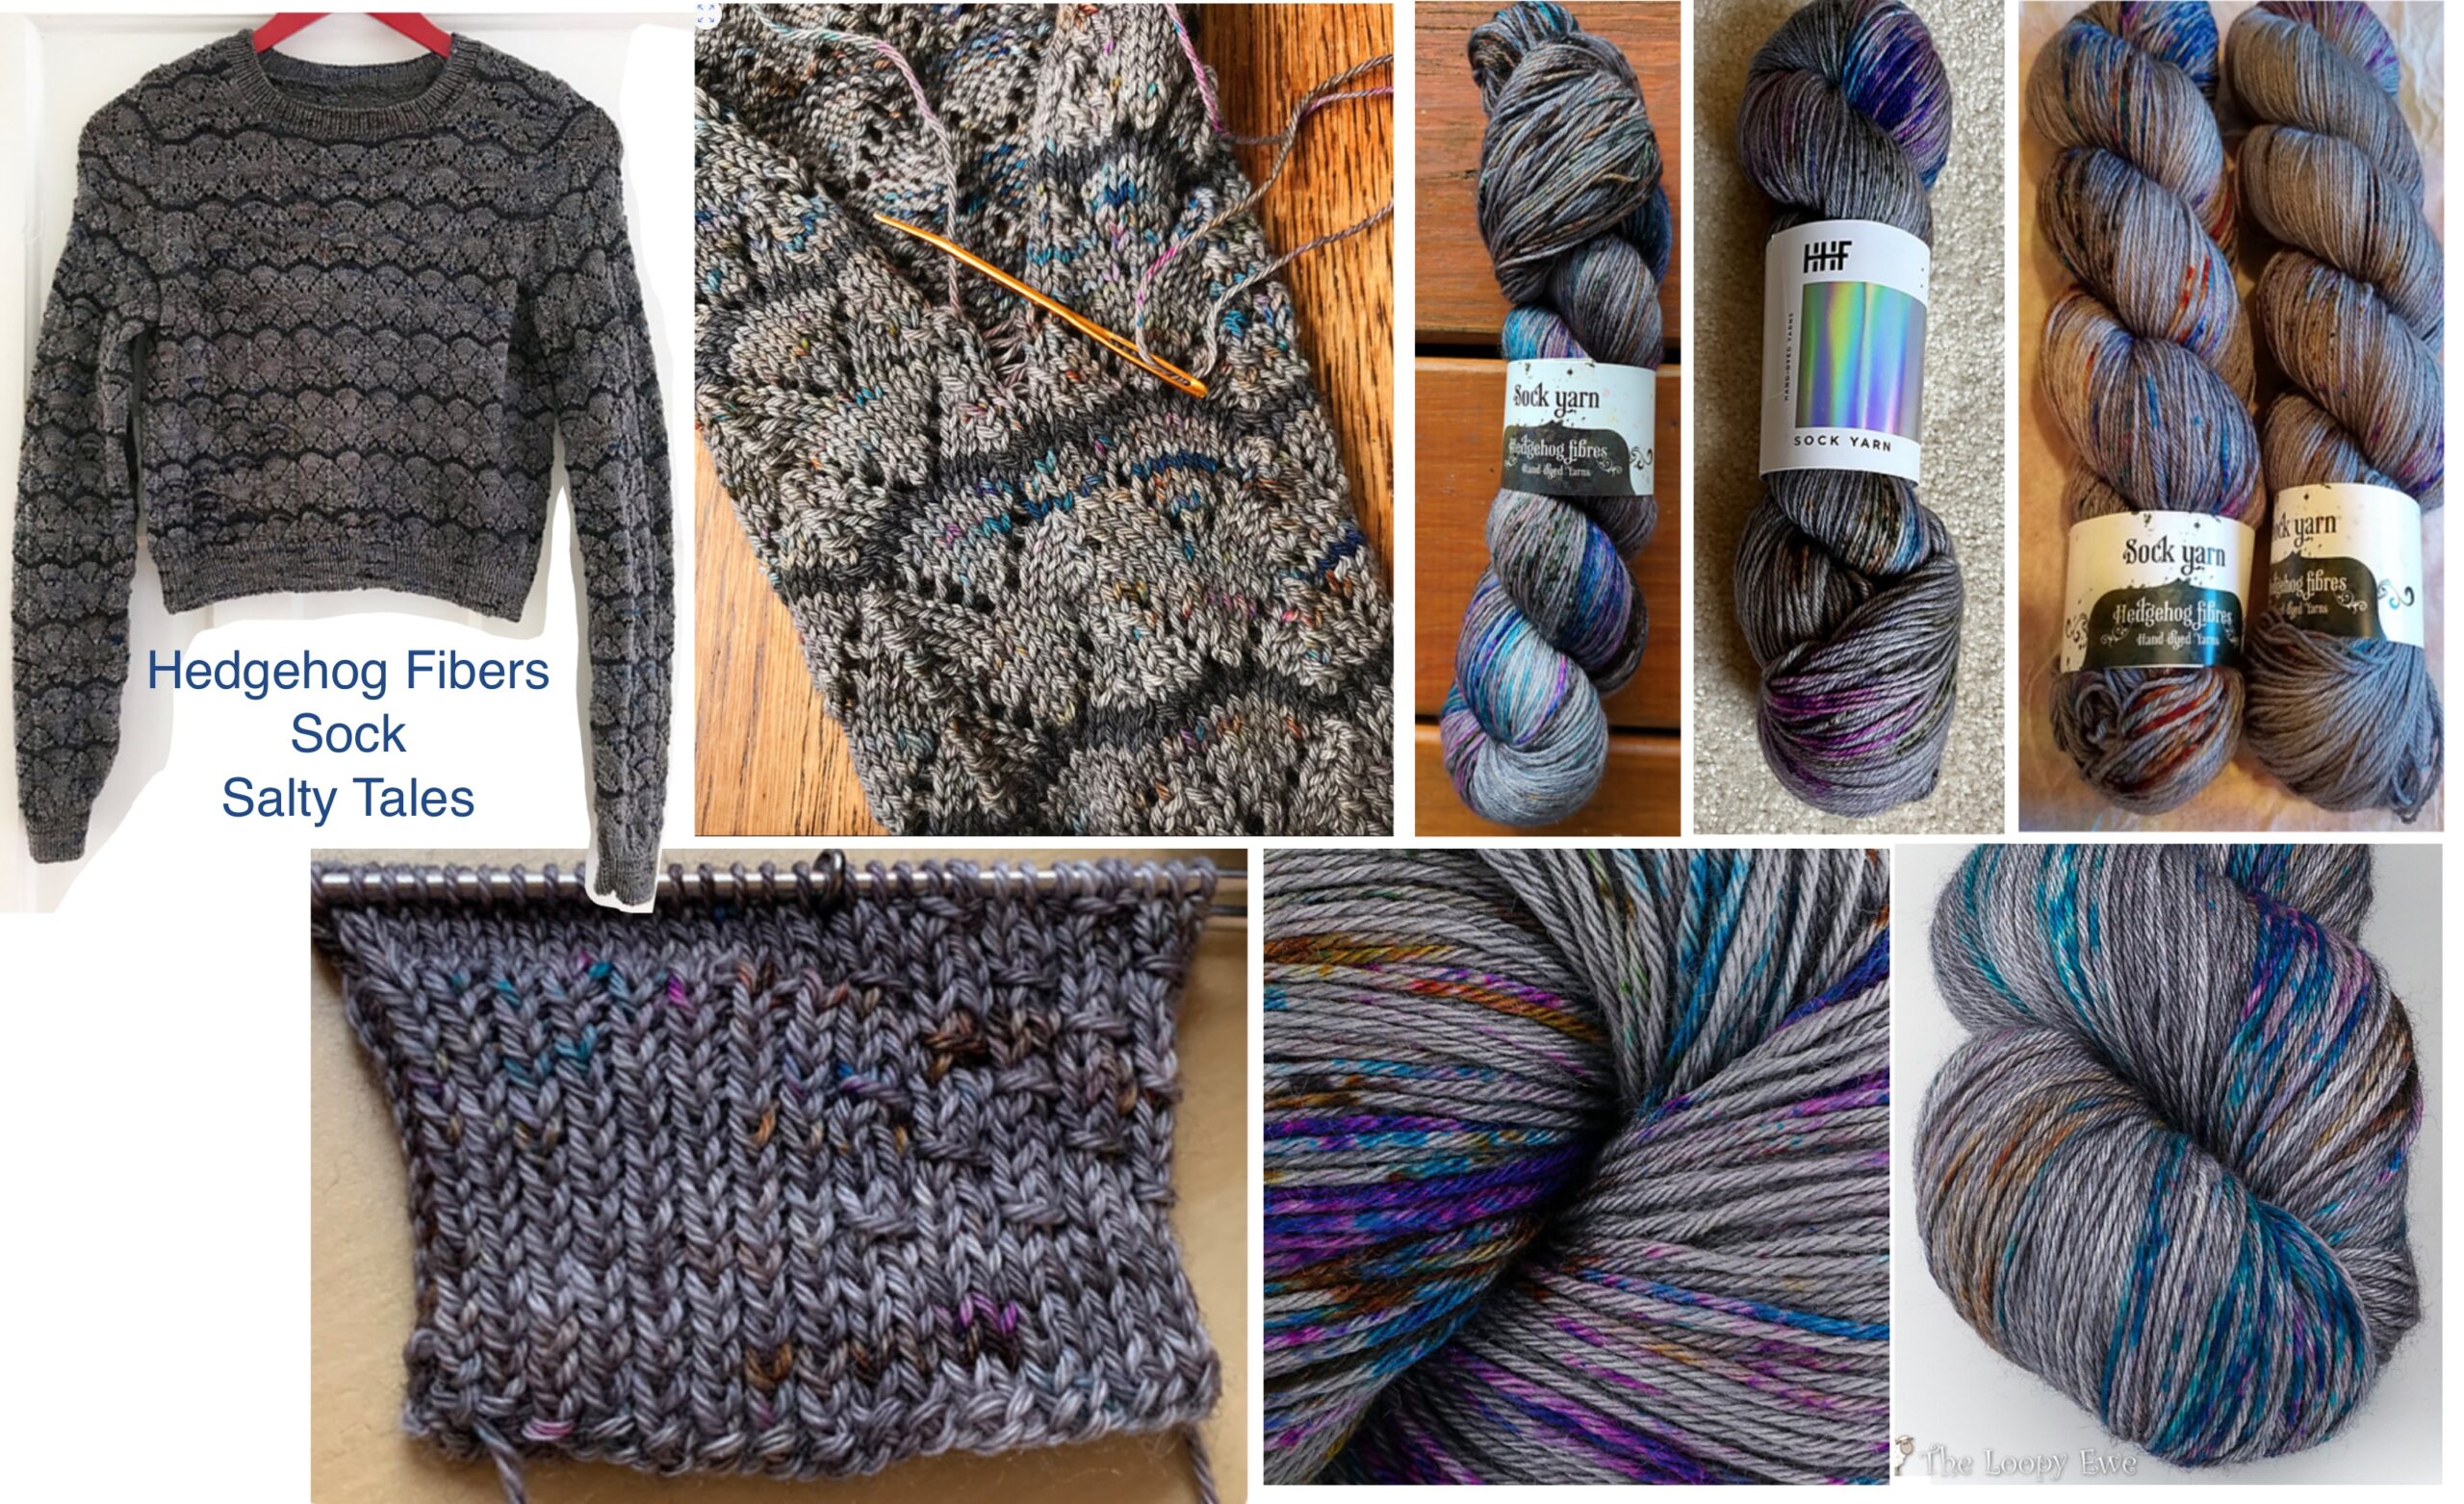
Sections:
Dyeing, preliminary discussion
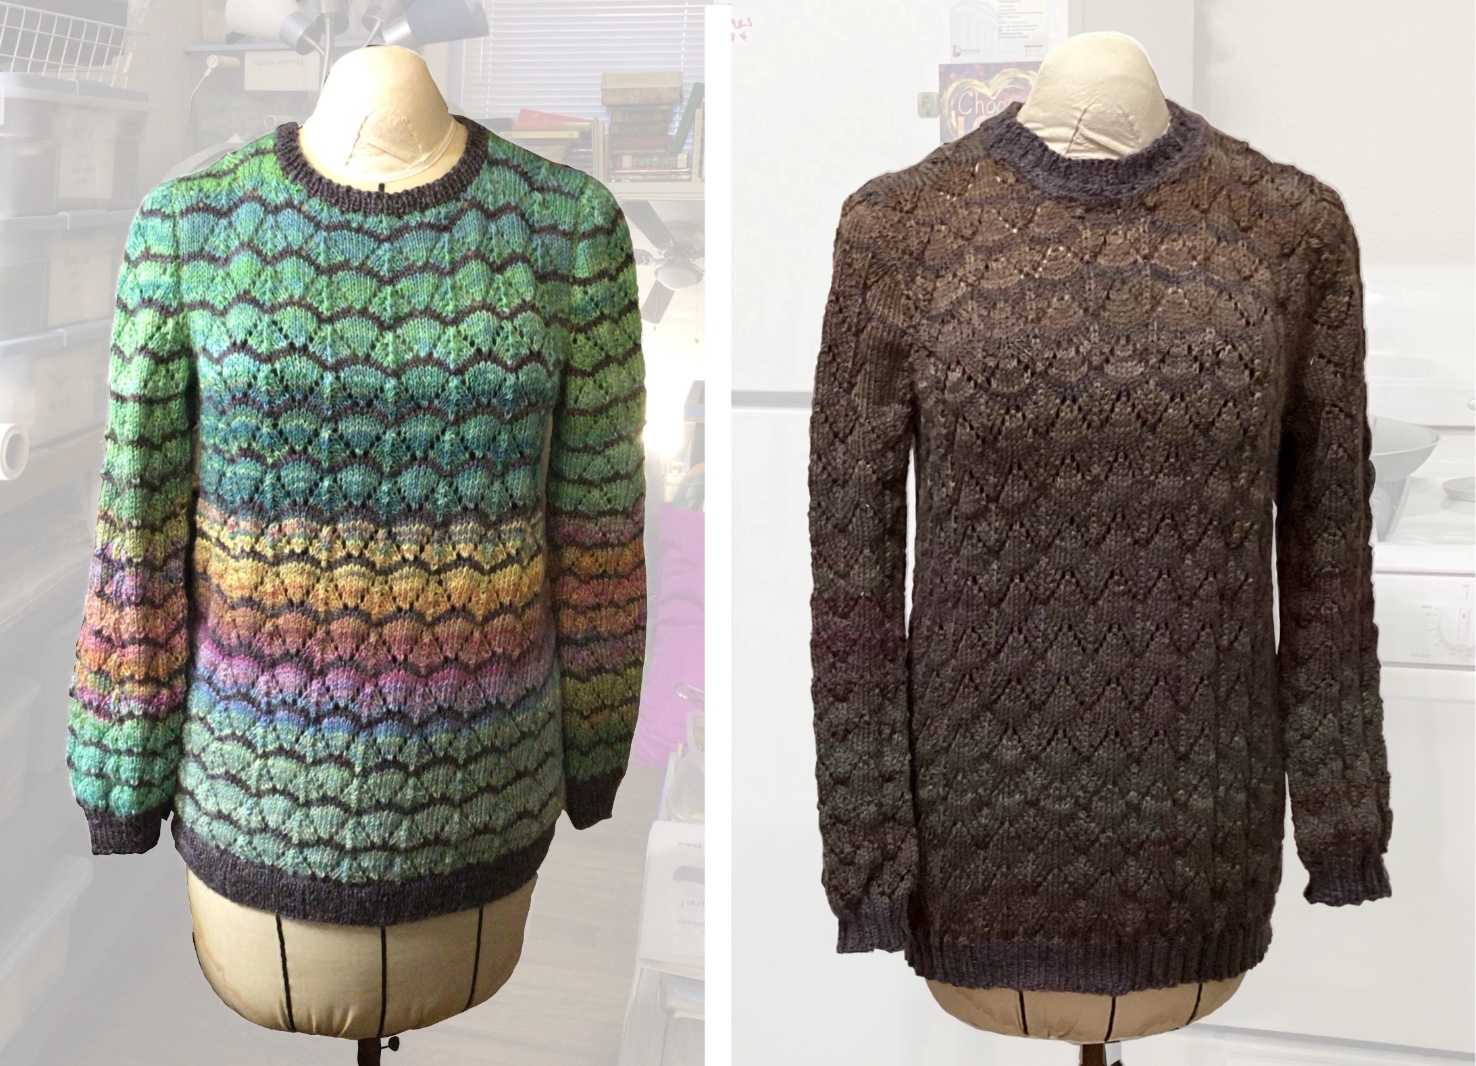
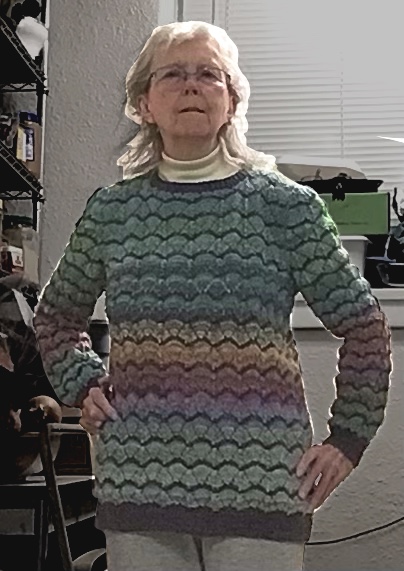
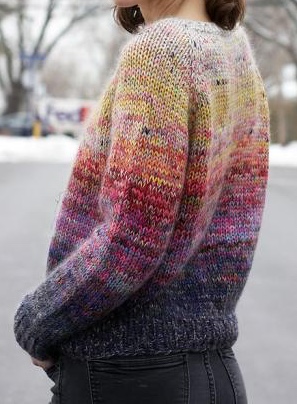
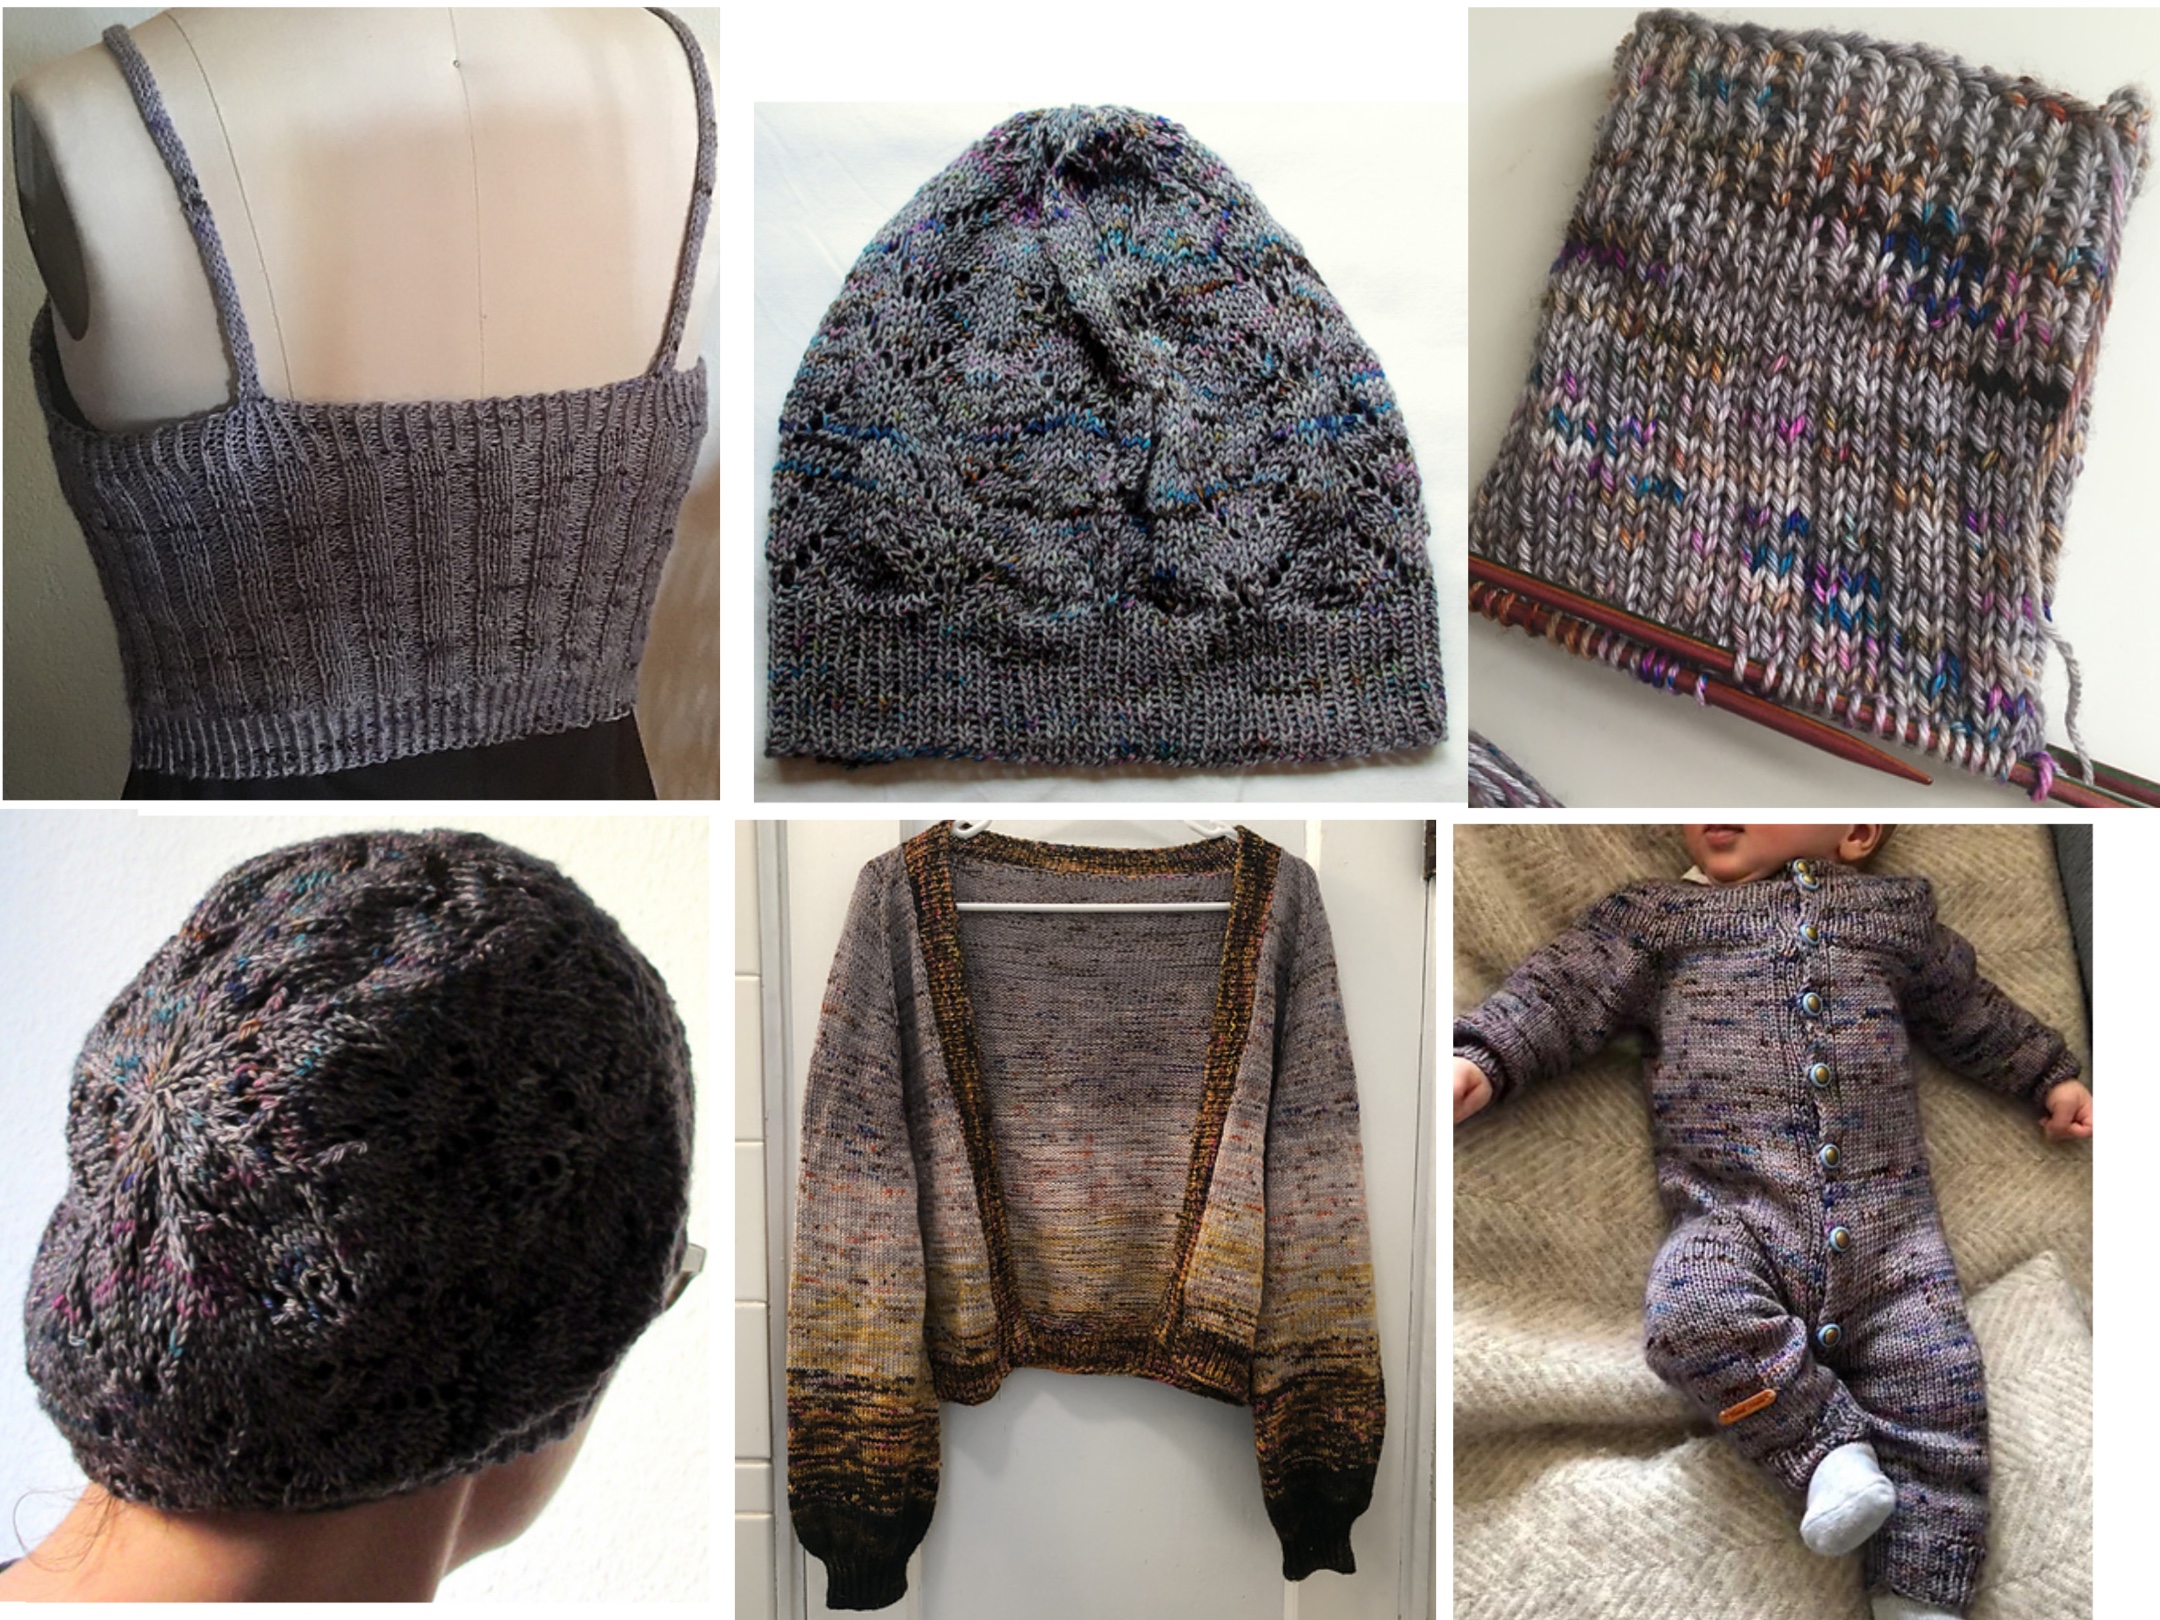
Myrtle Revisited
Kate’s Myrtle


(Irene):
- I know I’d like warm greens, and complementary colours to the greens
- yellows, oranges, violets
- would apple-ish greens work with lavenders and purples? don’t like greens with too much blue
(Carol): Golden ochres/tan/orange/violet

(reference for dyeing)

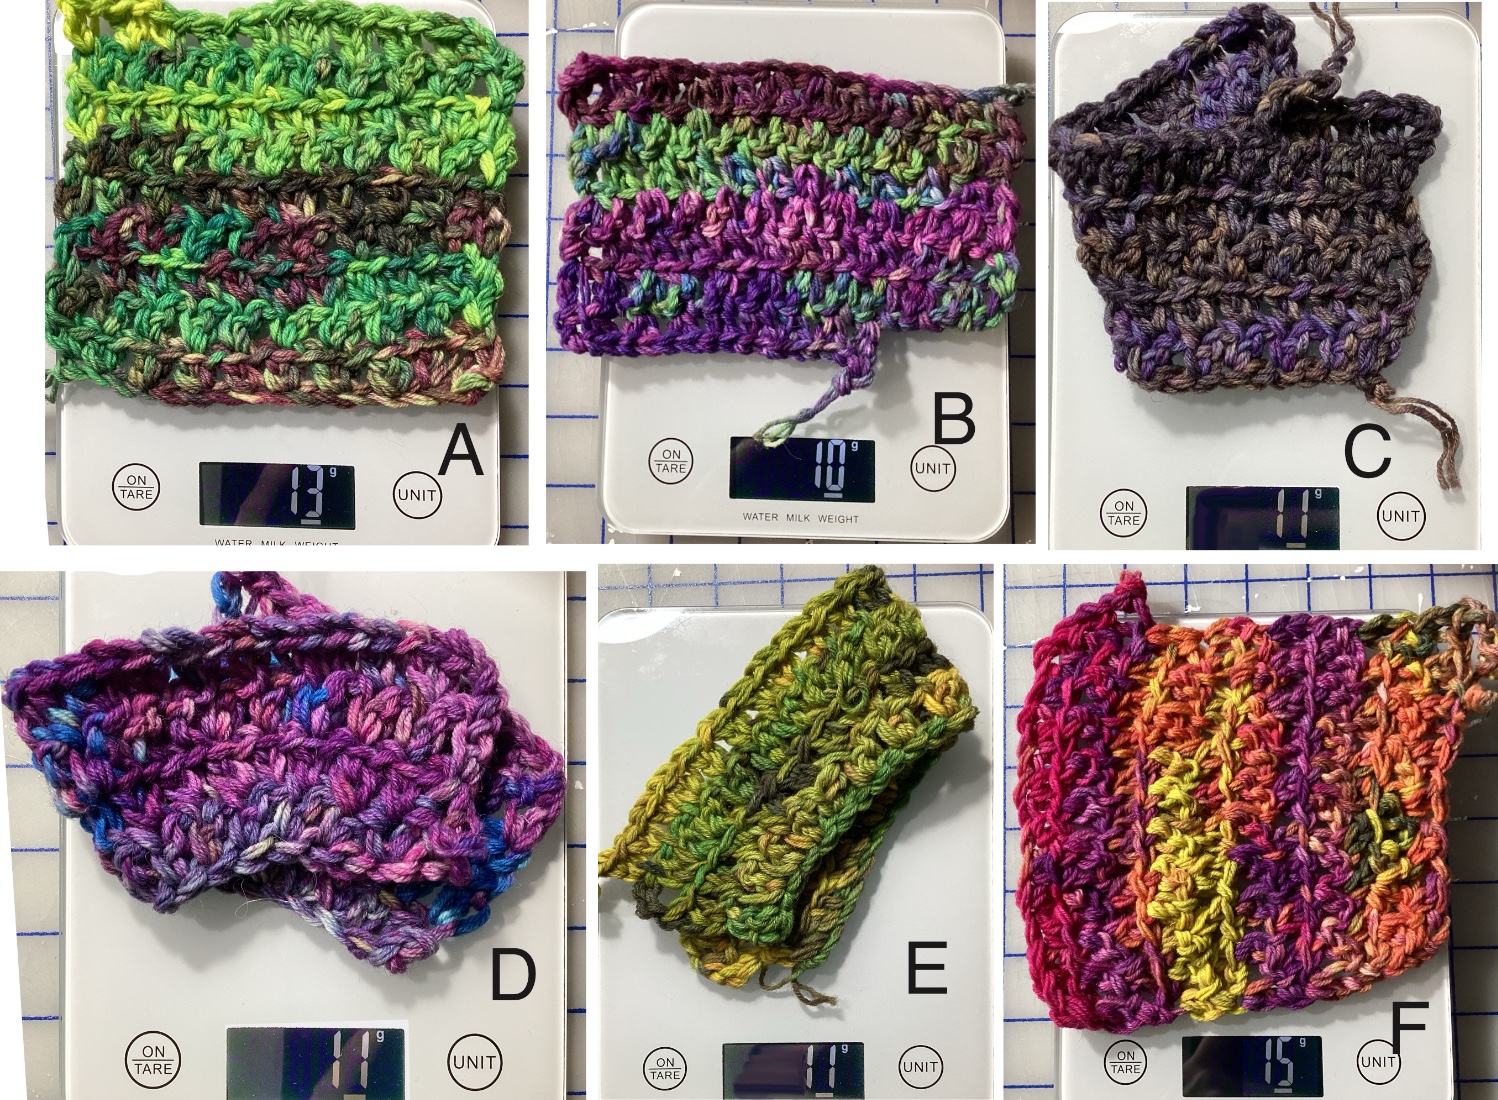
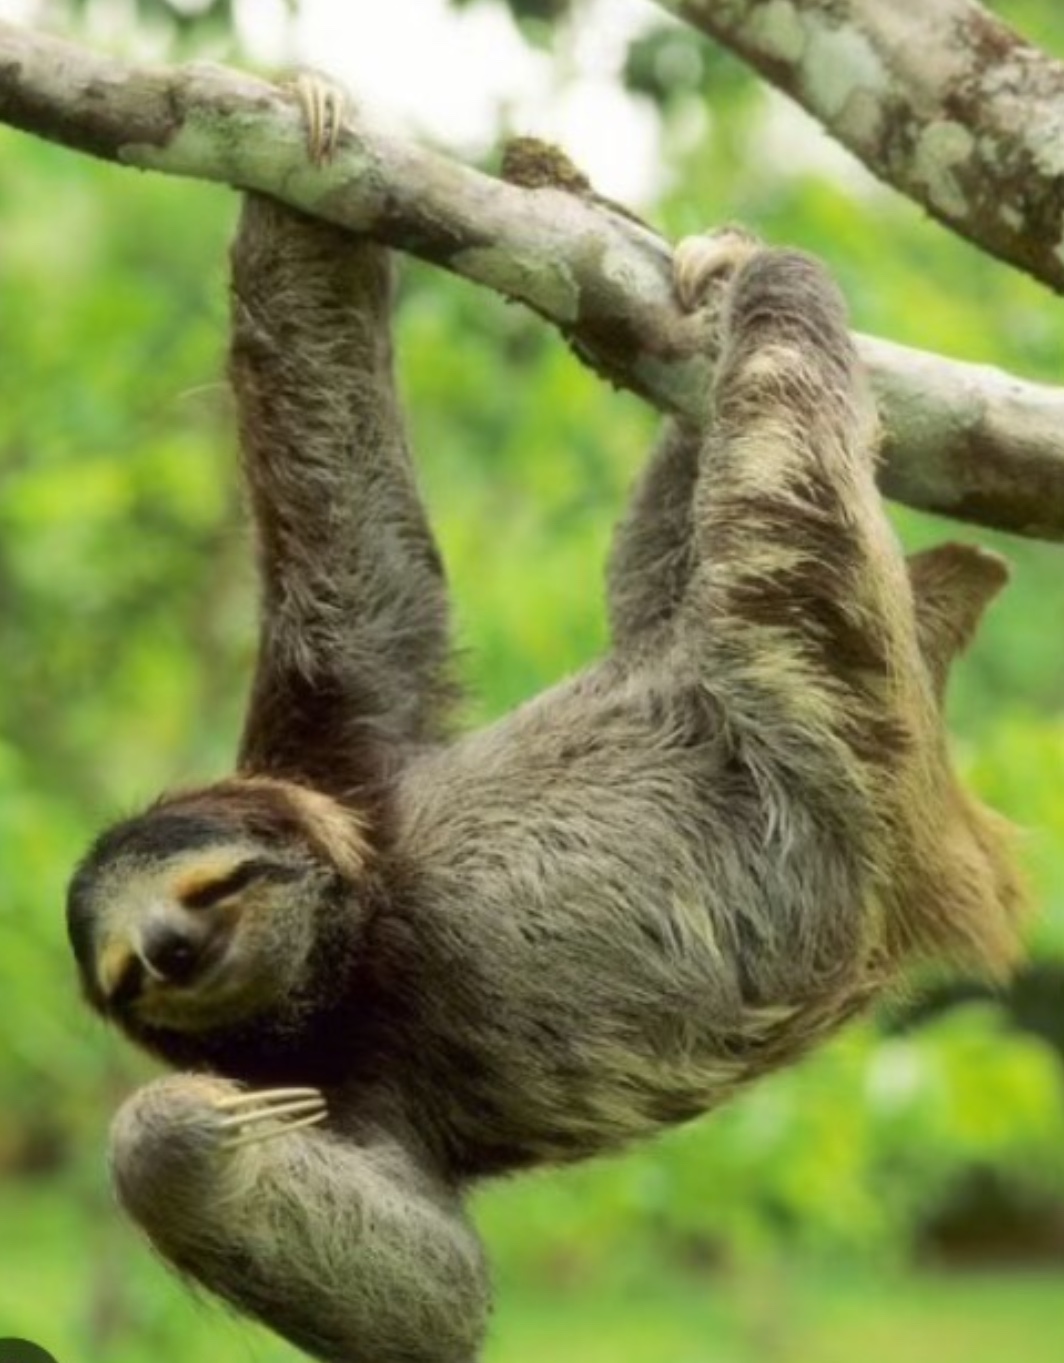
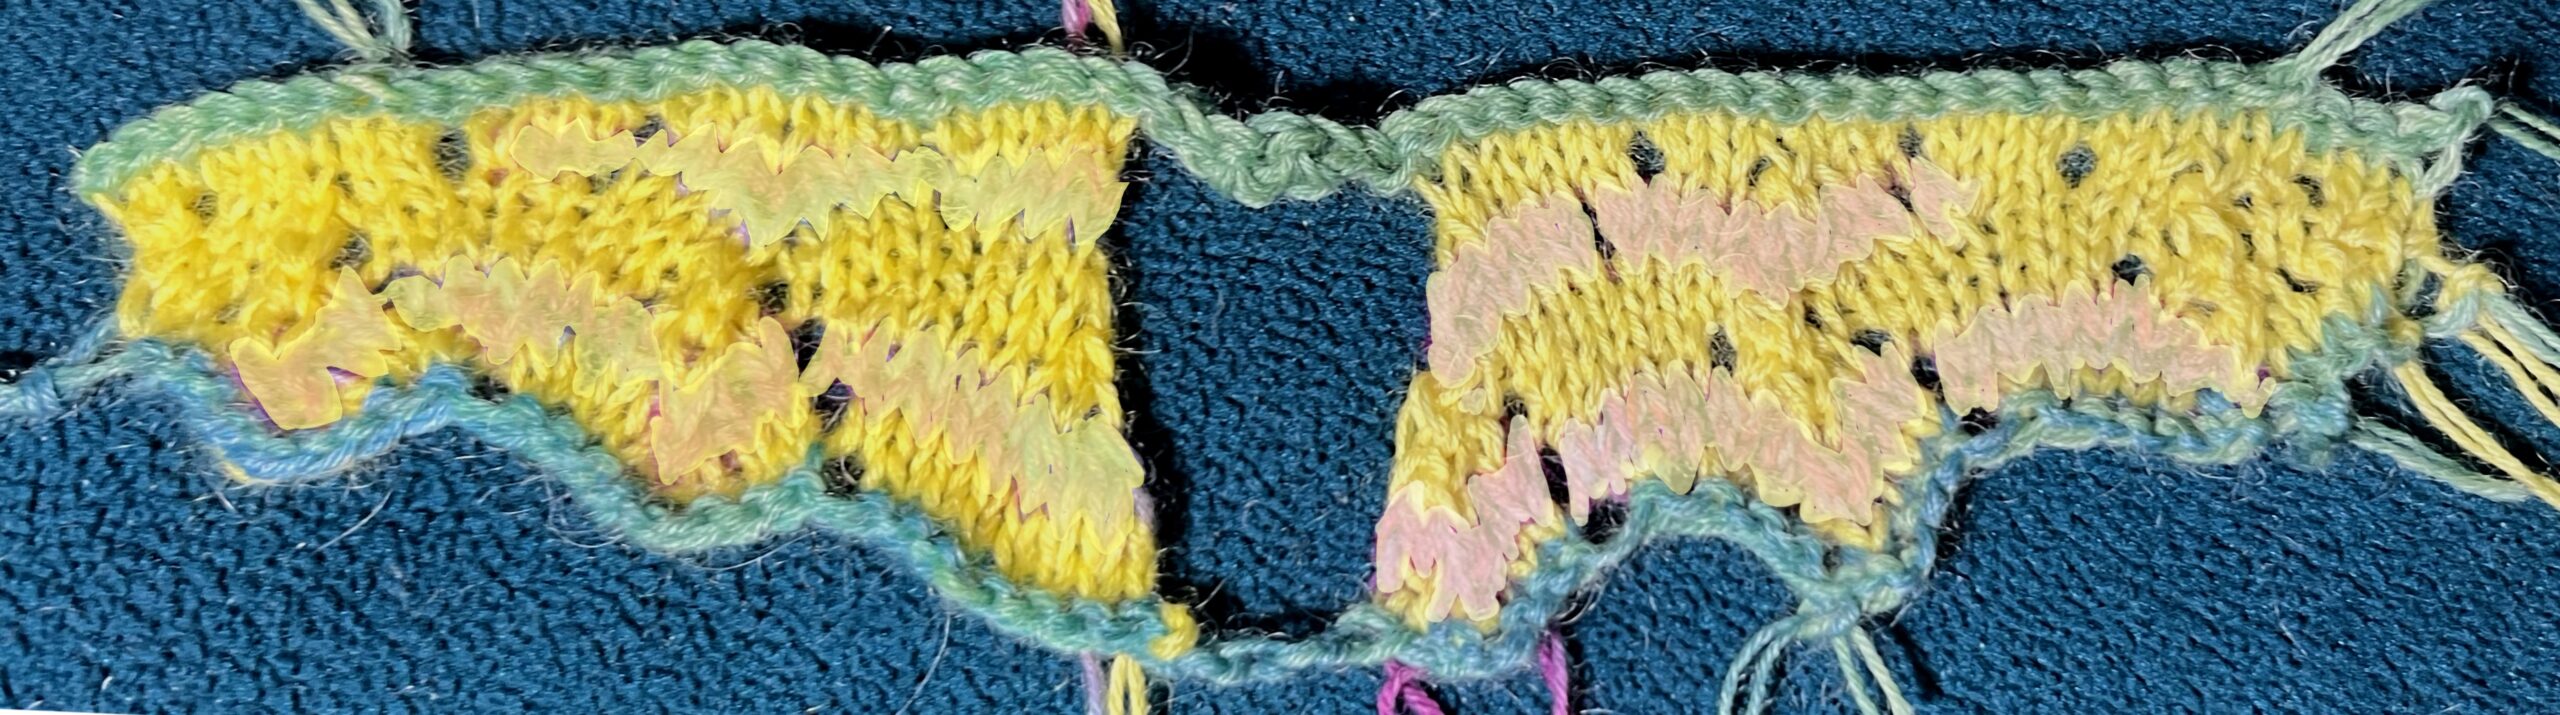
A. “Sloth”
Crayon Green, Lemon Yellow, Fuscia, Cerulean Blue; crochet too tight along bottom
B. (Unnamed) Fuscia, Sky Blue, Cerulean, Crayon Green, Lemon Yellow; crochet was too tight in fuscia area
Apple green to the purples tends to go through brown, though the purplish brown at the top is interesting.
C. “November” Midnight Blue, Brown, Black
The Midnight Blue goes to the navy (not fond of here), the sample is darker than I’d like, and there’s not much variation.
D. (Unnamed) Fuscia, Cerulean, Sky Blue? Midnight Blue?
E. Lemon Yellow, gold, Crayon Green, Cerulean?, Brown?
Maybe a touch of Fuscia
F. “Carnival”
Fuscia, Lemon Yellow, Gold, Cerulean Blue
November 2
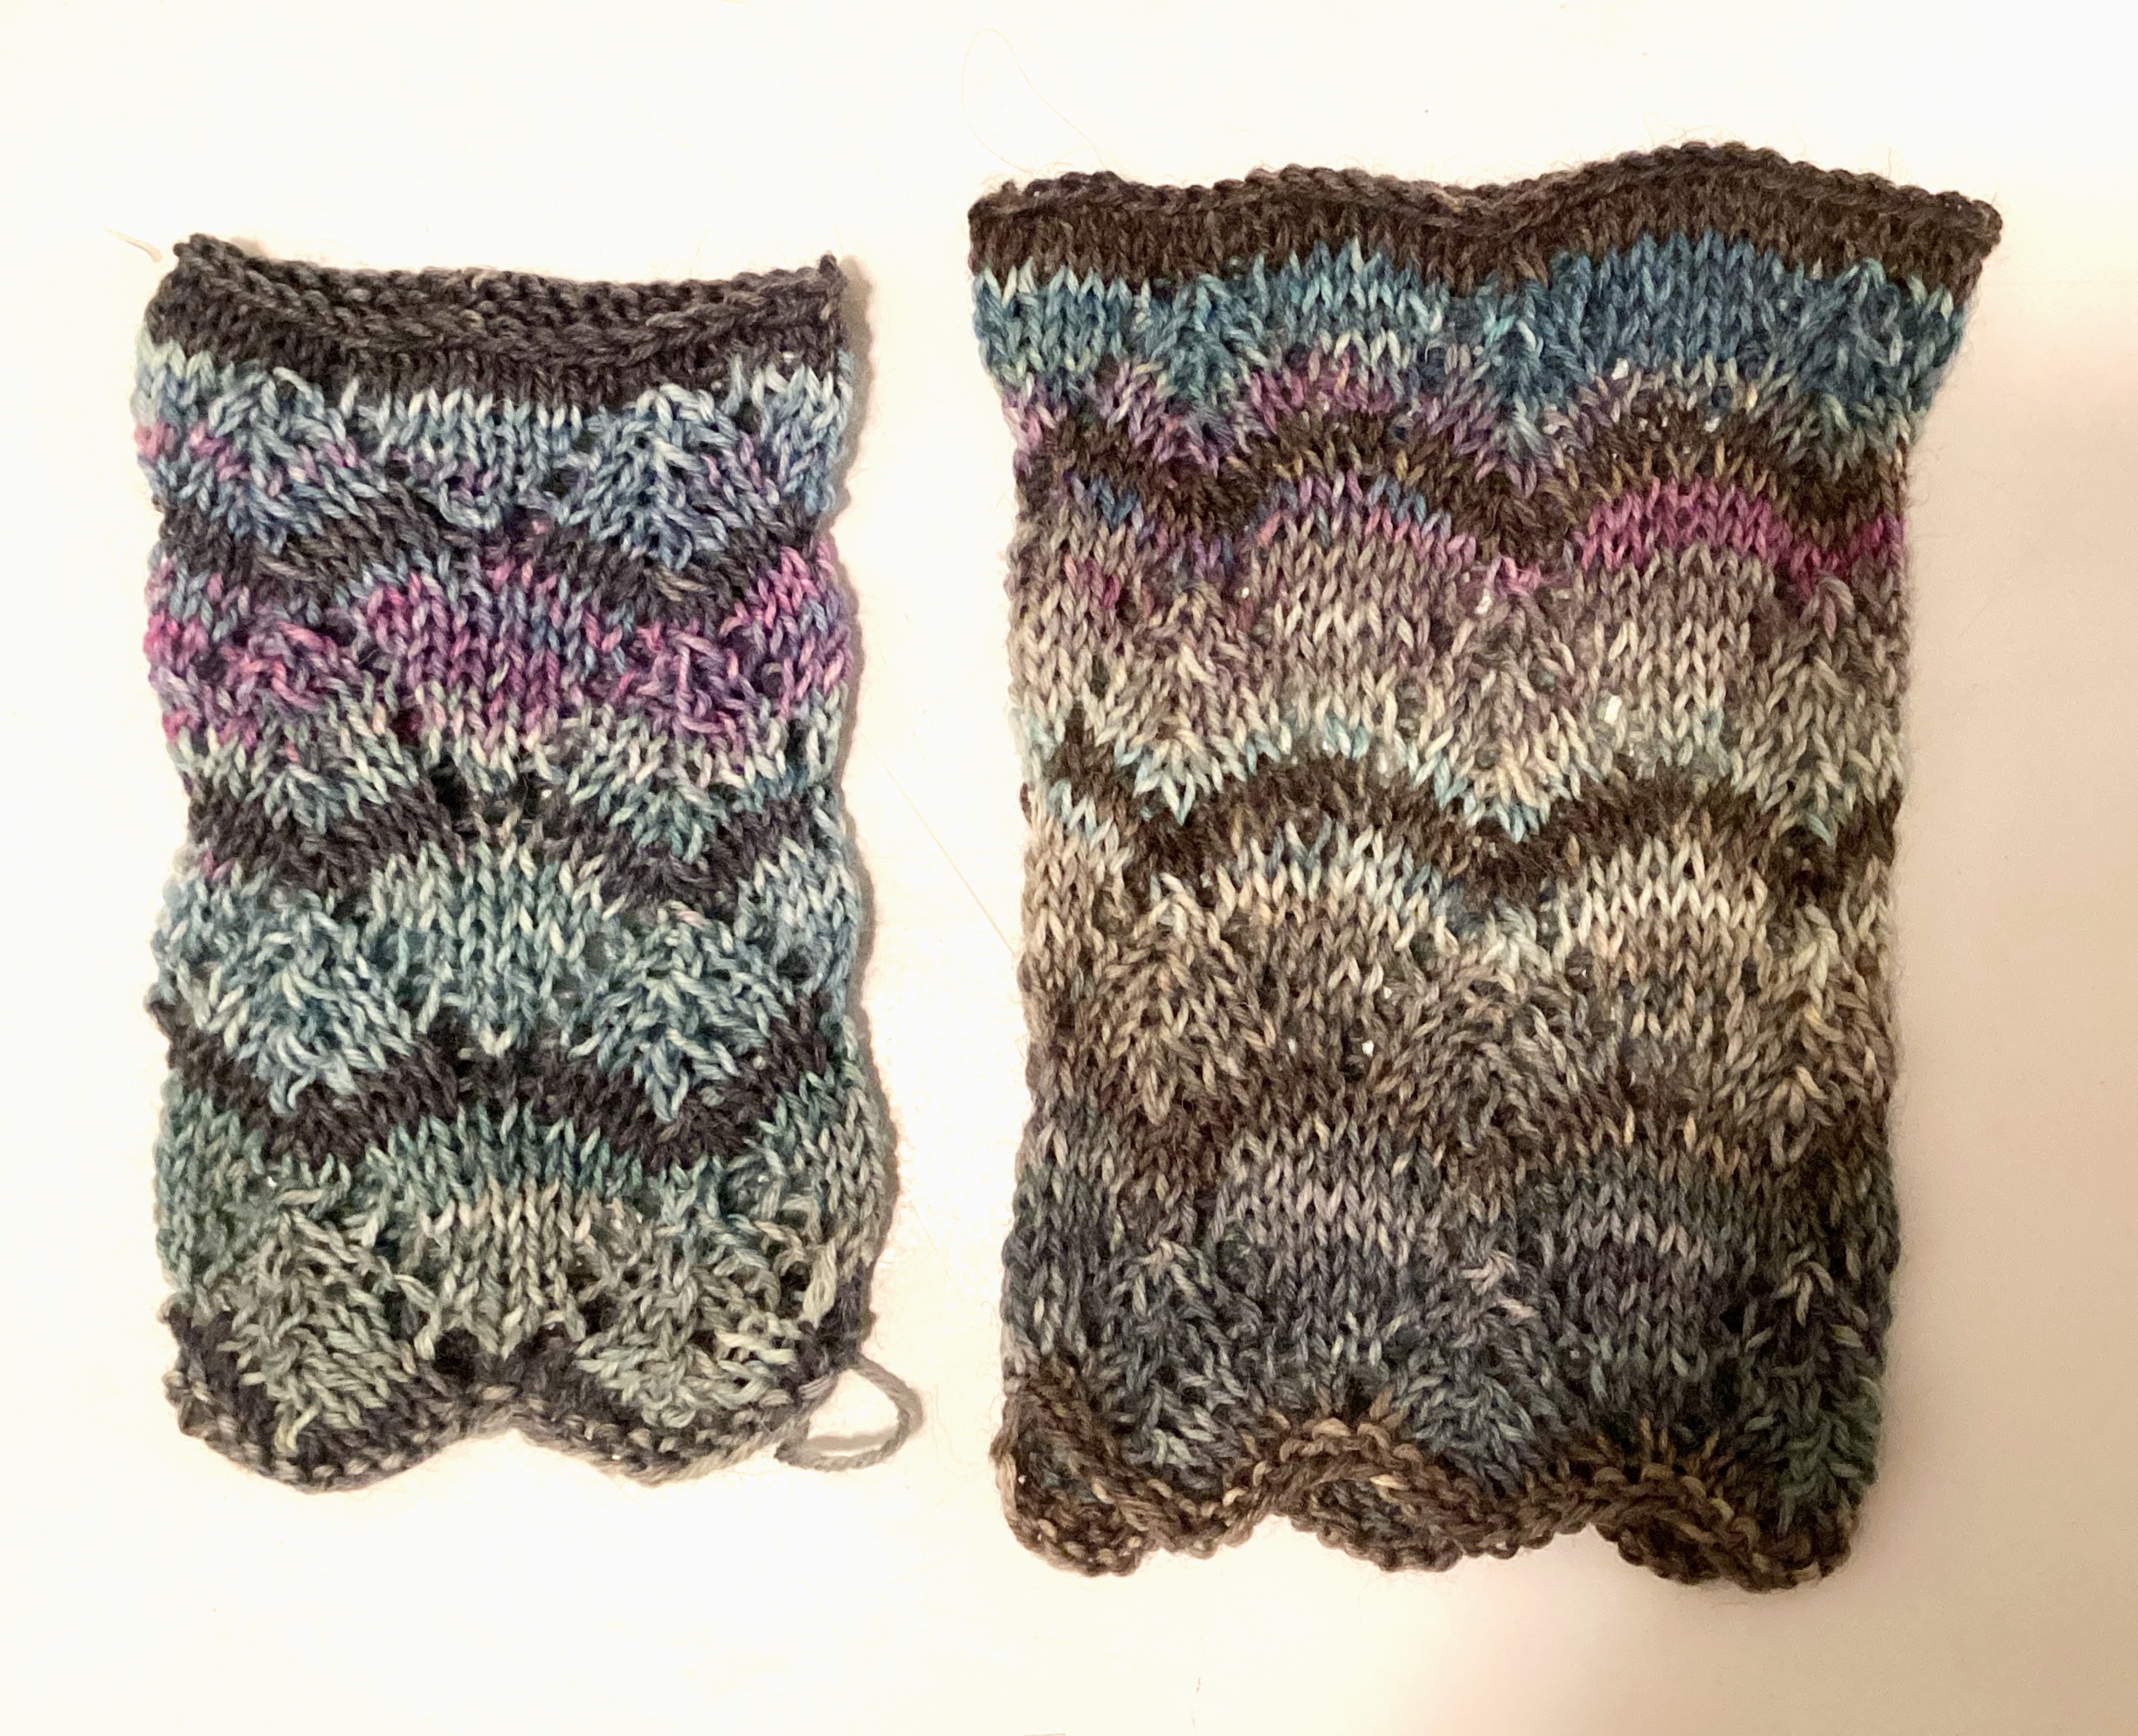
swatches: crochet single stand of bootie yarn
One: try again for yellow/orange/violet.
Lemon Yellow/Gold/Fuscia/Sky Blue
Two: try agan for apple green/lavender/purple.
Lemon Yellow (no gold, that went brown with the green)/Crayon Green/SkyBlue/Fuscia
Three and Four: try these two progressions:
Gold, Brown, Fuscia, Black, Cerulean Blue.
Black, Cerulean Blue, hint of Brown, water, water
Five: Black/tones for the CC (smaller amount)
Will lack subtlety but eh
Bootie single strand for less wound-together blanks: clearer color progression
might crochet the results, if it looks promising try Myrtle
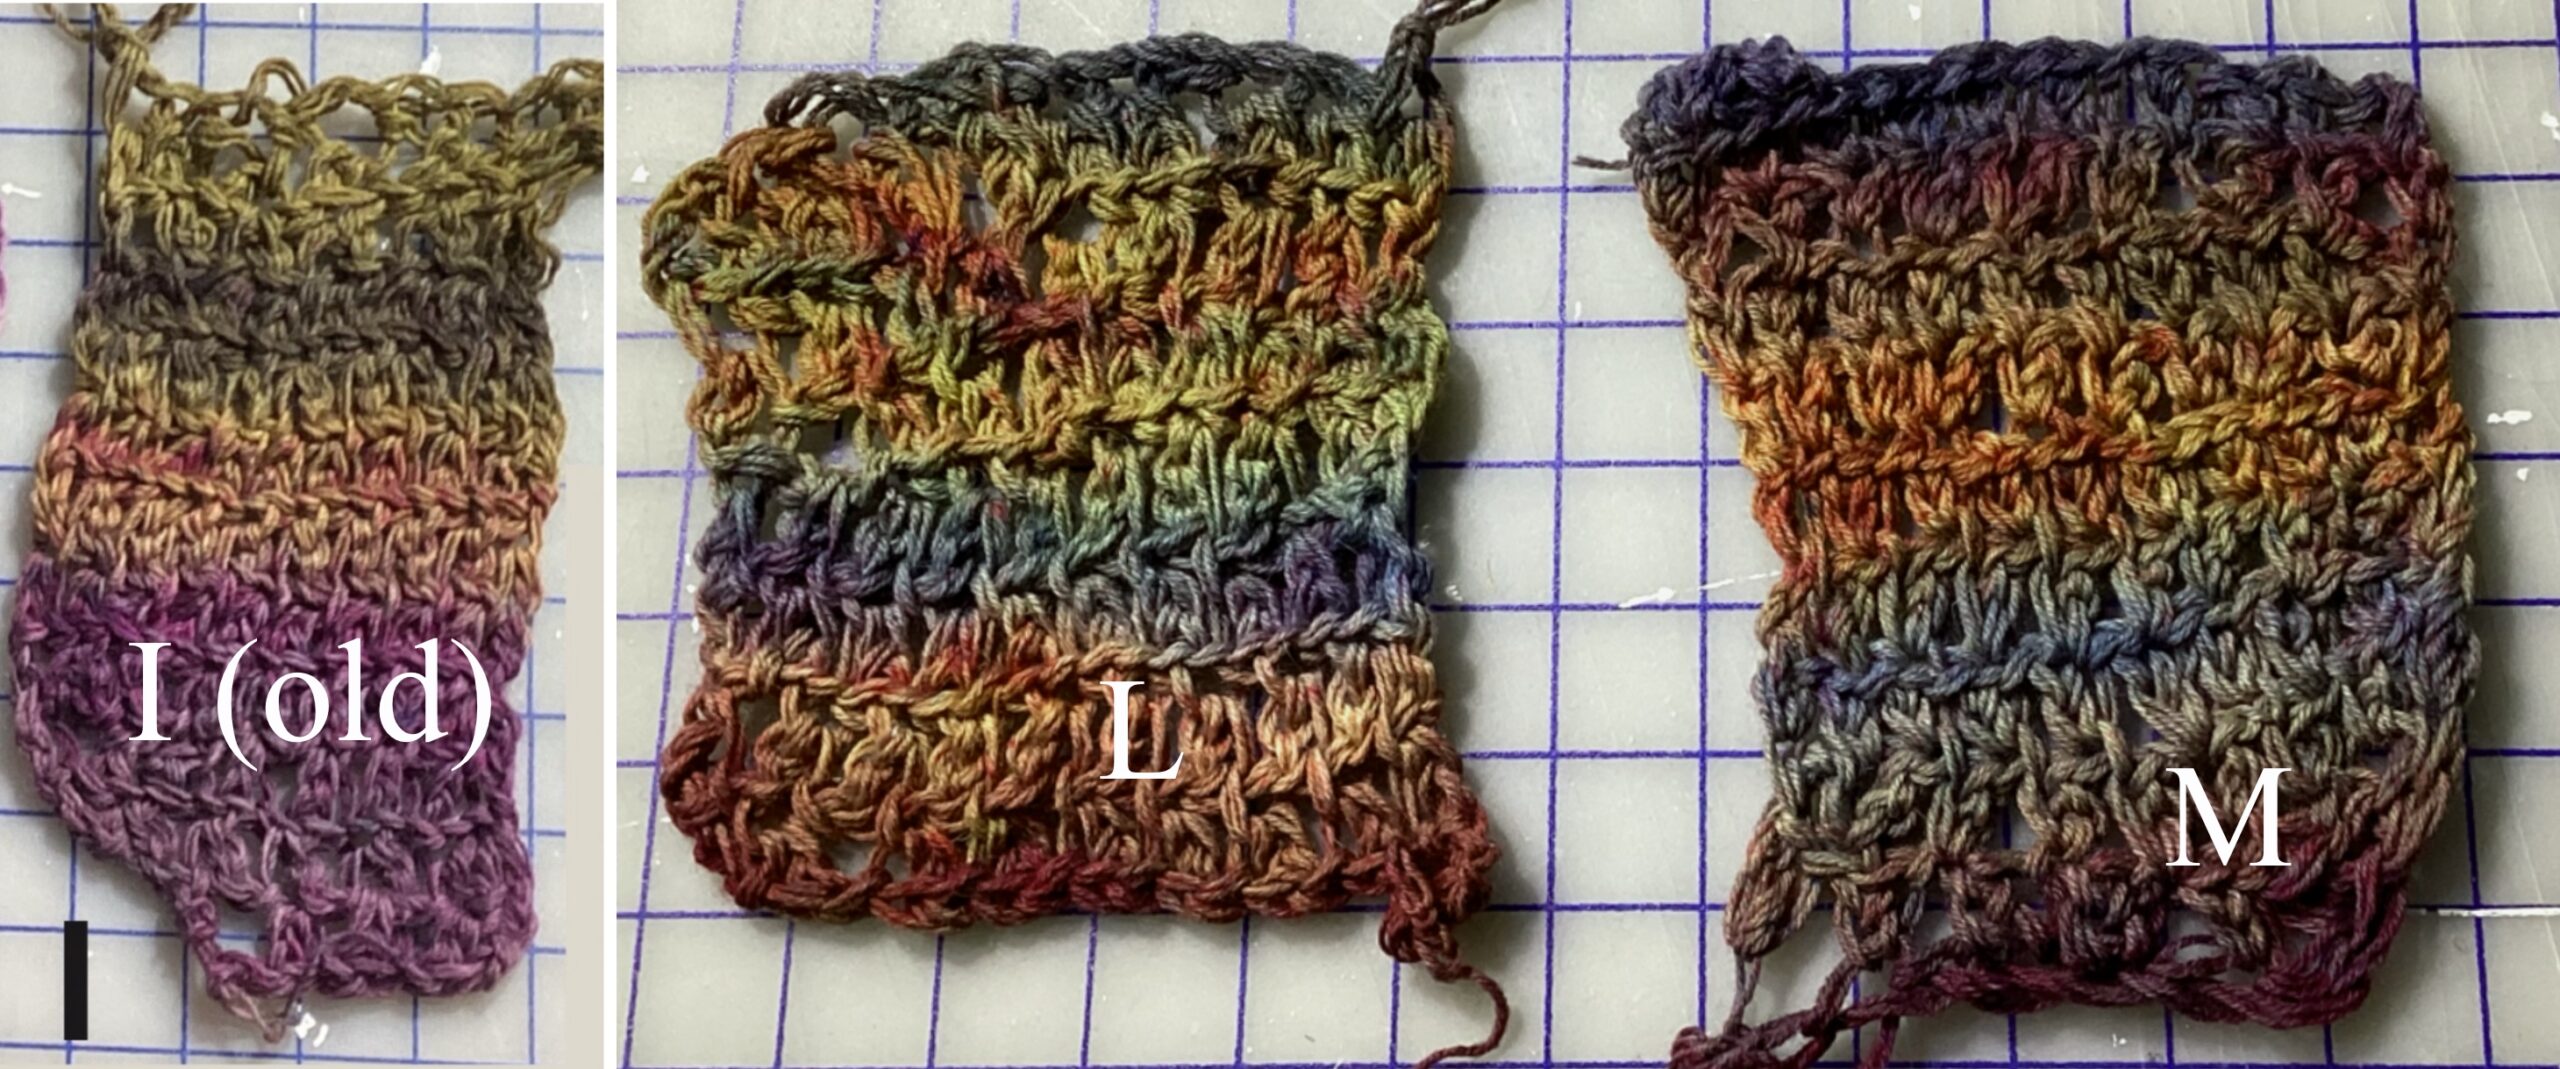
I: Gold, Brown, Fuscia, Black, Cerulean Blue.
L. and M. as above, with Lemon Yellow, Sky Blue
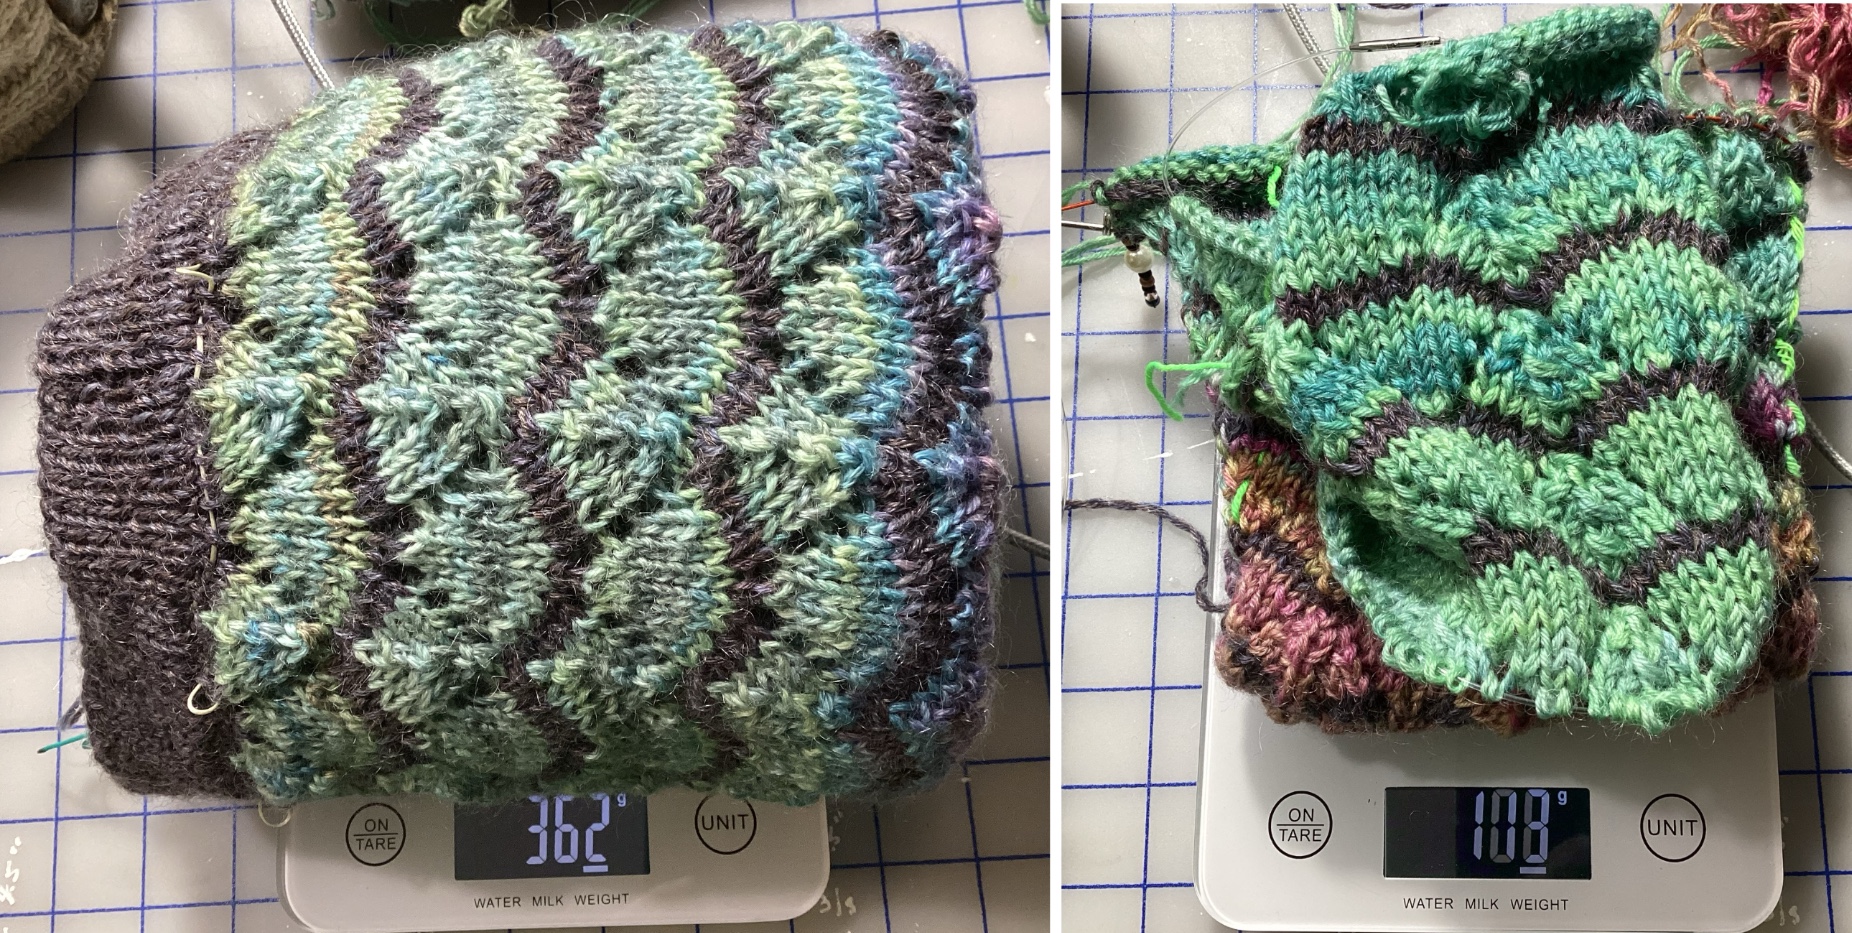
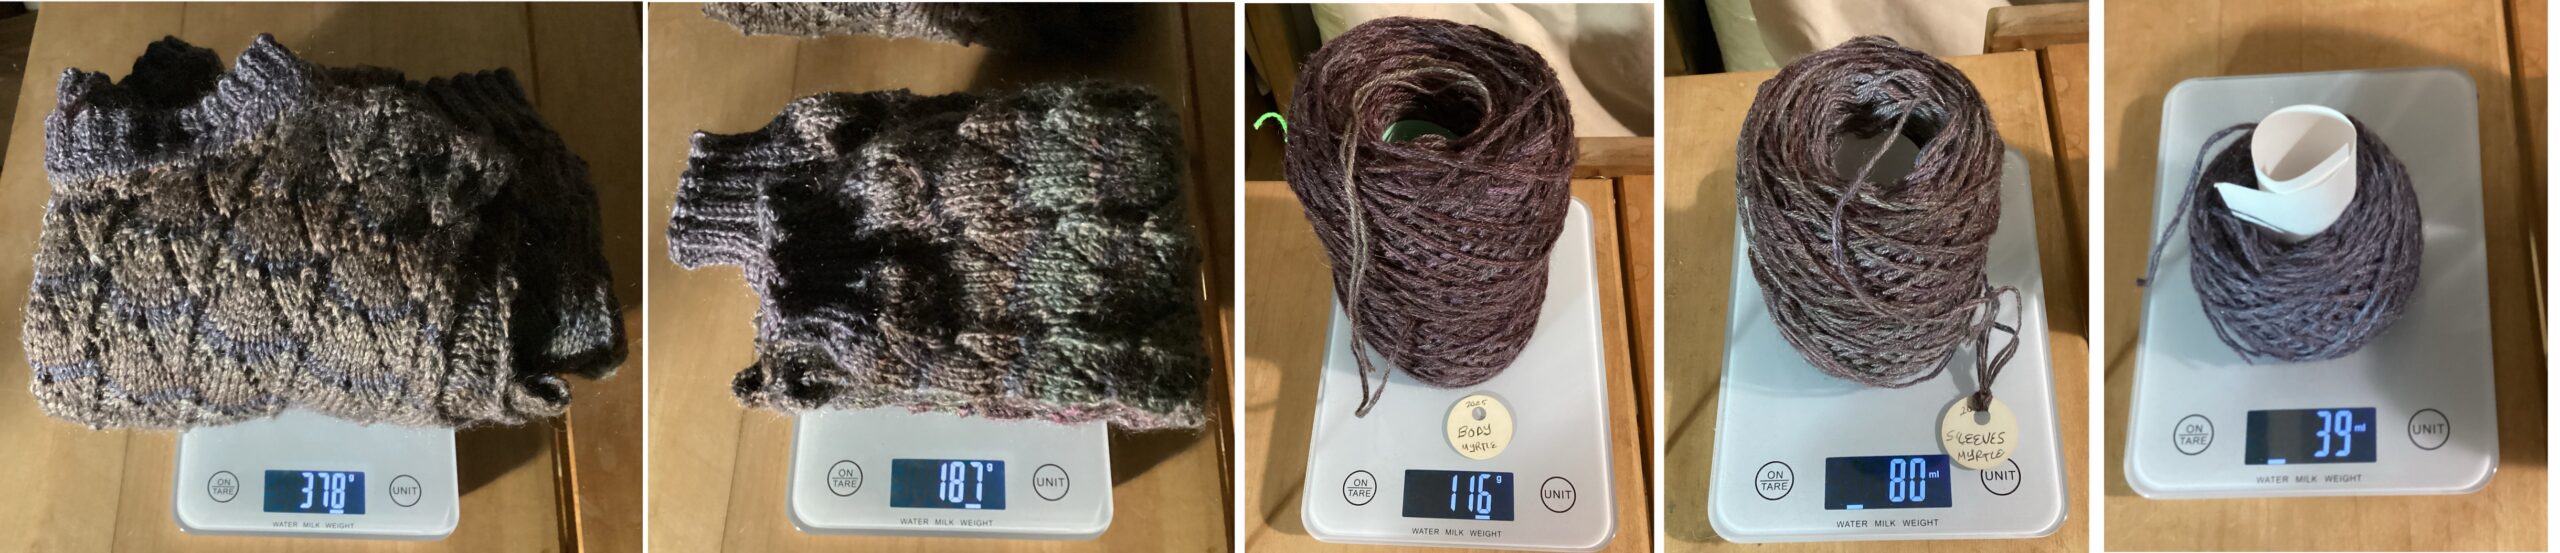
Yarn needed by weight – 2 skeins twisted together = 200 gm
Front/back (with contrast yarn but no sleeves) = 362 // 200 + 162 minimum – do 200 + 175
One sleeve = 113; 2 = 226 // 200 + 25 minimum- do 200 + 25
Contrast yarn – original was 178 gm, have about 50 gm left; do 200 grams, 2 original skeins
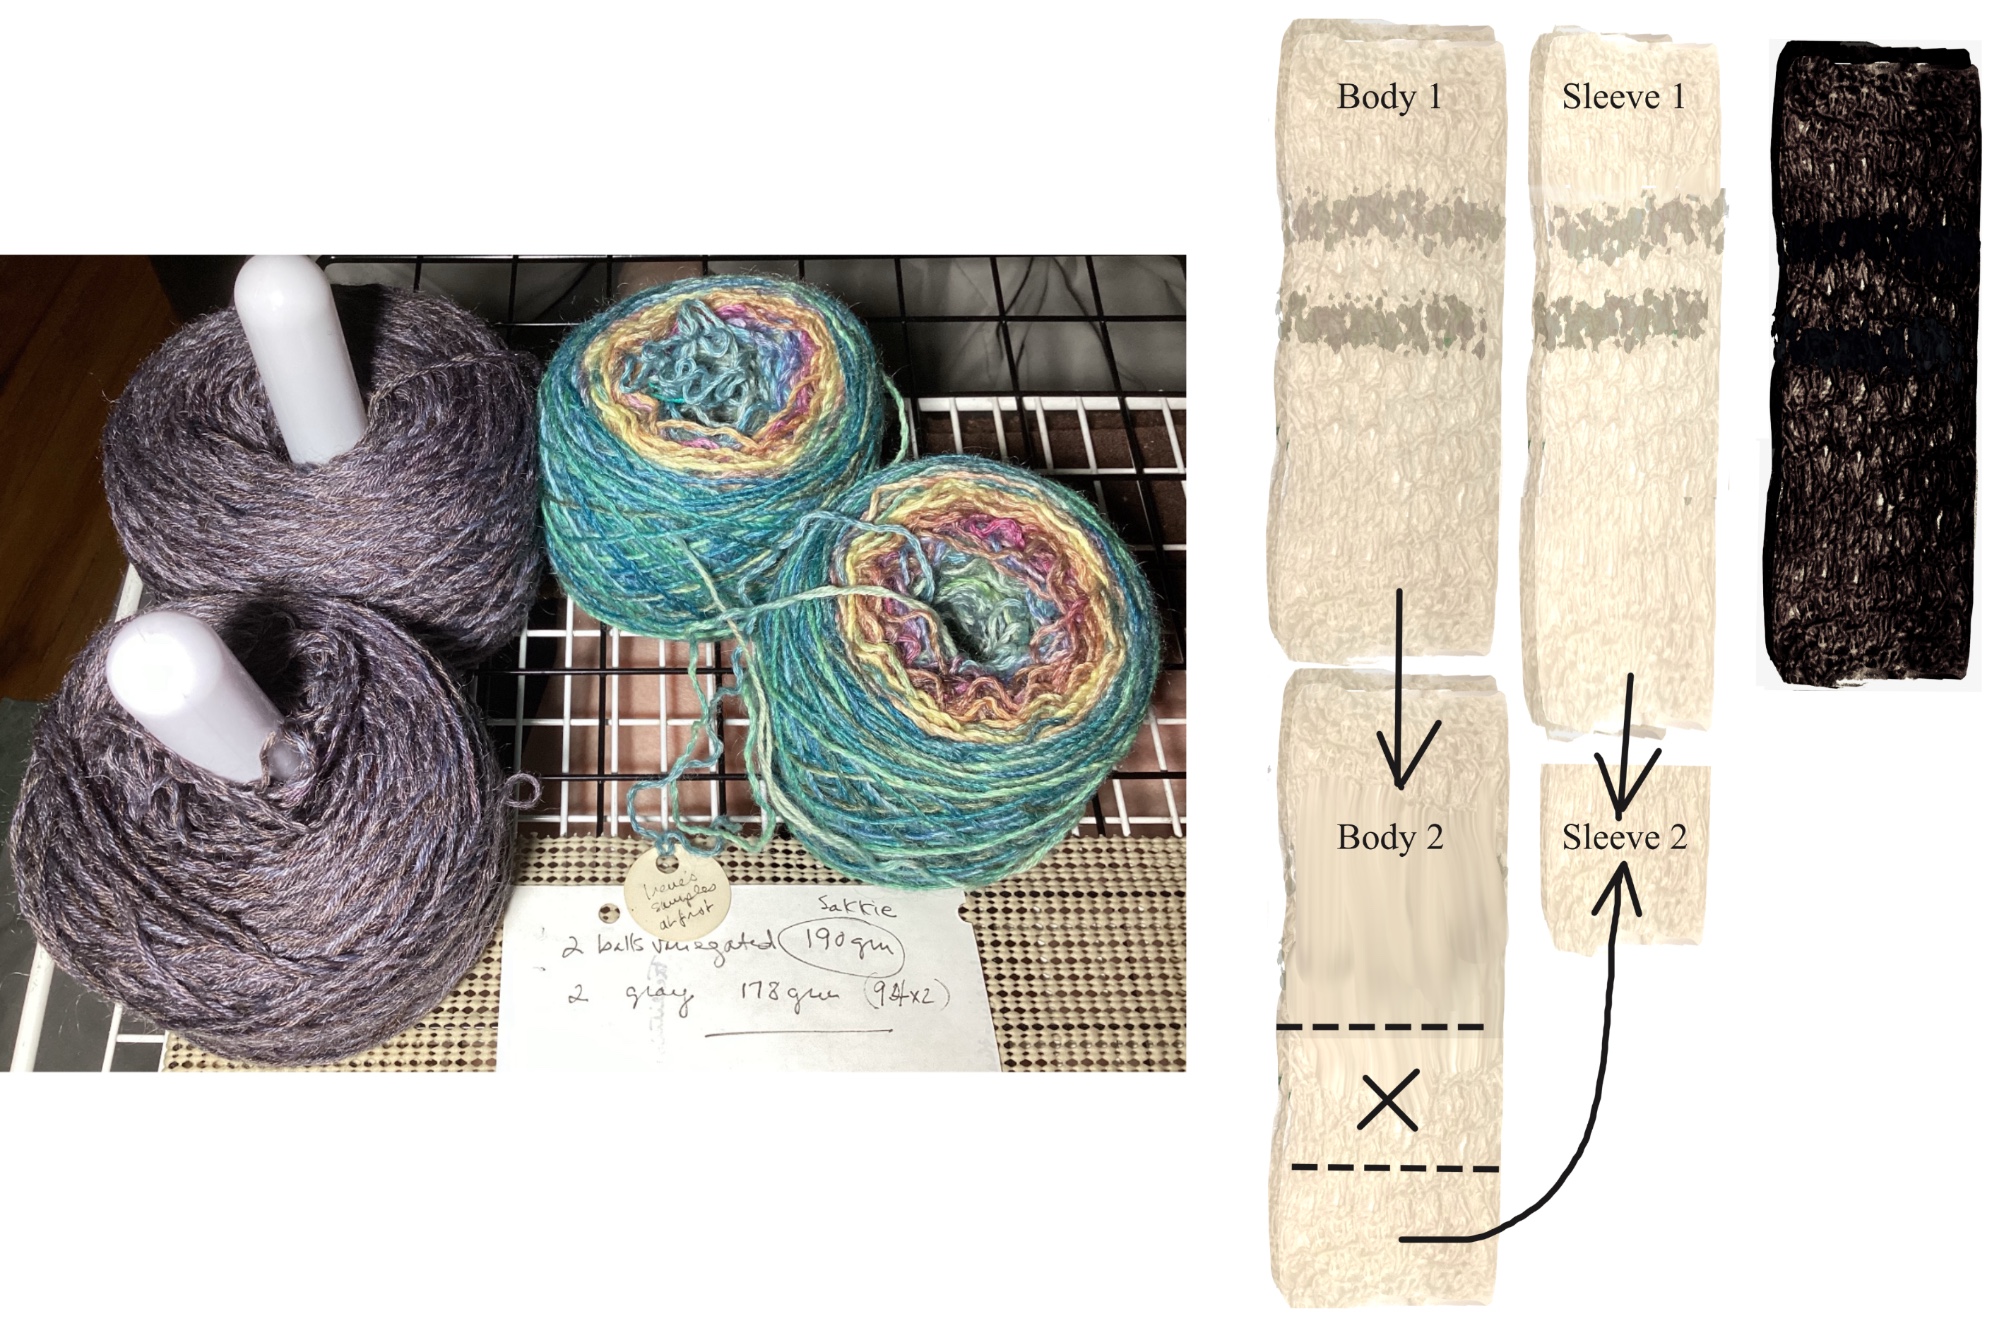
Body 1 segues into Body 2, which continues into the unneeded X section. The blanks will be roughly proportioned to the sweater body.
Sleeve 1’s blank will be longer/narrower than the body, so that the painted dye coordinates across. The extra at the bottom of Body 2 (175 for body, 25 for sleeves) will plug in there.
The contrast color will be two single-strand skeins vat-dyed separately and then plied together.
Each sweater will use 8 single-ply Sakkie skeins.
Notes for Myrtle Revisited
construction roughs, taken from private conversations with Irene
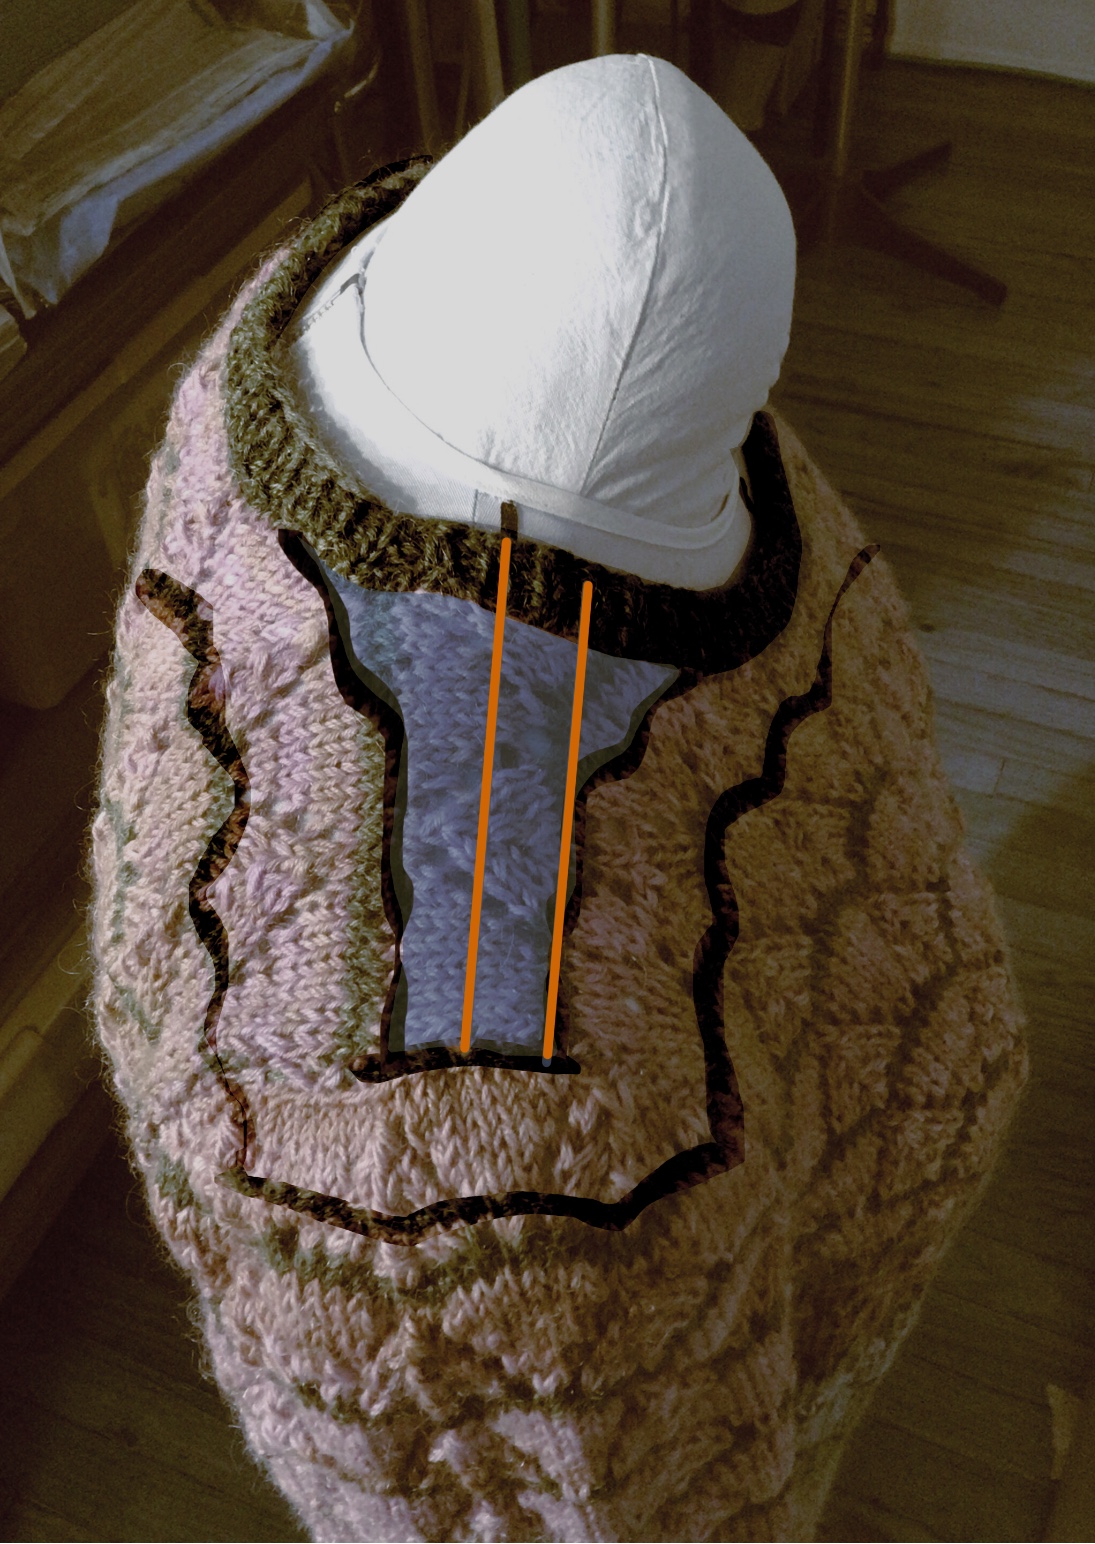
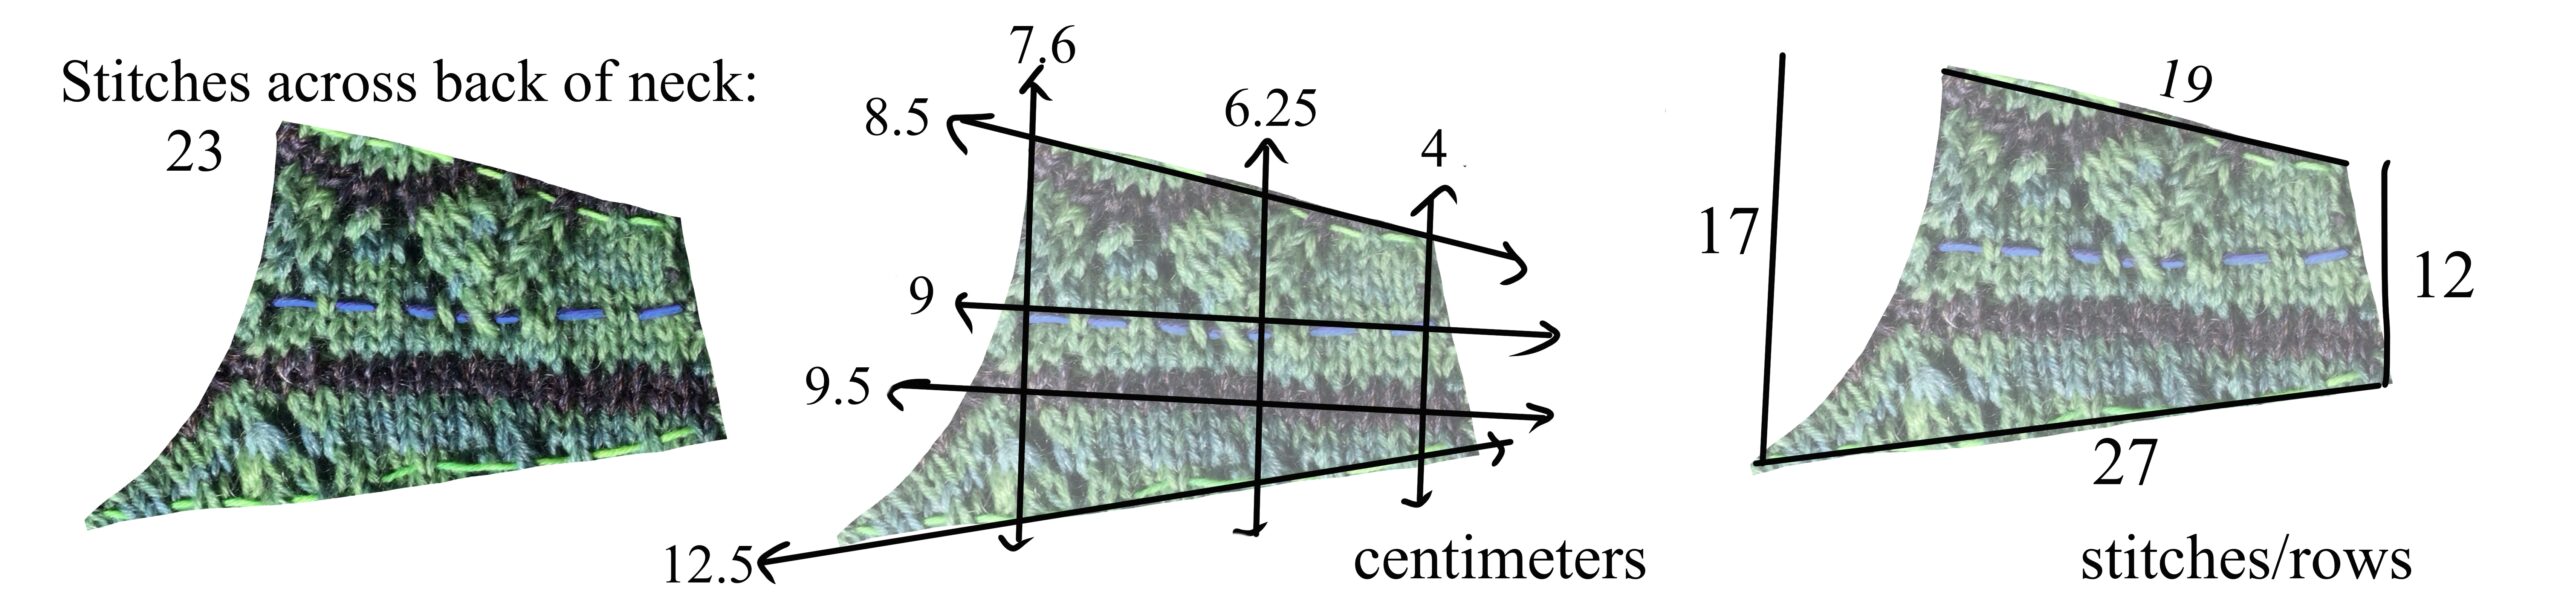
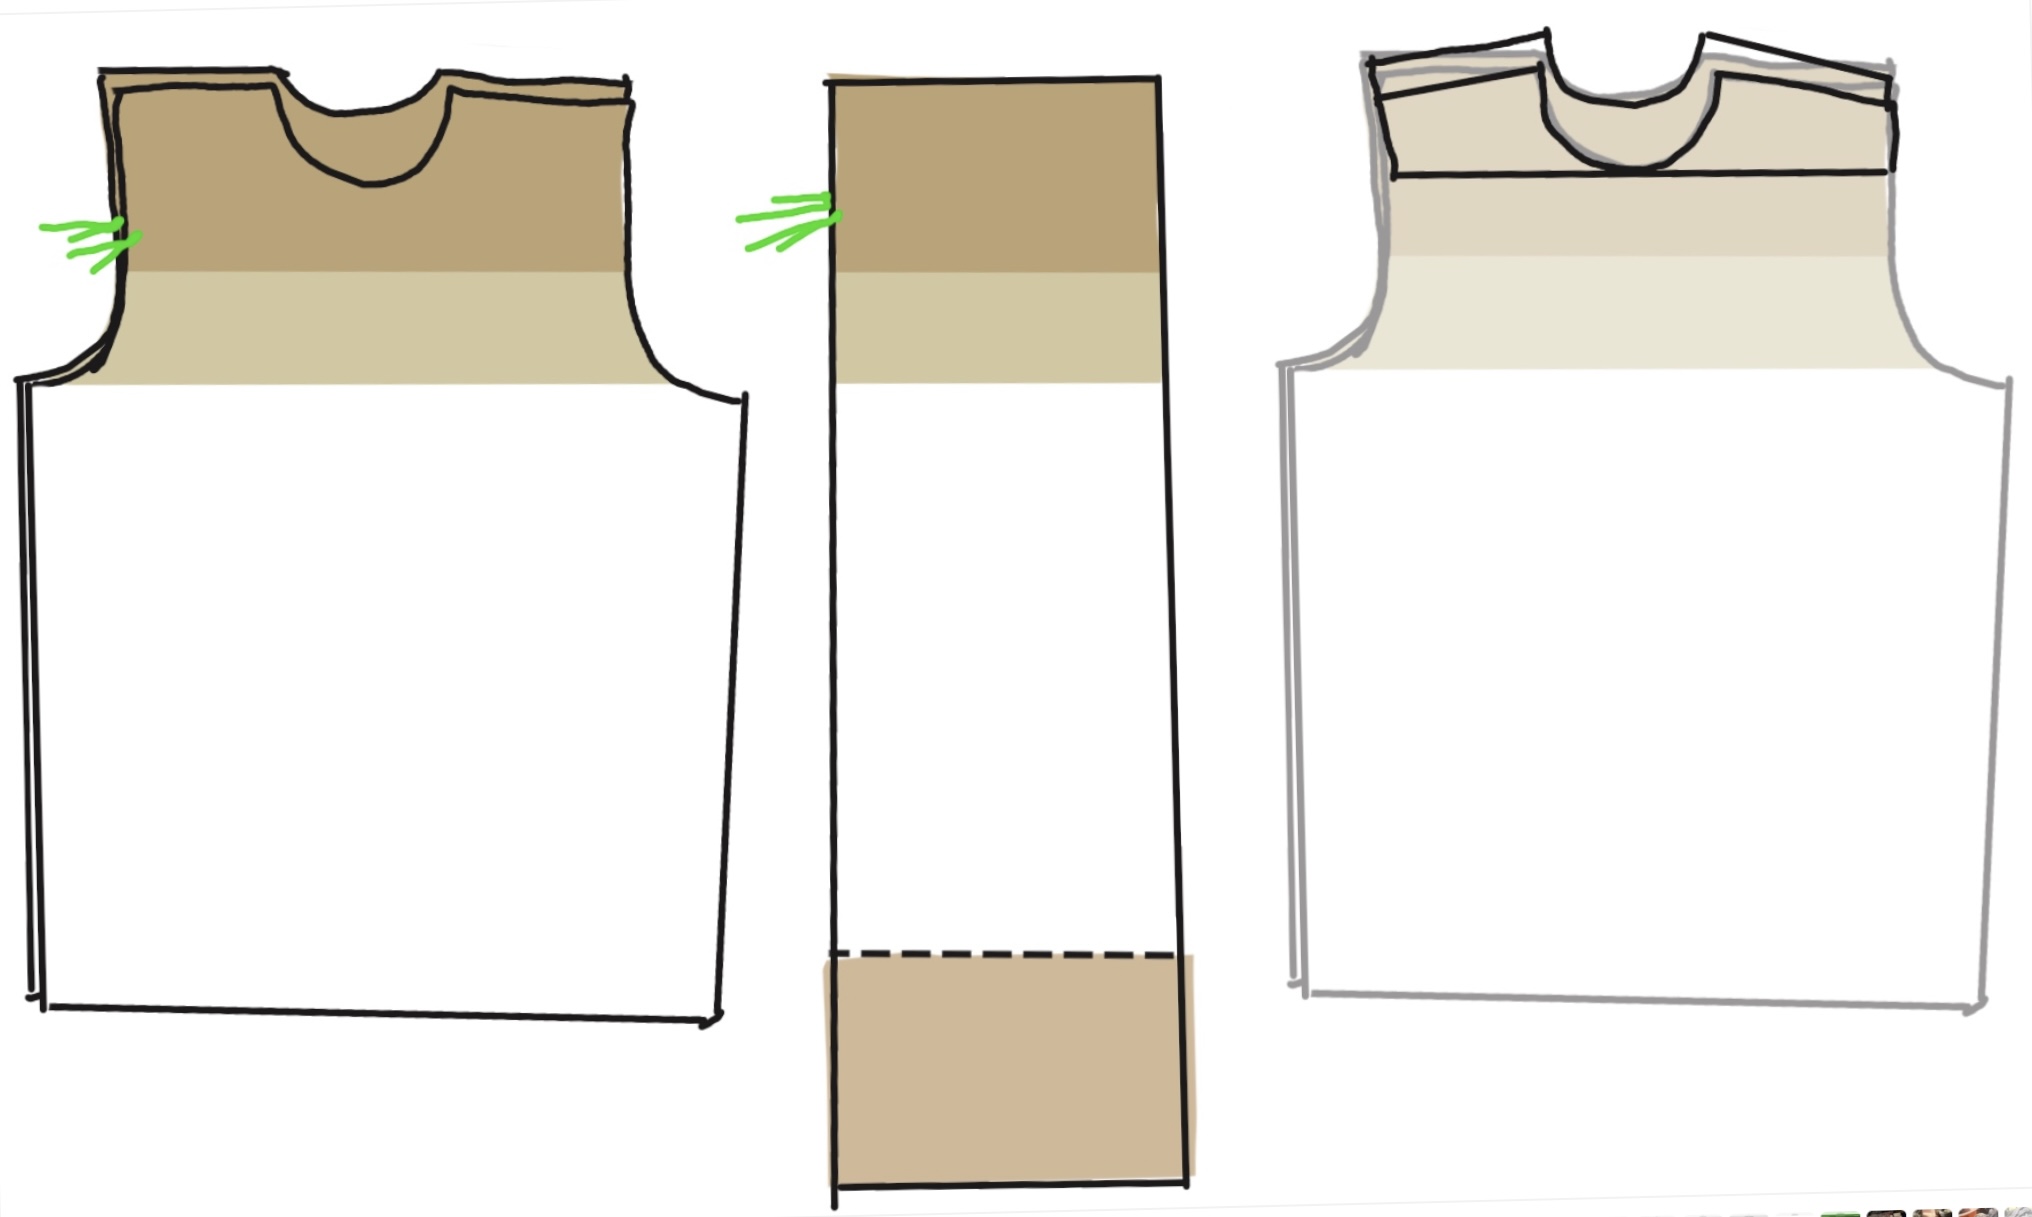
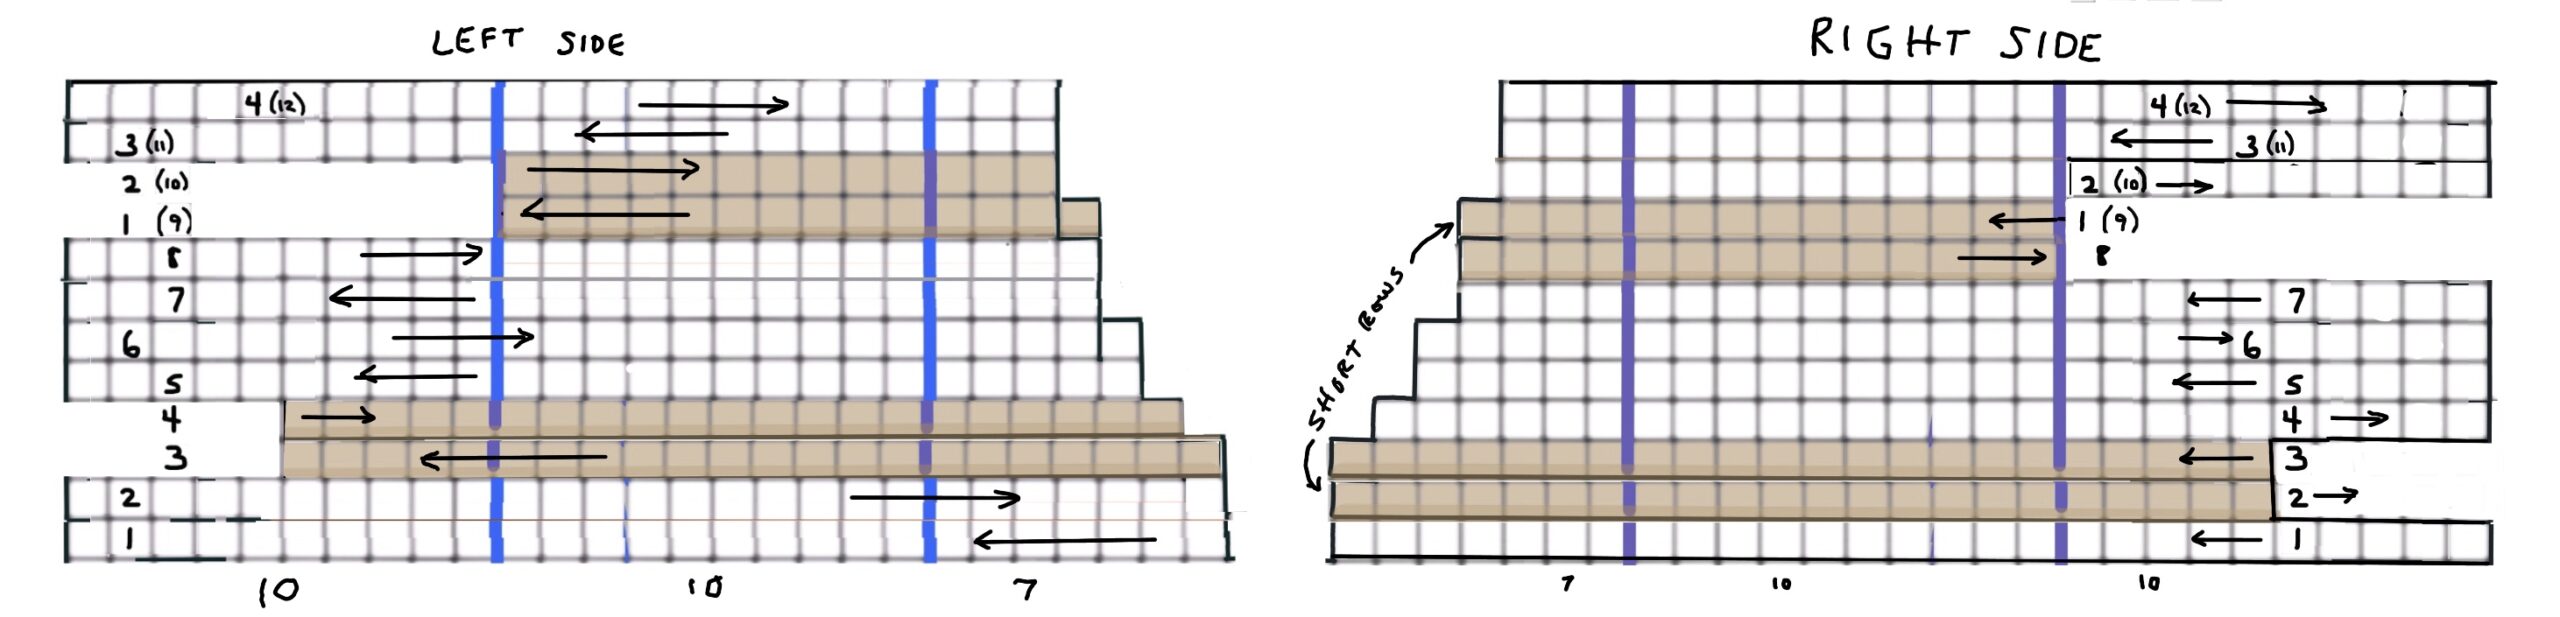
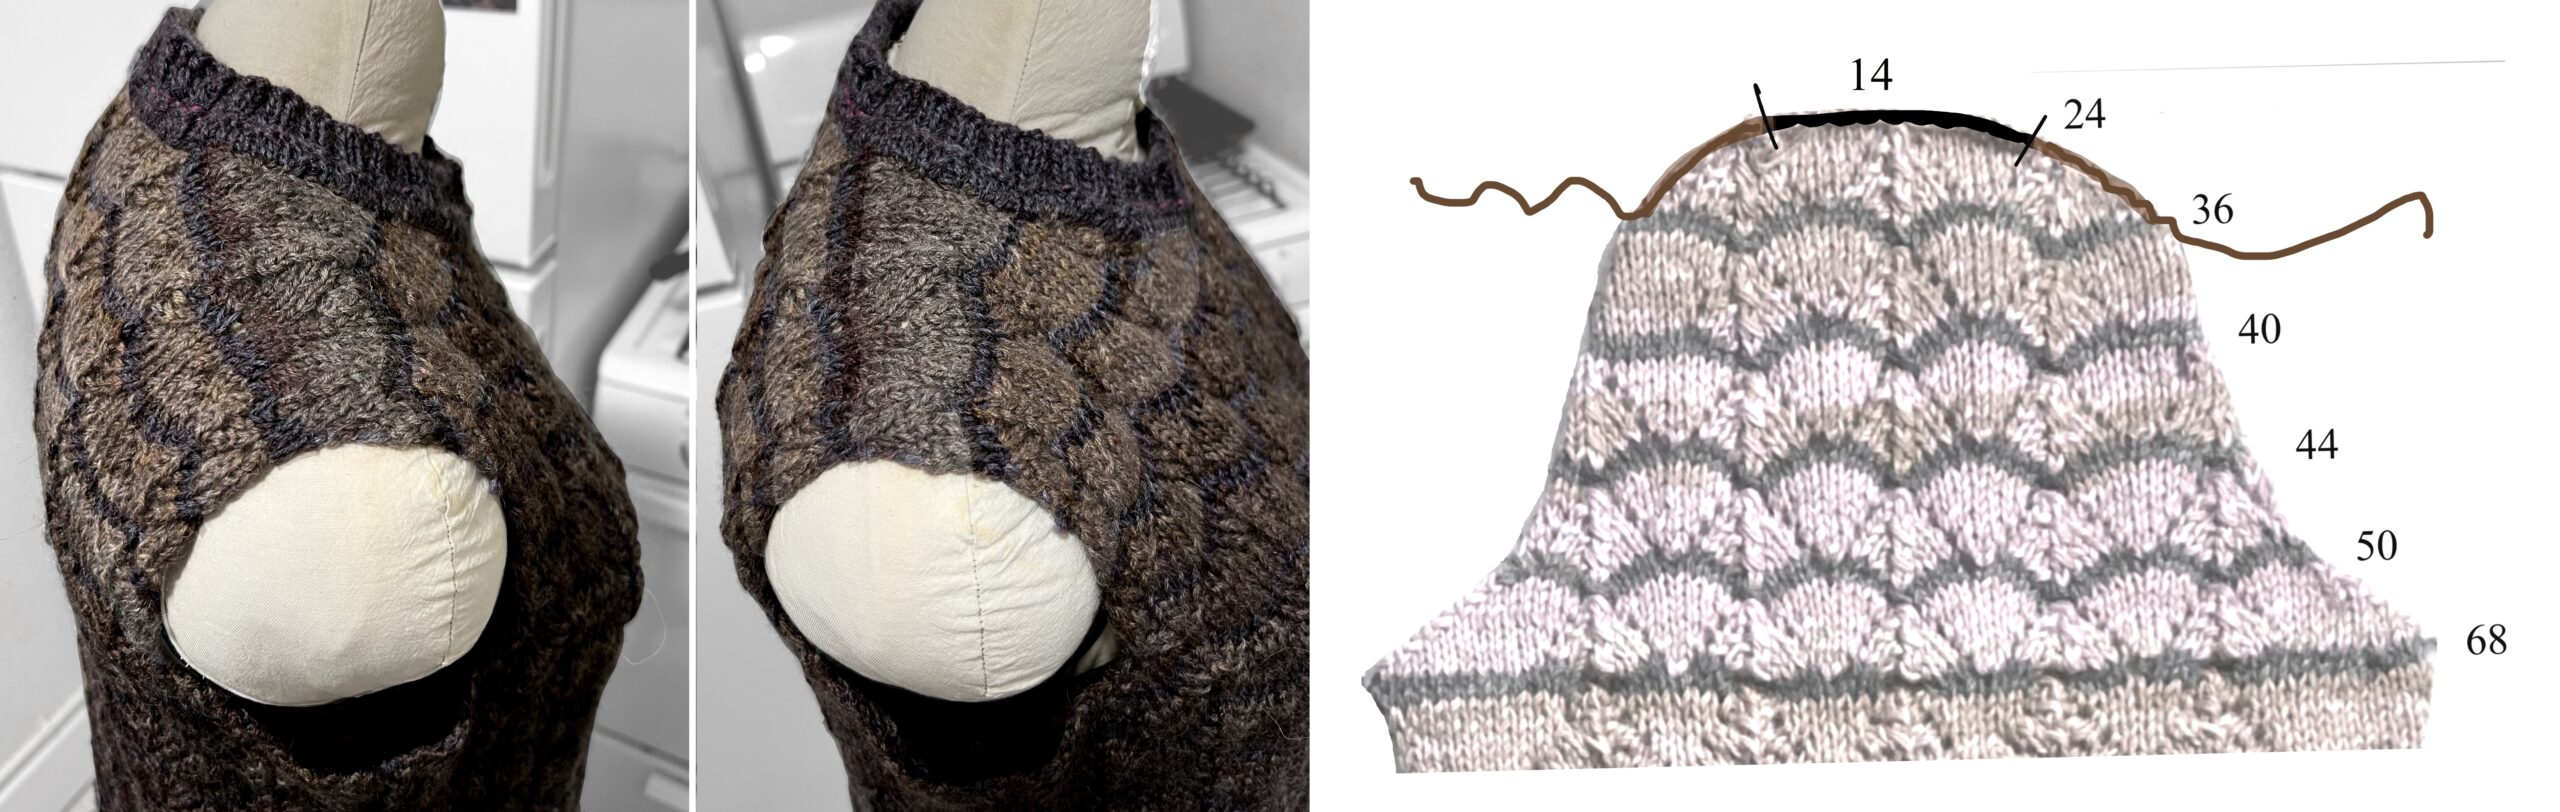
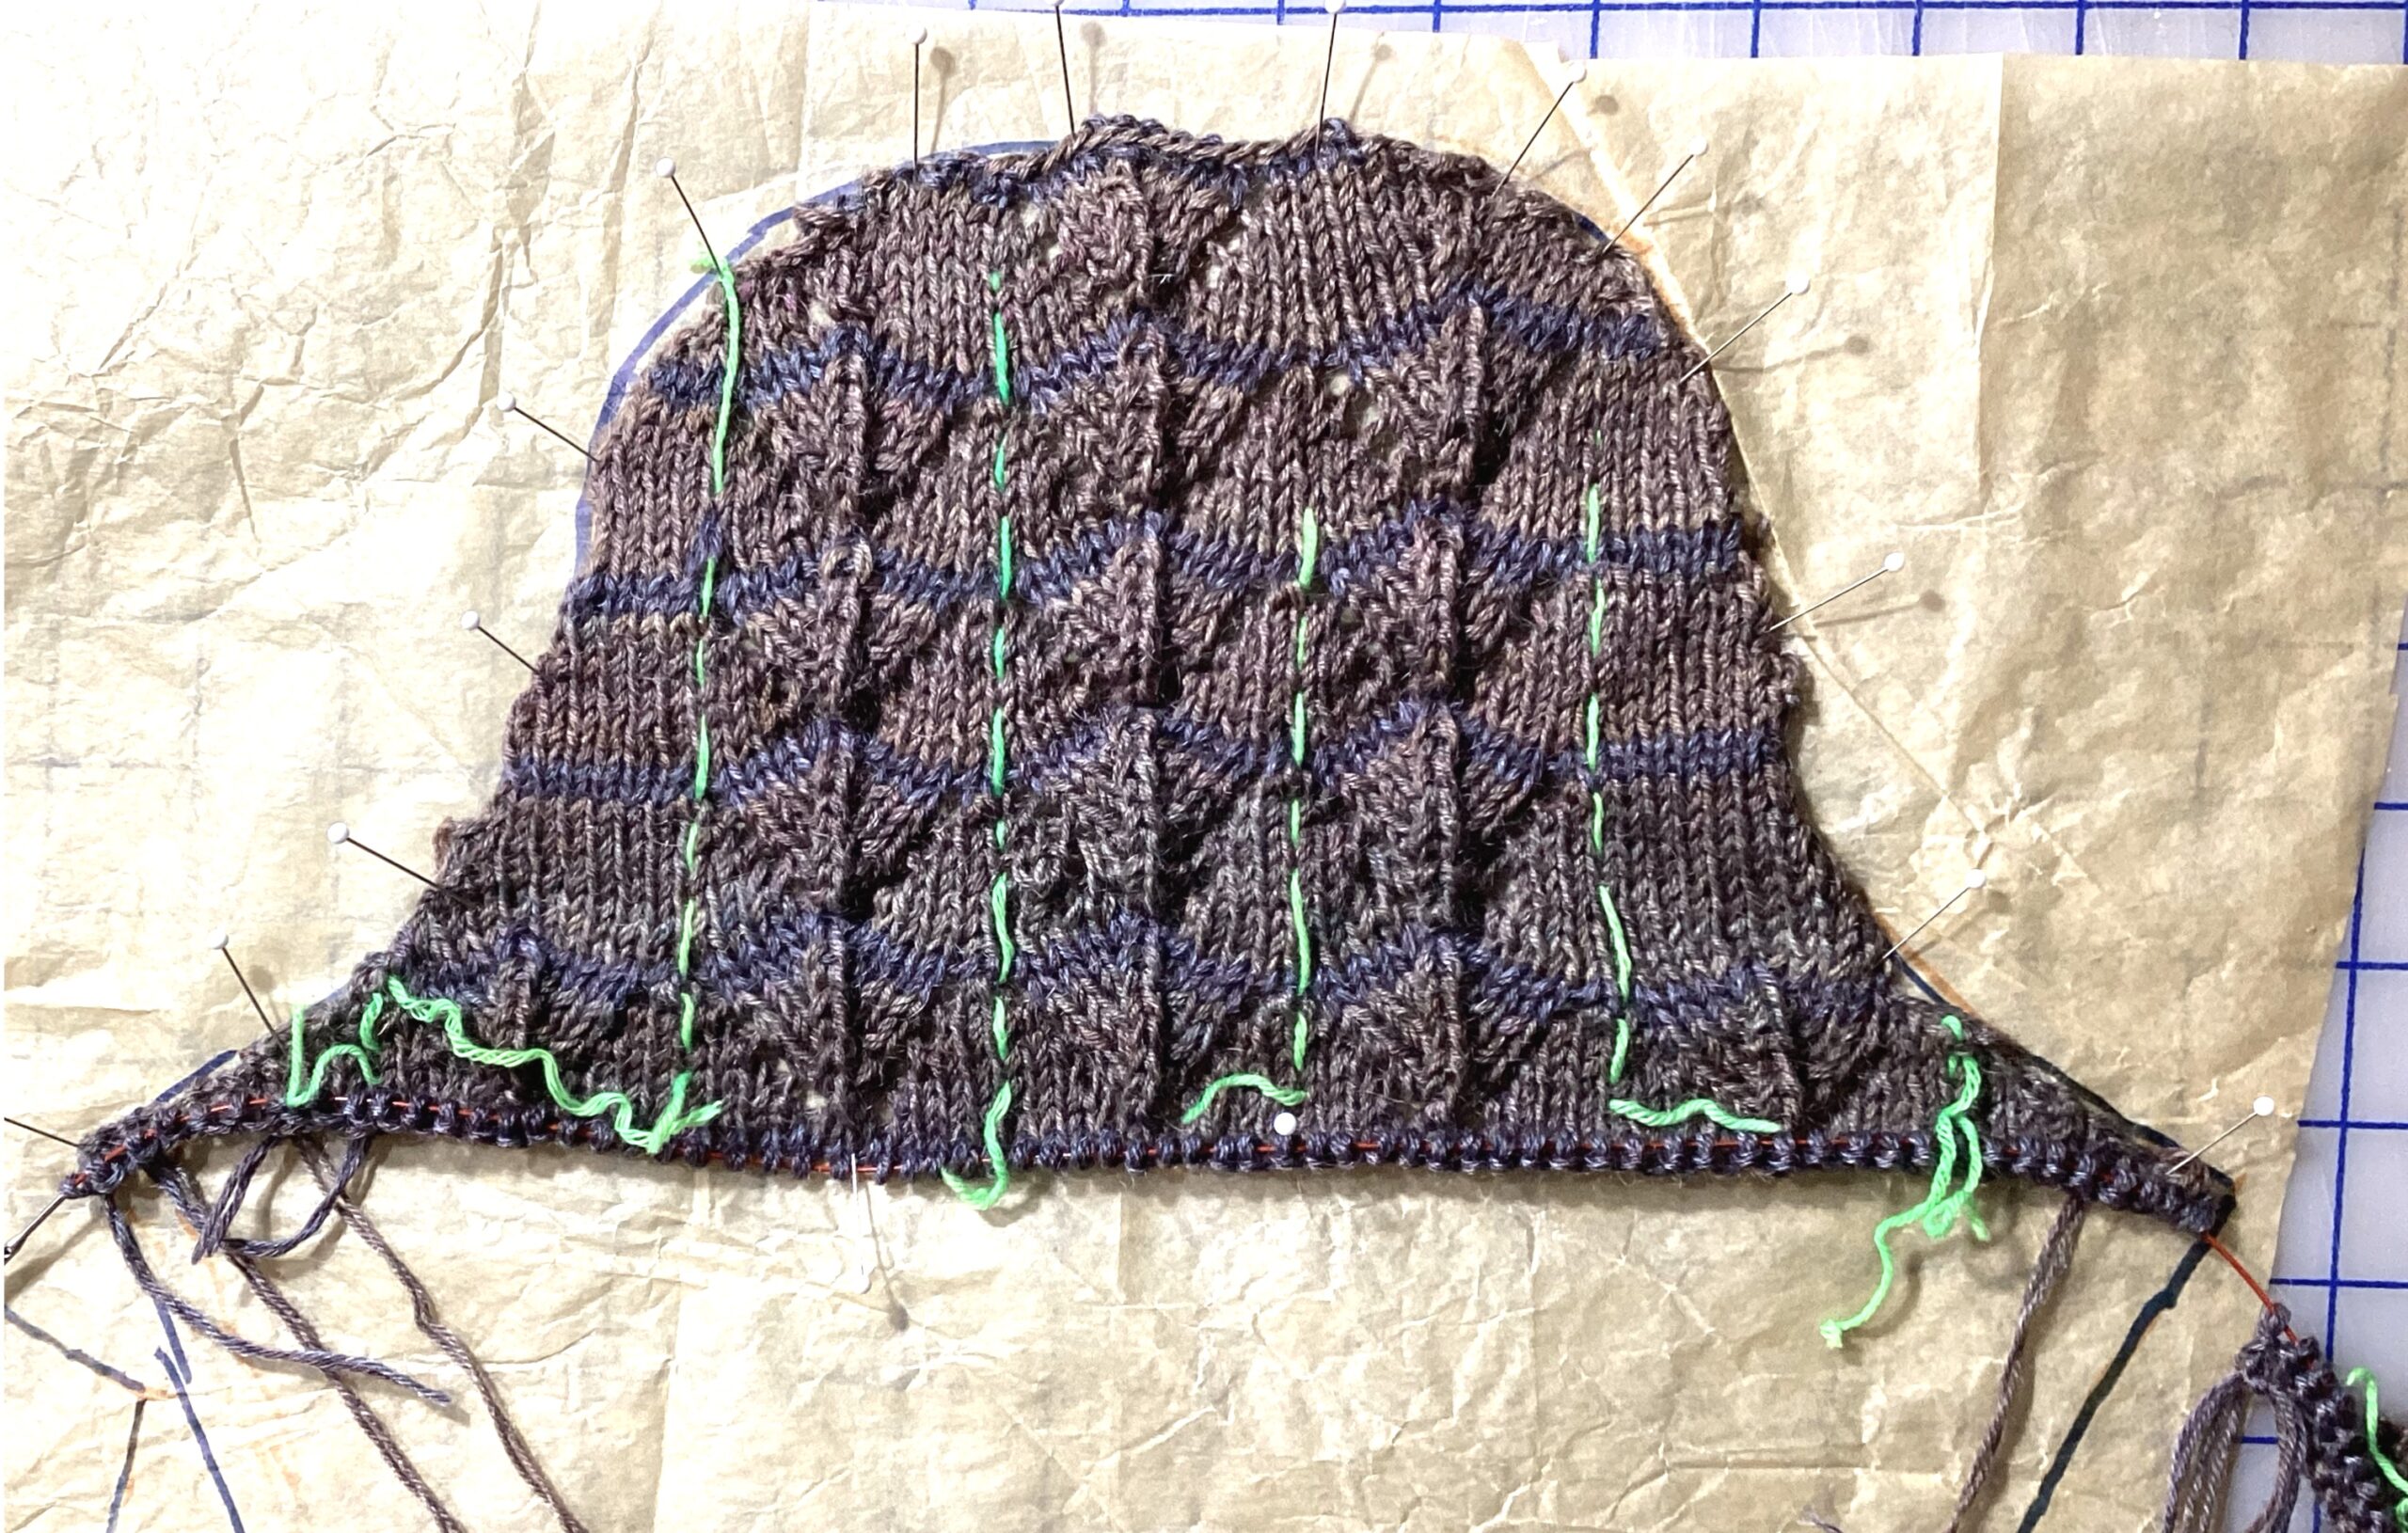
False-color mock-up working out short-row shoulder wedge(s). Orange lines are the highest point across my shoulder and my natural shoulder seam.
Contrast yarn defines short row wedge.
Blue yarn is my natural shoulder seam.
The distances from any point on the long sides of the wedge to the floor are the same (white arrows), so adding Front/Back/Sleeves from the insides of their cakes – original tops of blanks – puts the bands in sync.
The short end is one band plus its two bracketing CCs: 12 stitches
JMCO 27 + 23 (24?) + 27 = 77 (78?) with dark gray contrast color.
The double-row join between front and back will be a straight-ish line rather than scalloped. Can’t be helped.
Put the back neck stitches on a cable and as work goes around the neck, loop around the cable at each end of the inner wedge to add a stitch
When the wedges are done, switch to Front (with neck shaping) or Back cakes and work down the body (add specs).
The swoops of the scallops are dependent on direction (top-down or bottom-up); they will be opposite to the first Myrtle.
Document further once actually cast on
January 13 sample: CC JMCO 80 sets: 27+ 26 +27 (= 160 on both needles), size US 6 / 4 mm both sides, 22” mini cable; my gauge is 5spi.
Put (back) half of sets on cable. Place running markers every ten stitches on front, working from shoulder. Count from shoulder on Front and place 2 markers at 27 (10 + 10 + 7) [26 in center for back neck] mirror second side
Flip markers every row
Begin row shoulder wedges with separate balls, maintaining pattern between markers
User error: the neck edge wraps on one side were on the back rather than the neckline cable. Stitches a bit loose after moving/will know better on real one.
Notes: Test sample is good enough (unblocked). 80 stitches each f&b, pattern tracks.
The shoulder wedges need pattern completely across, but they sit perfectly.
Start pattern on Row 3 of Kate’s pattern so it segues into the front.
Suspect the JMCO will be a flat line, as on the first Myrtle due to tension being balanced on each side rather than free to pull into scallops. Think this happened on all projects but have not bothered to check.
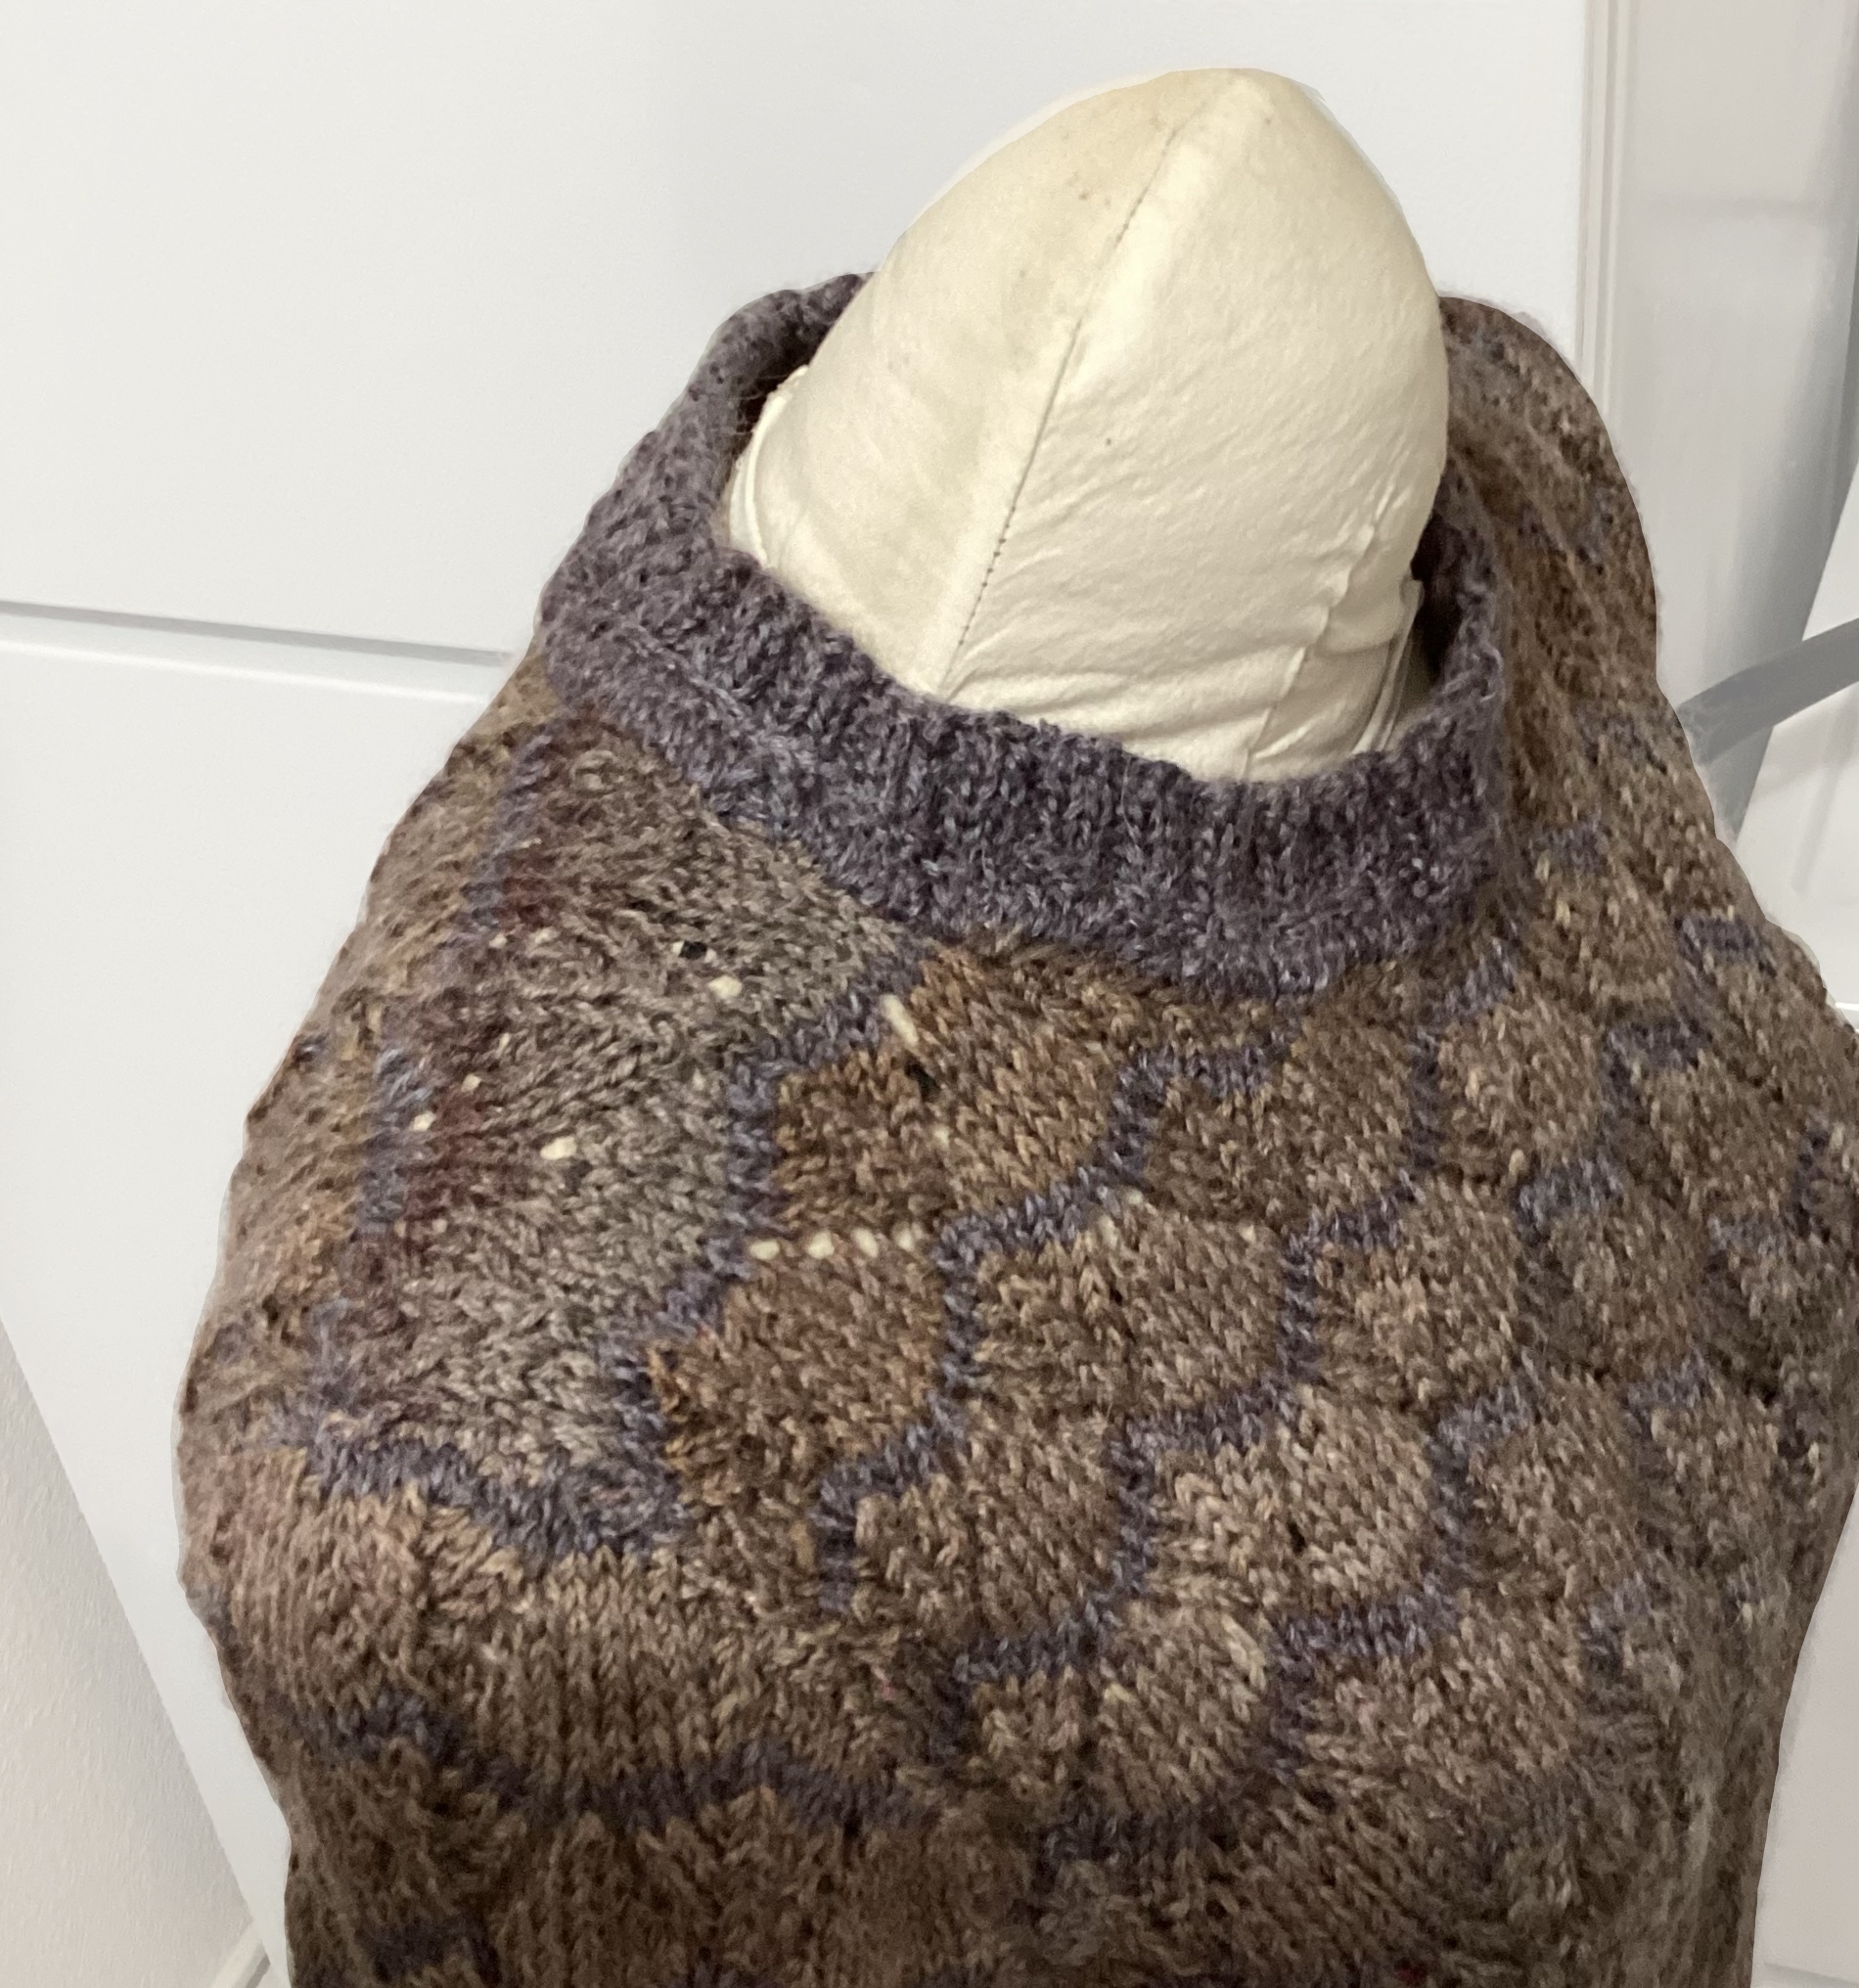
Had about half the CC for the height of the neck binding. Did a simple bind-off at the neck edge due to laziness, will use Jeni’s stretchy one as per first Myrtle.
Myrtle Revisited, Instructions
https://www.simple-knitting.com/horseshoe-lace.html
Kate Davies’ bottom-up Myrtle sweater is based on the Horseshoe Lace pattern, which is what I have modified. Mine is top down.
[Specs on dyeing yarn]
January 16: CC JMCO (two cakes) 80 sets: 27+ 26 +27 (= 160 on both needles), Size US 6 / 4 mm both sides, 22” mini cable; my gauge is 5 spi.
Put (back) half of sets on cable. Place running markers through cast-on every ten stitches, working from shoulder. Count from shoulder on Front and place 2 markers at 27 (10 + 10 + 7) [26 in center for back neck] mirror second side
Shoulder wedges are worked with the tail end of separate sleeve balls: all front stitches are worked from the front half of JMCO.
Neck stitches are put on a separate cable as soon as accessible
Right wedge is worked, capturing stitches over the neck cable
Then Left Wedge is worked with the end of the other sleeve ball
The wedge patterns are not reversible as the right is worked from shoulder in and the left, from neck out

The Contrast color also needs to weighed out, crocheted up and dyed.
There will be four sections: front, back, and two sleeves, made from the same yarn as the first which gives the weights. The fronts and backs will be dyed together, as will the sleeves, so two blanks, double-stranded. There will be extra yarn at the bottom of the sleeves that matches the tops of the body to use for the shoulder wedges.
Bright green poly cord will be tied to the starting ends. It would be tragic to get partway in and discover I’d been working from the wrong end.
How did I know how wide to make the blanks? I guessed, based on the first sweater.
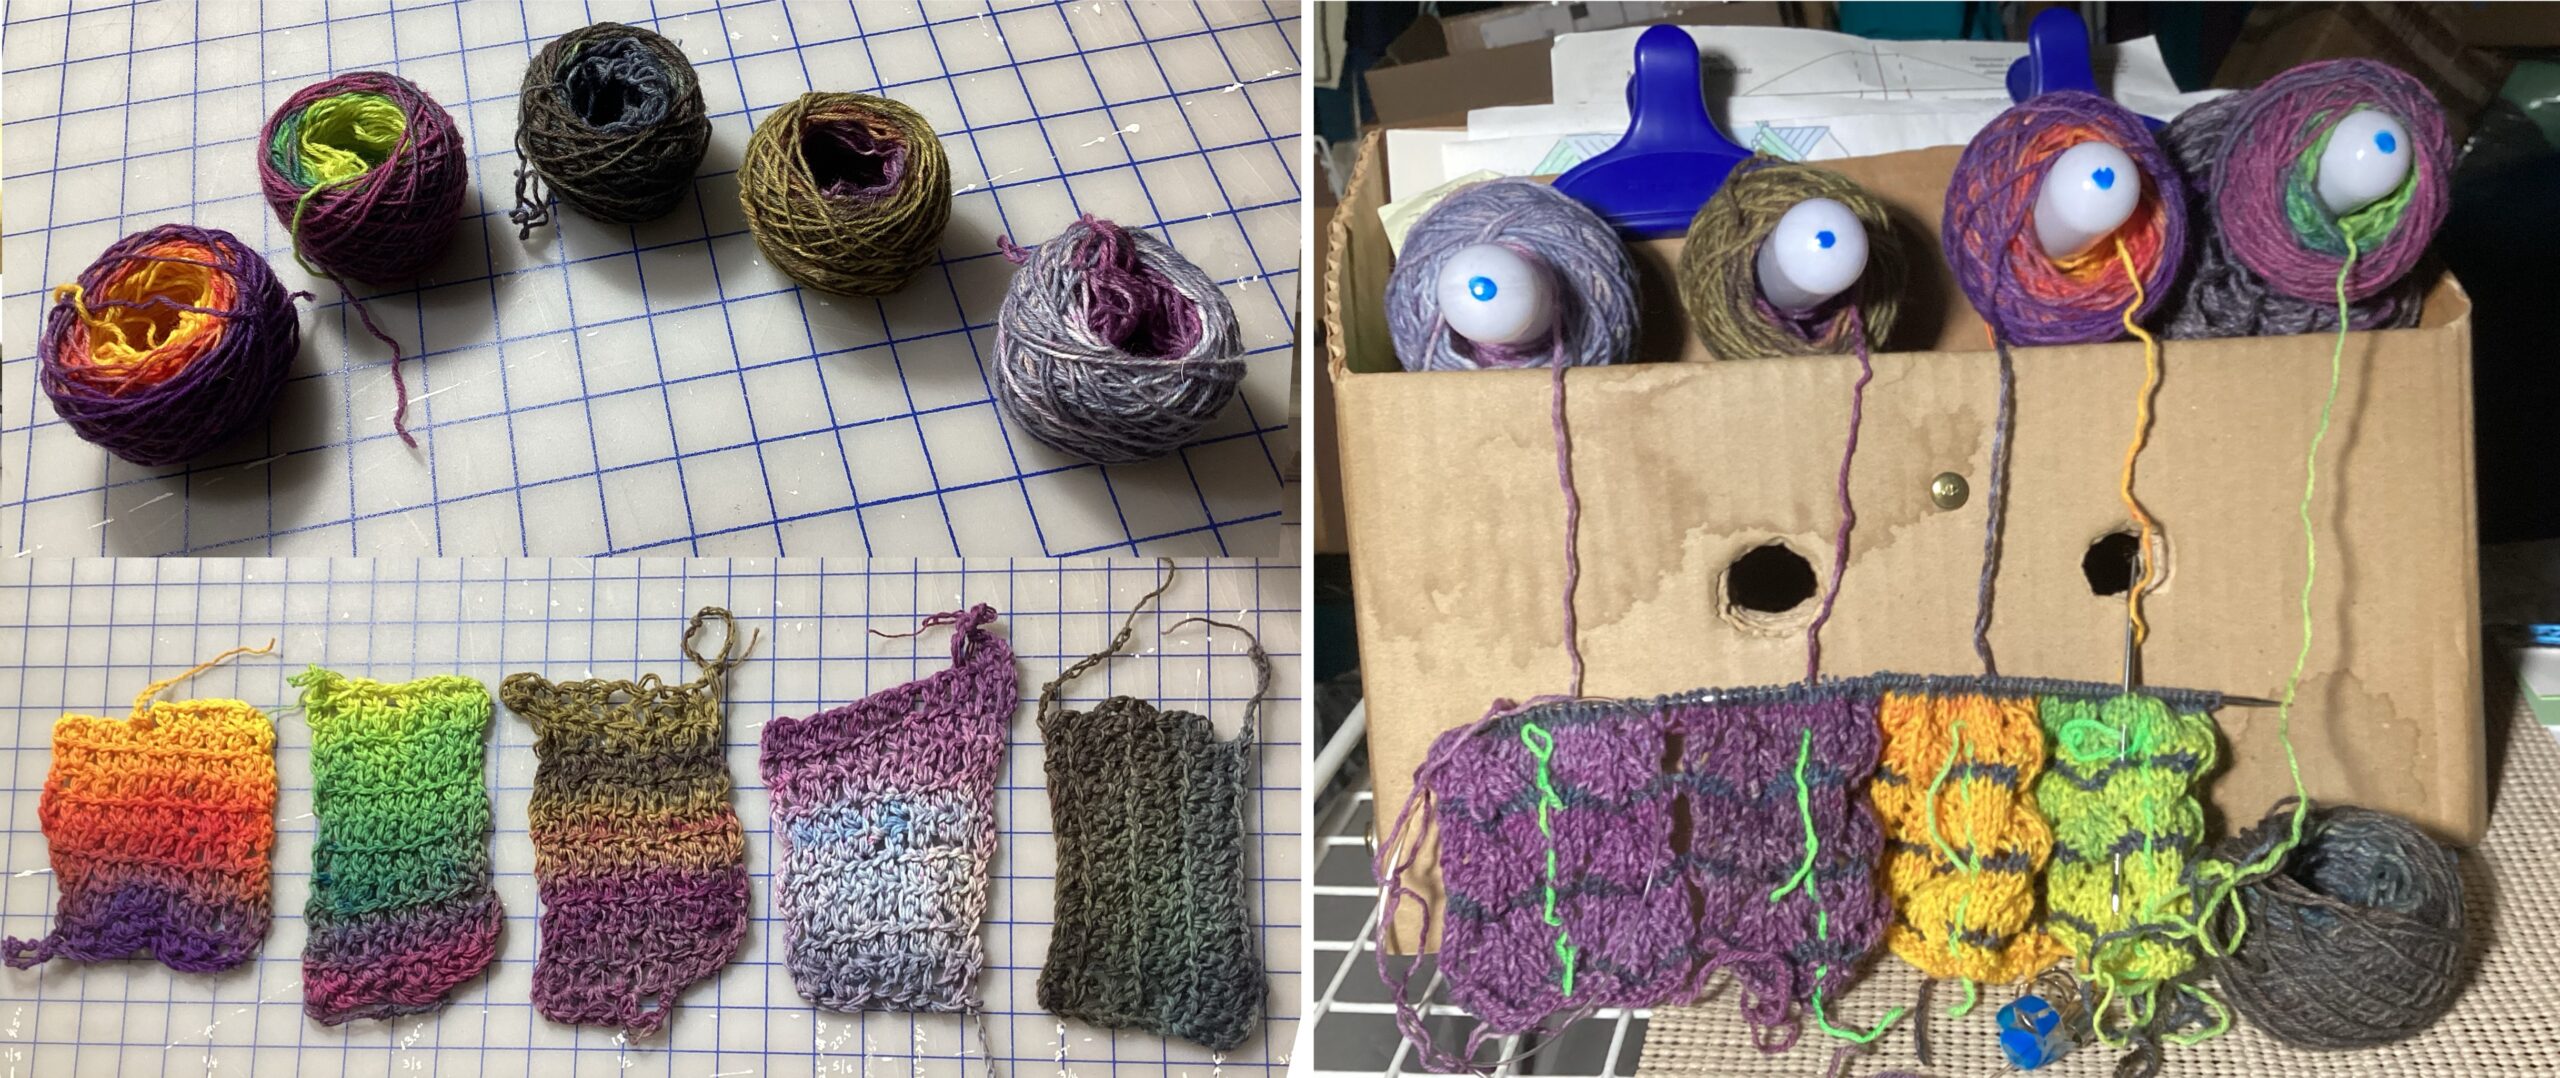
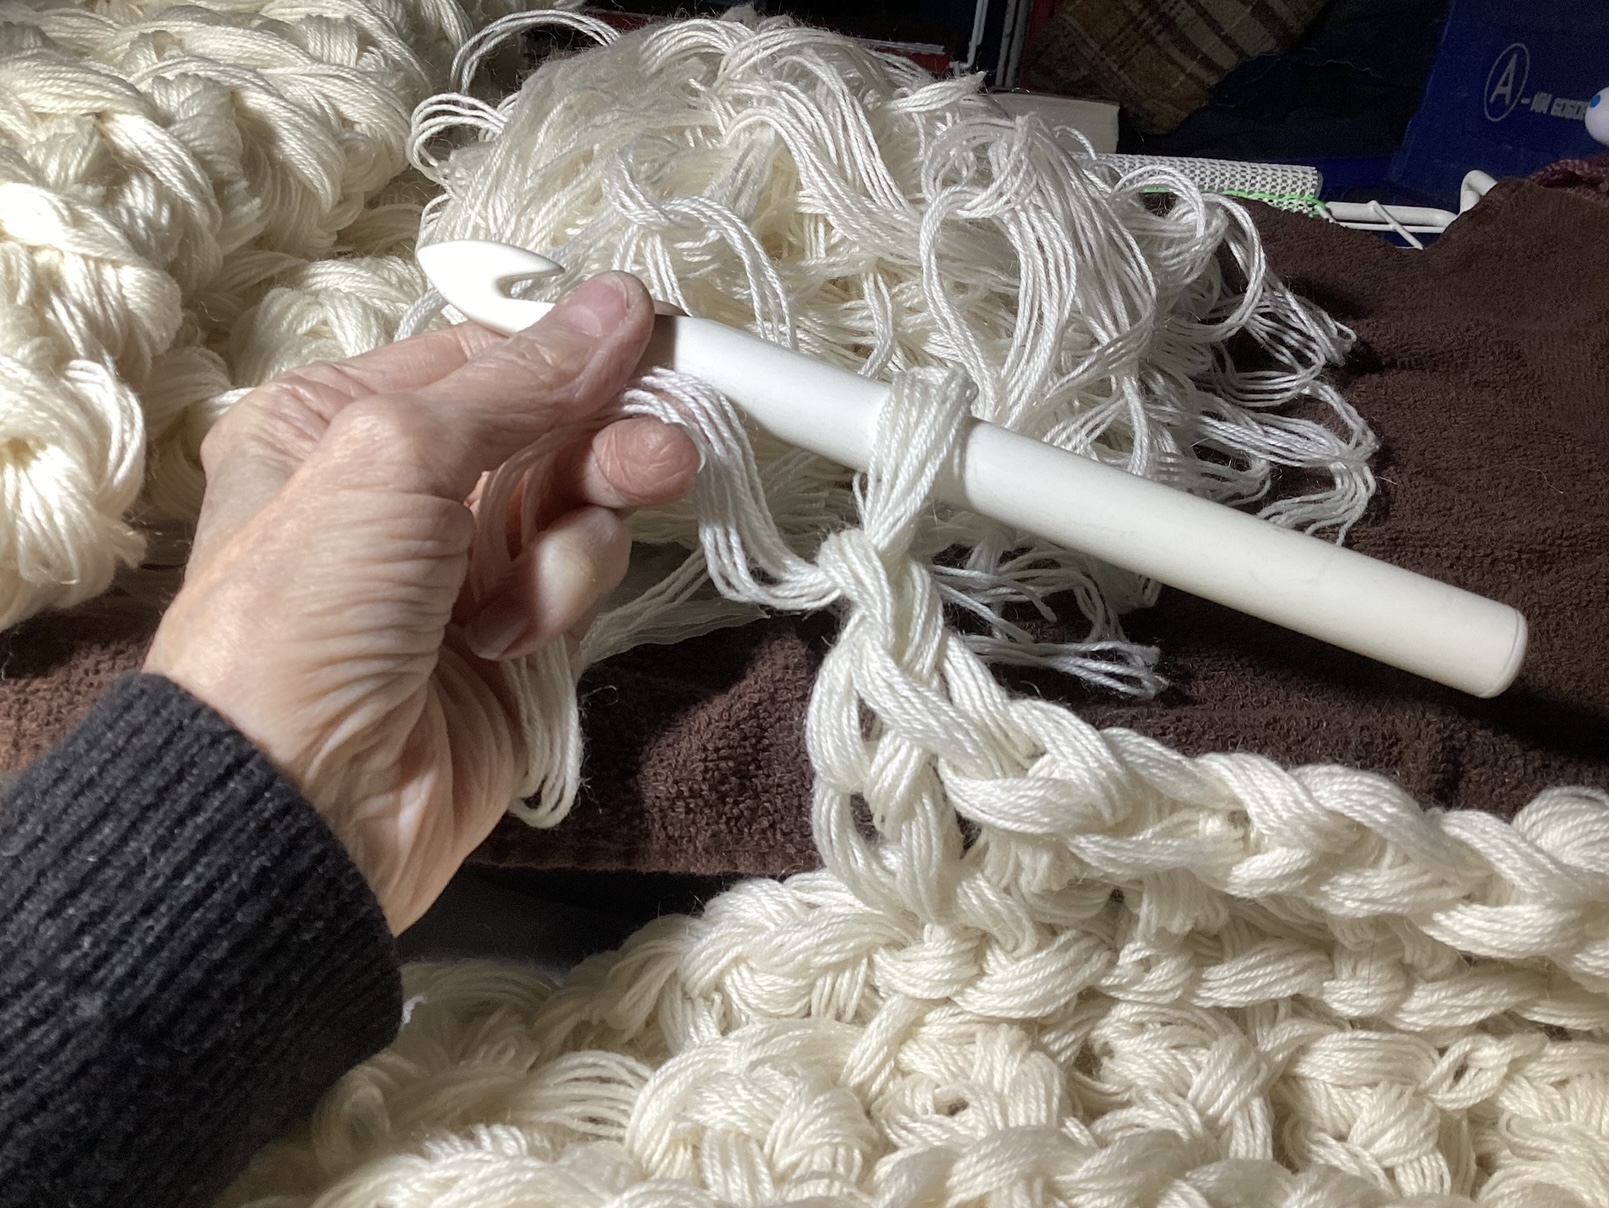
IYarn was weighed out and loosely crocheted into big blanks.
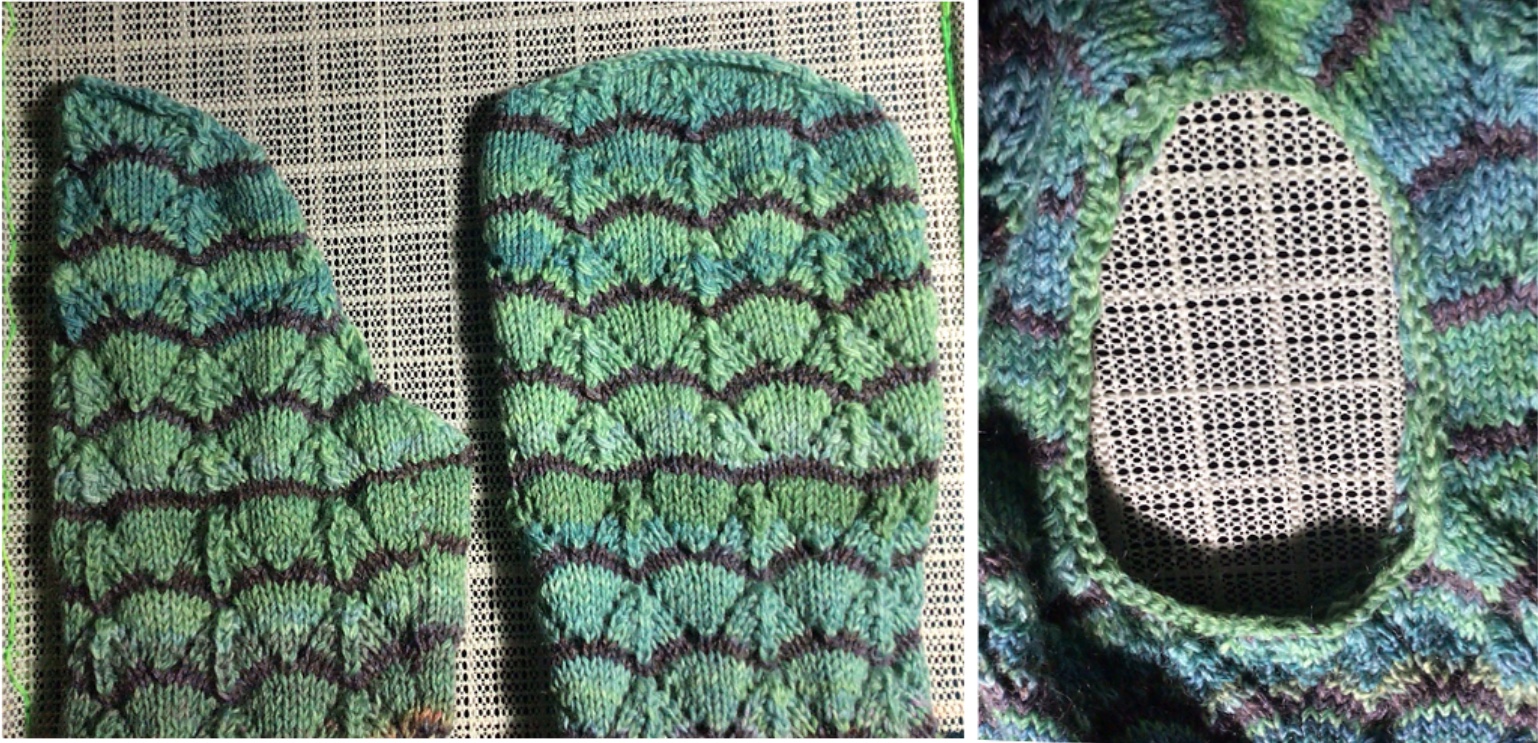
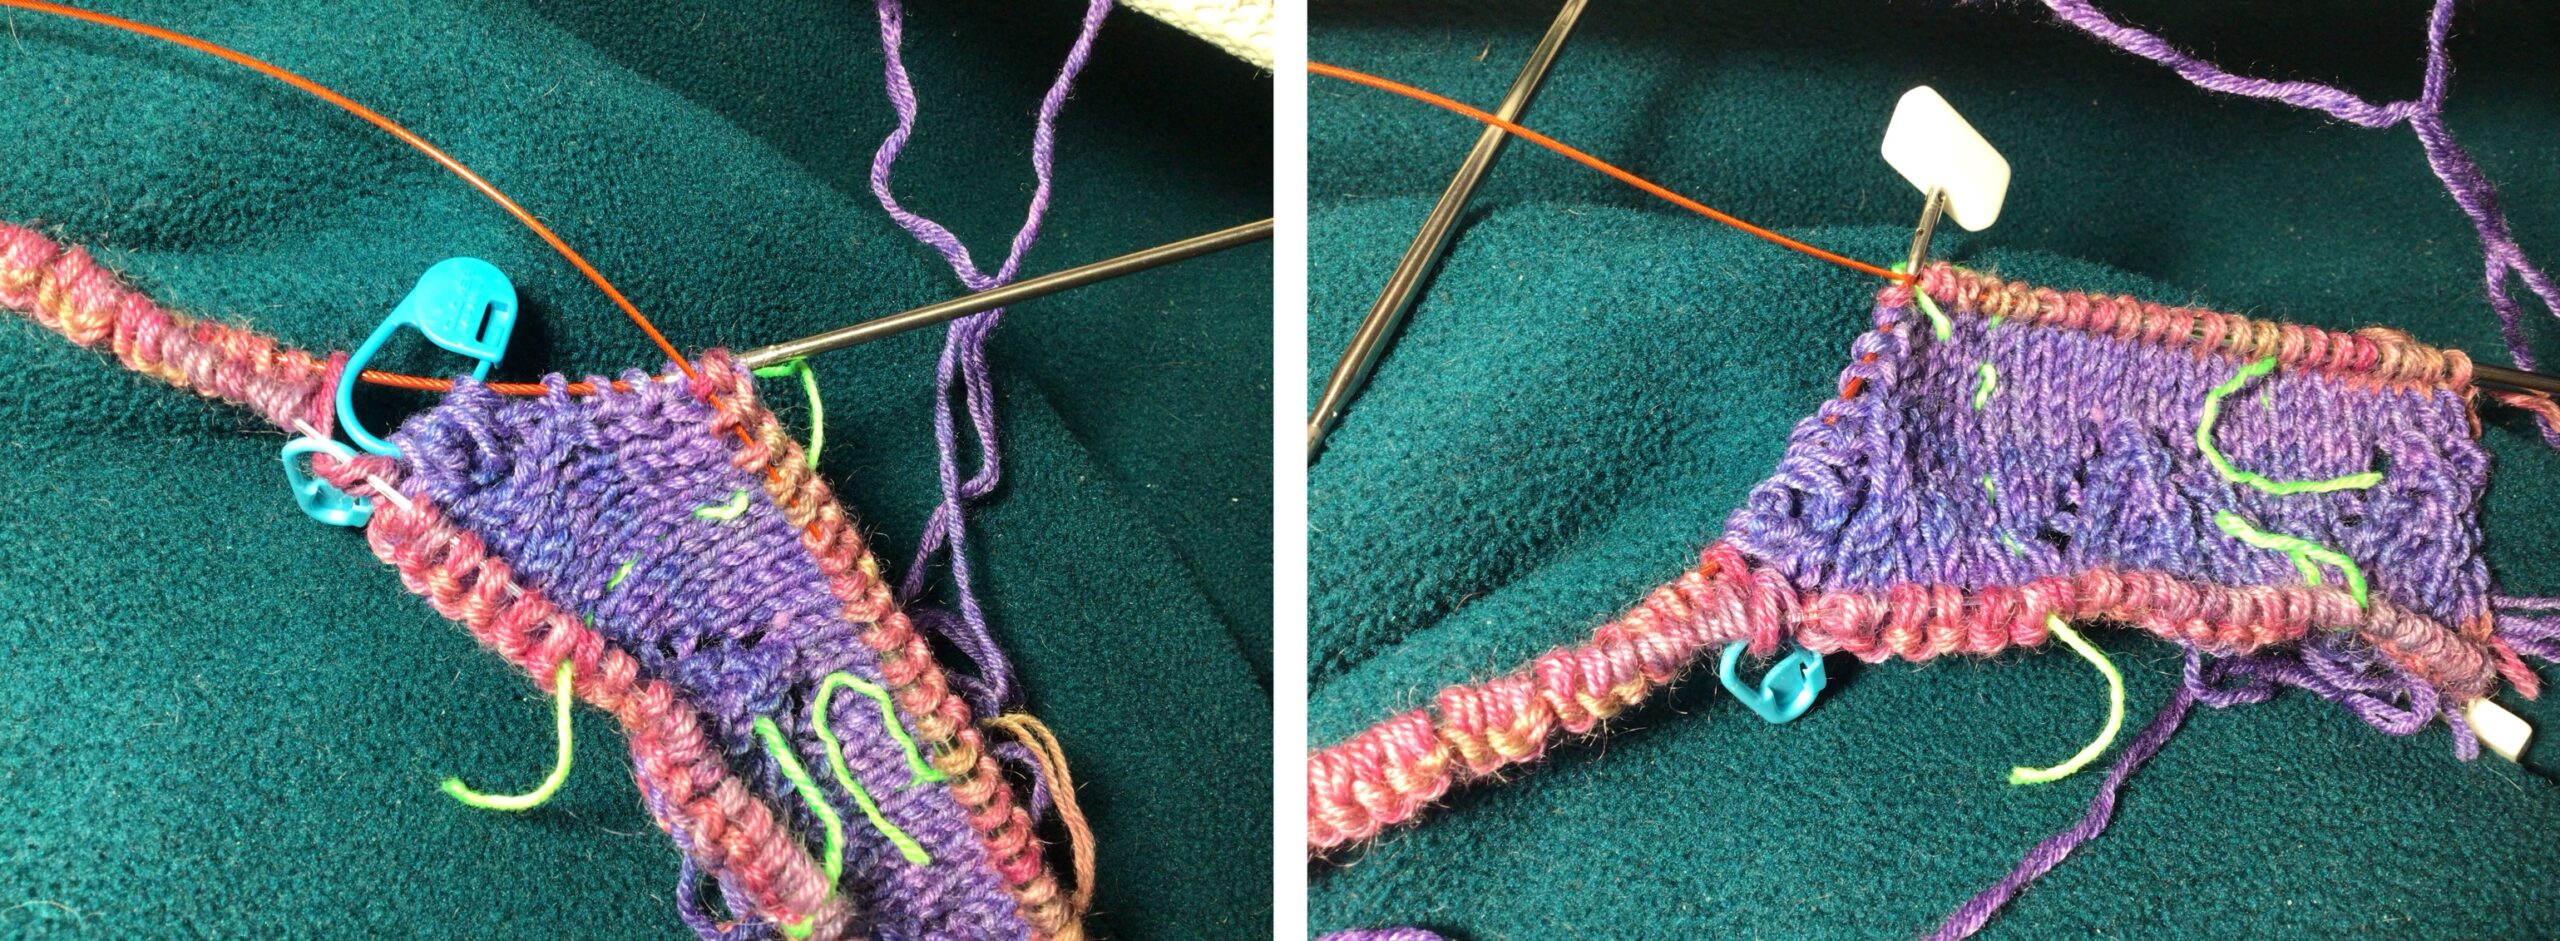
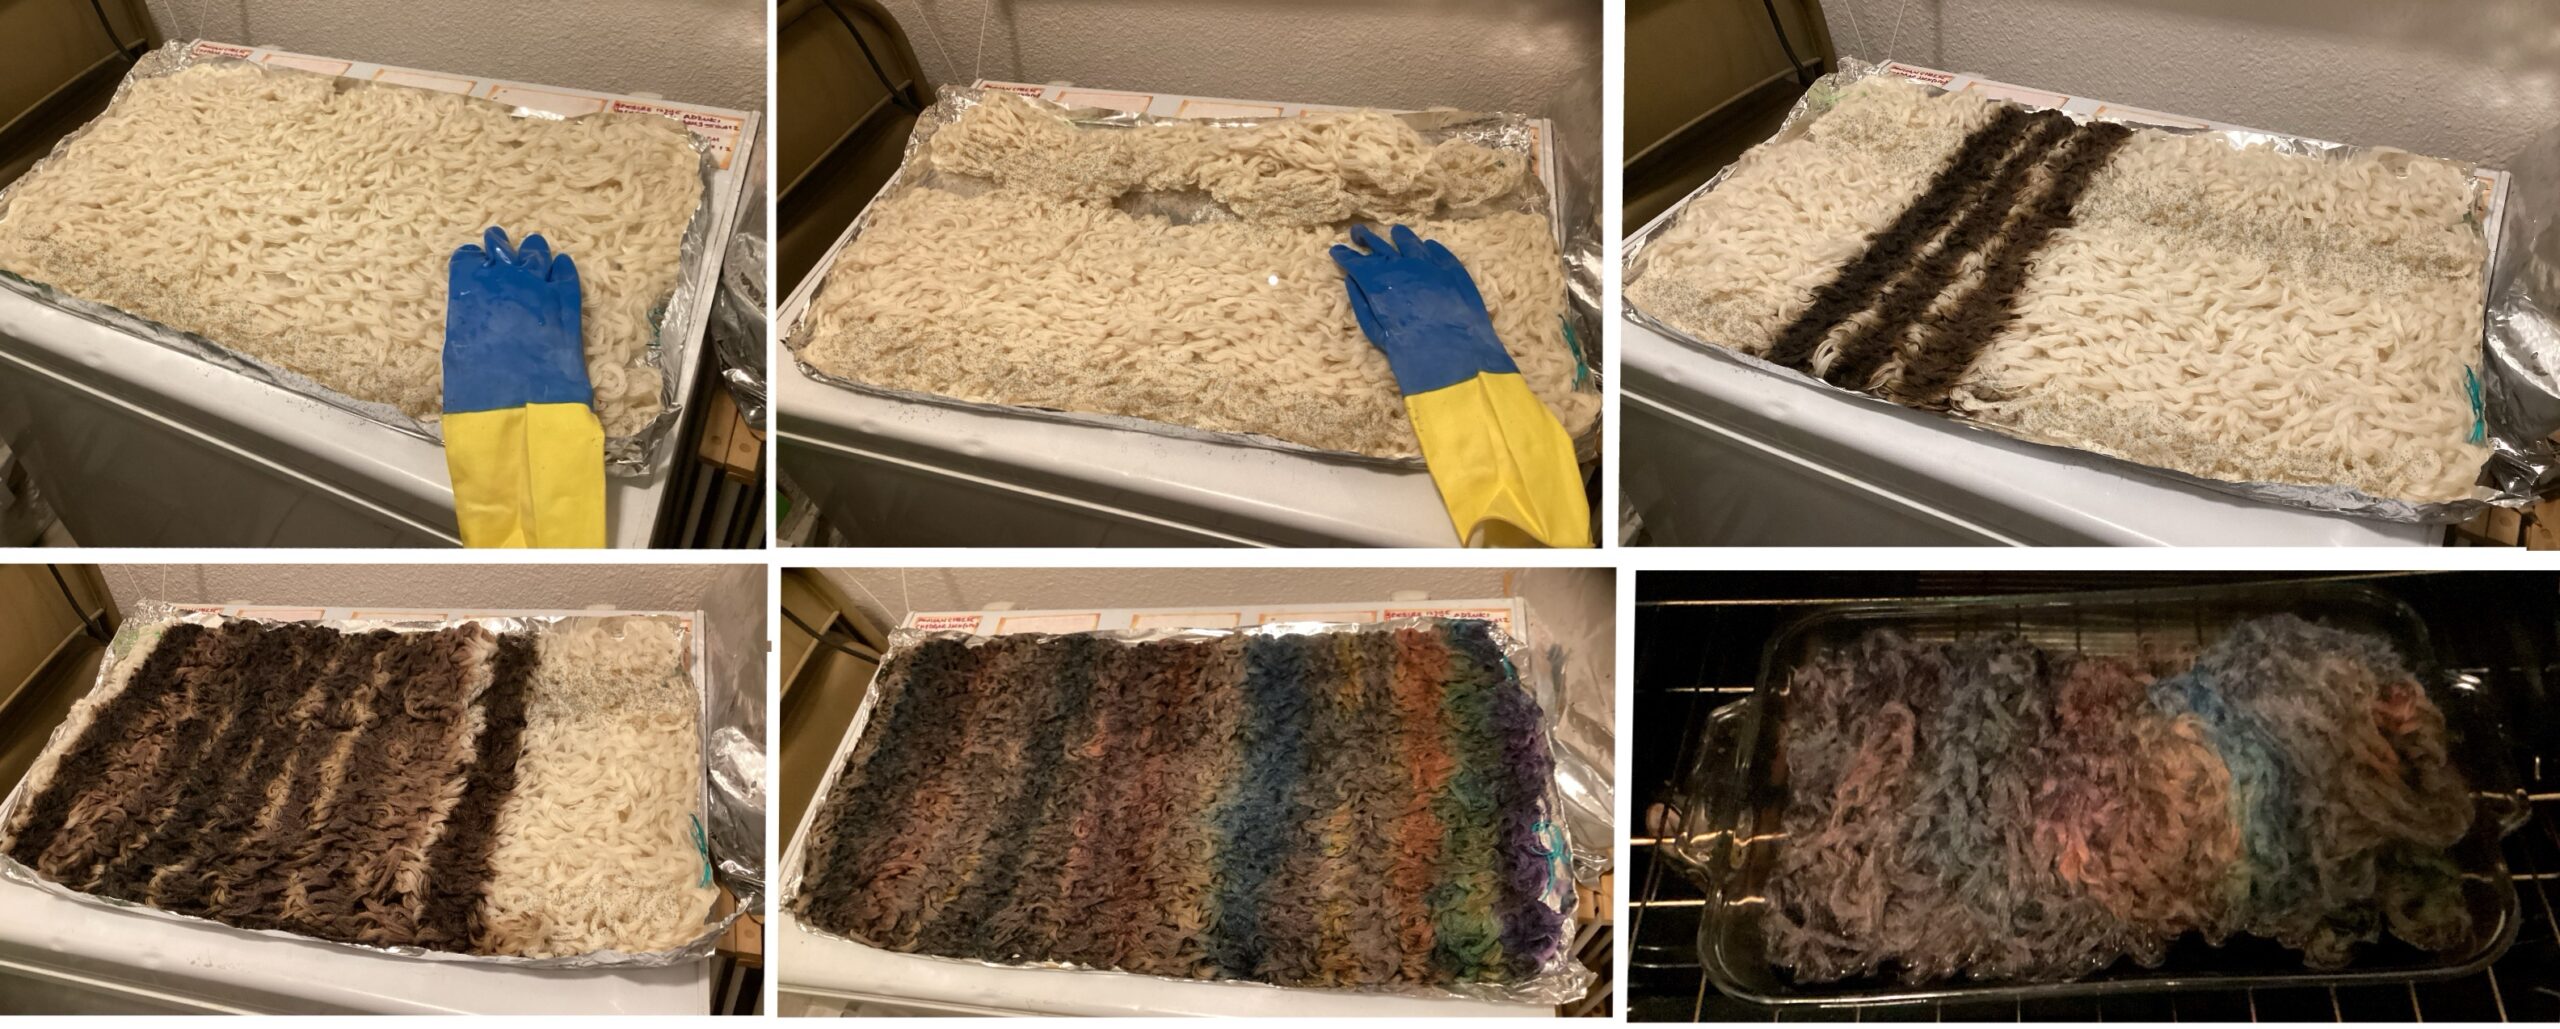
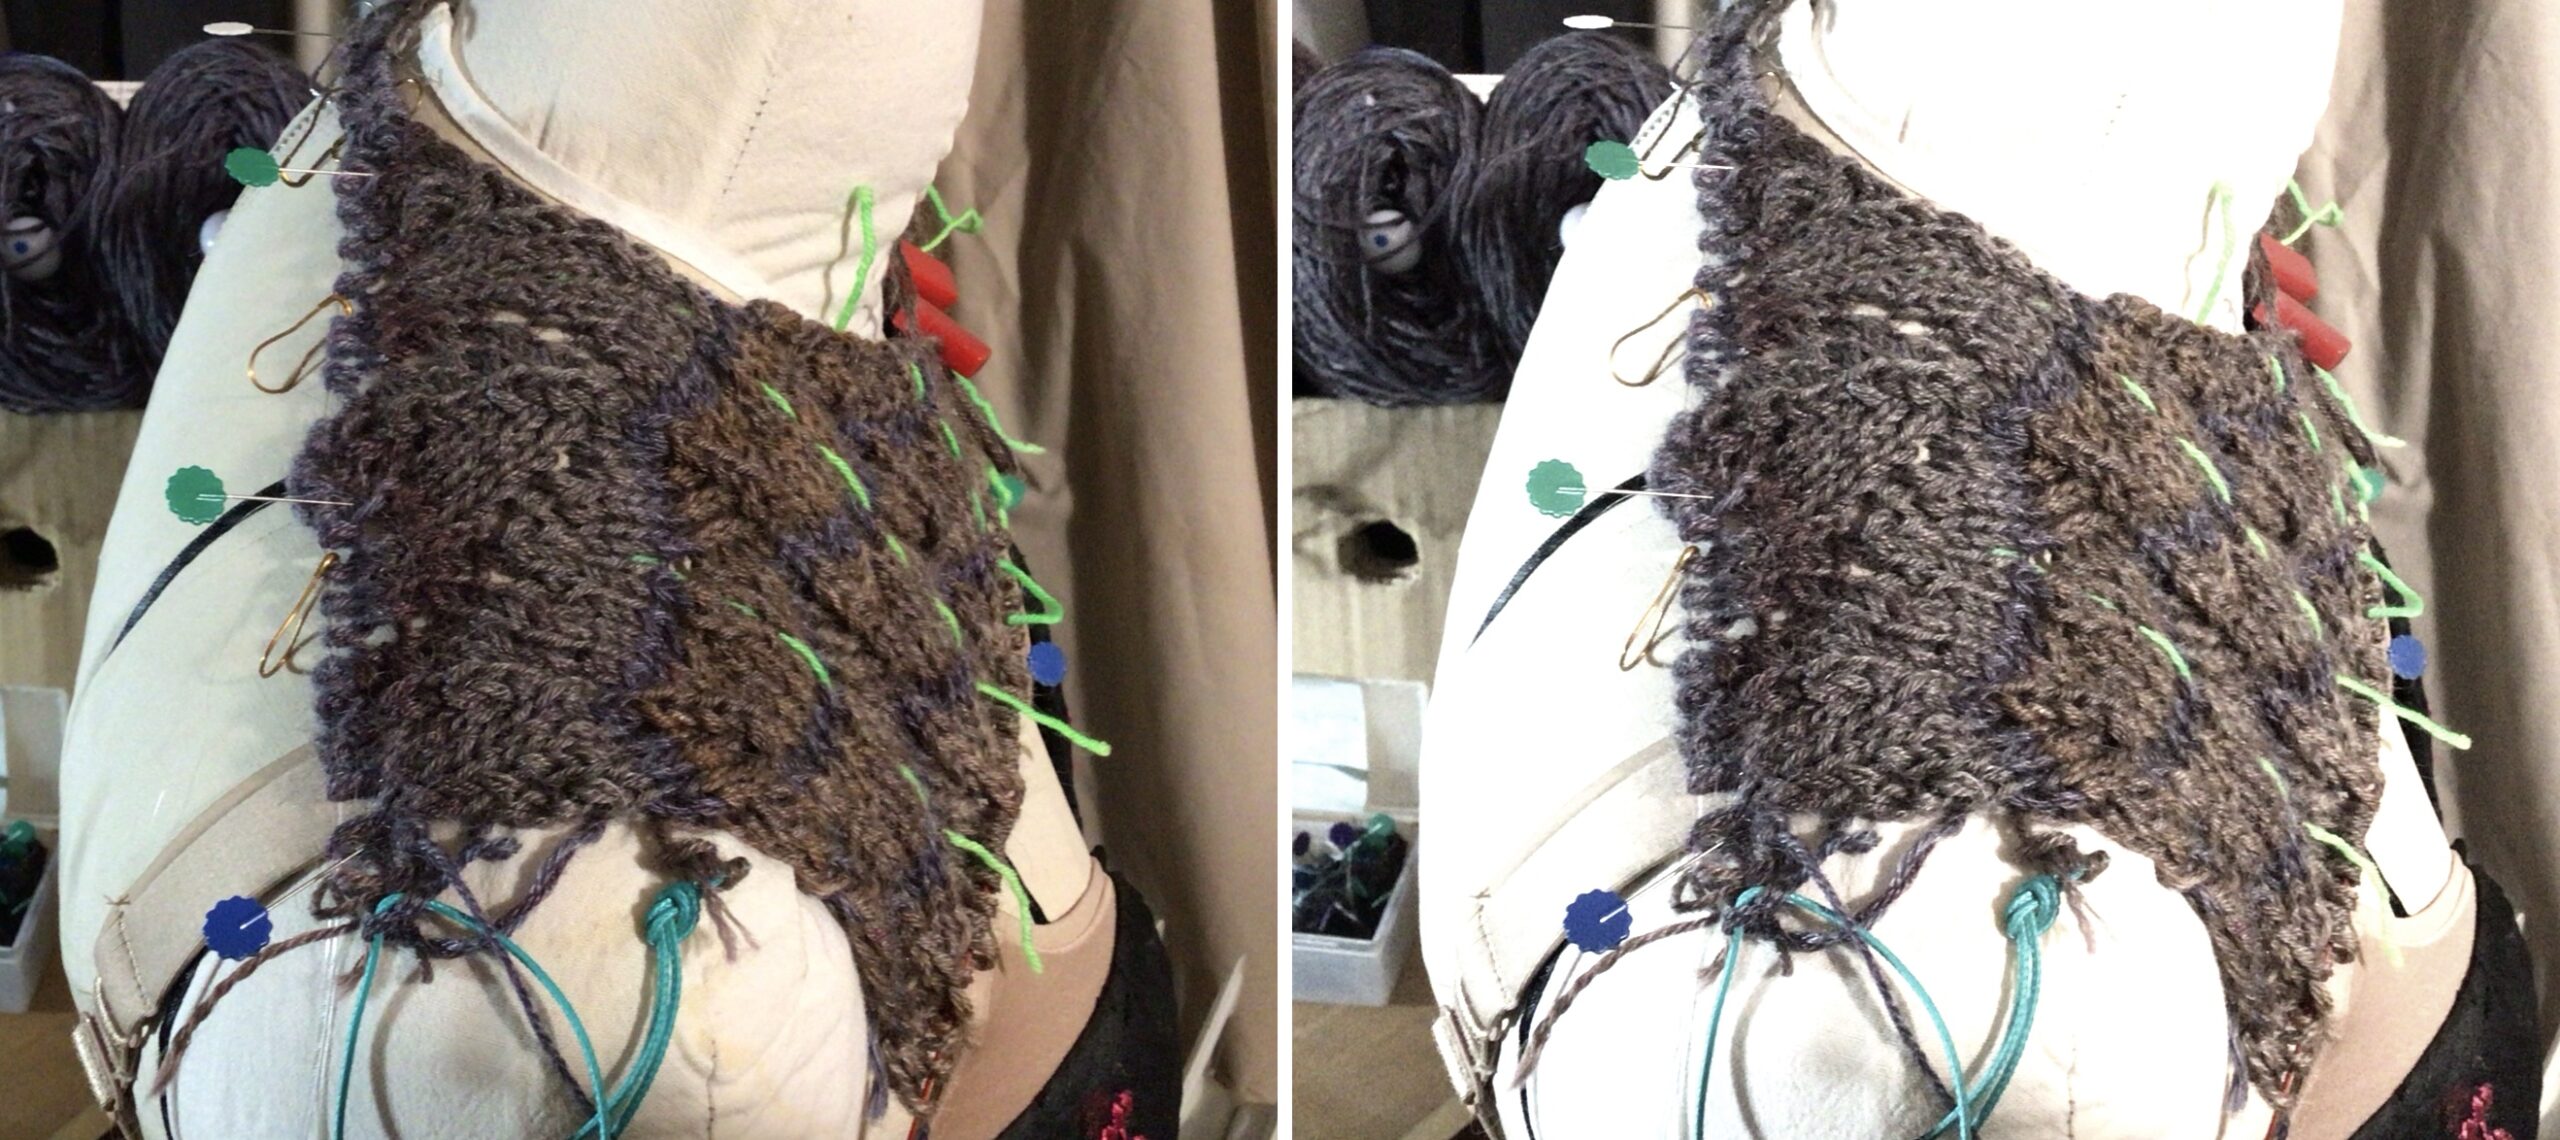
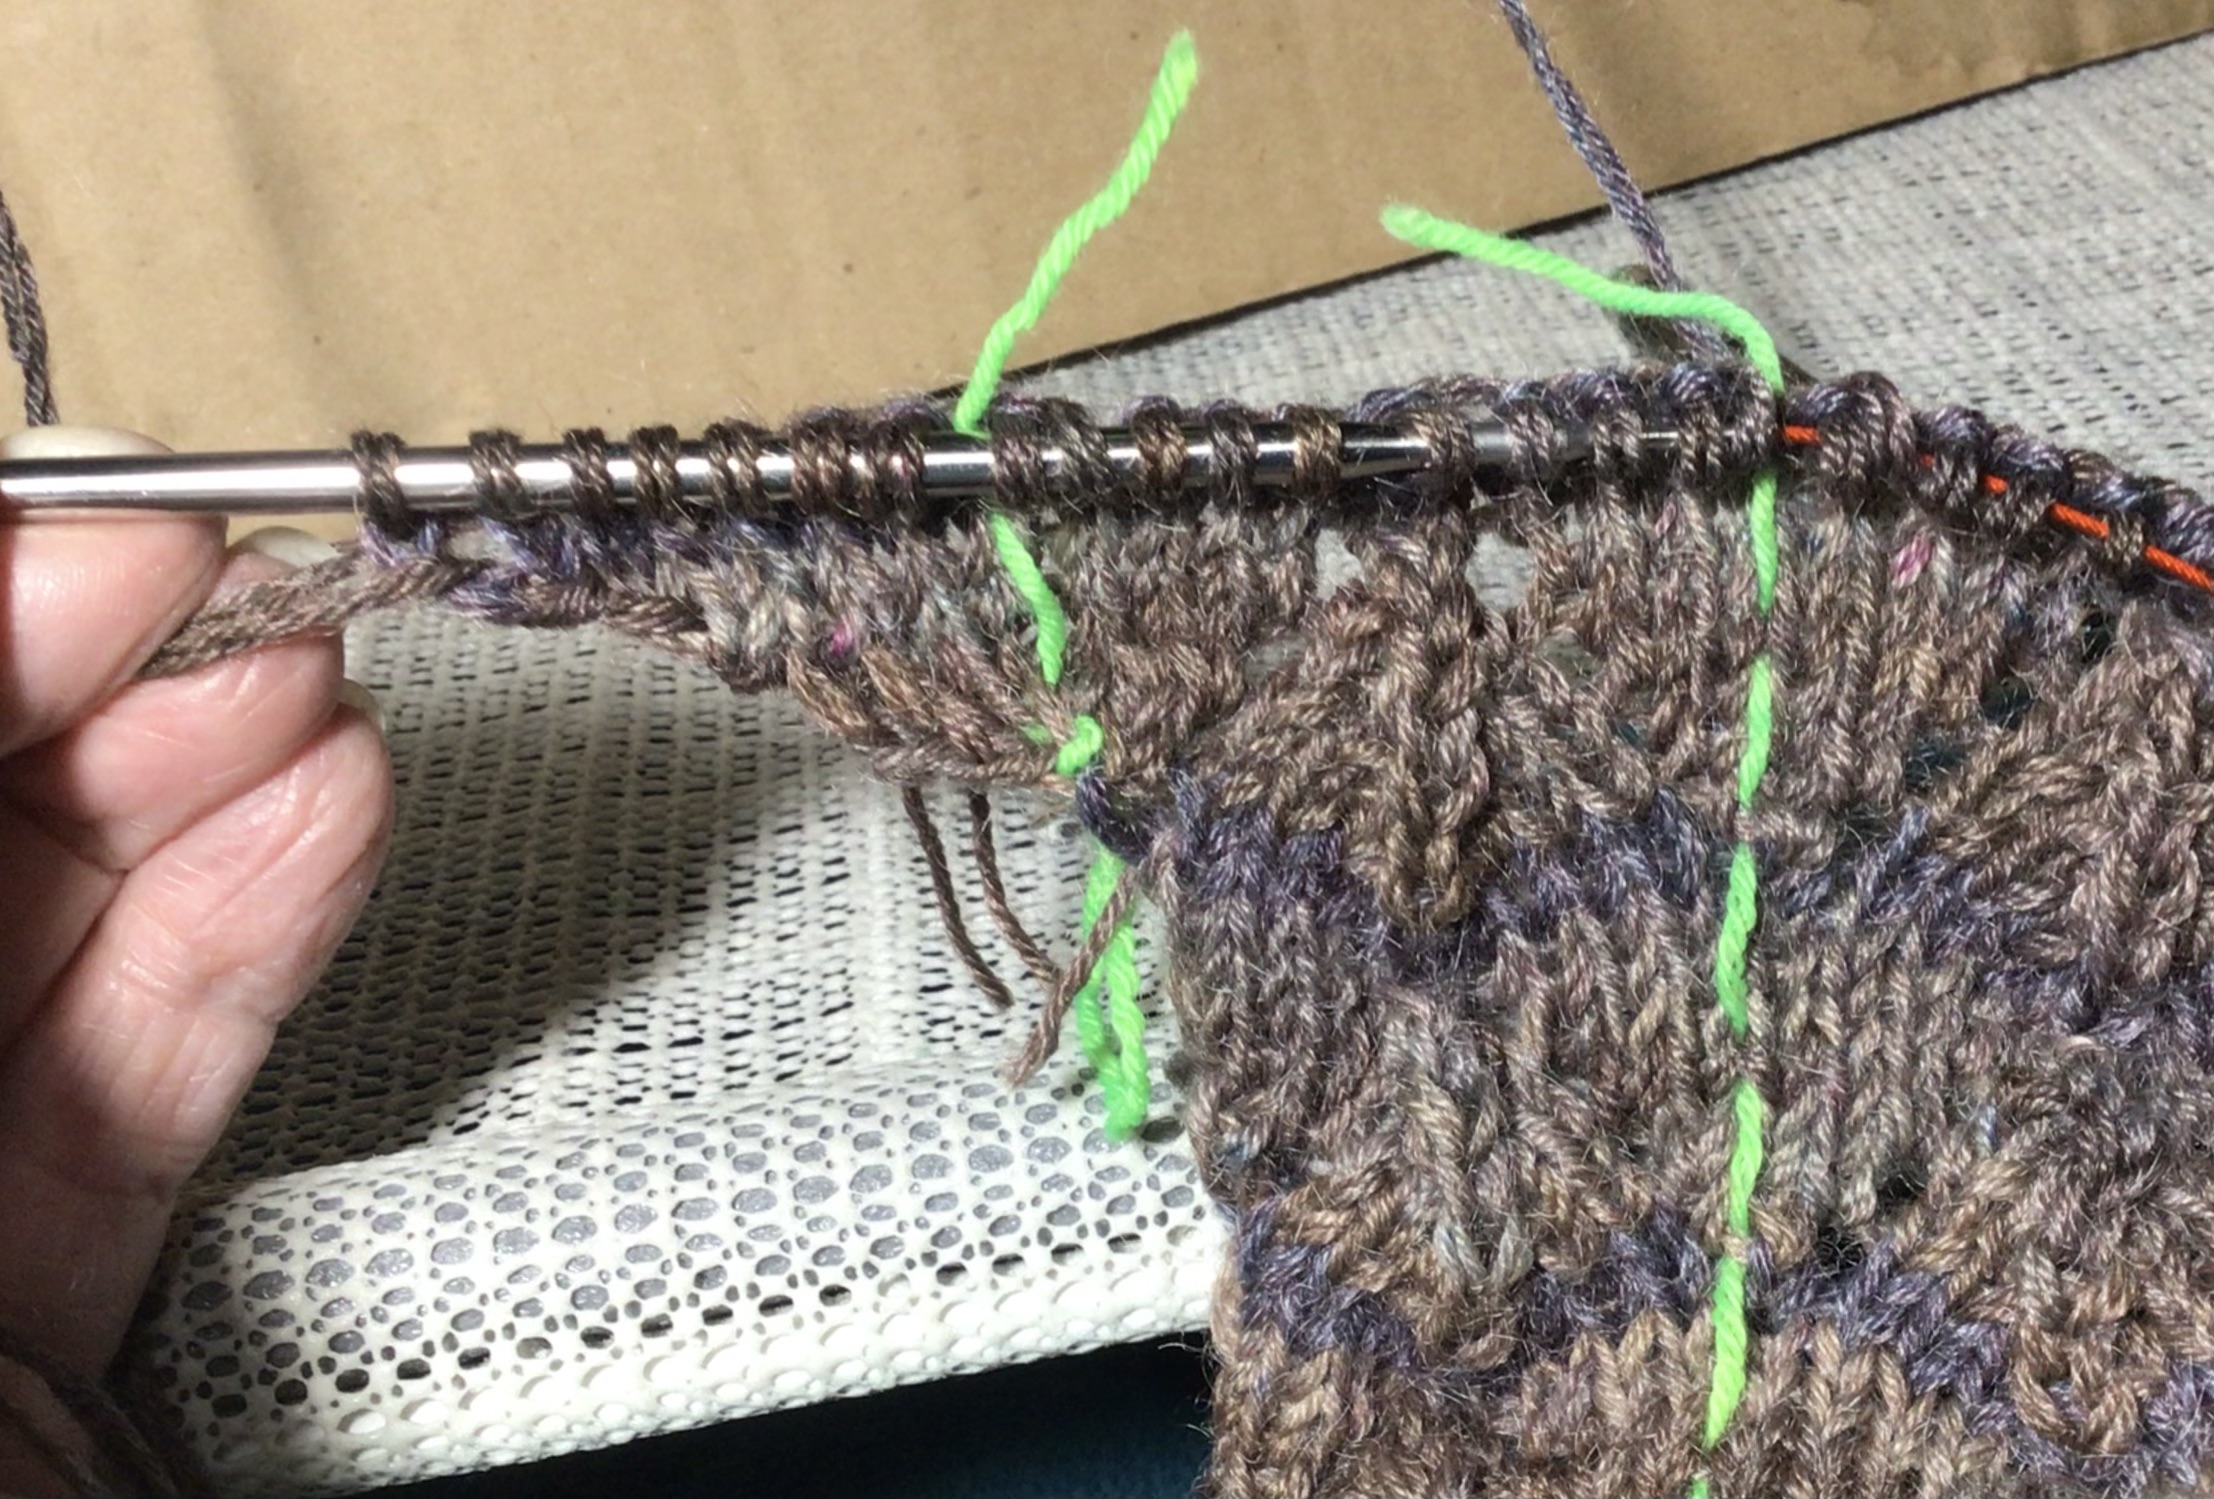
The blanks were soaked in vinegar and salt preparatory to painting on the liquid dye. A tray was made of heavy aluminum foil and the body blank carefully laid into it, followed by the sleeve. Dye was painted across. You can see in the bottom right corner of the top right shot the green “this end up” poly cord.
The blanks were laid into a dye-dedicated large Pyrex pan and heat-cured in my oven.
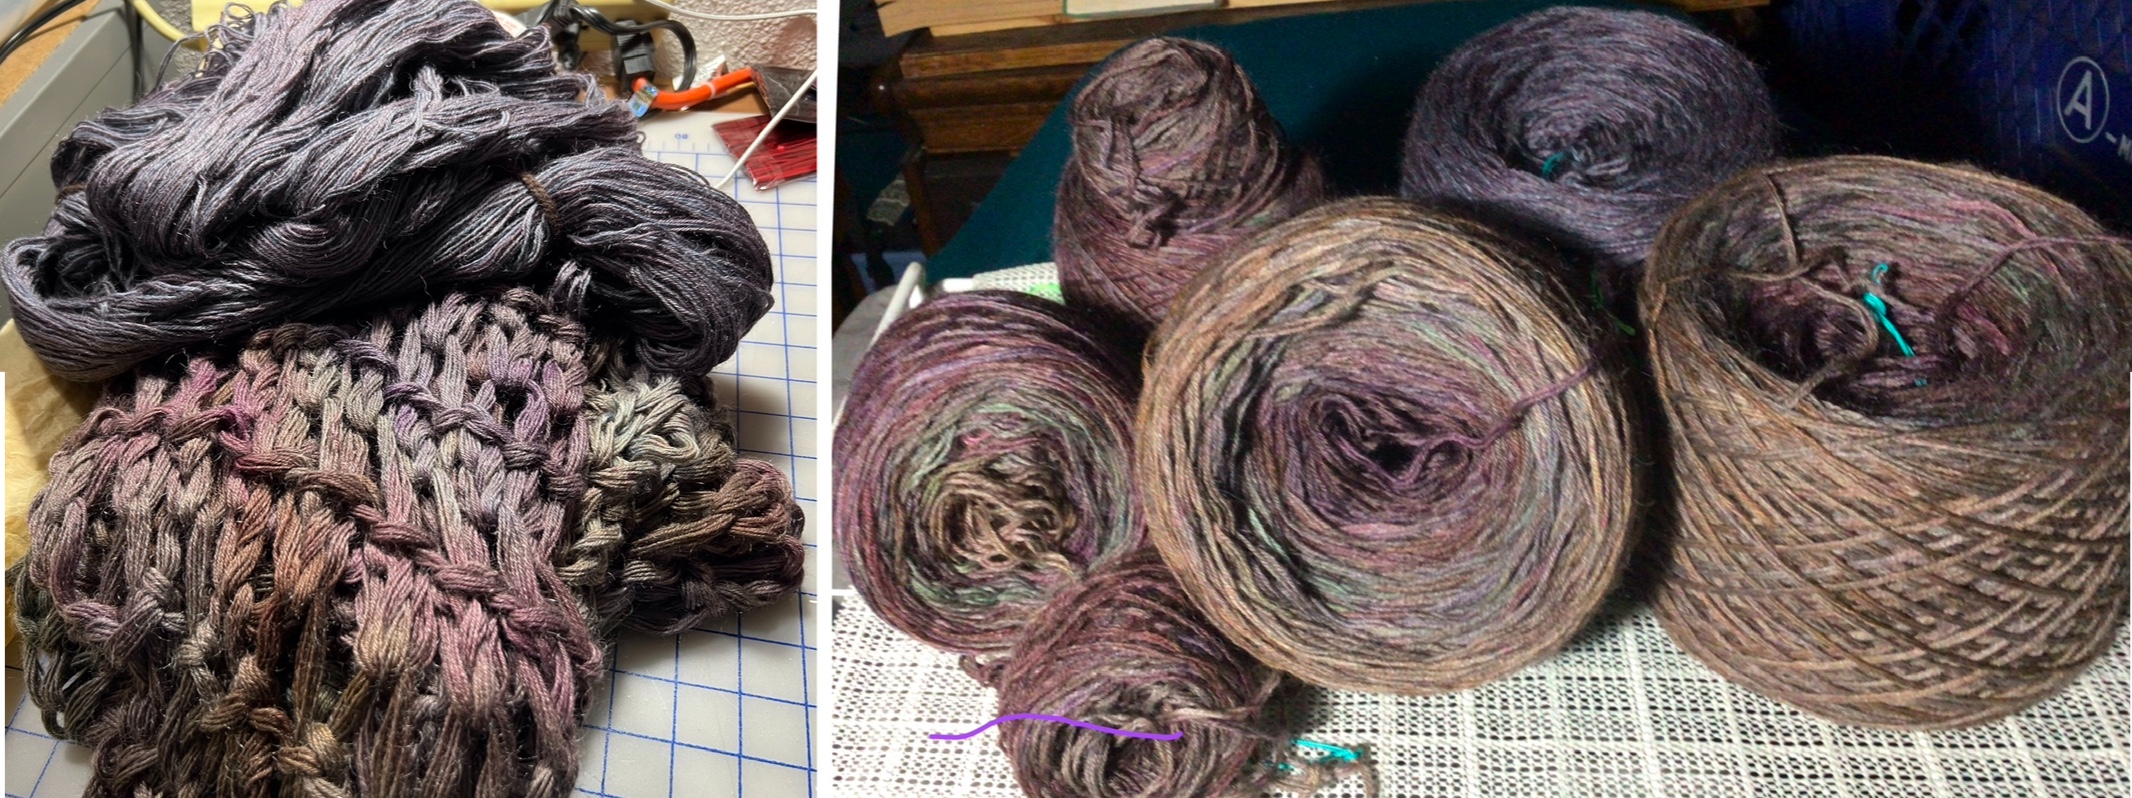
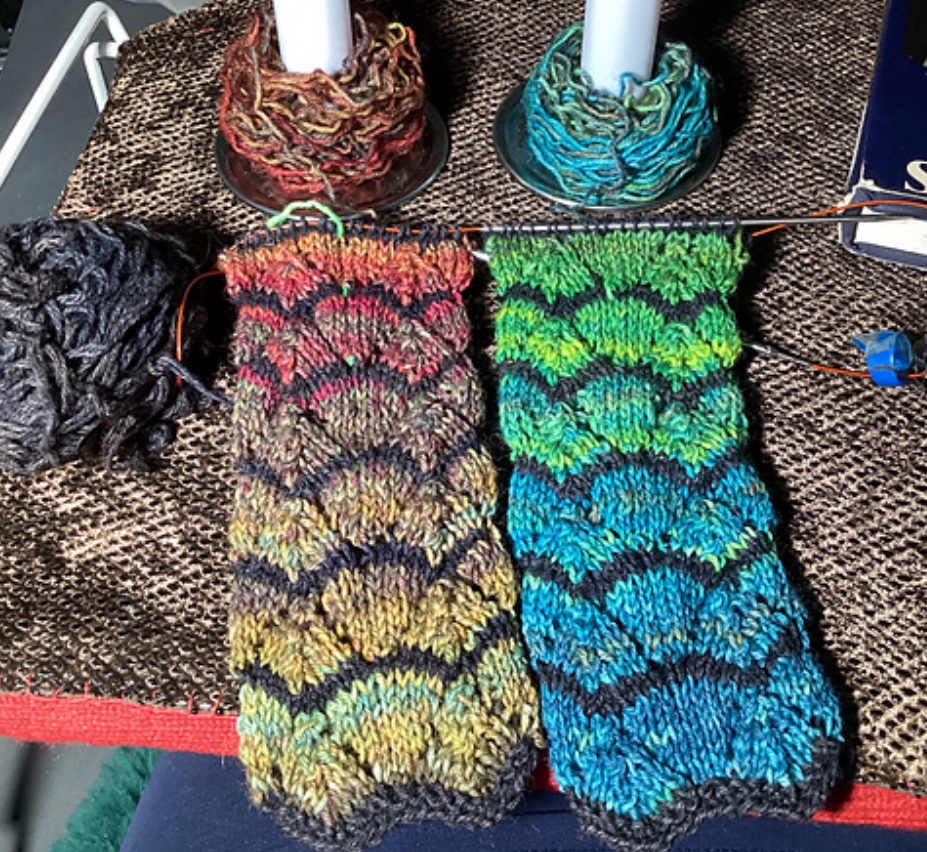
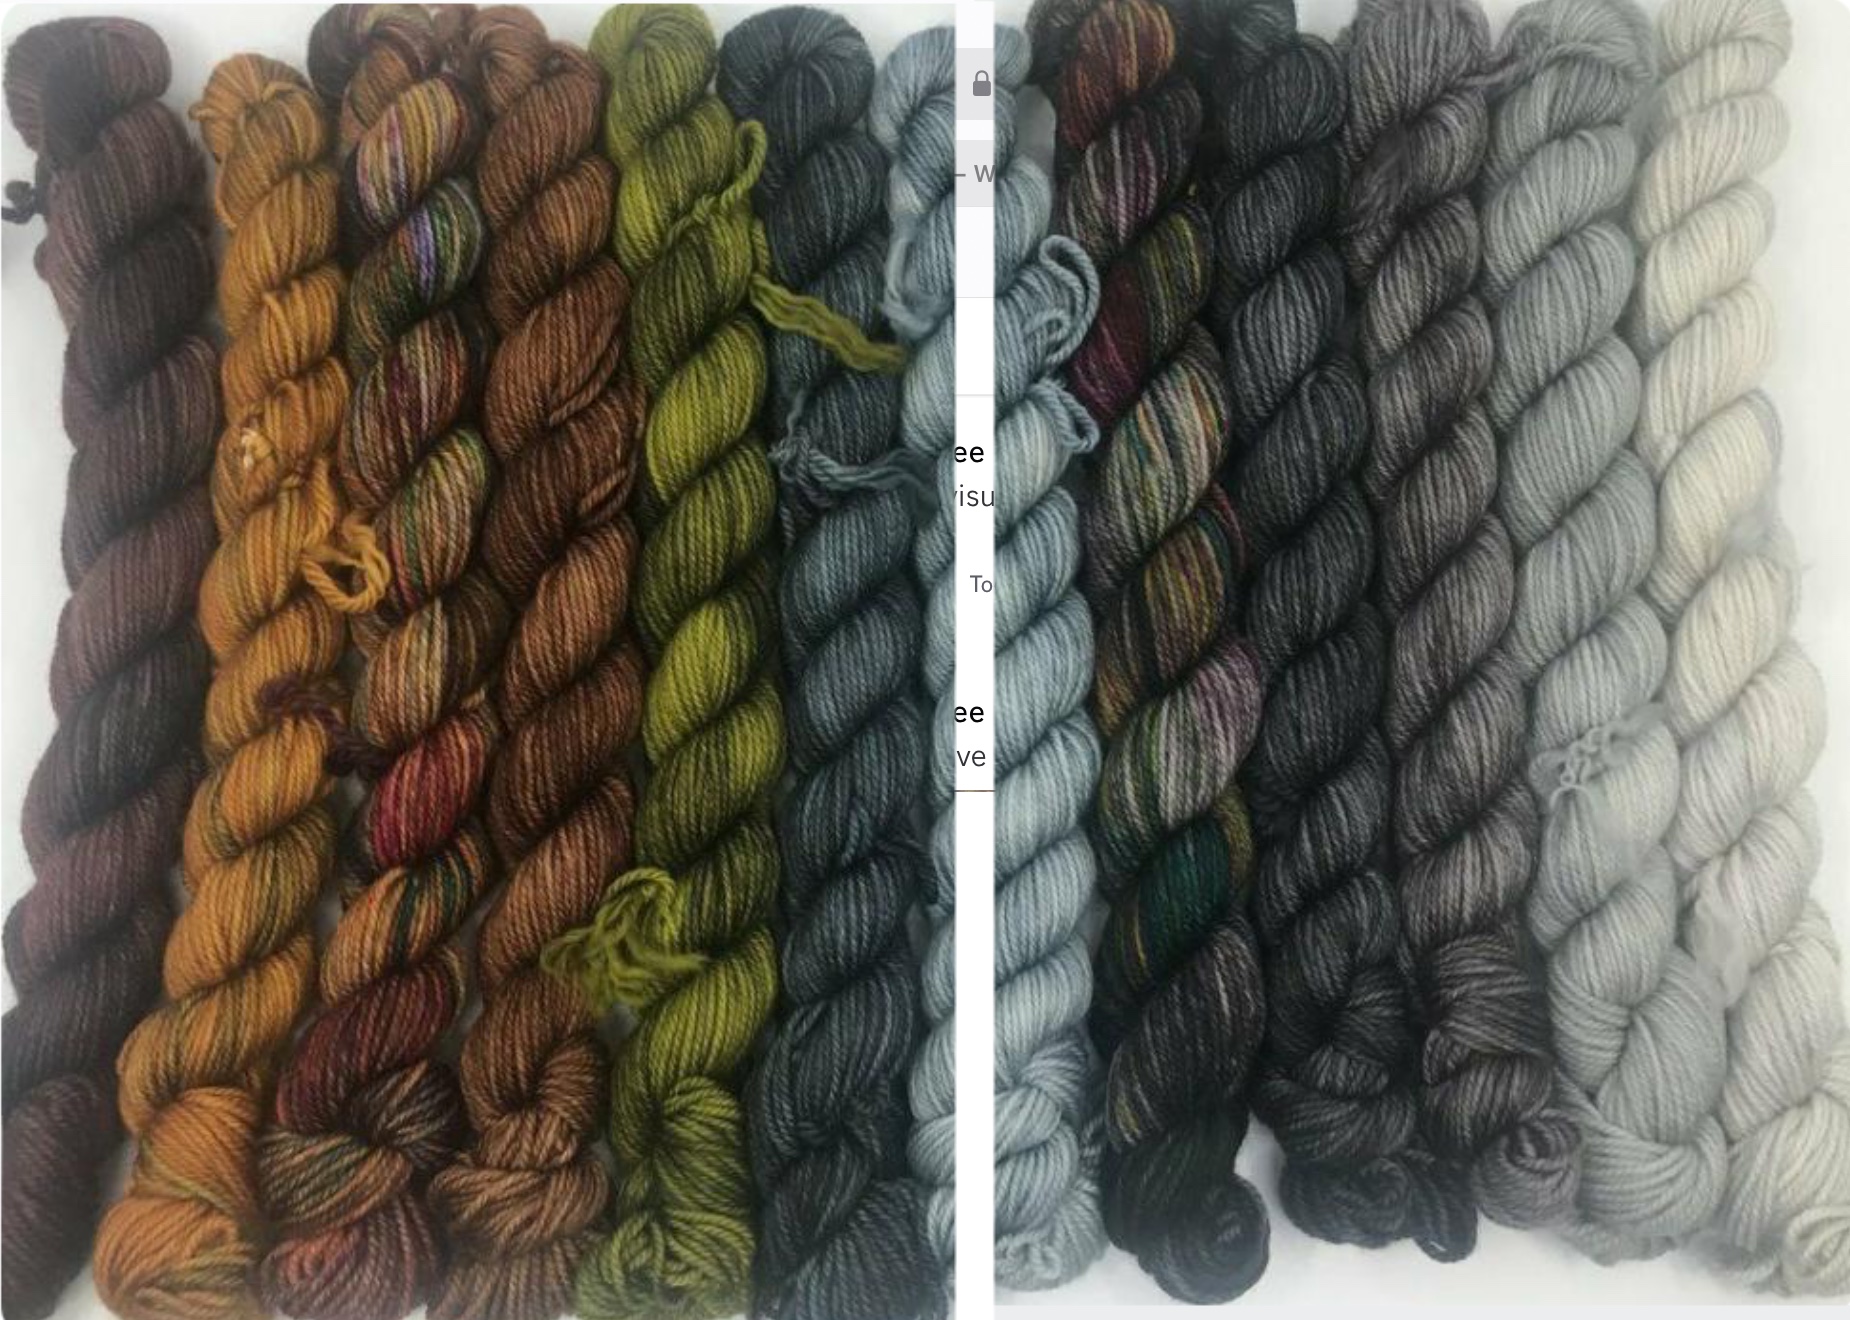
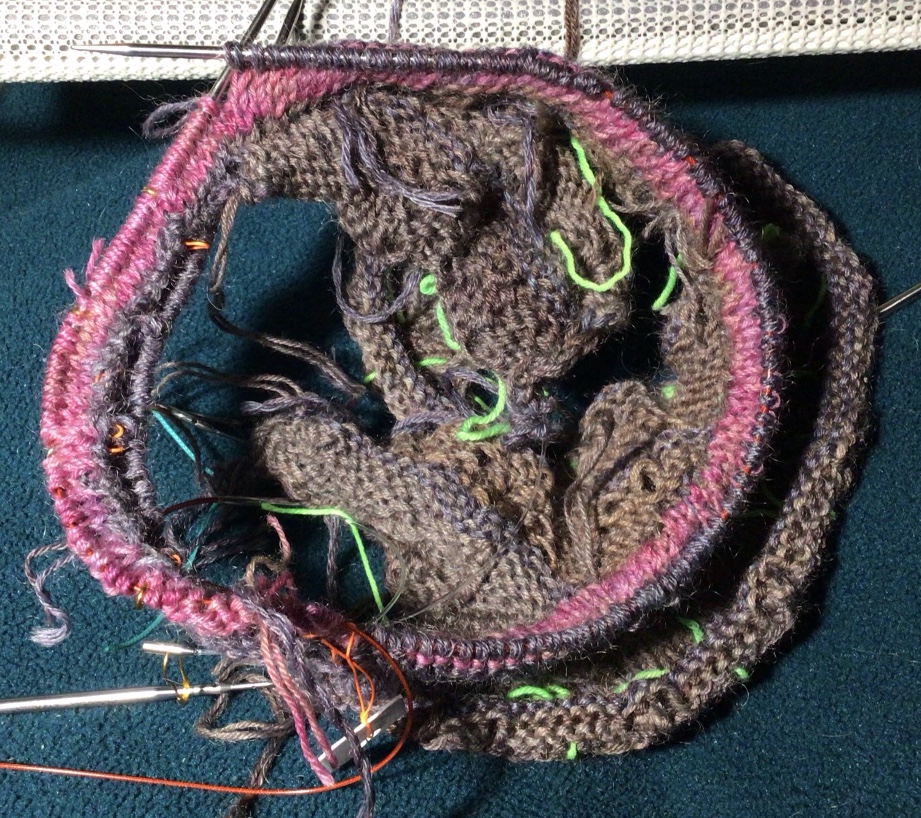
The blanks were frogged, split into front/back and right/left sleeve and caked up.

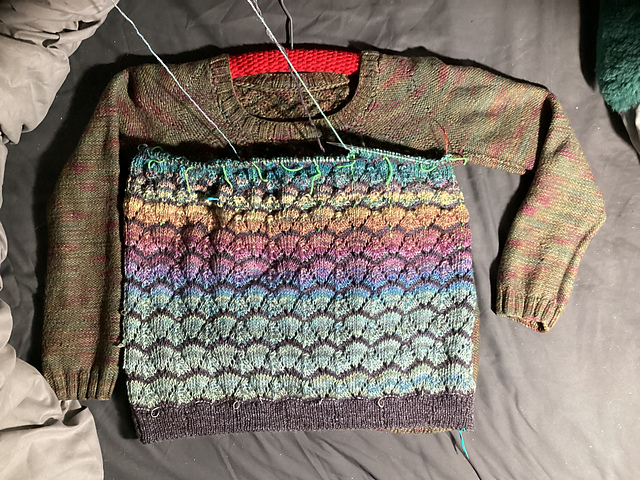
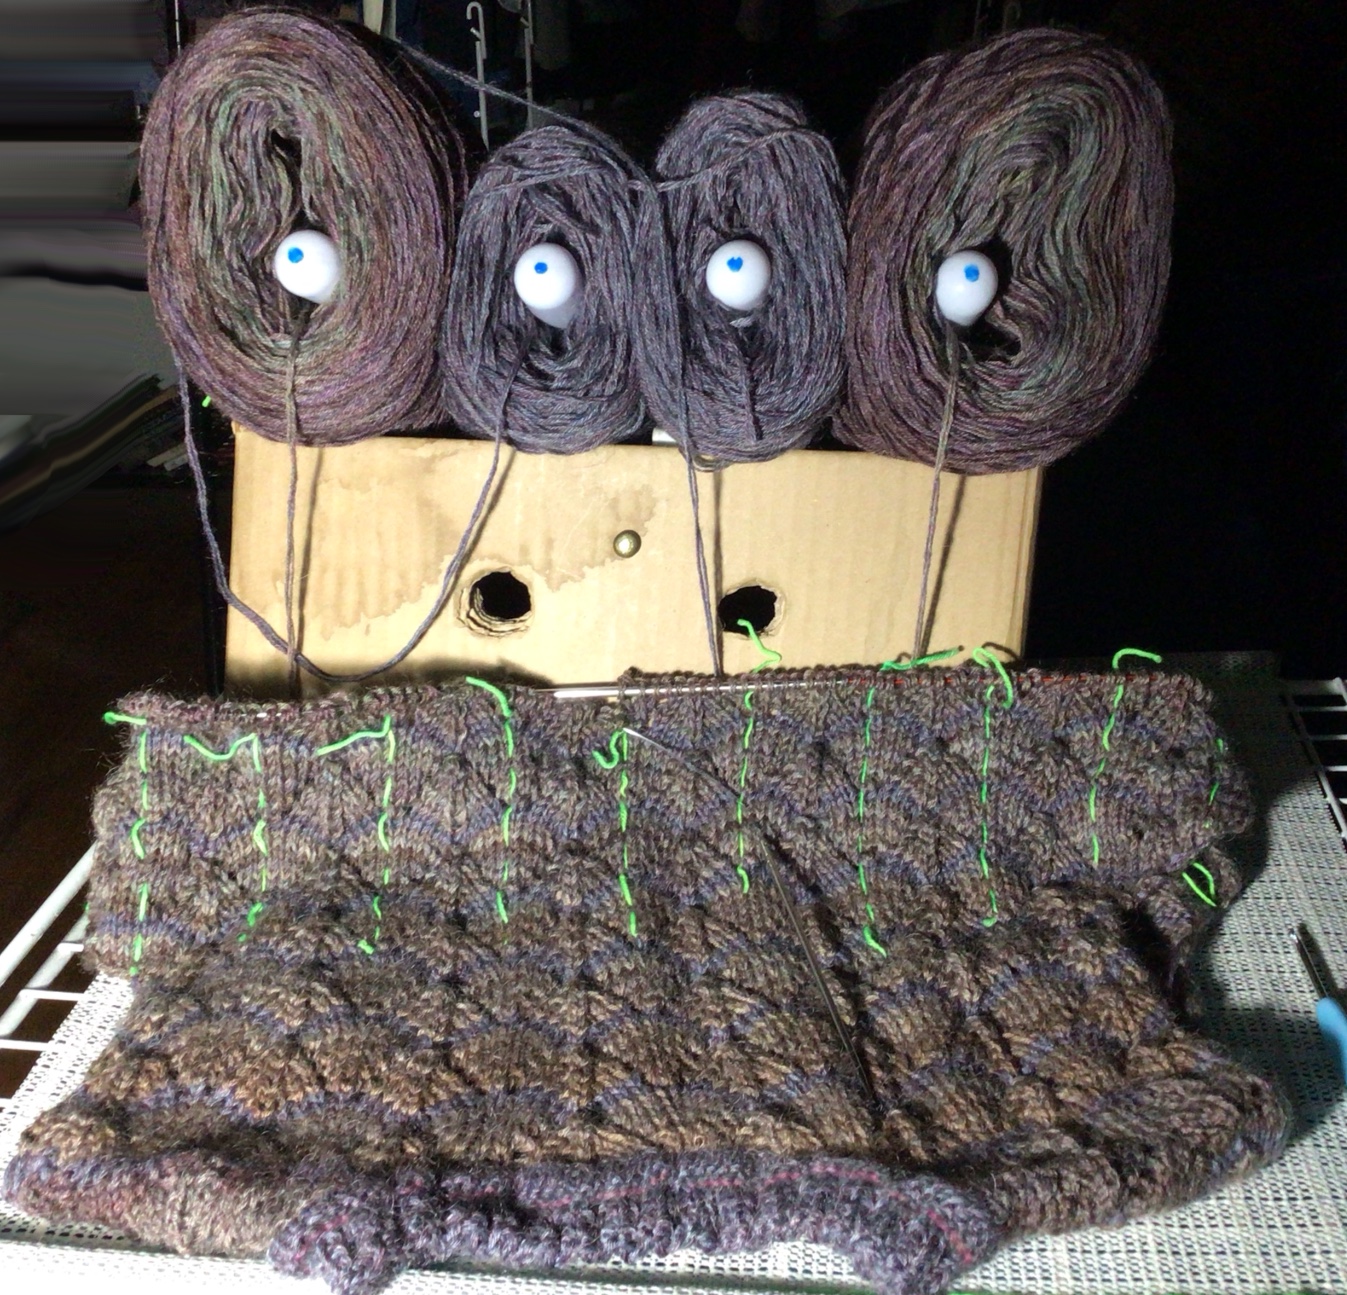
The front and back cakes, with the Contrast Color split in two balls (but left connected). The body balls were too large to fit all four cakes across my caddy at first!
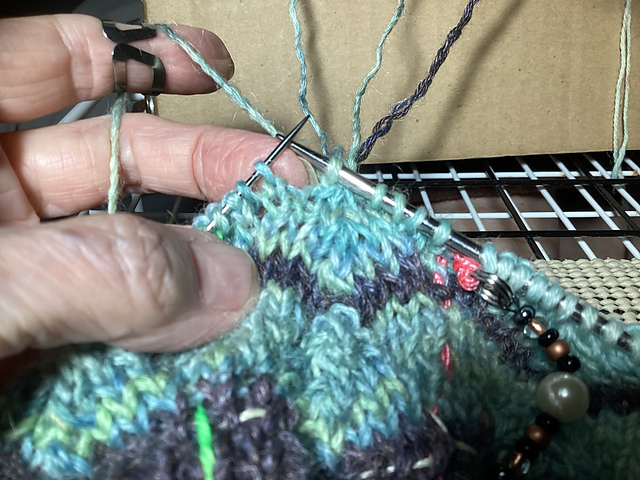
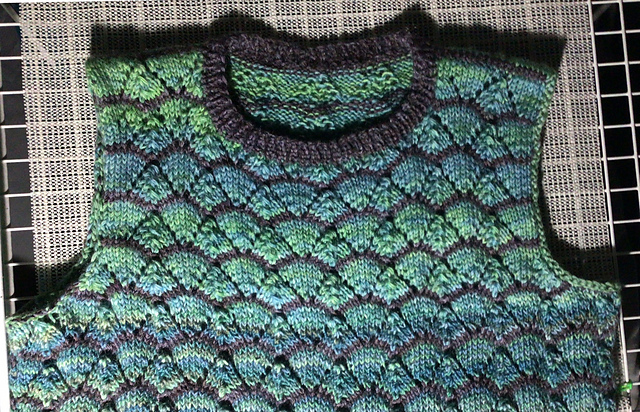
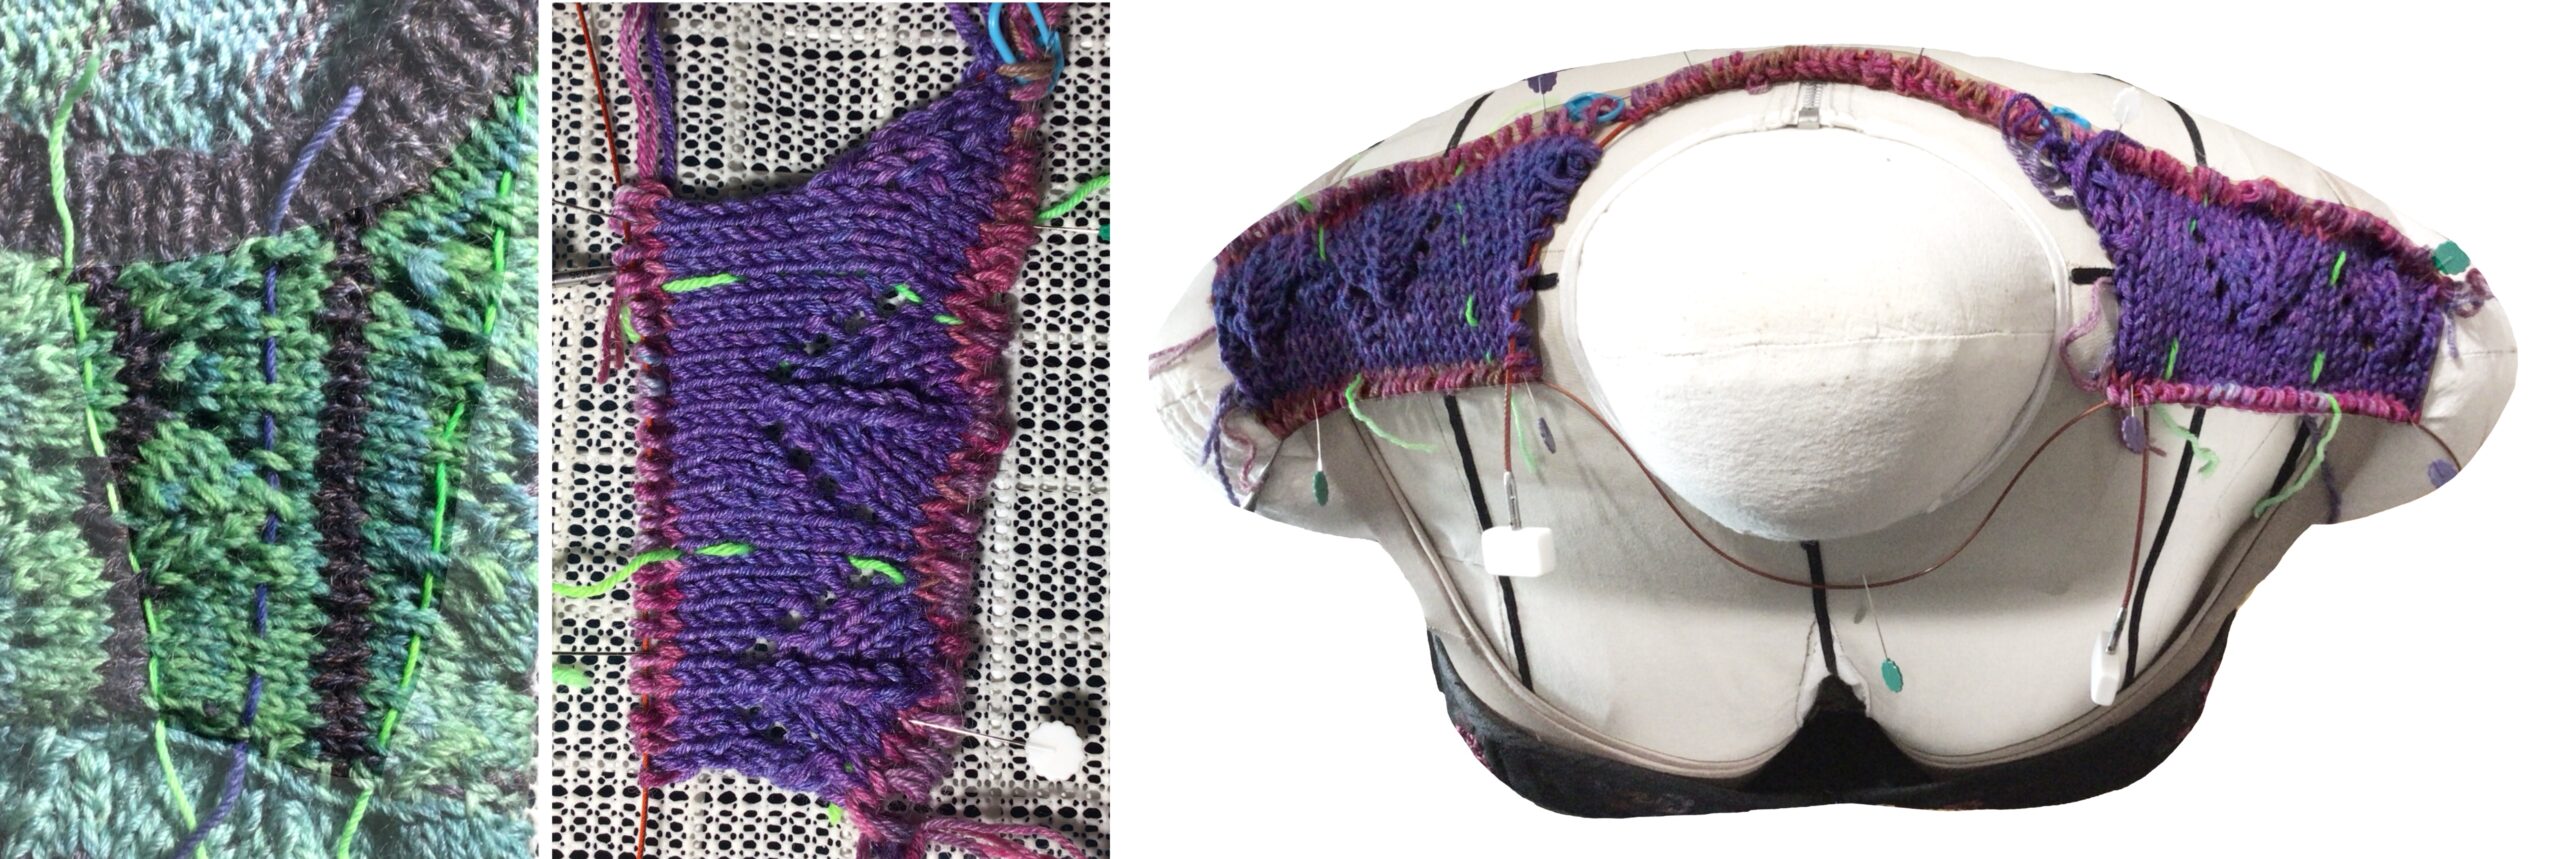
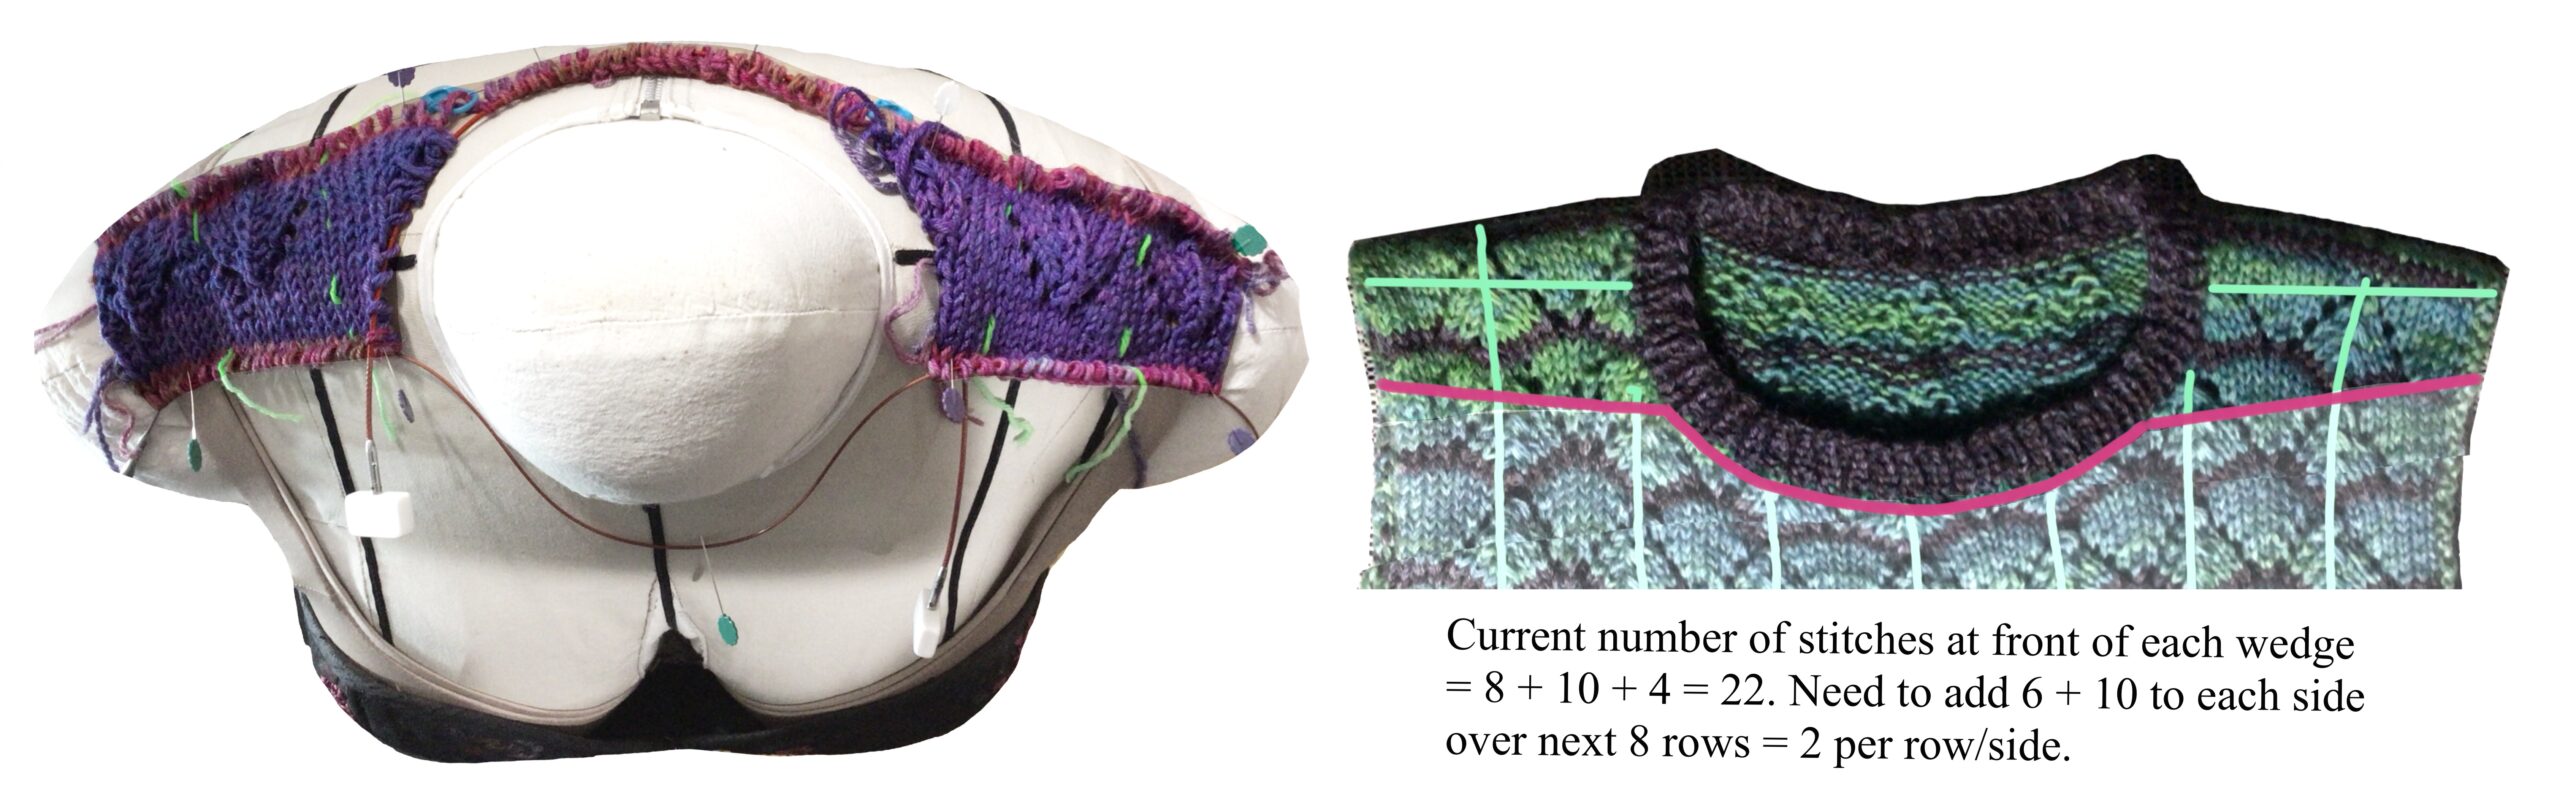
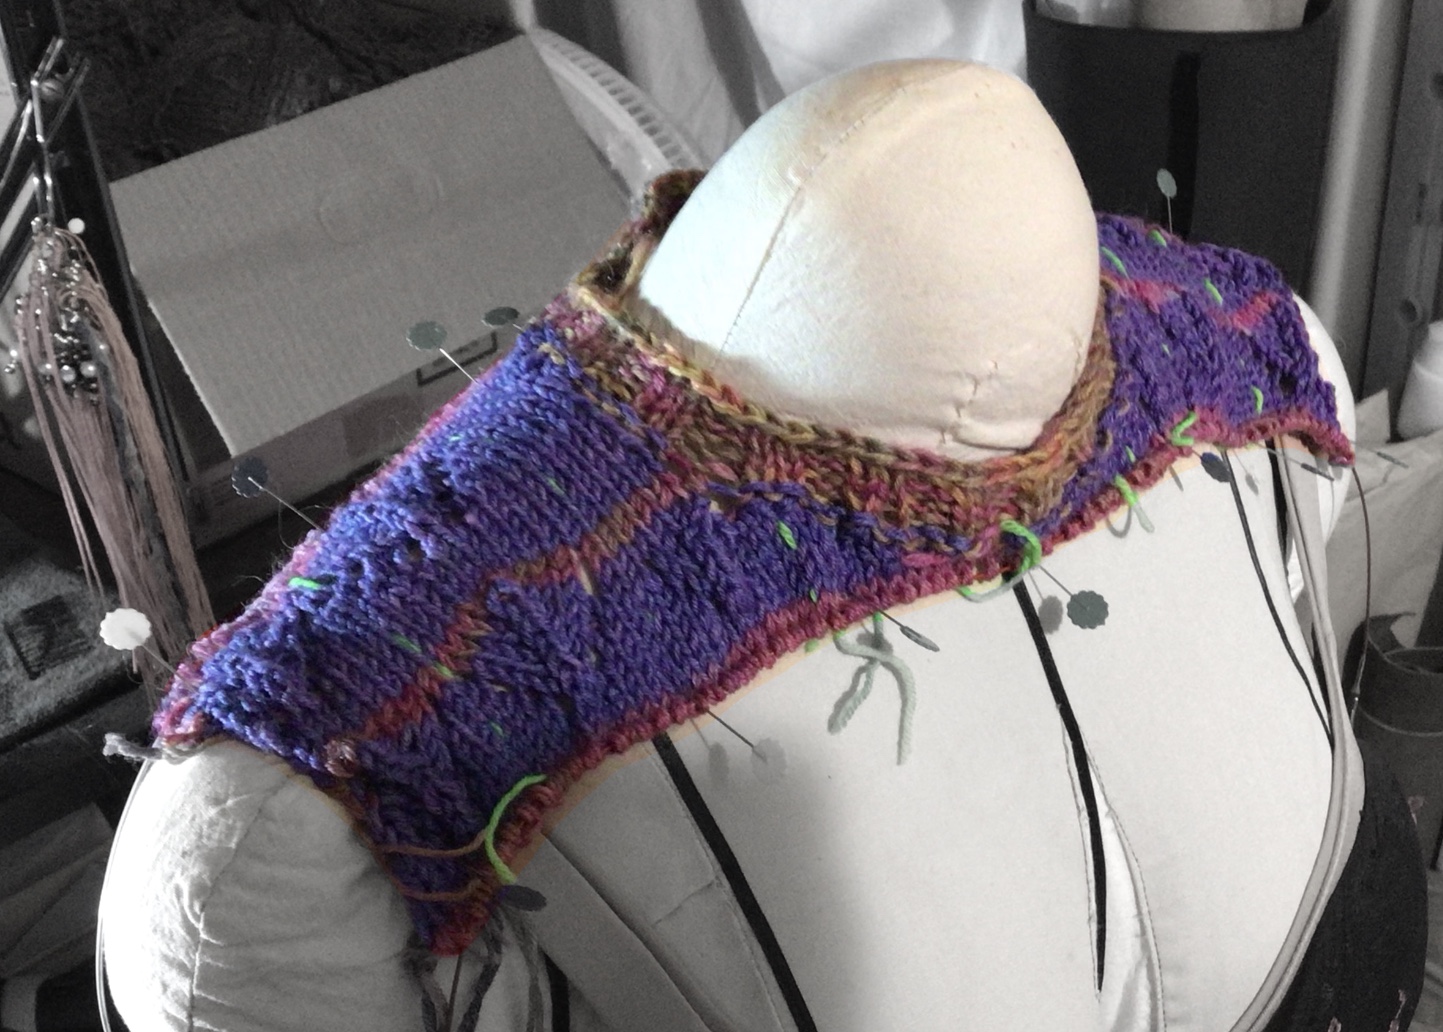
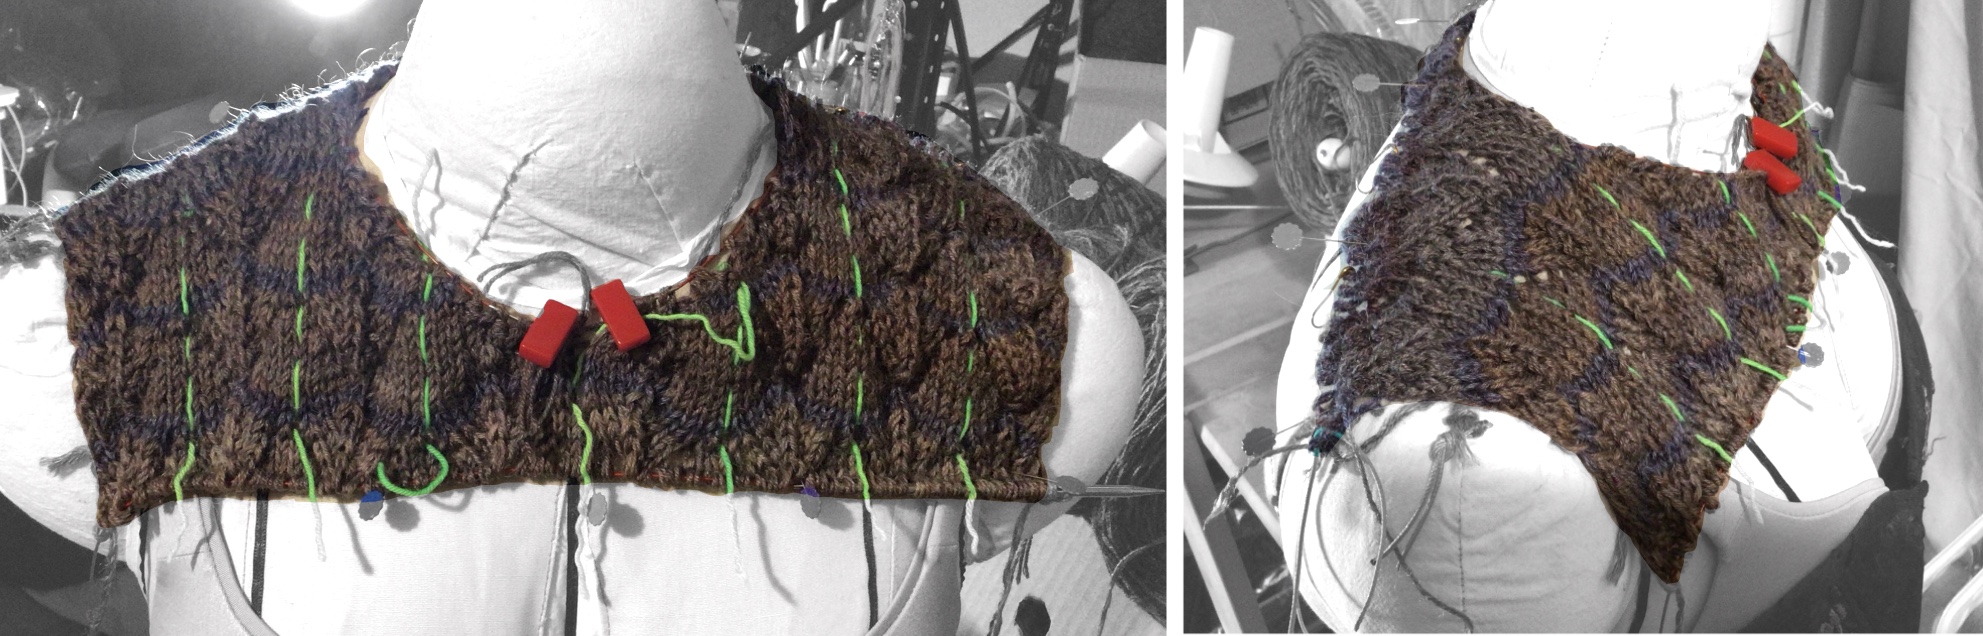
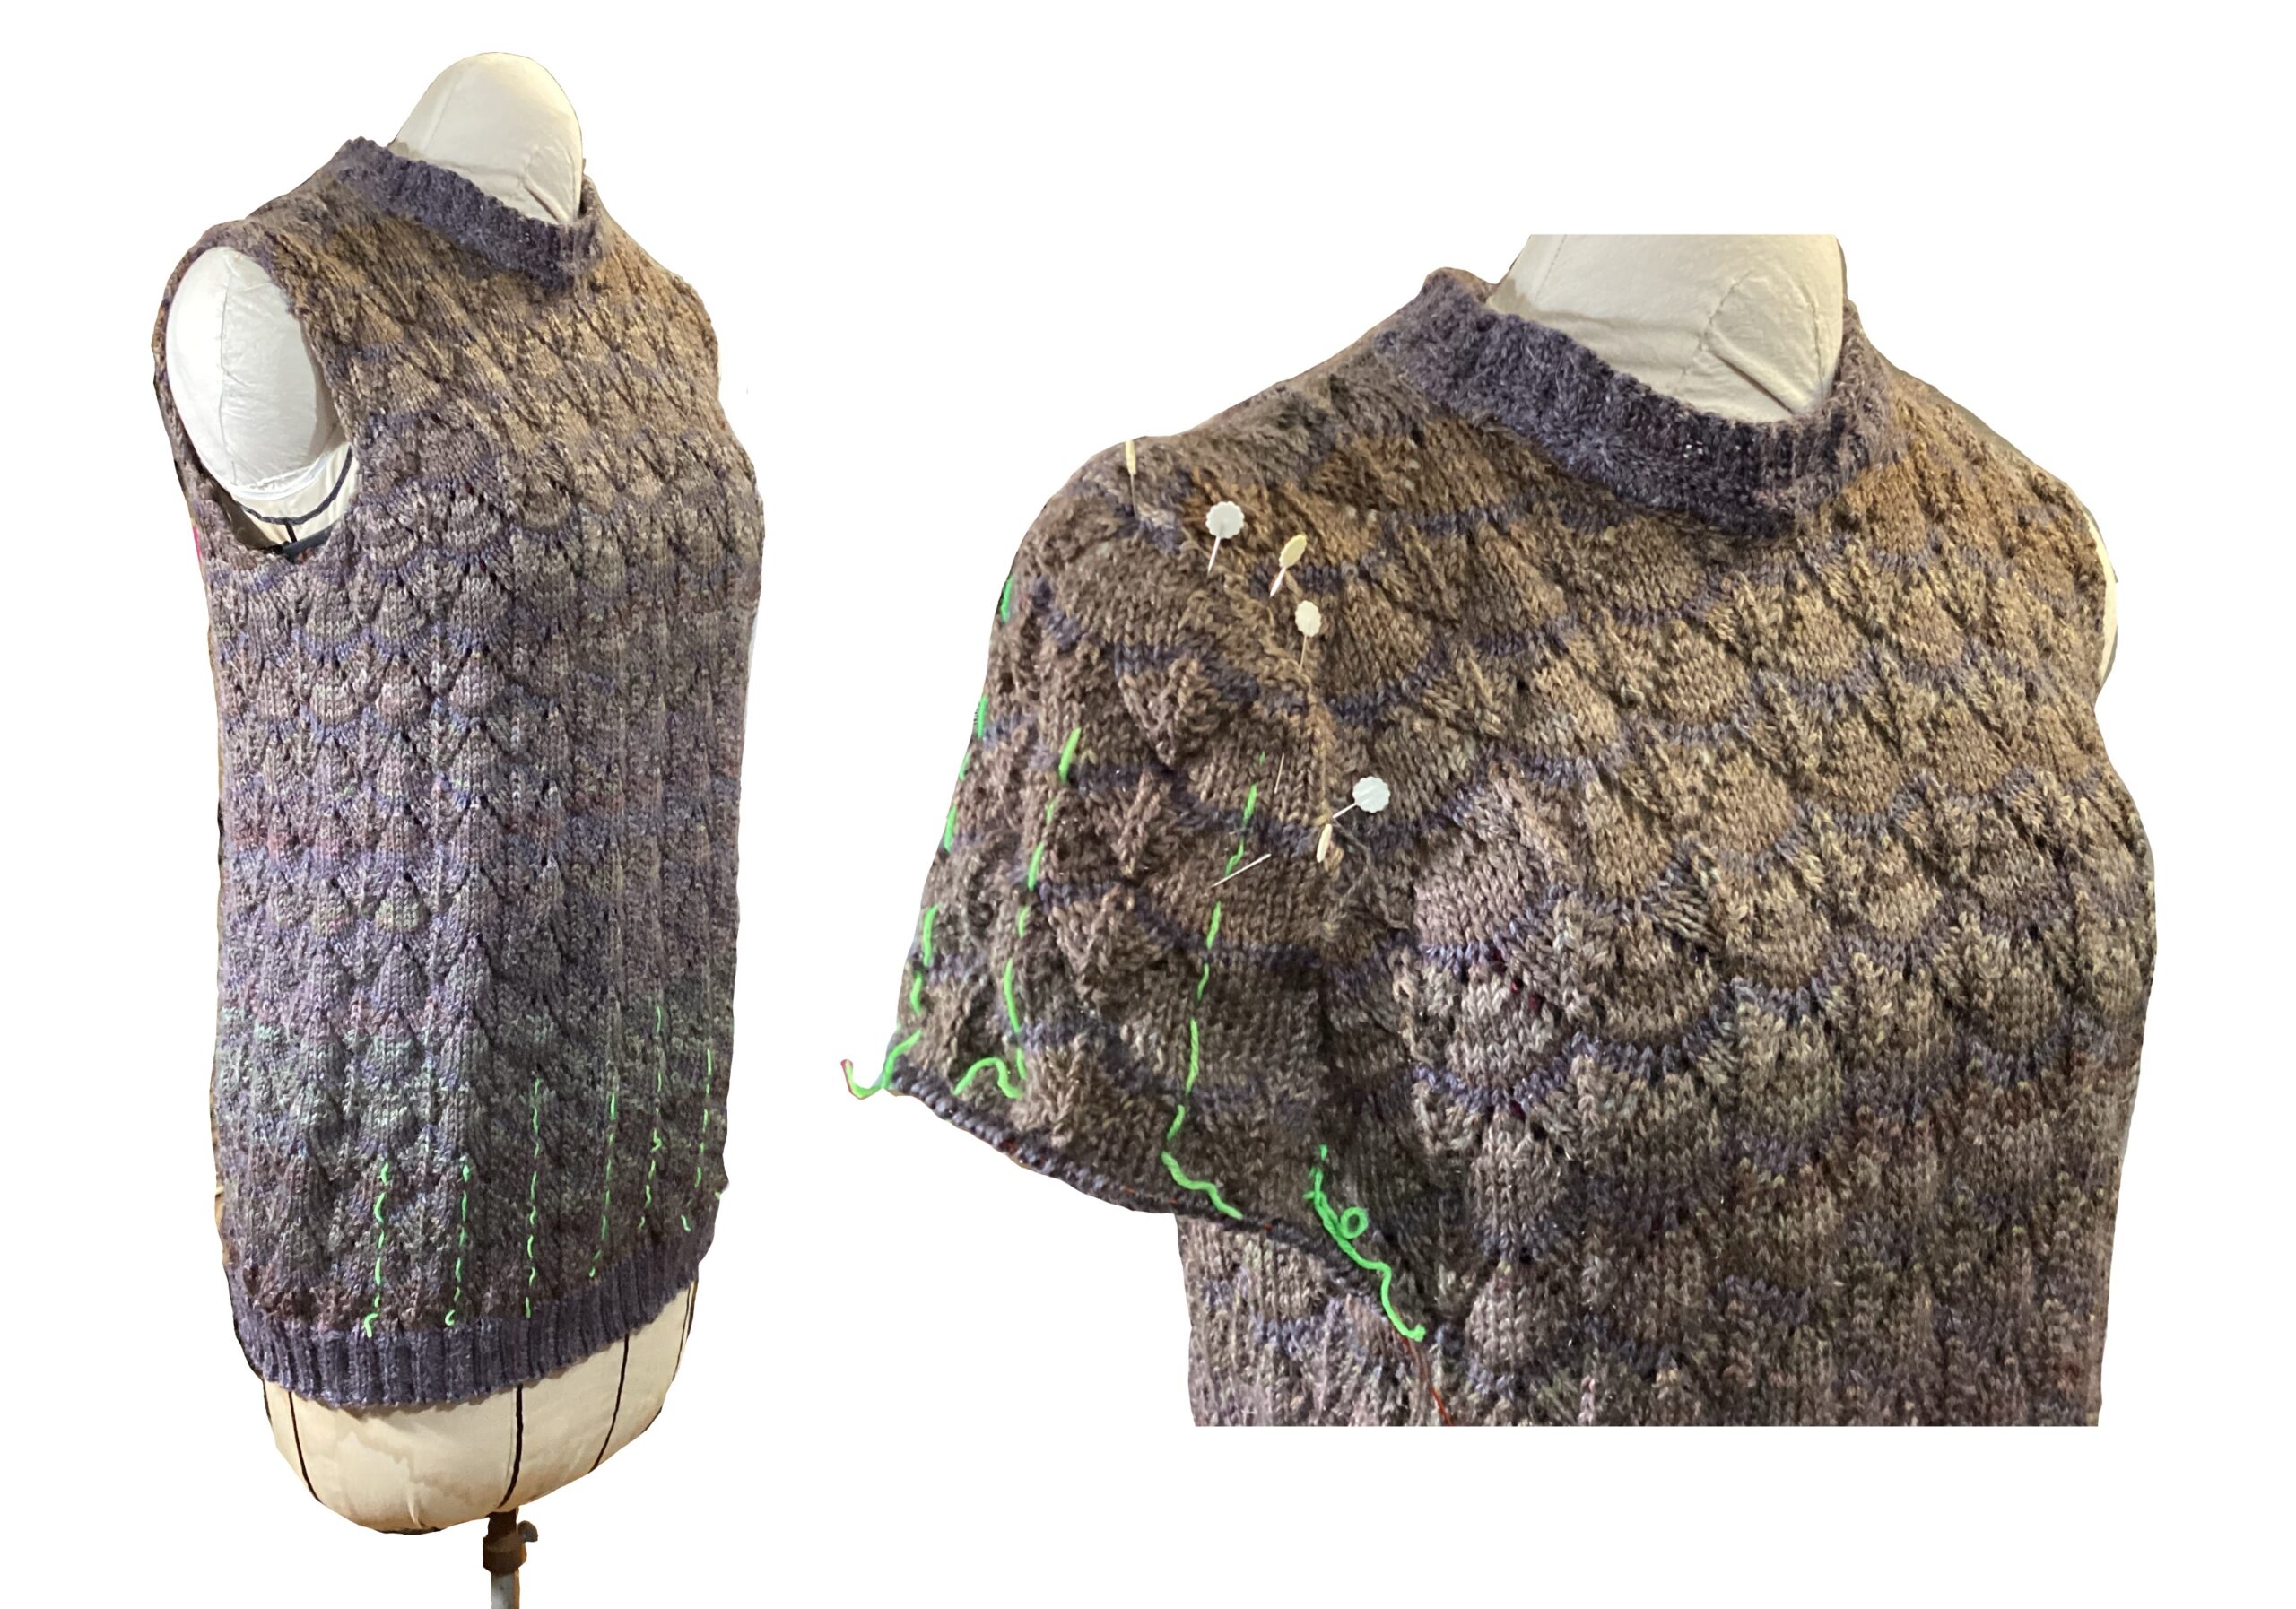
The knitting started by casting on the neck edge and then working the shoulder wedges at each side (using the yarn from the sleeve cake bottoms, remember?). Once the wedges had been done, I followed the game plan from the first sweater, with slight changes going from bottom-up to top-down.
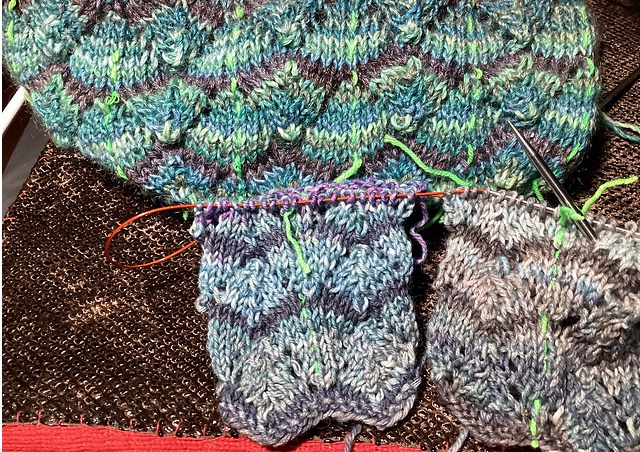
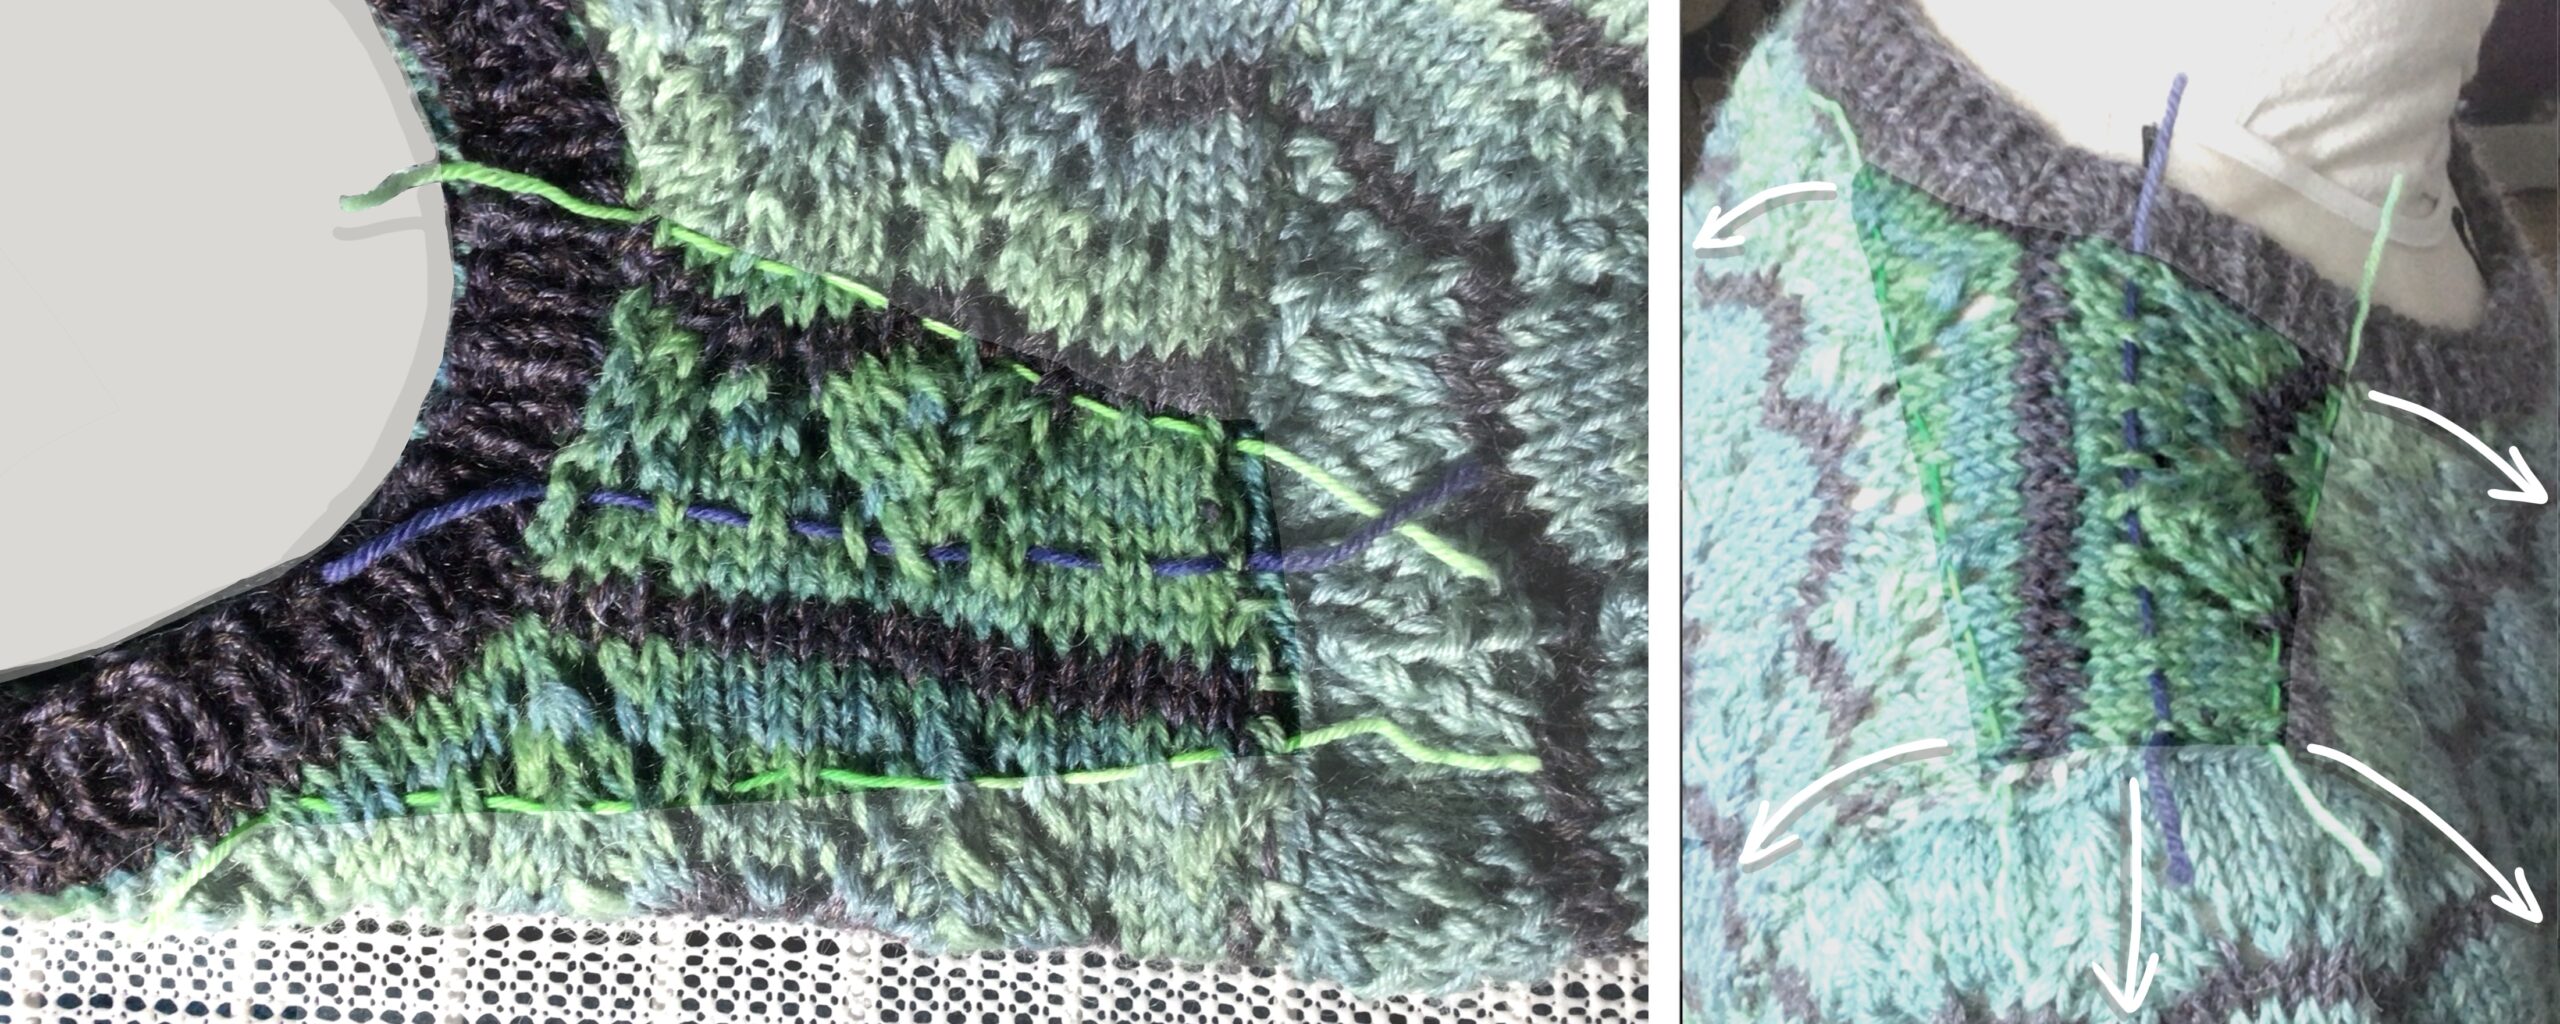
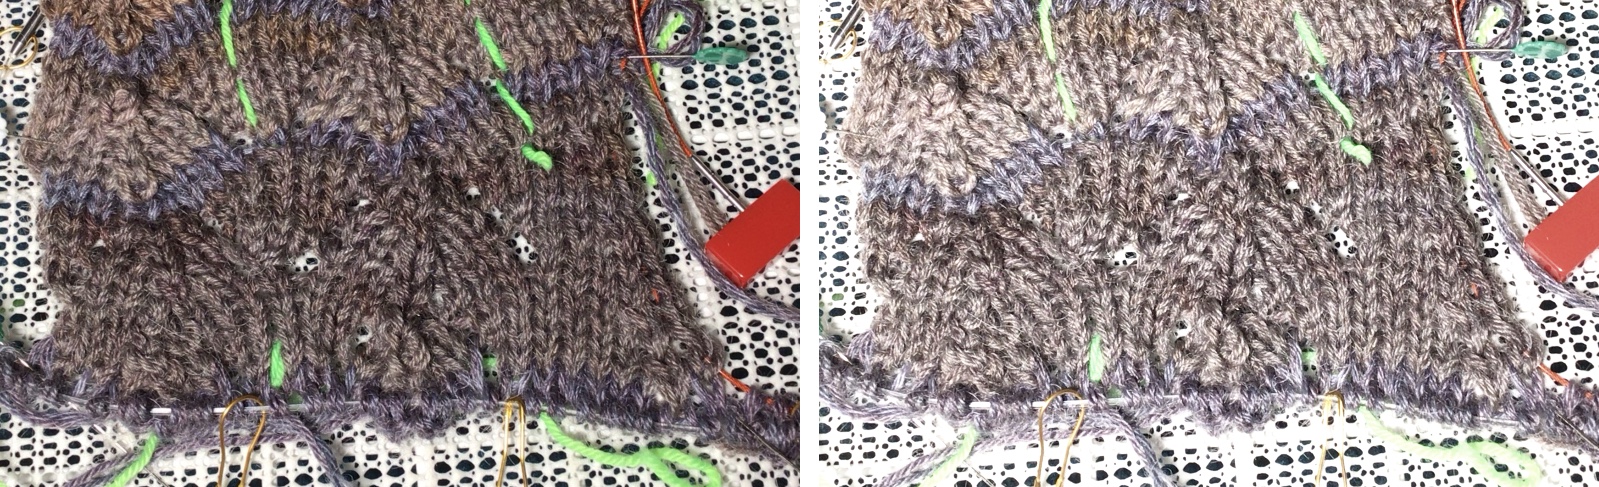
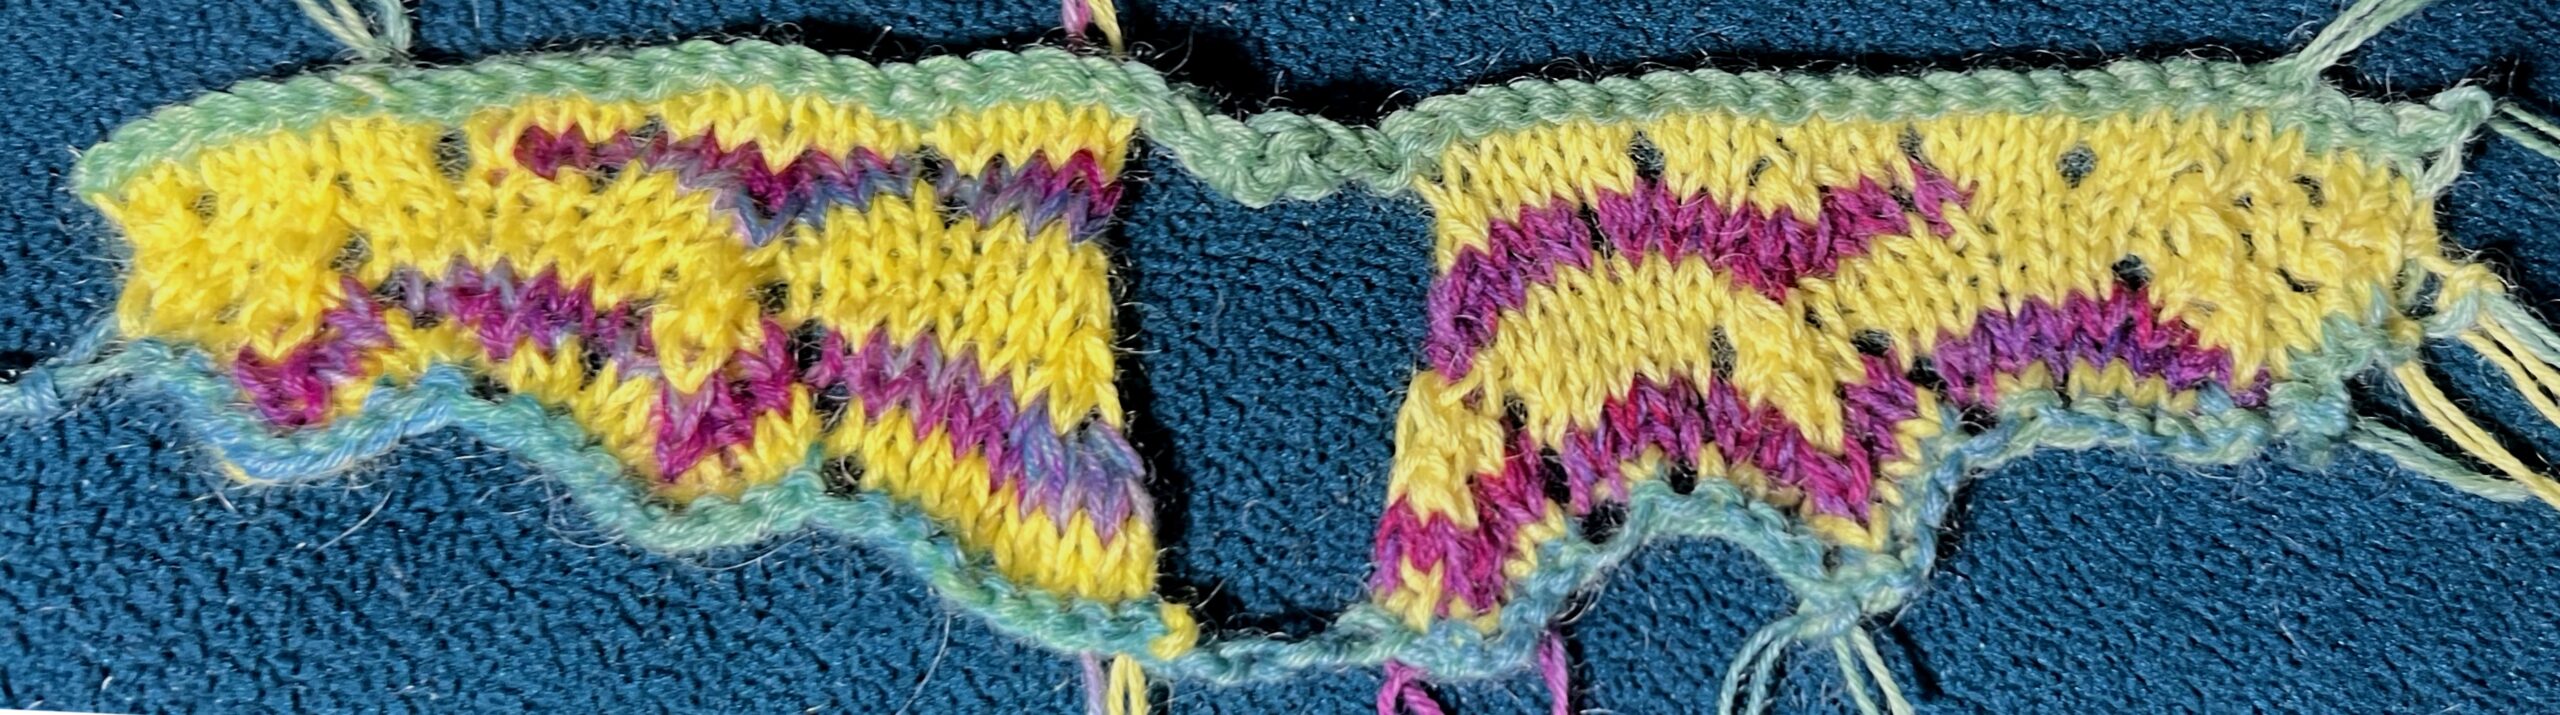
The shoulder wedge, showing how the top of the sleeve completes the contrast edging.
Start pattern on Kate’s Row 3, not Row 1!
Right Wedge Row 1/2/3 Short Rows:
(original horseshoe pattern, Row 3: k1, YO, k2, k3tog, k2, YO, k2)
k3tog = slip first two sts knit wise, k 3rd through back loop, pass slipped stitches over
Right Row 1 (27 stitches) (pattern), (pattern), k1, YO, k2, k3tog, k.
Right Row 2 (short row) slip 1, work back to 5 sts before shoulder, twin st, turn.
(Original horseshoe pattern, Row 5: k2, YO, k1, k3tog, k1, YO, k3).
Right Row 3 (full 27 stitches):
(pattern starting 5 in, and work 2 tog at neck: k2, YO, k2, (pattern), k2, YO, k1, YO, k1 k2tog
Right Row 4 capture neck cable on first stitch, k to shoulder (k twin as one)
(Original Horseshoe pattern, Row 7: k3, YO, k3tog, YO, k 4)
Right row 5: (pattern), (pattern), k3, YO, k3tog, YO, k1
Right Row 6 capture neck cable on first stitch, k to shoulder
(Original Horseshoe pattern Row 1 – skipping contrast rows – YO, k3, k3tog, k3, YO, k1)
(Missed noting a couple neck edge reductions)
Right Row 7: work 2 tog at neck edge (pattern with LI rather than YO at start), (pattern), YO, k3, k3tog, k2
Right Row 8 capture neck cable on first stitch, k2tog, k to shoulder = 10, 10, 3
(Original Horseshoe pattern Row 3: k1, YO, k2, k3tog, k2, YO, k2)
Right Row 9: (pattern), (pattern), k3 = 10, 10, 3
Right Row 10: Work 2tog at neck edge after capturing cable, work to 10 from shoulder, Twin stitch, turn
Right Row 11, Short row: (k2, YO, k1, k3tog, k1, YO, k3) (k3).
Right Row 12, capture neck cable on first stitch, k2tog, k to shoulder = 10, 10, 2
Right Row 13: (k3, YO, k3tog, YO, k4) (k2tog) = 10, 10, 1
Done with first ball from tail of sleeve!
Right Rows 14-15 CC: knit across & back as per established pattern, LI beg of neck = 10, 10, 2
Change to Front Ball, continue to work front using patterns given below, extending neck edge each time by 2 st until total of 40. Use old tail hanging out the front for the cast-on stitches at the end of each pattern row.
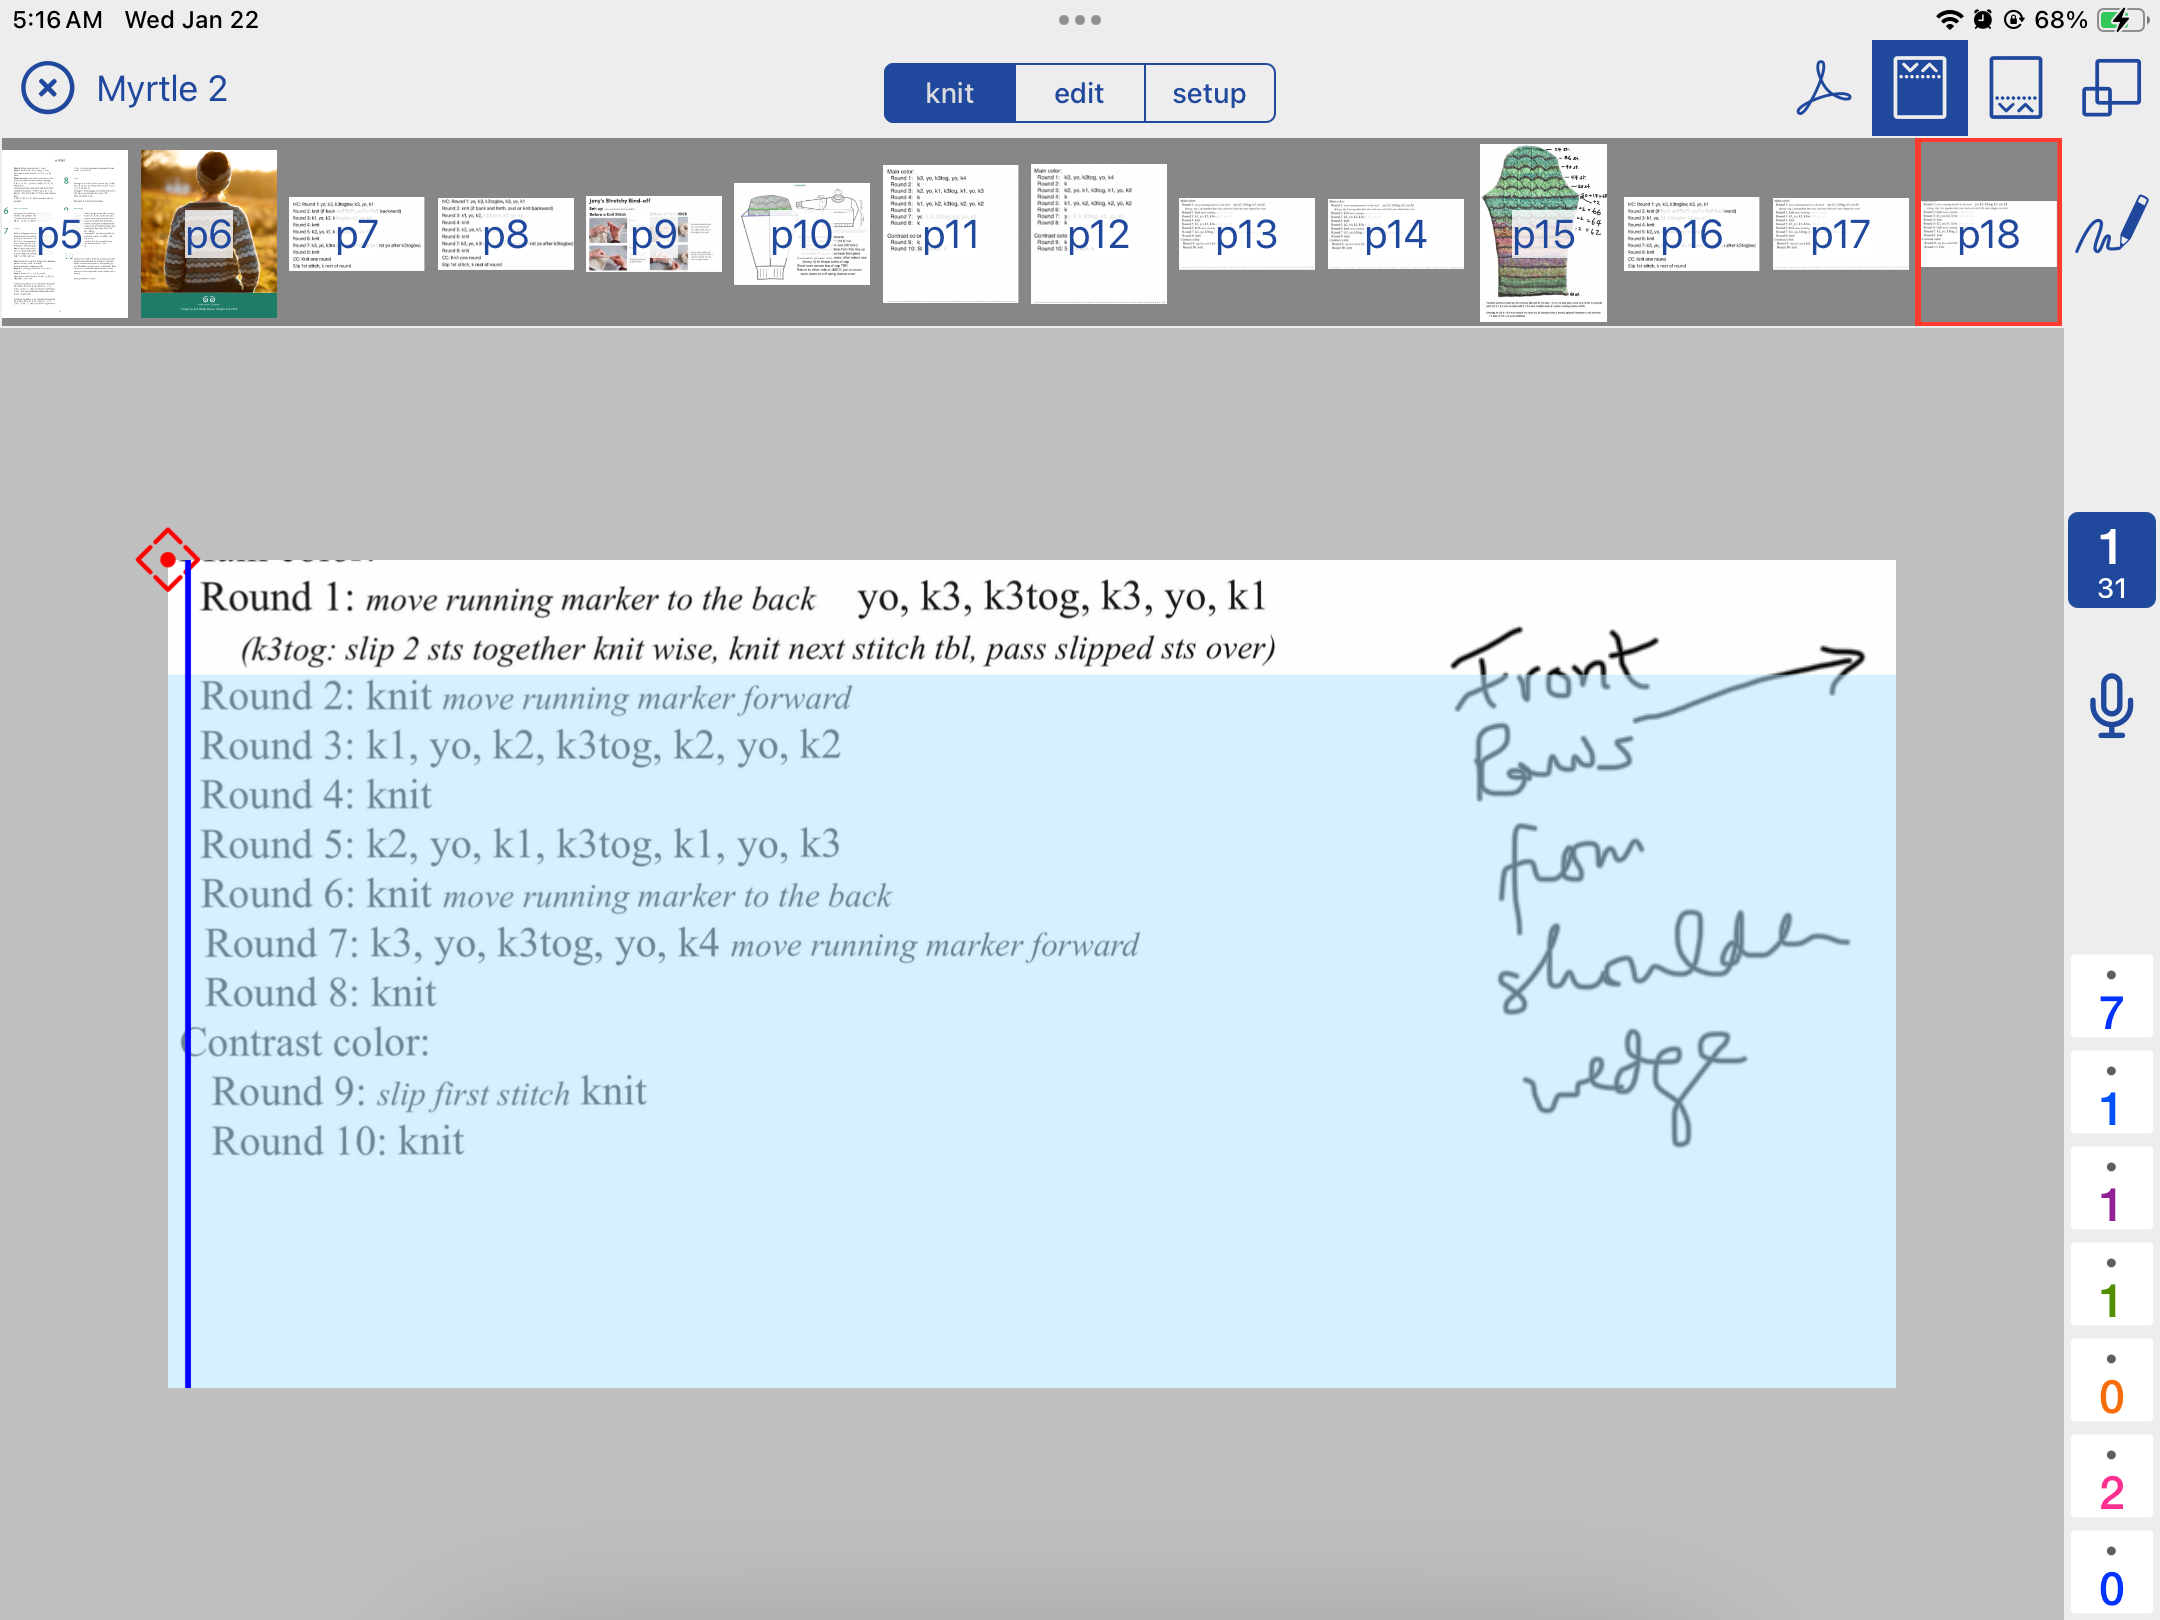
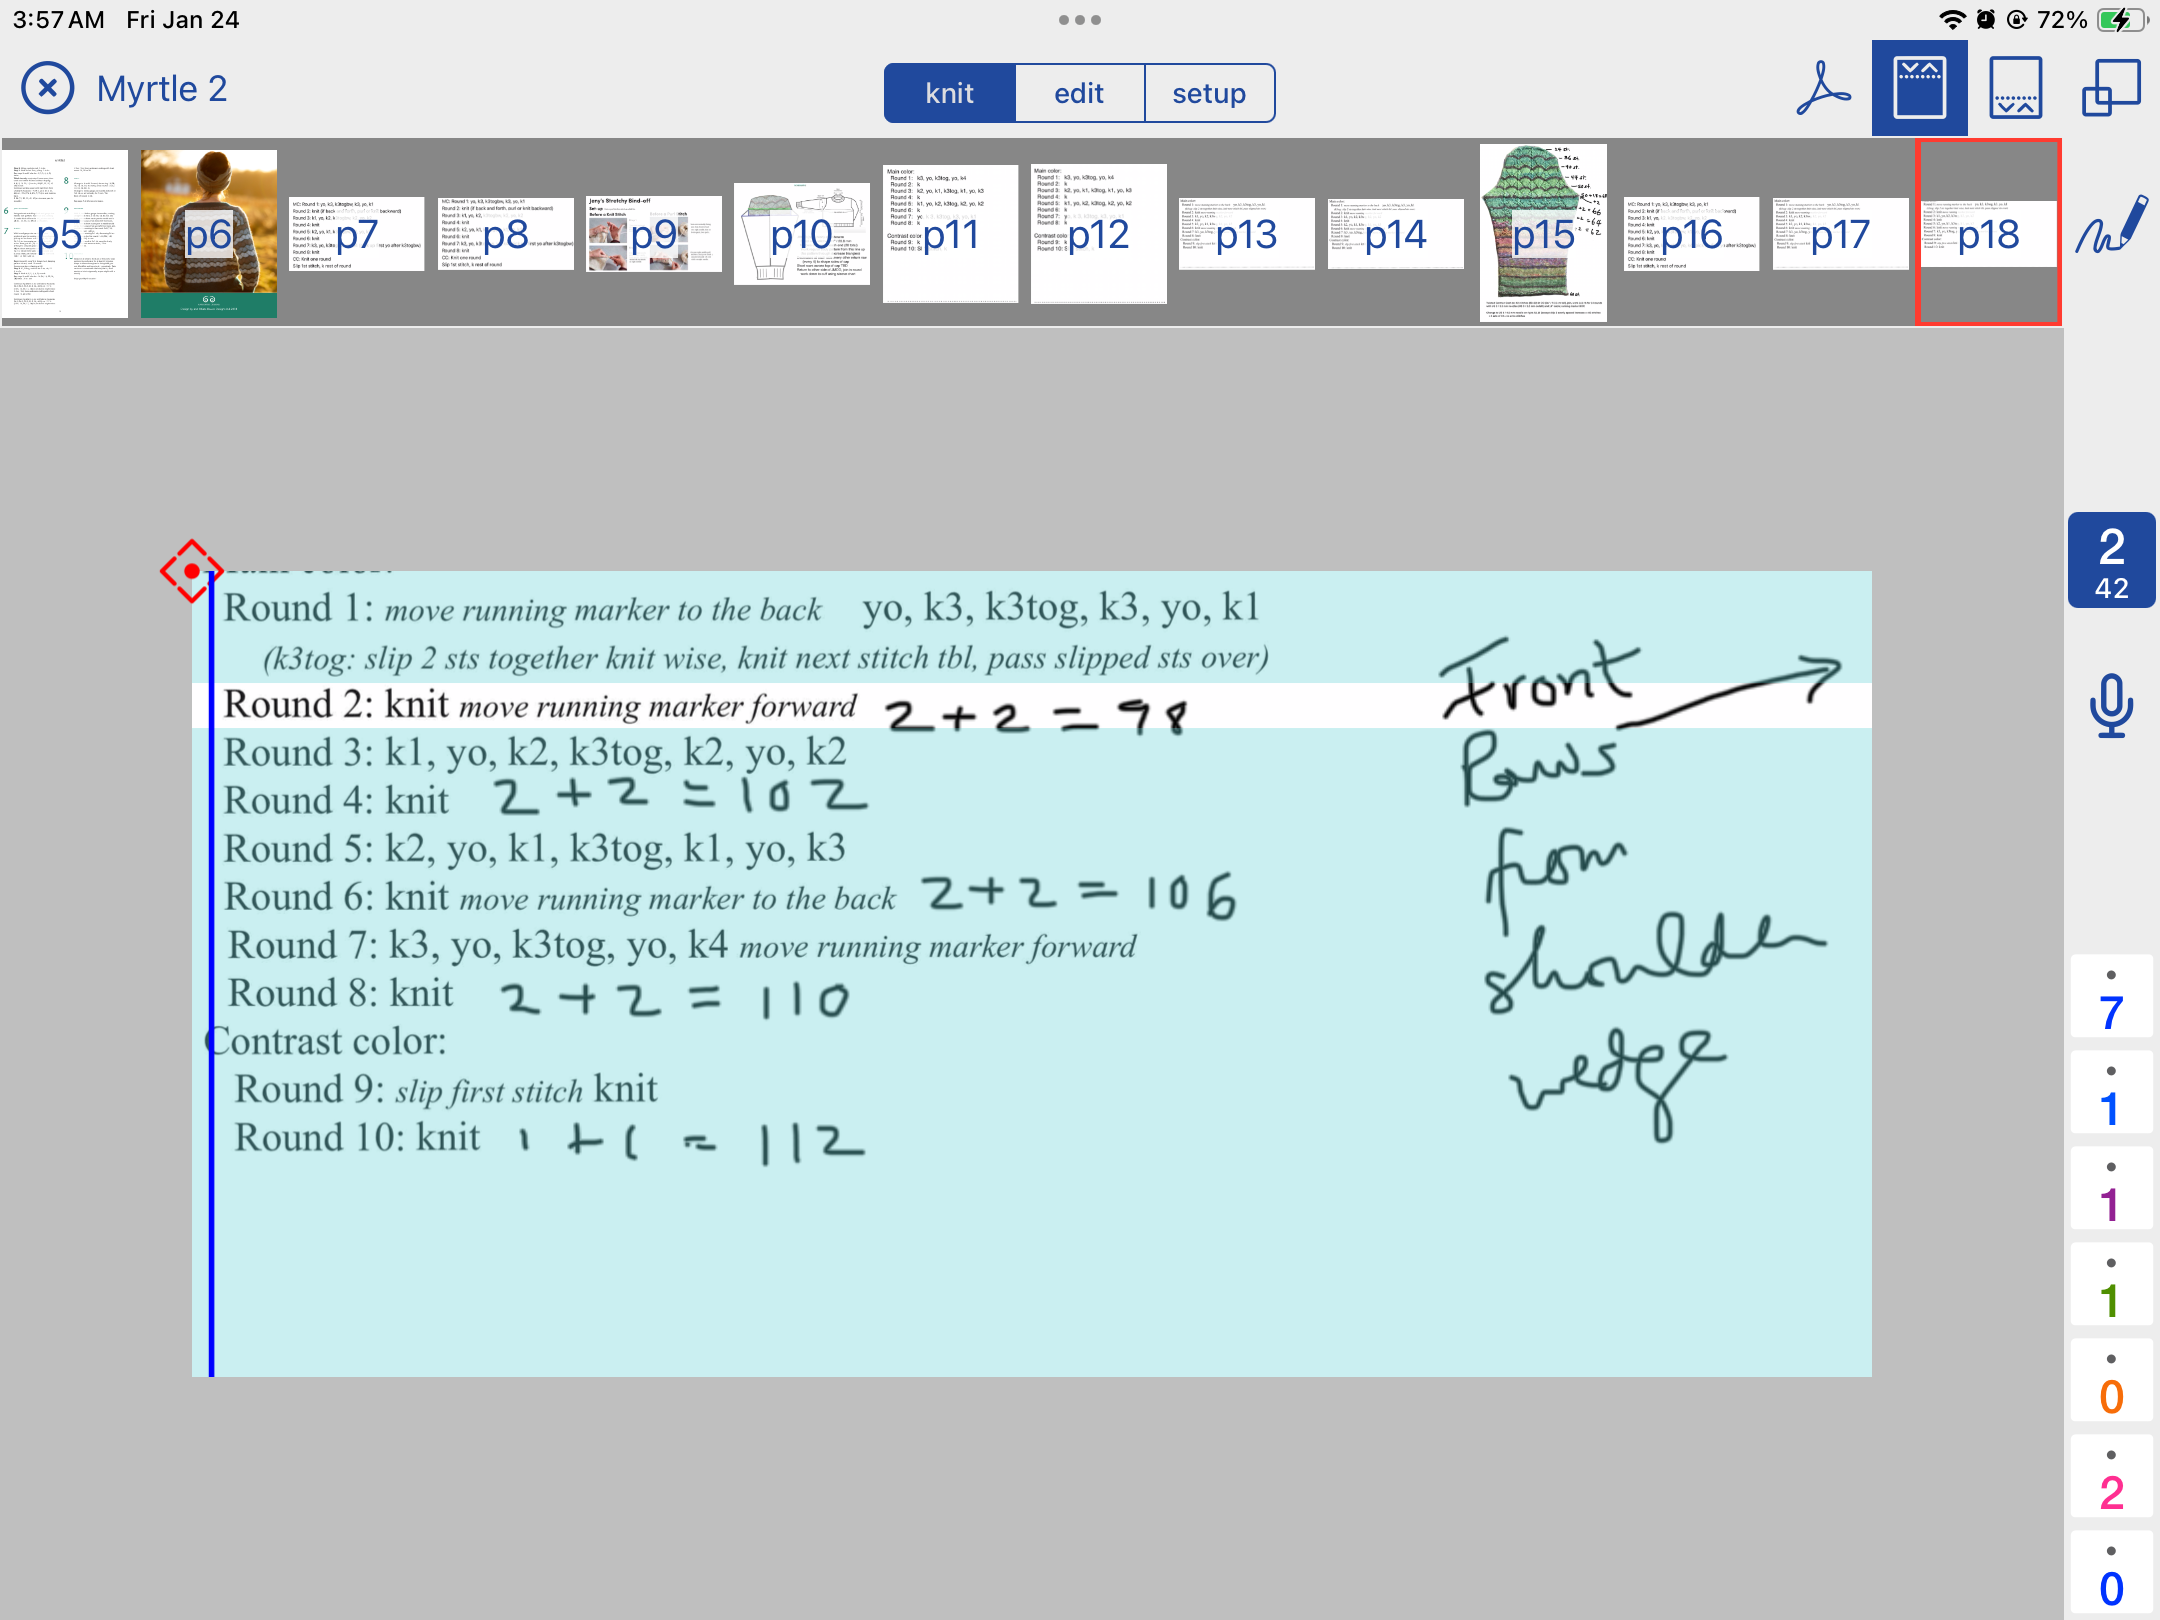
Main Color:
Round 1: move running marker to the back yo, k3, k3tog, k3, yo, kl
(k3tog: slip 2 sts together knit wise, knit next stitch tbl, pass slipped sts over)
Round 2: knit move running marker forward
Round 3: kl, yo, k2, k3tog, k2, yo, k2
Round 4: knit
Round 5: k2, yo, kl, k3tog, kl, yo, k3
Round 6: knit move running marker to the back
Round 7: k3, yo, k3tog, yo, k4 move running marker forward Round 8: knit
Contrast Color:
Round 9: slip first stitch knit
Round 10: knit
Ready for Left Wedge
Left Wedge Row 1/2/3 Short Rows:
Far end of Sleeve Cake
(original horseshoe pattern, Row 3: k1, YO, k2, k3tog, k2, YO, k2)
k3tog = slip first two sts knit wise, k 3rd through back loop, pass slipped stitches over
Left Row 1 (27 stitches) k7, (pattern), (pattern) ends at shoulder.
Left Row 2 sl1, work back to neck
Left Row 3 (short row) capture neck cable, k2tog, work back to 5 sts before shoulder, twin st, turn.
(Original horseshoe pattern, Row 5: k2, YO, k1, k3tog, k1, YO, k3).
Capture cable, k2tog, k4, (k2, YO, k1, k3tog, k1, YO, k3) (k2, YO, k1, k2tog) = shoulder end of short row.
Twin next stitch, turn.
Left Row 4 work back to neck.
(Original Horseshoe pattern, Row 7: k3, YO, k3tog, YO, k 4)
Left Row 5: capture cable, k2 tog, k3, (k3, YO, k3tog, YO, k4) (k3, YO, k3tog, YO, k4) = shoulder.
Left Rw 6: sl1, work back to neck edge
(Original Horseshoe pattern Row 1 – skipping contrast rows –YO, k3, k3tog, k3, YO, k1)
Left Row 7: capture cable, k4, (YO, k3, k3tog, k3, YO, k1) (YO, k3, k3tog, k3, YO, k1) = shoulder
Left Row 8: sl1, work back to neck edge
(Original Horseshoe pattern Row 3: k1, YO, k2, k3tog, k2, YO, k2)
Left Row 9: capture neck cable on first stitch, k2tog, k2, (k1, YO, k2, k3tog, k2, YO, k2) (k1, YO, k2, k3tog, k2, YO, k2) to shoulder = 4, 10, 10
Left Row 10: sl1, work back to neck edge
(Original horseshoe pattern, Row 5: k2, YO, k1, k3tog, k1, YO, k3)
Left Row 11: capture neck cable, k3, (k2, YO, k1, k3tog, k1, YO, k3) (k2, YO, k1, k3tog, k1, YO, k3)
Left Row 12: sl1, work back to neck
(Original Horseshoe pattern, Row 7: k3, YO, k3tog, YO, k 4)
Left Row 13: Short Row – capture neck cable, k2tog, k1, (k3, YO, k3tog, YO, k 4), twin next stitch, turn
Left Row 14: sl1, work back to neck
Left Row 15: capture cable, k2, (k3, YO, k3tog, YO, k 4) (k3, YO, k3tog, YO, k 4)
Left Row 16: sl1, work back to neck, LI next to last stitch. = 10, 10, 4
Tie on CC and Change to Front Ball, continue to work front using patterns given, extending neck edge each time by 2 st until total of 40. Use old tail hanging out the front for the cast-on stitches at the end of each pattern row.
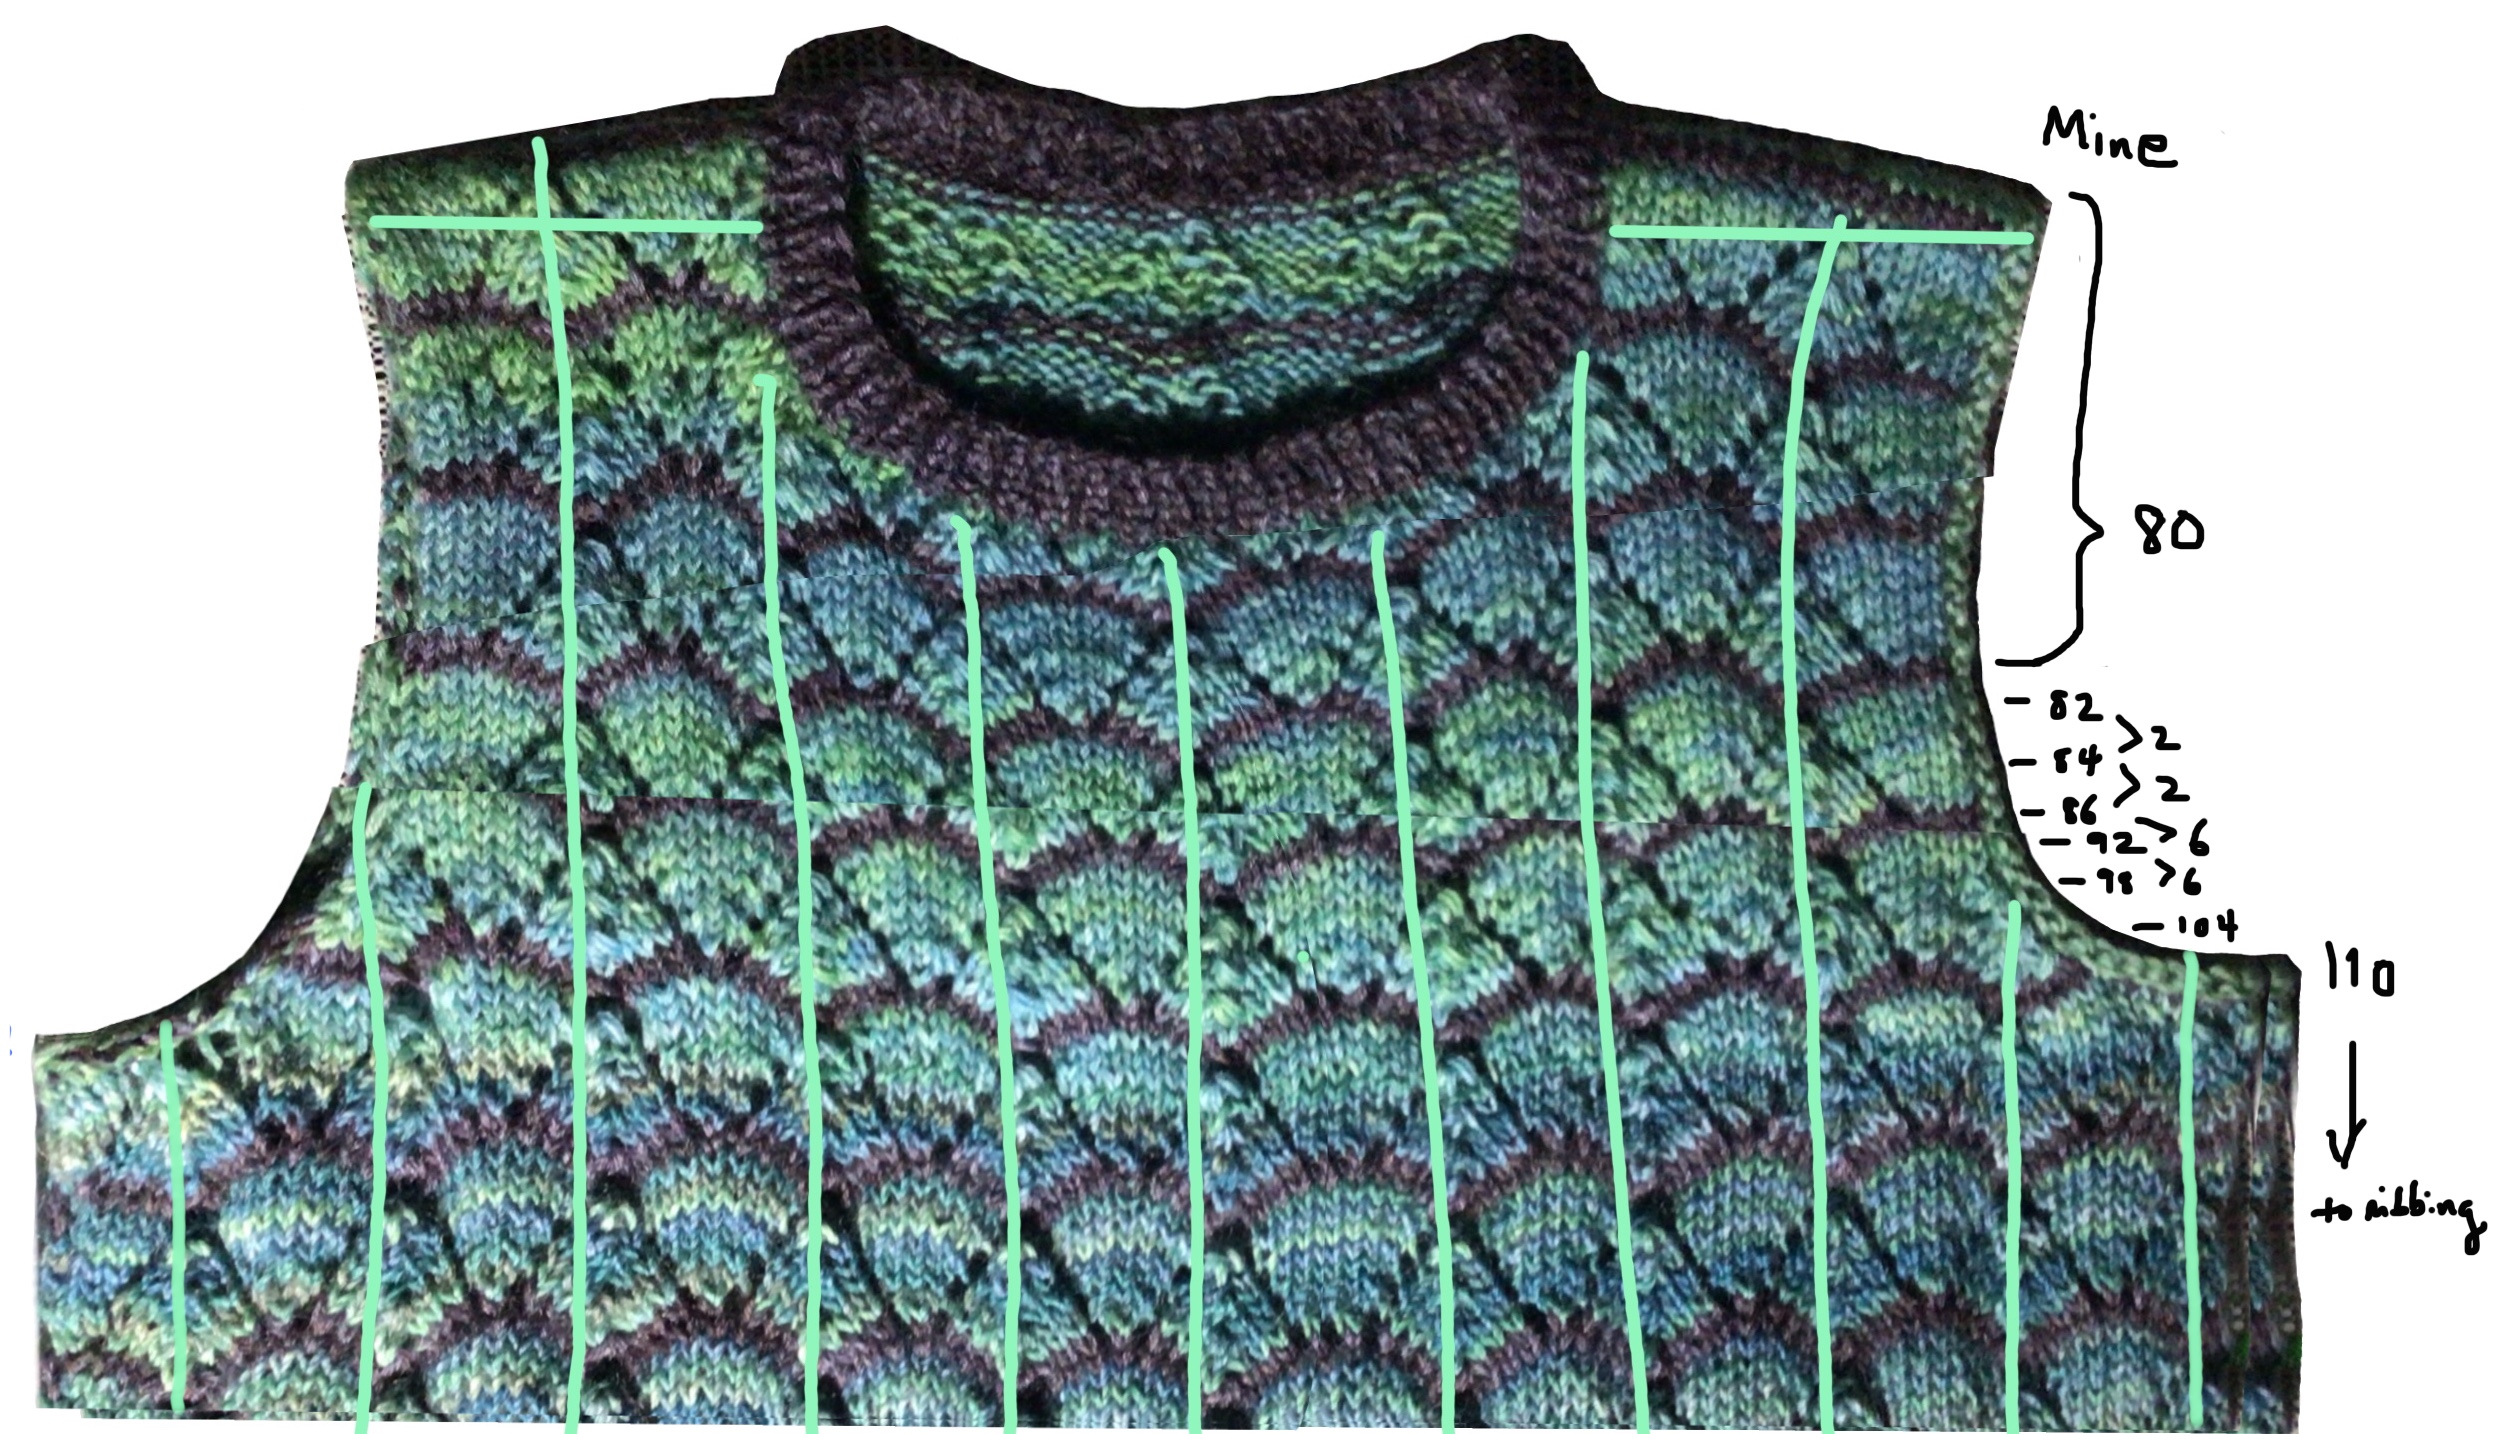

Armscye increases
Use annotation in KnitCompanion to mark increases.
CF of neckline = Round 8 of pattern, Row 18 (running total at right sidebar of knitCompanion)
Round 2, Row 32 (return) + 1 each side = 82 stitches
(Lifted) Increases are 1 stitch in from end of row
Round 4, Row 34 (return) + 1 each side = 84 stitches
Round 6, Row 36 (return) + 1 each side = 86 stitches
Round 8, Row 38 (return) + 2 each side = 90 stitches
Round 10, Row 40 (return) + 2 each side = 94 stitches
Round 2, Row 42 (return) + 2 each side = 98 stitches
Round 4, Row 44 (return) + 2 each side = 102 stitches
Round 6, Row 46 (return) + 2 each side = 106 stitches
Round 8, Row 48 (return) + 2 each side = 110 stitches
Round 10, Row 50 (return) + 1 each side = 112 stitches
(Irene): When the neck isn’t neat I sometimes like doing a double pickup when ribbing
- You pick up for the ribbing as usual but with a contrasting lace yarn so as to distinguish the back of those stitches from the back of the work. You K 3 rounds or so. You turn the work and you pick up the backs of the PU sts (the ones with the contrast yarn, you get rid of the contrast yarn, you k 3 rounds or so, then knit one of frnt, back together to unite then, then work ribbing as usual
- knitted the inside sts on a contrasting yarn
- basically you pick up for the ribbing, then use the back of those stitches to build an encasement to the edge for the edge
- the fine contrast yarn you use to pick up sts is just so you can see where the back of the stitch is and not pick up something else by mistake
(next time I will try a lifeline)

36×4 k2p2 stitches = 144 stitches on US3/3.25 mm needles for 5 rounds.
Jeni’s Super-stretchy Bind-off
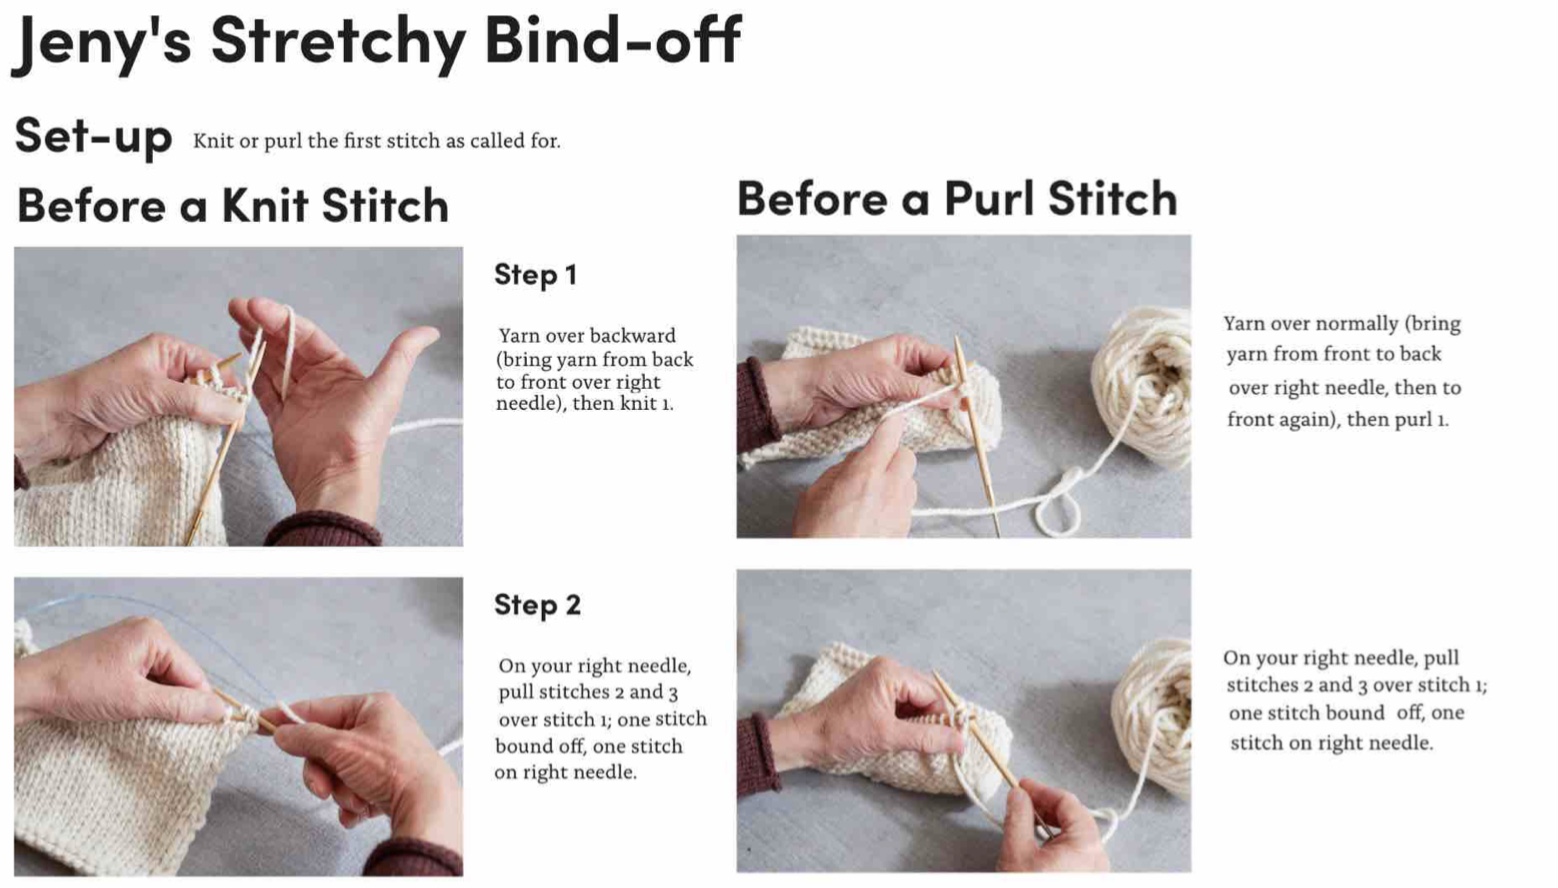
https://cocoknits.com/blogs/knit-tutorials/how-to-work-jenys-stretchy-bind-off
Continue back, using increases worked out from front.
At Row 50, join at armscyes, working a complete round from one ball and switching to the other for the following plain row. Set the left needle at US 3 / 3.25 mm.
There will be 6 extra stitches on each side at the armscyes. On next 2 rounds, work 2 together at side seams and then work pattern on the (10) stitches on subsequent rounds.
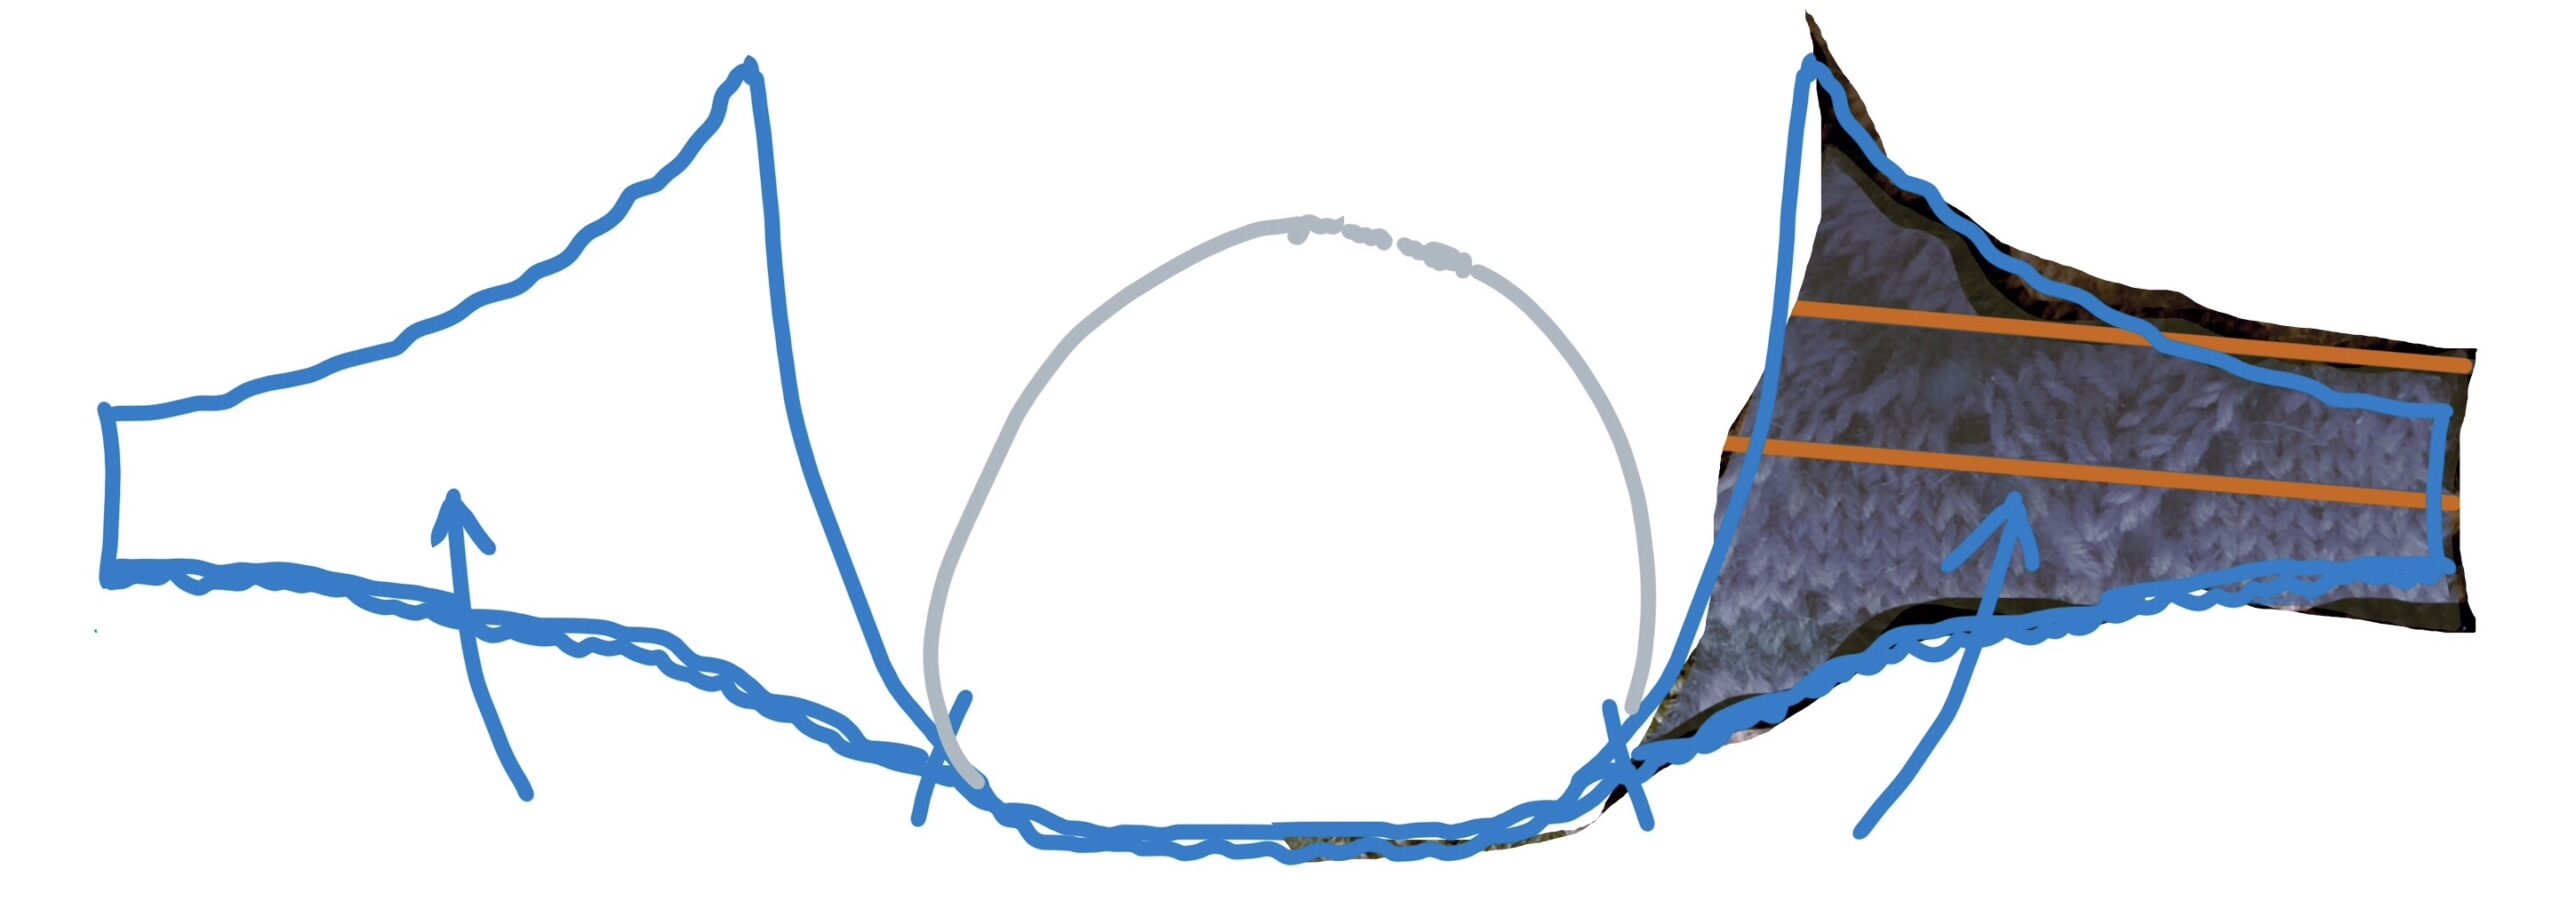
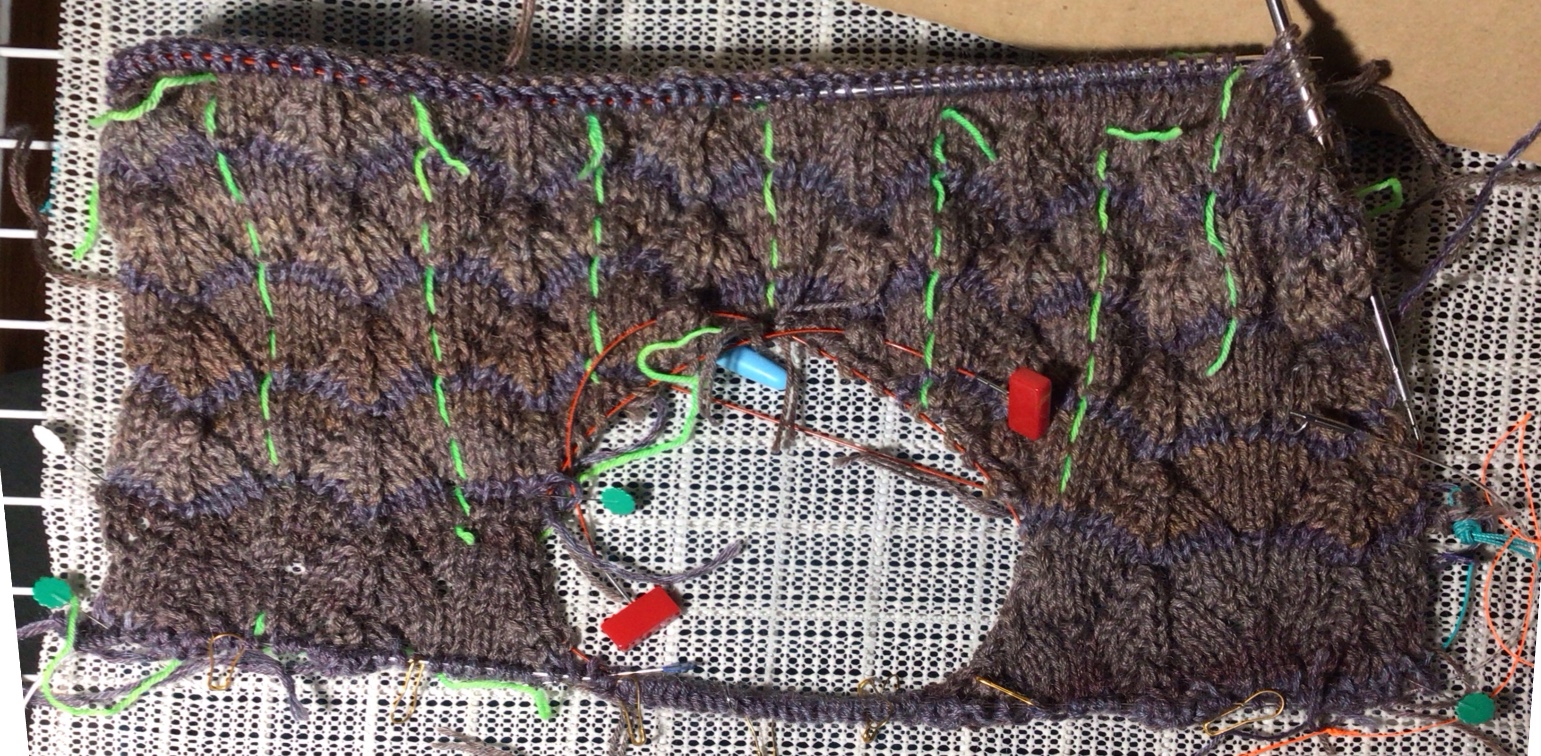
Short rows for wedges, with pattern if desired. Direction of knitting is from back of wedge forward.

Contrast yarn was left over from the first Myrtle.
- Odd rows are in pattern, even rows the return in plain stitch. Short rows must come from the fatter end of the wedge, and sets of rows must come from the right side of the piece, which is why the short rows are offset from each other.
- The blue lines are ten stitches apart, to orient the pattern (because I need them!)
- For the samples, 17 + 17 are cast on, with the pattern starting on the flipped work.
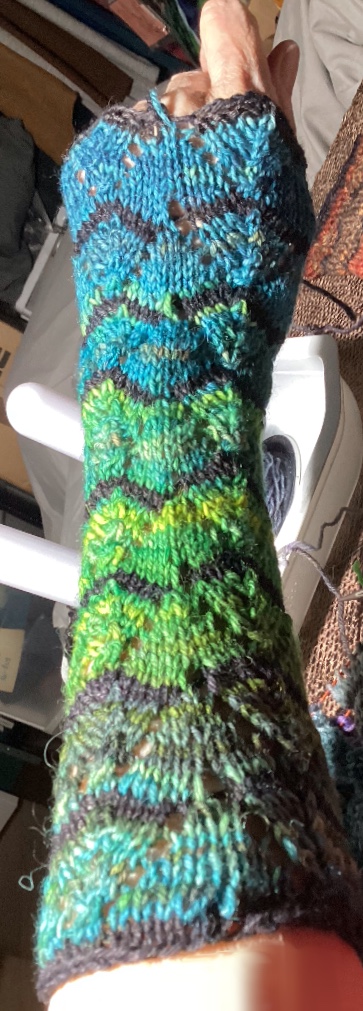
Sleeves
Sleeves are worked two at a time from the cap down using the balls dyed for them, which start with the ends with the bit of poly cord. They start out worked flat, back-and-forth, and switch to in-the-round tubes once the armscyes have been reached.
The pattern follows Kate Davies’ 10-row repeat block.
join MC (forearm’s length tail) and CC and cast on 14 (2+10+2) with the contrast yarn. Knit back (all alternate rows).
Leave a forearm’s length tail of MC yarn to be used for the long-tail stitch increases.
Switch to MC for the next 8 rows.
K3tog: slip 2 st knitwise, k next st TBL, pass slipped st over
Repeat for second sleeve.
Row 1 (cast-on) CC 14 st.
Row 2 (and all even rows hereafter) knit backward or turn work and purl back.
Place running markers at 2, 10, 2 (add running markers at 10 stitch intervals)
Row 3 MC, tie on fresh yarn: add 2 stitches with long tail cast-on, k4, [YO, k3, k3tog, 3, YO, k1], k2
[horseshoe lace Row 1]
(Add 2 stitches with long with long tail cast-on to start of return row) – 4, 10, 4 = 18
Row 3: + 2 st with ltco k6, [k1, YO, k2, k3tog, k2, YO, k2], k4, +2 ltco
[horseshoe lace Row 2]
(Add 2 stitches with long with long tail cast-on to start of return row) – 6, 10, 6 = 22
Row 5 +3 with ltco K9, [k2, YO, k1, k3tog, k1, YO, k3] K6
(Add 2 stitches with long with long tail cast-on to start of return row) – 9, 10, 9 = 28
Row 7 +2 with ltco K1 [k3, YO, k3tog, YO, K4 (x3)] k1
(Add 2 stitches with long with long tail cast-on to start of return row) 1, 10, 10, 10, 1= 32
Row 9 +2 with ltco K across 3, 10, 10, 10, 3
(Add 2 stitches with long with long tail cast-on to start of plain return row) 3, 10, 10, 10, 3 = 36
Row 11/1 +1+1 K4, [YO, k3, k3tog, 3, YO, k1] (x 3), k4
4, 10, 10, 10, 4 = 38
Row 13/3 +1+1 K5, [k1, YO, k2, k3tog, k2, YO, k2] (x3), k5
5, 10, 10, 10, 5 = 40
Row 15/5 K5, [k2, YO, k1, k3tog, k1, YO, k3] (x 3), k5
5, 10, 10, 10, 5 = 40
Row 17/7 K5, [k3, YO, k3tog, YO, K4] (x 3), k5
5, 10, 10, 10, 5 = 40
Row 19/9 Knit
5, 10, 10, 10, 5 = 40
Row 21/1 1+1 K6, [YO, k3, k3tog, 3, YO, k1] (x3), k6 6, 10, 10, 10, 6 = 42
Row 23/3 K6, [k1, YO, k2, k3tog, k2, YO, k2 (x 3)], k6 = 42
Row 25/5 K6, [k2, YO, k1, k3tog, k1, YO, k3 (x 3)], k6 = 42
Row 27/7 1+1 K7, [k3, YO, k3tog, YO, K4 (x 3)], k7 7, 10, 10, 10, 7 = 44
Row 29/9 Knit
Rows 31-39 = 44-50 stitches
Row 31/1 K7, [YO, k3, k3tog, 3, YO, k1 (x3)], k7 7, 10, 10, 10, 7 = 44
Row 33/3 K7, [k1, YO, k2, k3tog, k2, YO, k2 (x 3)], k7 = 44
Row 35/5 1+1 K8, [k2, YO, k1, k3tog, k1, YO, k3 (x 3)], k8. 8, 10, 10, 10, 8 = 46
Row 37/7 1+1 K9, [k3, YO, k3tog, YO, K4 (x 3)], k9 9, 10, 10, 10, 9 = 48
Row 39/9 1+1 Knit 10, 10, 10, 10, 10 = 50
Rows 41-49 = 52-68 stitches
Row 41/1 1+1 k1, [YO, k3, k3tog, 3, YO, k1 (x5)] , k1 1, 10, 10, 10, 10, 10, 1 = 52
Row 43/3 1+1 k2, [k1, YO, k2, k3tog, k2, YO, k2 (x 5)], k2 2, 10 x 5, 2 = 54
Row 45/5 2+2 K4, [k2, YO, k1, k3tog, k1, YO, k3 (x 5)], k4 4, 10 x 5, 4 = 58
Row 47/7 2+2 K6, [k3, YO, k3tog, YO, K4 (x 3)], k6 6, 10 x 5, 6 = 62
Row 49/9 3+3 Knit 9, 50, 9 = 68
Upper sleeve: decrease over 3 bands to 60 stitches total
Armscye down (decreases areas stack each side of underarm “seam”)
Round 1: pattern as usual = 68 stitches.
Round 2: work 2 together each side = 64 stitches.
Round 3: pattern as usual.
Round 4: work 2 together each side = 62 st
Rounds 5-7: as usual
Round 8 (return row at end of the series of 8): work 2 together = 60 stitches
There will be ten stitches at the underarm split to each side, move them to one side and begin the pattern on them after the CC rounds.
Underarm to cuff = 12 bands
Change to US 3 / 3.25 mm needles for cuffs: 1 3/4”
To use a sewing pattern as a template:
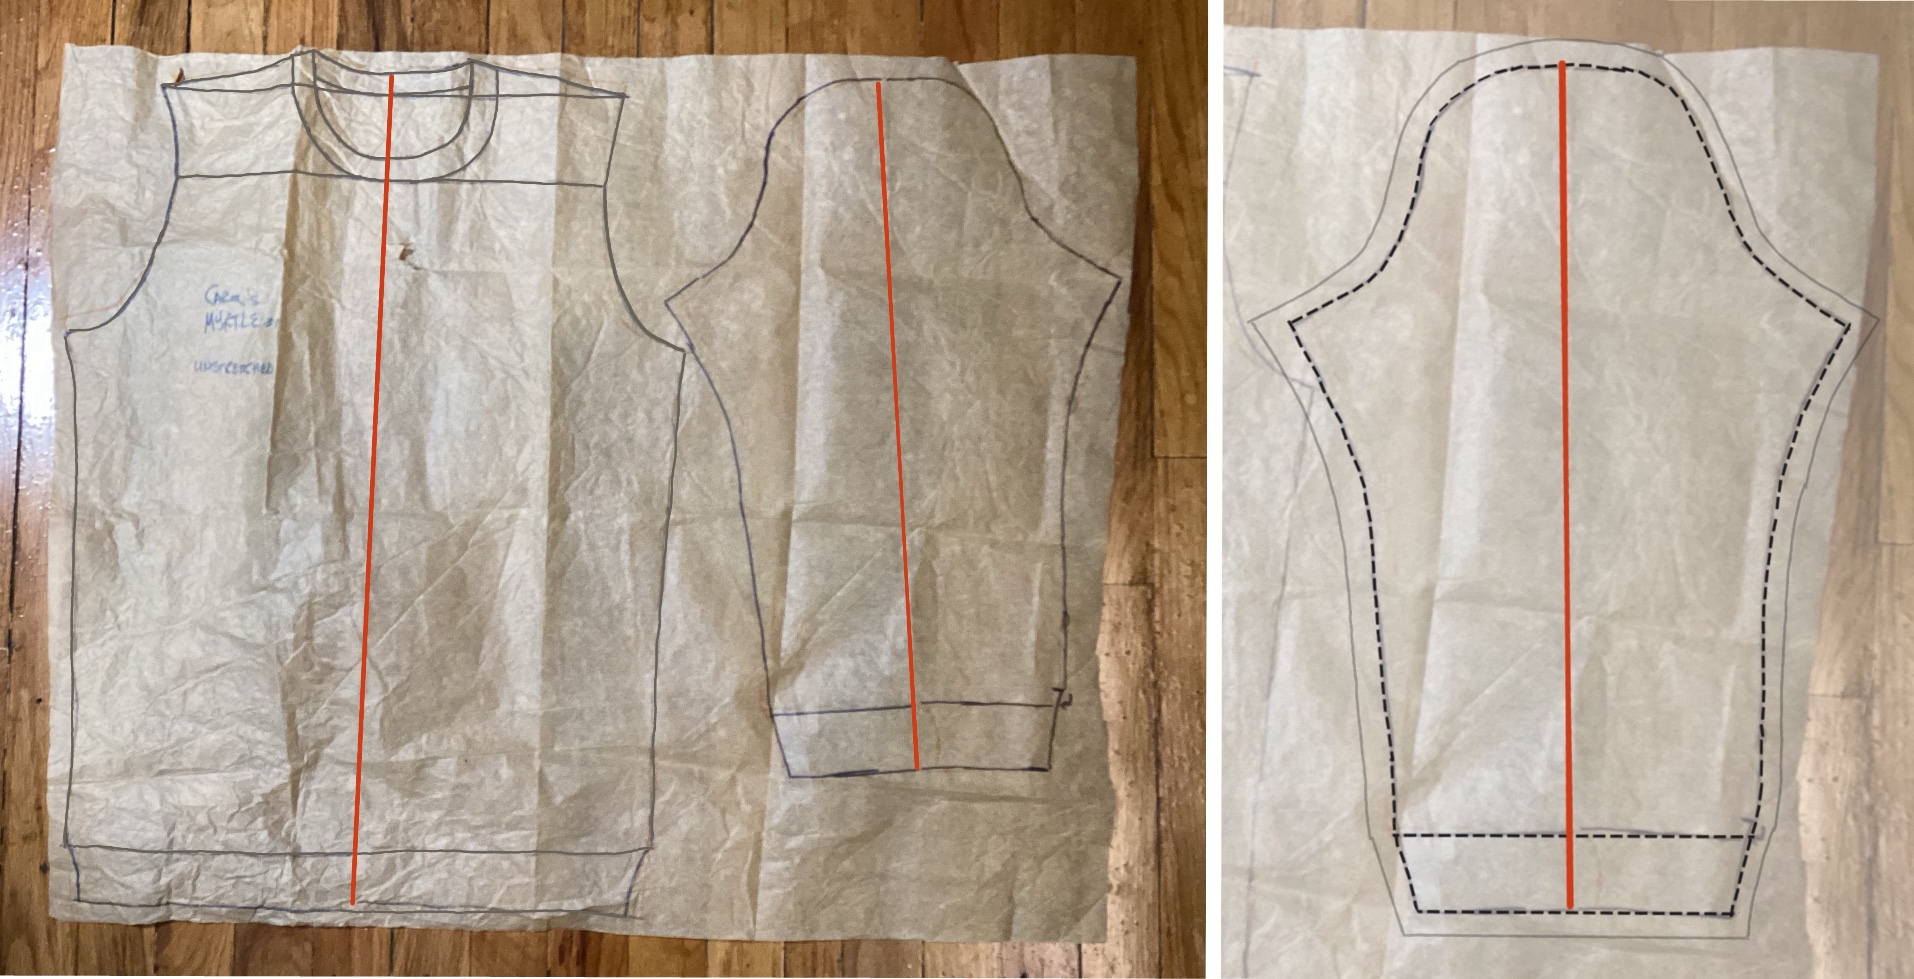
Trace off the pattern piece(s) without their seam allowances. The pieces can be tipped to fit the paper, but must have their grainlines exact.
Check your knitting against the template. How much you increase (or decrease) will depend on your stitch pattern, and you will need to be prepared to redo your work as you get a sense of how this works.
Throw in lifelines often.
Keep notes so that you don’t have to figure this again on future work.
Note that my pattern doesn’t run all the way to the edges in the increase areas, but is plain stockinette. This falls where the sleeve cap is rolling over to meet the bodice and won’t show much. What you do will depend on your pattern and how much you’re willing to fuss.
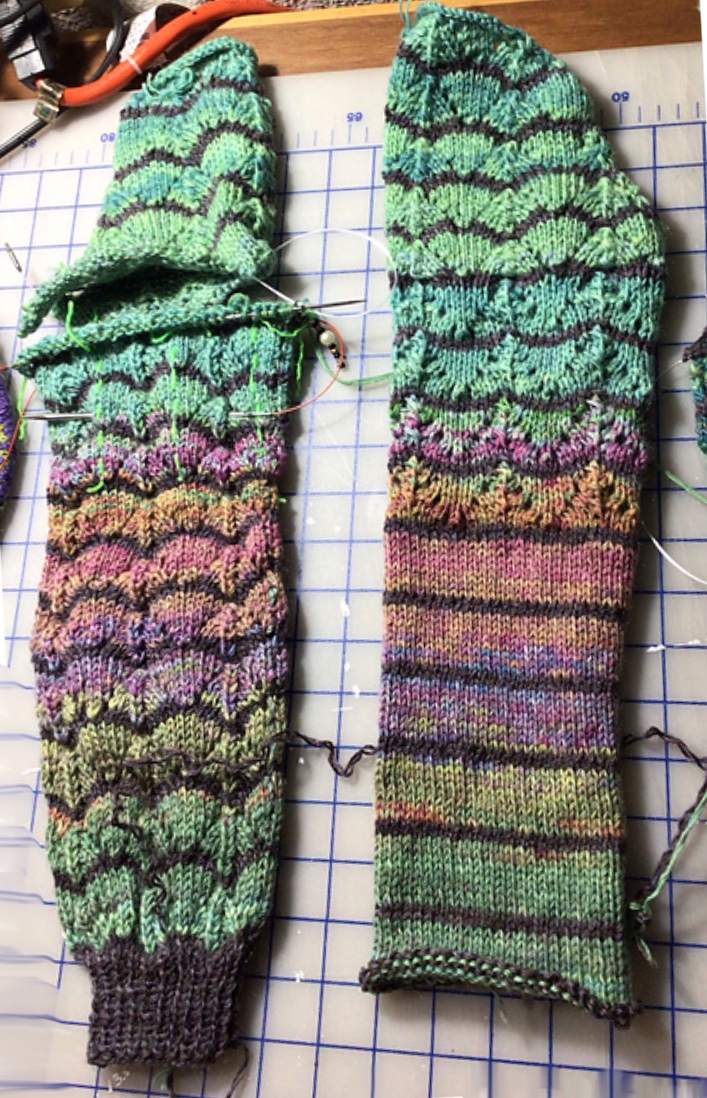
The sweater body has been blocked, the caps have not. A quick check shows everything is lining up.
The sleeve caps, worked flat so far, will be joined at their underarms and knit 2aaT in the round to their cuffs.
Cuffs:
= 60 stitches.
Knit one round CC
Decrease from 60 to 40 stitches
K2, k2tog – 40 —> 12 = 36 total, too much. 4-> 3
K3, k2tog – 40 —> 16 = 48 5–> 4
Remove running markers
Switch to Size US 3 / 3.25 mm, 2 x 2 rib for 1 3/4” / 4.3 cm
Decrease 8 stitches so total count is 40 (k4, k 2tog)
Work until cuff = 1 3/4” / 4.4 cm
Jeni’s Surprisingly Stretchy Bind Off
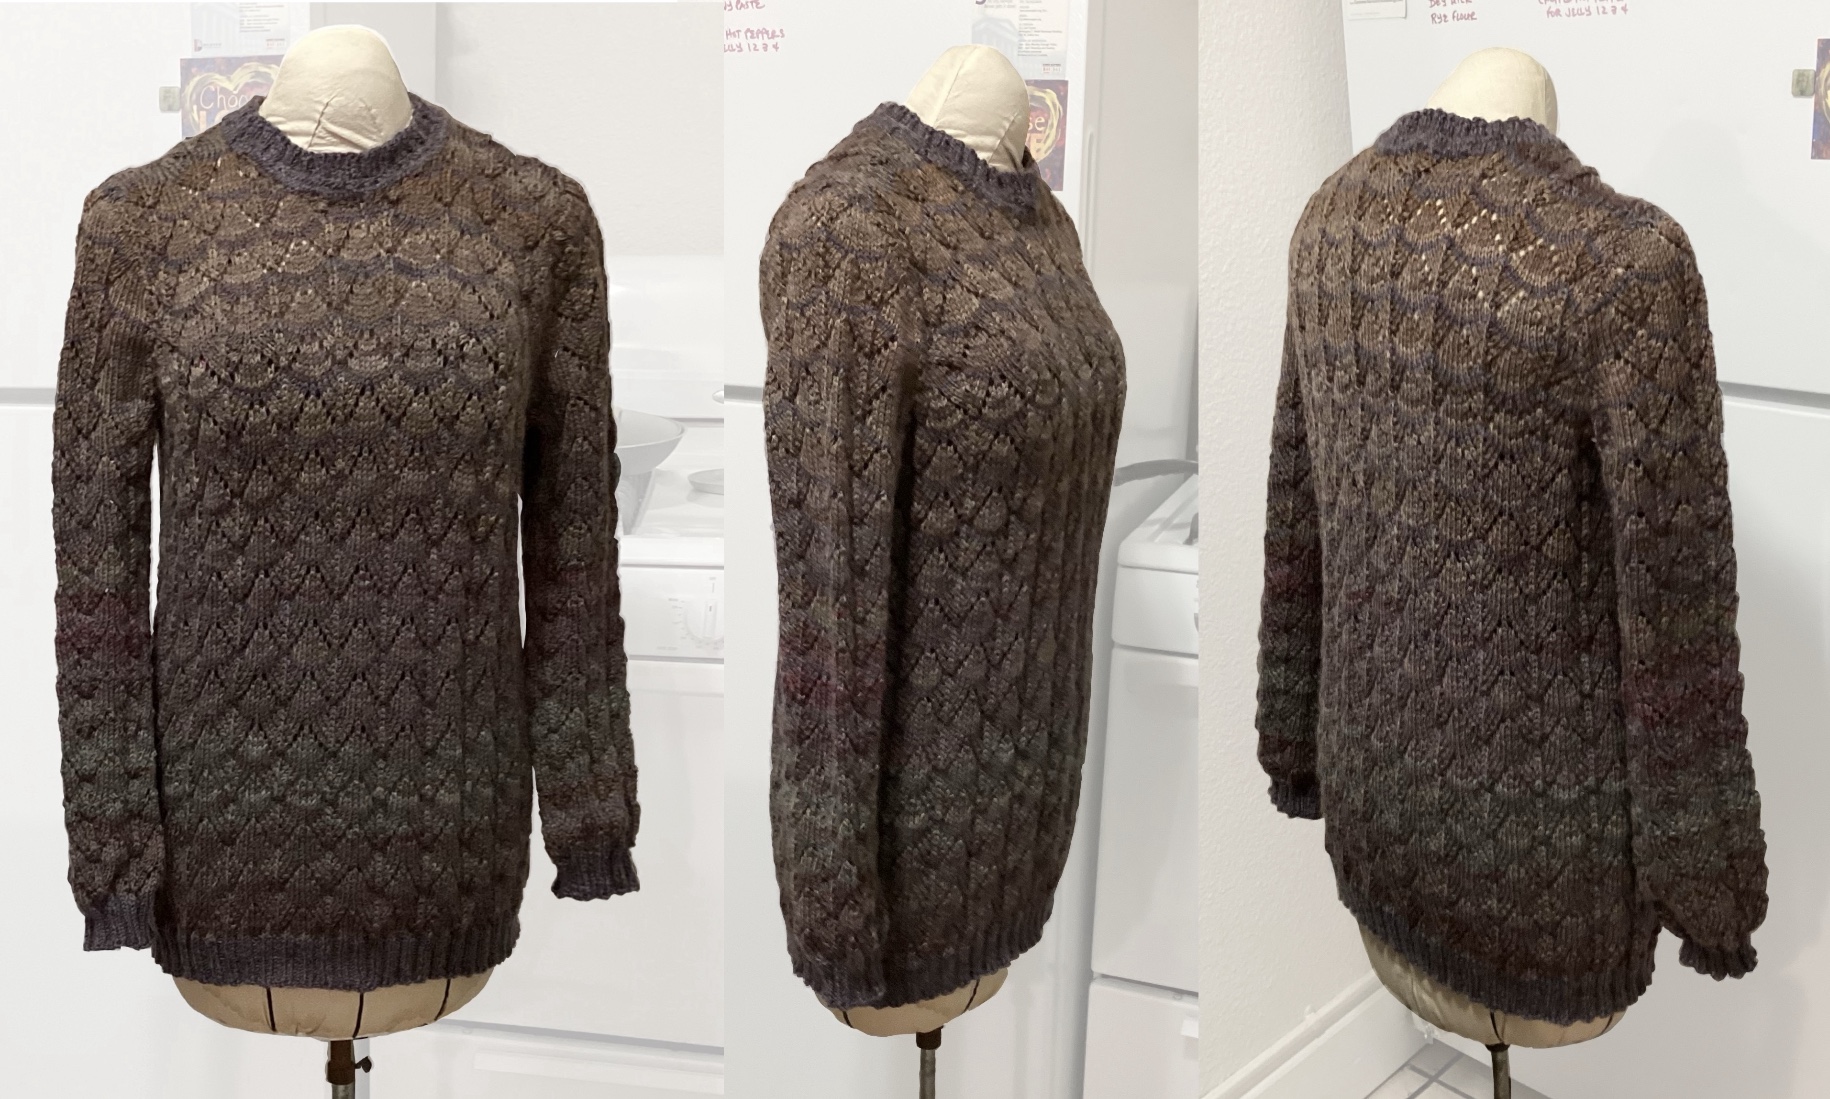
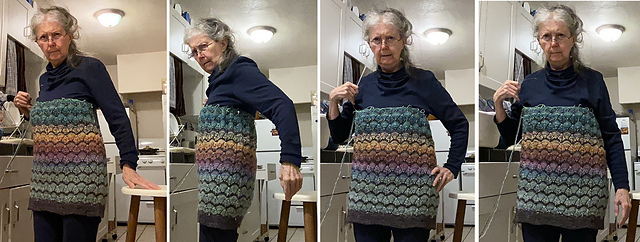
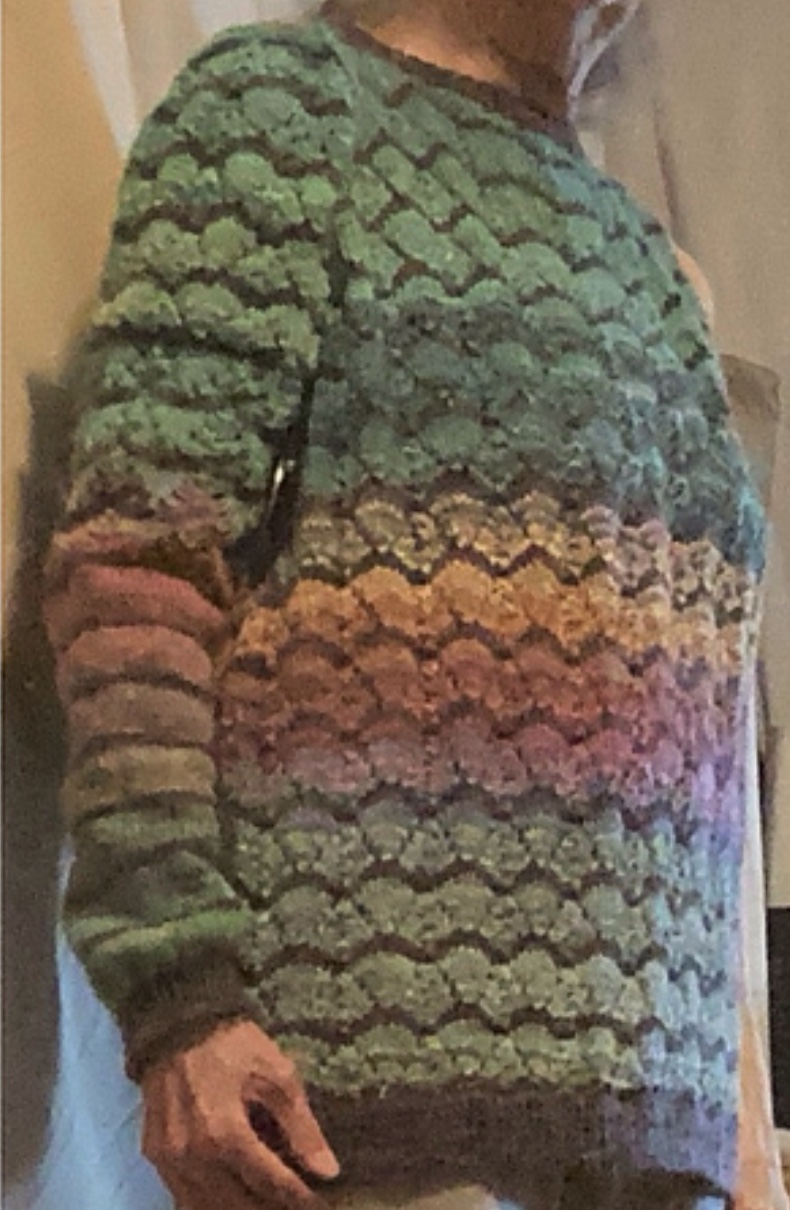
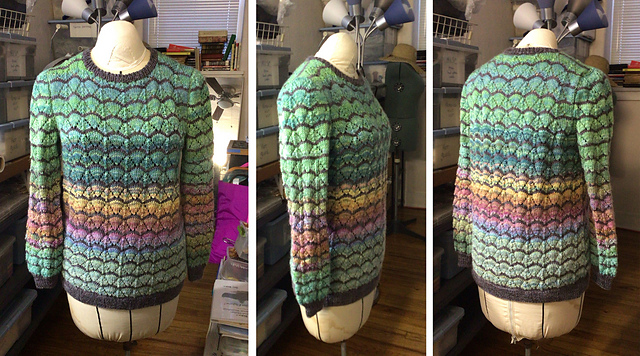
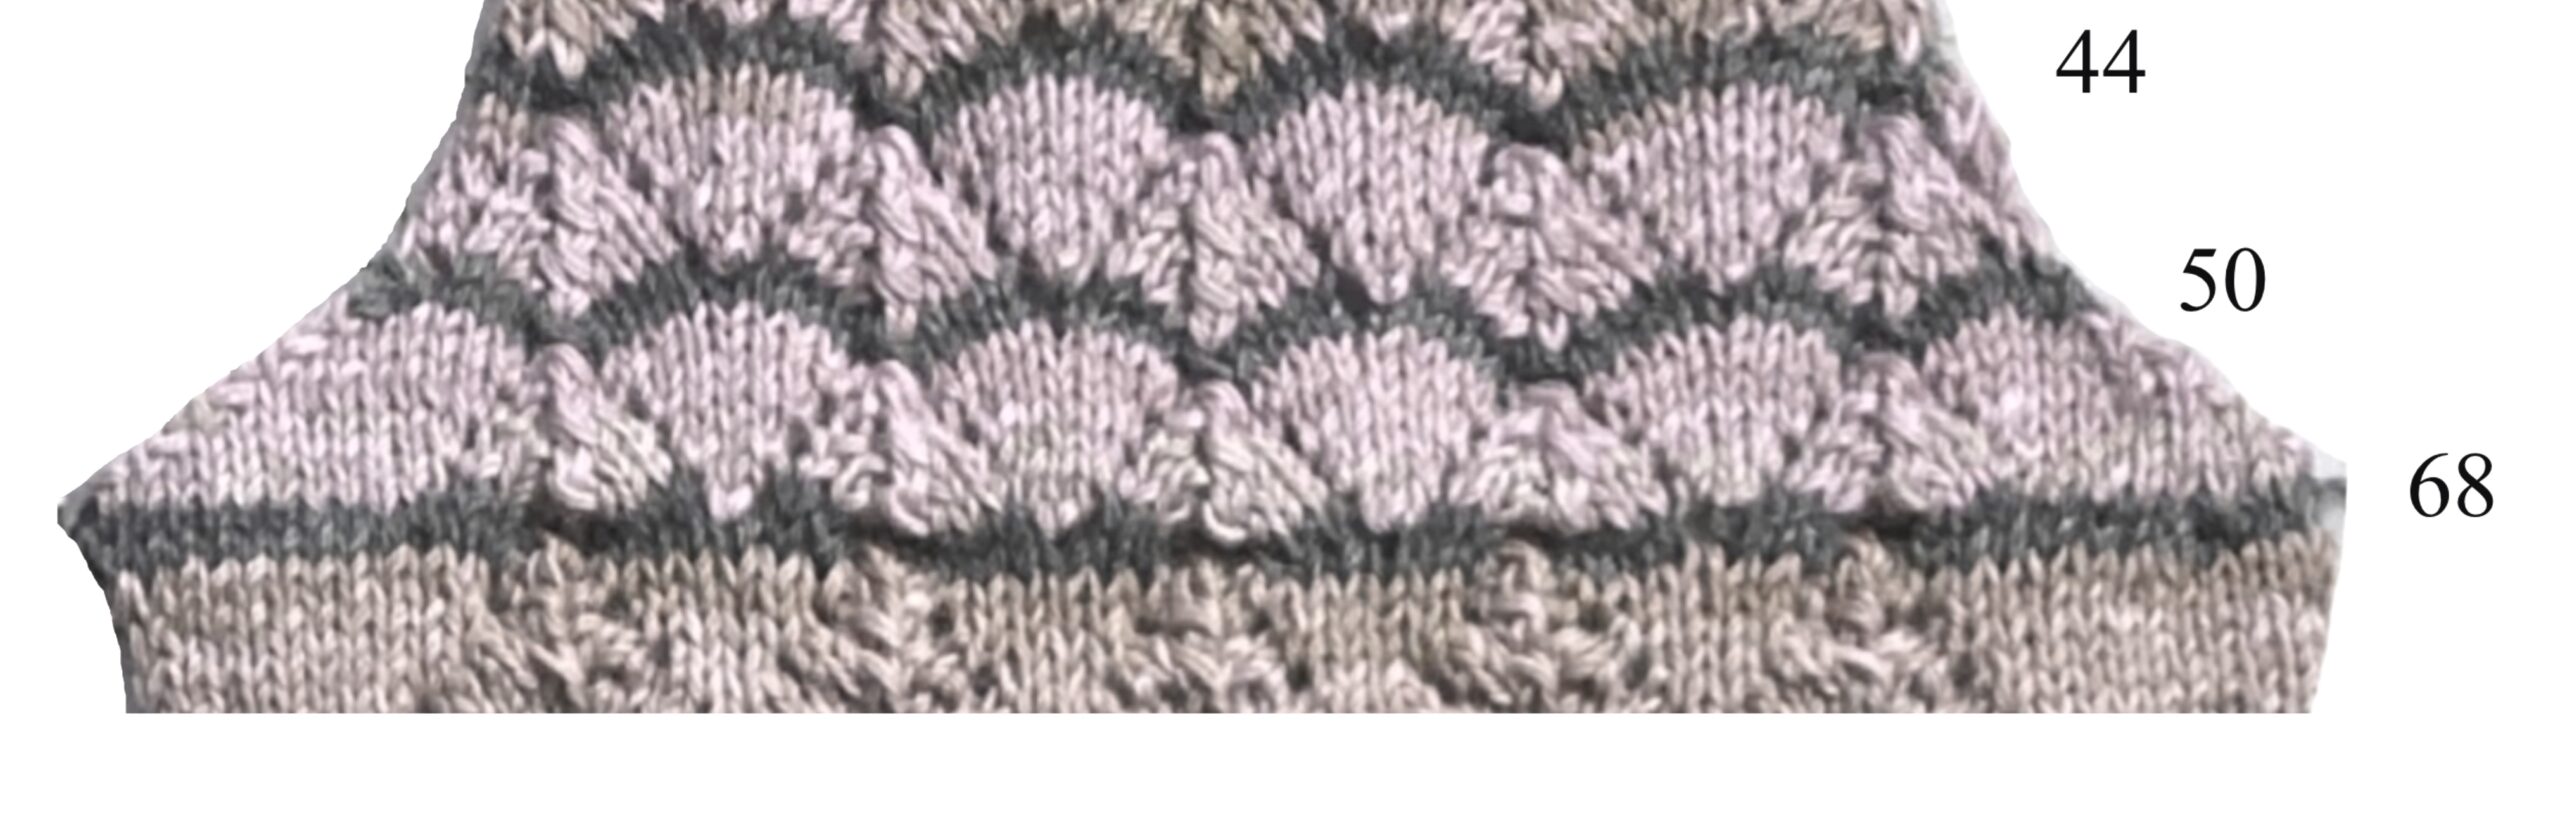
Finished. The colors matching around the body of the sweater and the darkening towards the bottom are subtle but visible.
565 gm
This second sweater confirms these pieces as my alpha sweater block. The weights show how much of this yarn will be needed for another (to this gauge in this yarn).
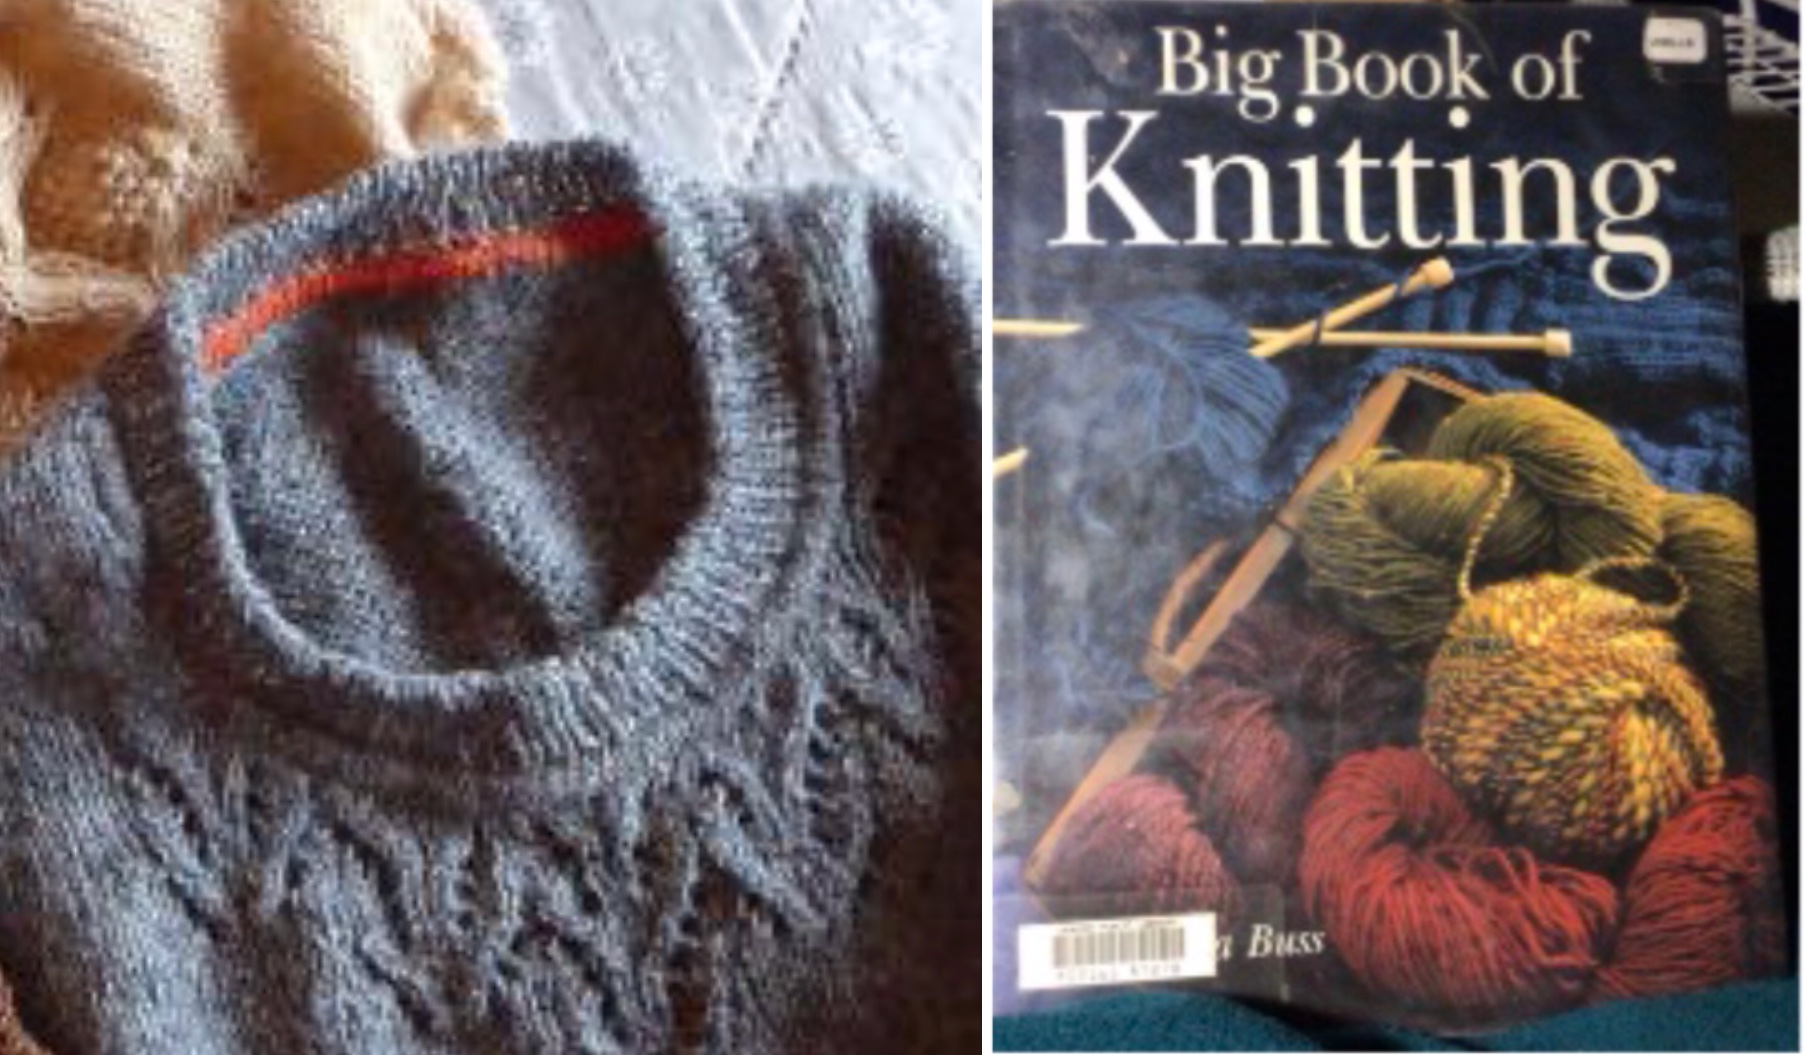
Kate Davies’ Myrtle
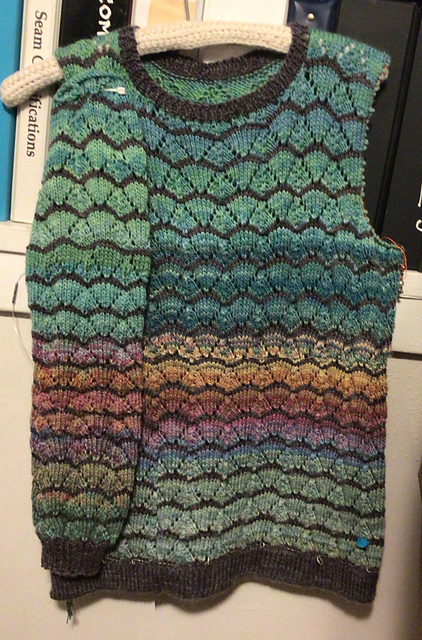
Irene (grounds4coffee) got me excited about joining this along, starting with what might have been a cropped vest from a couple balls of dyed sock yarn and their contrast color. Decided to expand it to a full winter sweater.
https://www.ravelry.com/projects/BreiKonijn/crocheted-blank-tutorial
https://www.ravelry.com/patterns/library/myrtle-16
Discovered two cakes, each 2 strands plied together, of Sakkie. Charcoal to coordinate. Dyed maybe five or six years ago; meant for colorwork socks. Wrong weight (socks would have been on US 1s, sweater body is on 6s). Nowhere near enough yarn. Irene thought there might be enough for a short vest/cropped sweater.