
My clients come to me because they can’t buy clothes that fit off the rack, so no surprise that their patterns don’t look like commercial ones.
But (adult) students with “average/normal”* bodies? Theirs don’t either.
Unless you have a considerable reference pool, you have no chance to compare bodies and their patterns to see this.
I have; I do. My job.
“Possible” doesn’t equal “commercially feasible”. I’d have been thrilled if any of my custom clients took the patterns I’d charged out as work for hire to a larger market.
Comparing patterns for different bodies:
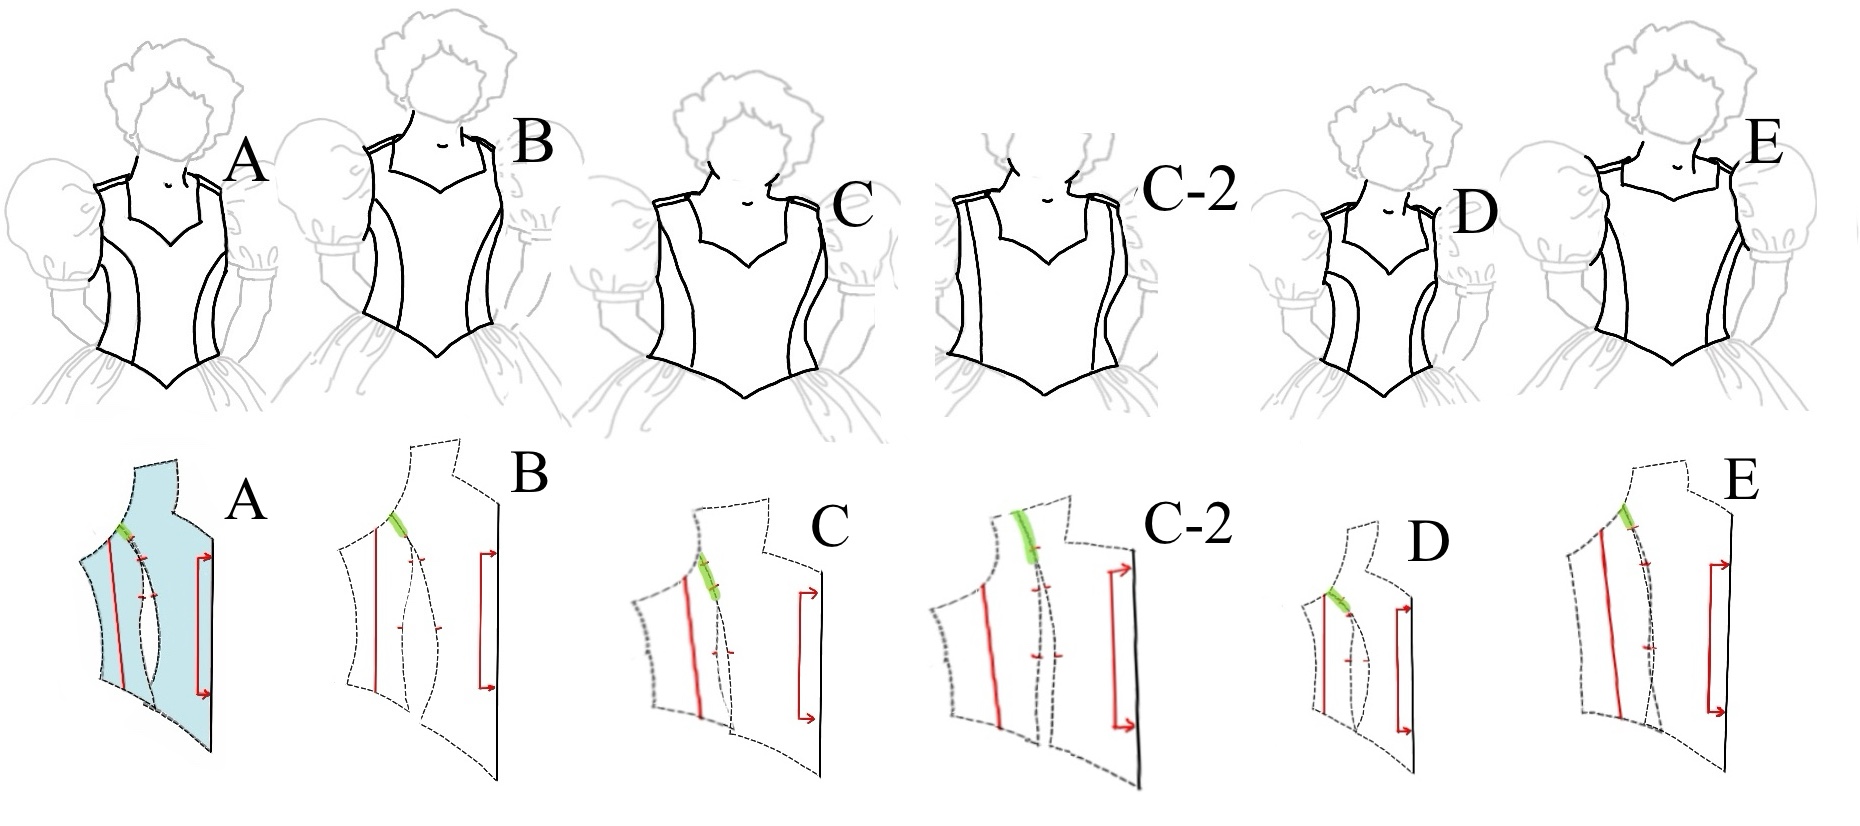
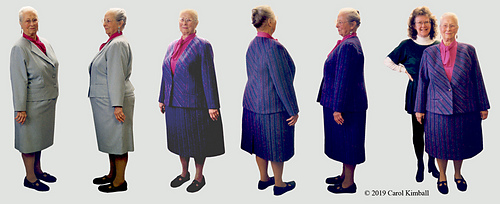
I did a wedding with five bridesmaids who all ended up in the “same dress”(this style rolls around every decade or three). Fitted bodice with princess seaming, sweetheart neckline, puffy sleeves, Basque waist with full tea-length skirt gathered to it.*
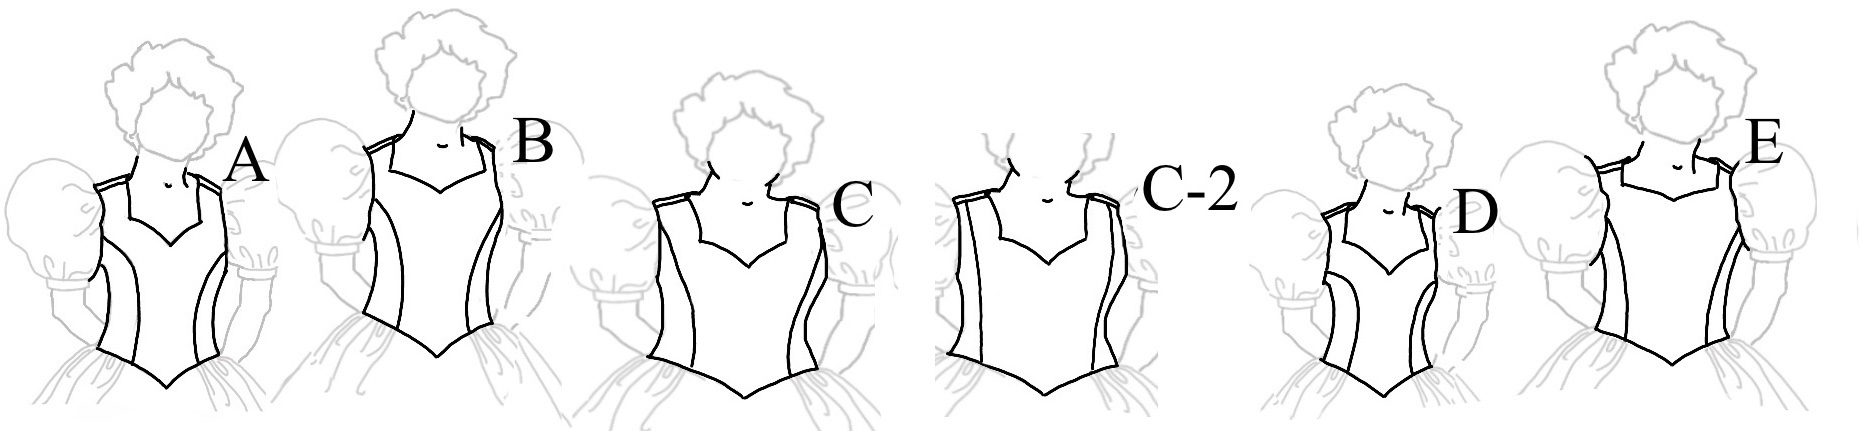
All of this apparent figure-sculpting was done with pattern work, not padding or corsetry. The bust can be emphasized (A, D) or minimized (B, C, E) by where the princess line runs to the side, or armscye, or shoulder. Some had shapewear from their first fittings all the way to the ceremony: their choice. Ditto heels of the right height (not necessarily the same shoes).
They each had a bucket with their patterns where they could keep their undies, etc, if they chose. One gal dashed by to drop off shoes with the same heel height as her good ones, and as I reached to take them from her, she proudly said “I know where my bucket is!” ran upstairs and put them in herself.
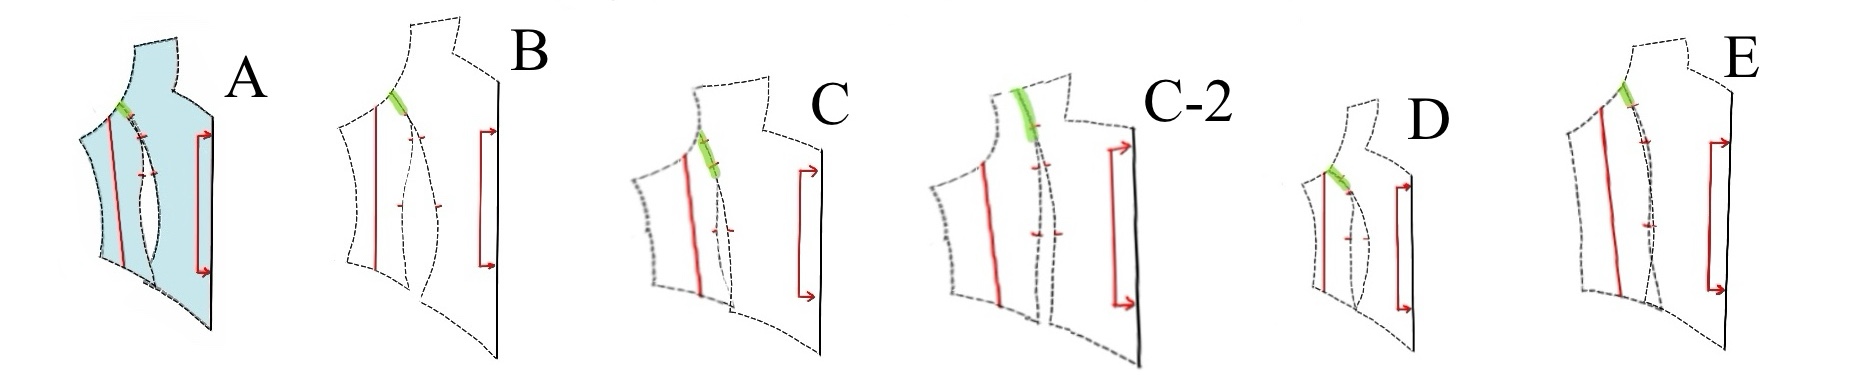
A. is our so-called “normal” or “average” figure. I hate those terms.
B. is the tallest.
C. is the most curvy. She wanted to look more slender even if it meant minimizing her bust.
D. is very small and slight. Curving her line strongly into her armscye made the most of her bust.
E. had had open heart surgery, which scar came close to her neckline.
* it’s a kindness to leave the center of the skirt ungathered, though it means altering the skirt. I have never yet had any client (men included) who asked if I could make their stomach look bigger.
The shape of necklines, and helping a client choose their options: LINK
Triumph of Individual Style//Pimmie//Katie, sweethearts
Sewing a Princess Seam: LINK
Blocks:
“Block” is the sewing industry’s term for a set of pieces that can be used without further modification to cut and sew a garment. They have seam allowances and wearing ease. They have ease for style if the design calls for it.
Not to be confused with a sloper/moulage/toile/muslin/fitting shell, which happen at the beginning of the fitting process. Those may or may not have seam allowances. They may be skin-tight or have wearing ease, and their nomenclature is worth dozens of hours of argument. We’re not going to get into that here.
Creating a personalized library of blocks is at the heart of sewing comfortable, well-fitting, attractive garments. If a client has used themselves for a fit model for a garment with the goal of expanding it into a line, each new size will have its own block.
To create a new block, an old one is traced without its seam allowances, modifications made, and the seam allowances put back on. For production, it gets a fresh number. For personal use, labeling is enough. Those who enjoy color-coding can go crazy here.
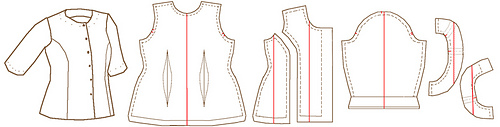
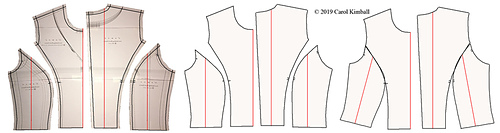
Here’s a bodice block with a shorter sleeve and a curved princess line that goes to the armscye. Six pattern pieces: back, side front, front, sleeve, neck facing (oops, did an armscye facing for a sleeveless blouse, guess that’s an extra). Five pieces for this block.
Our client is happy with the fit on that but would prefer a less curvy-looking princess line. Here’s the block for her new blouse.
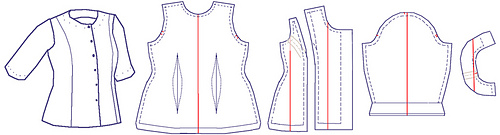
But but but isn’t this a bodice AND a sleeve block? Sure. You’re making your patterns, you get to decide. If you’re doing a basic top and know you’re going to run fancy with the sleeves, you might split them at the start. All of a person’s block pieces are interchangeable – any sleeve will fit any shirt/bodice.
As this already has a jewel neckline (the base for a collar), we’ve added that and a collar stand. Note that the button spacing may change.
Exie’s Suit
This lovely woman who had hand-loomed her striped fabric also had severe scoliosis. A previous dressmaker had managed a reasonably good fit in that gray suit. I tweaked design details.
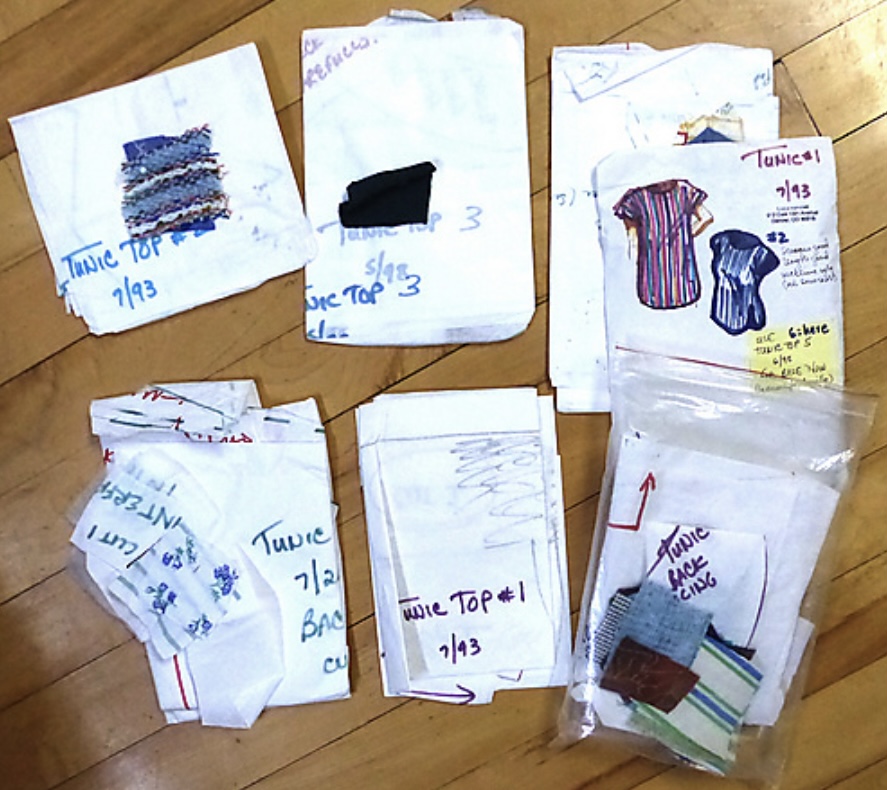
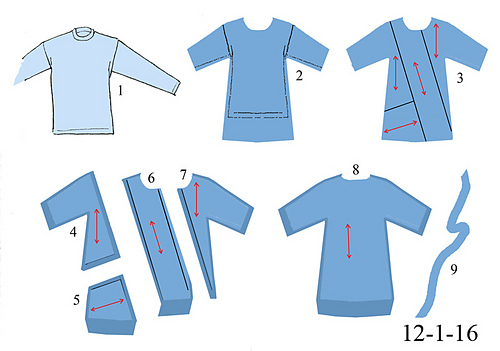
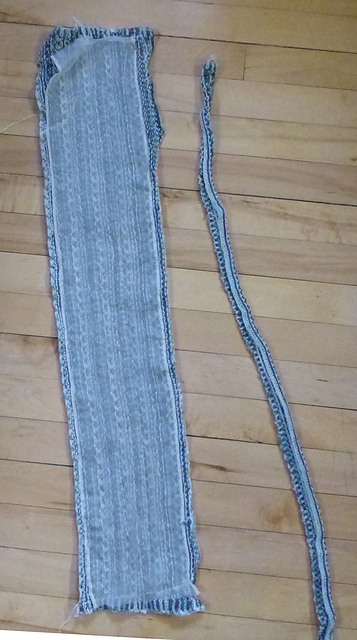
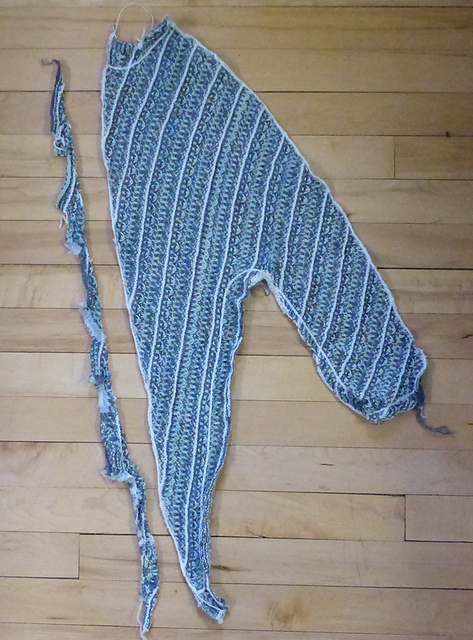
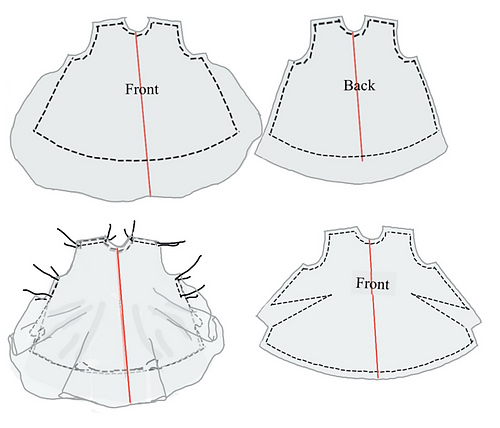
Evolution of my Striped Tunic:
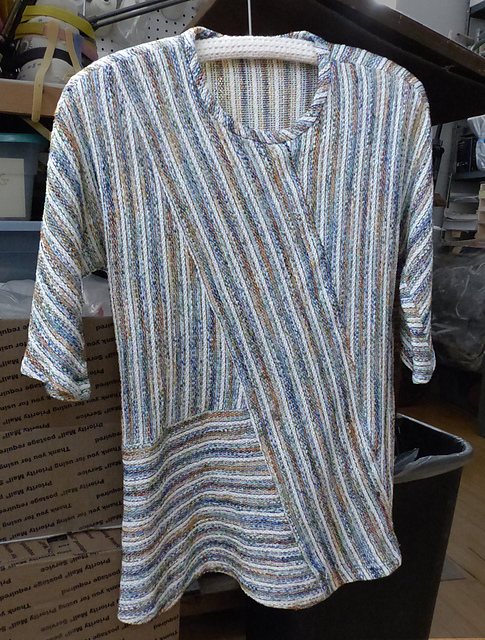
This tunic from a pattern I created is decades old (1992!) and worn pretty much to shreds, from an inexpensive supple but stable knit that sewed up much better than anticipated. A heavier fabric would have been better.
xxx
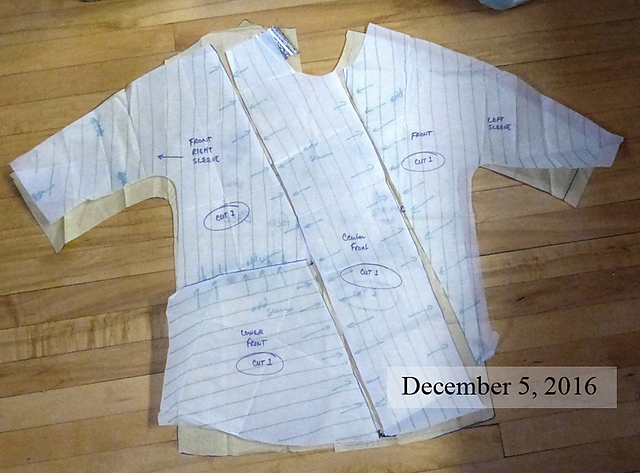

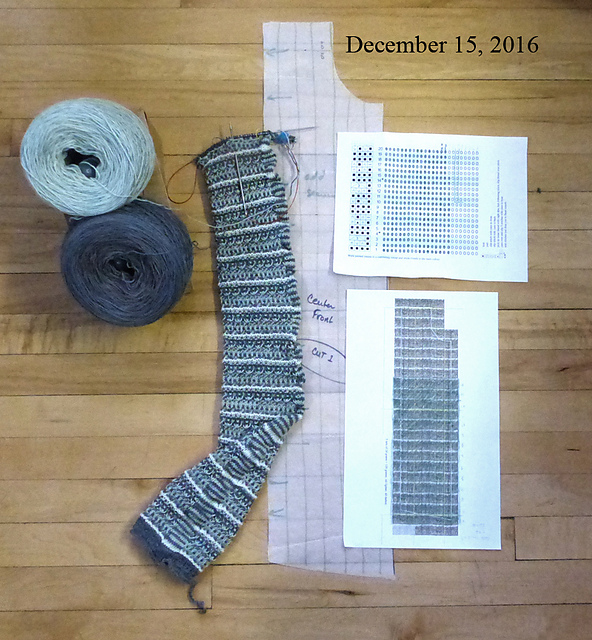
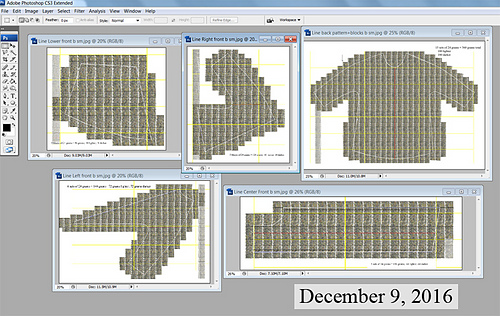
How to recreate this pattern using a long-sleeved tee of your own (or knit fabric of the same stretch):
- Lay the arms flat except for what bunches at the armscye and trace around the tee.
- Modify pattern by shortening sleeves, making them and the body wider (don’t drop the armscye too much or you won’t be able to lift your arms).
- Figure where you want the divisions to run. Trace each piece and add hem and seam allowances – if you’re bias-binding the neck there won’t be any there. If you’re going to whip together the pieces edge-to-edge, skip this step.
- Upper right side
- Lower right side
- Center
- Left side
- Back (be sure the width of the neck scoop matches the front)
- Bias strip to bind neckline
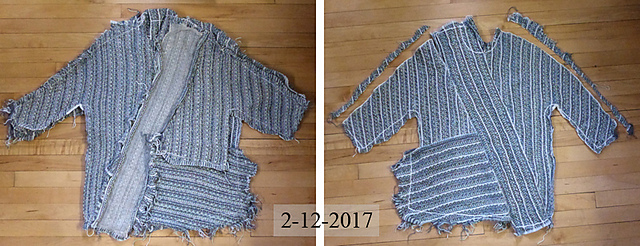
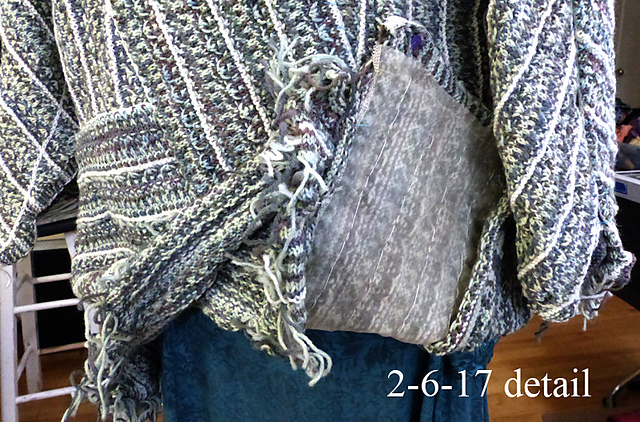
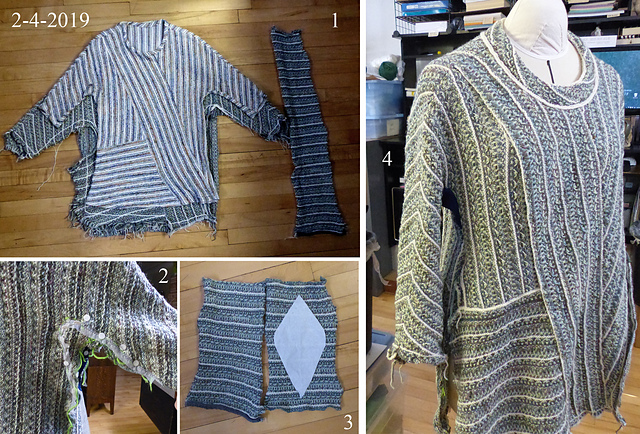
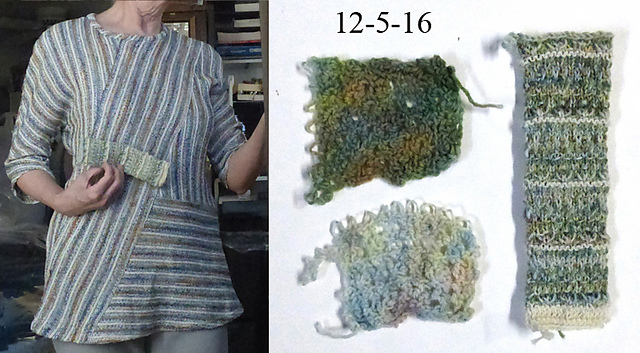
1. Original tunic laid over. 2. How much again needed to be taken out. 3. Old front band and gusset shape. 4. Serged off, gusset basted in.
MaxwellsDemon’s coat pattern:
Here are her unmodified pattern pieces, seam allowances removed. I ignore the mark at the top of the sleeve and instead use the one for the shoulder seam (it’s usually given as a circle or a square).
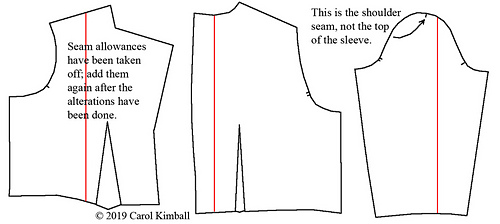
We’ll tackle the sleeve first. When messing with sleeves, the first rule is NEVER to change the length of the armscye (as long as it’s big enough, which it usually is even if the biceps line is too tight).
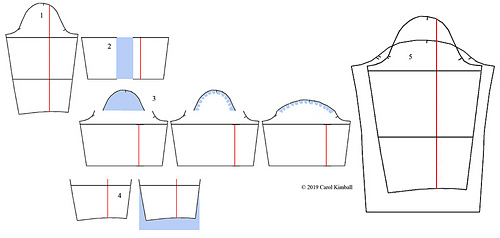
- The original pattern.
- Spread the upper arm section until you’ve got enough circumference for the biceps.
- Flatten and spread the sleeve cap (above the underarm area – don’t lose those curves).
- Lengthen and straighten the lower sleeve. Once it’s in the muslin and the length corrected, the taper to the wrist can be re-established.
- The corrected pattern.
Here’s an easier way to shape the sleeve cap using drapery weight: push it with your spread fingers.

Put the seam allowances back before cutting!
(other pattern work that will be plugged in when I find it)
(Shifted from the coat to a waistcoat)
Now that the fabric fits nicely on your body, here’s how to finish correcting the pattern. You’ve left good margins, yay!
- Raw pattern piece.
- Fold down the seam allowance at the shoulder and extend little ears so they’ll be caught in future seams.
- Likewise fold down the dart.
- Leave the paper folded as you cut. This is a fast, easy and correct way to get those extensions.
- Pattern ready to go to the fabric.
This no longer looks like your old bodice pattern. It looks like a correctpattern for your body type.
You may need to nibble out the armscye curve but that’s an easy fix if you find it cuts into the front of your body as you move your arm.
(back to the jacket)
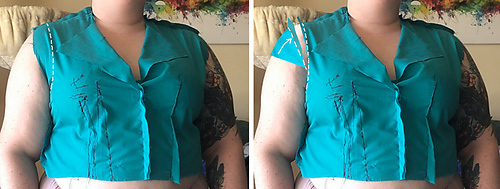
I have a bodice! I think the shoulder seam is too far forward and it goes on a wonk towards the front. Just redraw it straights and slightly further back? I don’t know if the shoulders need any more work? There’s some excess under the bust before the waist. I’m thinking maybe I should leave it because coat? But I would like to take it out to get a more fitted silhouette.

Answering your questions slightly out of order:
First, you’re at the stage where you should be trying on your muslin over whatever you’ll be wearing underneath it. You may already be doing this! With some historical recreations, the difference between a bra and a corset is astonishing.
Shoulder seams: only the part towards the neck is off; yes, it does need to straighten towards the back. If you reach up and pinch the big muscle that runs along the top of the shoulder, your seam needs to sit along its middle (not its highest part).
It’s difficult to find RTW where the seam is situated correctly, so it may feel funny until you’ve had a chance to get used to it there.

do those darts go too high? And I might need some extra length?
Oops. My bad, the darts should have been re-positioned before altering the drape. Looking hard at the drape’s shape, I think you can get away with using it as drafted. Next time, though, the darts should be moved first. You are tearing through this so fast!!!
The drawing shows how I mark my bust darts on the wrong side of the fabric with a T at the top and nips in the seam allowance at the bottom.
Darts need to point at, and stop short of, the “bust point” or “bust apex” *. You’ll get an obvious dimple at the top if they run all the way up.
Never, ever trust the pattern’s line drawings for dart placement. This coat is shown on an anorexic thirteen-year old.
* nipple
But WTF is a sleeve head? Does it just exist for the shoulder pad I’m not using?
In the Olden Days, dear children, sleeve heads were used by tailors to fill out the edge of a shoulder pad that had been built up from layers of thin batting. A modest one of two layers is shown.
Military uniforms in particular look odd with a sloping shoulder.
Traditionalists still use this method (yes, I’ve done it, with diagonal pad stitching to hold the layers together). Nowadays, it’s far faster and easier to use a pad of molded foam that has all the shape built in.
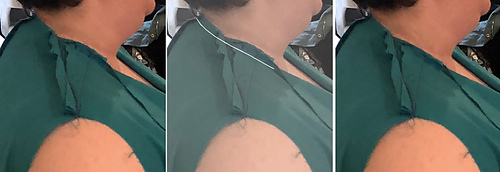
I have lost some of the curve of the neckline
This is an easy fix! Nibble it down a little, trimming a narrow crescent from the top. The safest way is to fold over the seam allowance to the right line (you may have to nip the seam allowance to get it to lie flat) and then trim back accordingly.
The front armscye needs to be trimmed back, but this is easy to do by slipping on the sleeve and pinning it with the seam allowances to the outside. Trim it back to the usual seam allowance and sew it in.
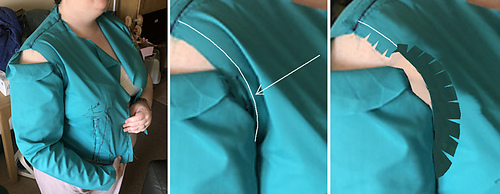
You have extra fabric wadding up at your underarm. You’ll have to make nips* in the seam allowance to be able to flip it up and smooth it out until it doesn’t bind. Then you can pin it to the sleeve’s seam allowance with the bodice’s extra hanging out. Don’t worry about the gathers in the cap: what’s important is the lower half of the armscye.
ETA: what’s happening in your second photo for the cap looks okay
* keep them short; you can always go a bit deeper as long as you don’t cross past the sewing line.
The bodice’s front armscye area extends too far; it needs to be clipped/released enough to smooth over so that it can be trimmed back. The cuts into the seam allowance at the lower armscye will be fairly deep; be sure you don’t go past the sewing line.
(discussion of sleeve/armscye summarized)
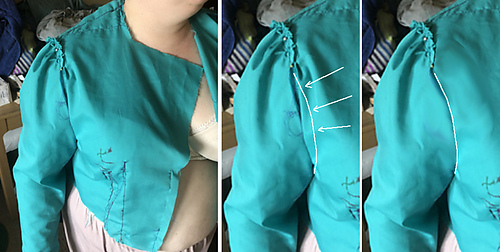
Here’s where we’re going to break the Sacred Rule and mess with the armscye length. We can get away with it by stealing length from the gathers in the sleeve cap.
Note that we have NOT messed with the shape of the armscye underarm.
If you want to go whole hog and alter the sleeve as well, you add sections of the same length in the same places.
Correcting the line at her waist:
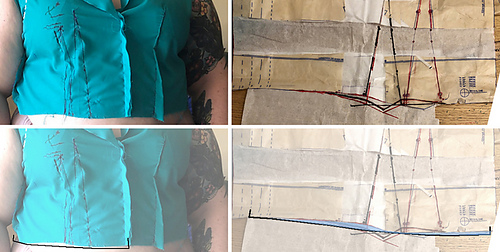
There are two spots that look like they could come down a little: at the new position of the dart (seam allowance triangle not added here) and at the CF.
Now to add the curved draped skirt.
The skirt expansion matches where it was added in the bodice: due to the shape of the drapes this is a fabulous alteration puzzle!
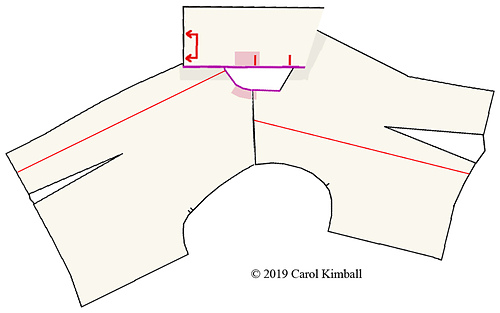
- MaxwellsDemon’s altered pattern with a blue chunk showing how much had been added to the bodice (these illos are NOT to the same scale).
- The front top drape we’re working with here.
- The pattern piece: the registration mark matches up with the bottom of the dart. Other than that, what is going on with that?
- When it’s sewn to the waistline, that upper curve straightens out, causing the bottom to fall into deep folds.
- The expansion in the drape must match where and how much was changed in the bodice. The blue line shows where this happens.
- The length at the top is what must be the same; how much the bottom flares is optional (two little drawings at bottom).
ETA: test the angle of expanding this piece by whacking some out of fabric. You’ll have a sense of what you want when you tackle the other draped pieces.
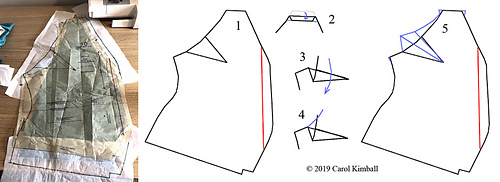
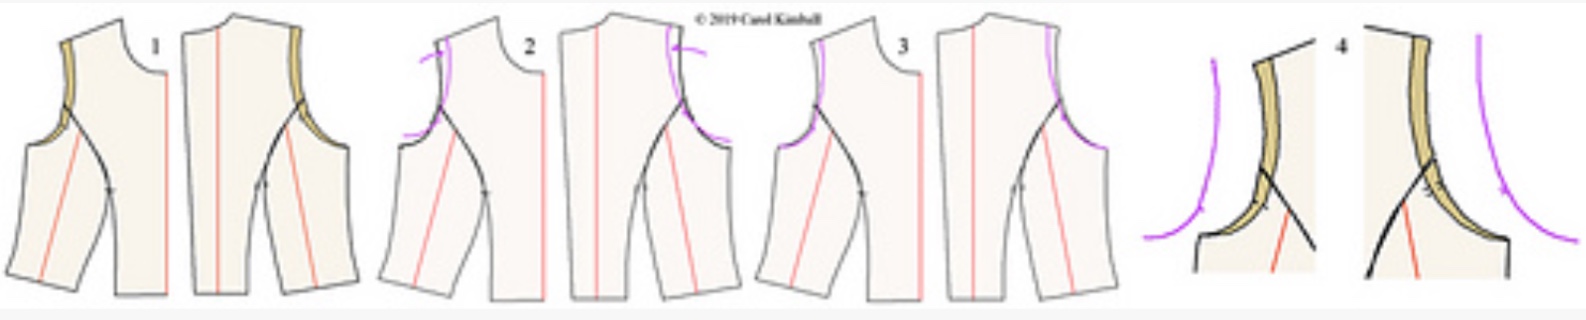
Dart Manipulation based on the above pattern work:
We’re using a bodice pattern adapted from MaxwellsDemon’s coat. The changes were to raise the front to a jewel neckline and remove the lapel flap.
Dart manipulation is an essential part of pattern-making*. Remember how we backed off about an inch/2.5 cm. from the nipple so there wouldn’t be a pucker at the end of the dart?
Before pivoting the dart, we’ve got to re-establish that point.
* Every decent set of pattern-making instructions has this; these illustrations/text are mine as it shows a pattern based on a common body type that’s not a fashion model.

The dart can be pivoted anywhere. 4 is the so-called French dart. It’s flattering due to the bias legs, but you’ve got to handle it carefully so as not to stretch it out when cutting/sewing.
It can be split between several lines, as in 6. This had unexpected popularity in certain eras: it creates a prismatic mono-bosom, particularly in stiff fabric.
Though the width of the dart varies at the seam line, that’s only because it extends farther. The arcs in each circle are the same.
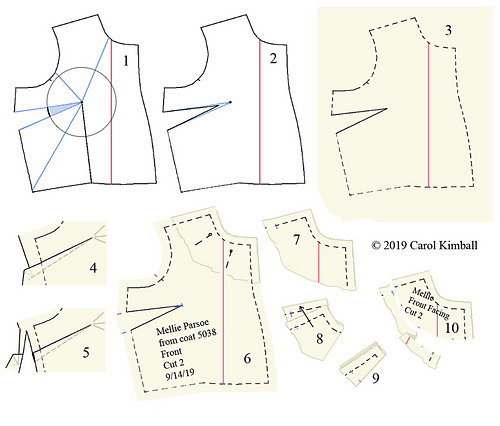
- Decide on your dart’s position.
- Redraw the dart with its point backed off about 1”/2.5 cm.
- Trace onto fresh pattern paper (dashed line indicates sewing rather than cutting).
- Fold out the dart. Press it down, or towards the side seams. This automatically creates the correct addition to the seam allowance.
- Cut out the pattern. You do NOT have to measure all around it, then draw that line, then cut it – just whack it out. About a third of my students get the vapors about how they couldn’t possibly. Give it a shot. Your hand-eye coordination will come up faster than you’d have thought possible. If you goof, tape it back and do it again. It’s amazing how much time this saves.
- Save even more time by pinning another piece of paper where the facing will go and cut both pieces together. Label the bodice piece.
- Transfer the marks for the facing. Figure how wide it needs to be to its finished edge, and mark at one end.
- Fold up the other end, matching cutting lines, and mark again.
- Cut off the extra.
- Label it (my common mistake is doing this earlier and chopping off part of the info).
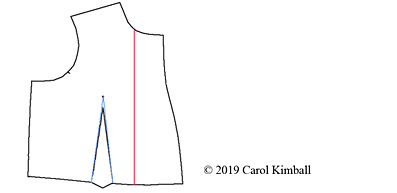
Next up: using this info to generate a princess seam.

- Start with a bodice dart extended to the nipple.*
- The curve runs from the top of the dart to wherever you’d like it, usually in the armscye. I’ve seen ones that went to the neck curve or front, but they’re uncommon. Put cross-marks so you can match up the pieces later. If you’re having trouble free-handing the curve, get a cup or bowl from the kitchen and use that for the middle.
- Trace each piece on its own paper. Note that the grain line on the side front changes once it’s independent of the center front. Grain lines run vertically. While the client’s trial pattern/muslin is on her body I’ll slap a ruler on her and draw a vertical line on the side front.
- Finish by adding seam allowances, registration marks, and labeling your pattern pieces.
*If it’s elsewhere (the dart, you goofs), use dart manipulation to pivot it straight down from the bust point.
Dart manipulation and conversion to a princess seam is utterly magic.
When I first learned about this, I had a stack of quarter-scale paper bodices, multiplying like origami frogs. Their darts were in different rotations, and they nested together perfectly, all the same shape.
One of the reasons I’m so taken with princess seams is that the lines can be curved** and the result fits so well over a curved body. There’s no reason, ever, to fit a princess seam together by easing part of it. Now a design element, where the center section or the side fronts are ruched is a different deal.
** so can dart legs, but still
Xxxxx
xxxx
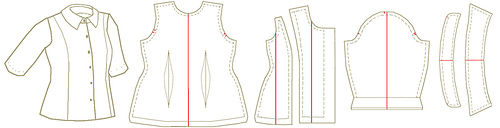
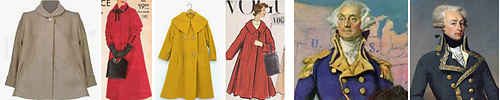
how to draft a “normal” collar?
I’m perplexed. The ones for coats, particularly of this flavor, all have collar stands.
Take that away and you have a Peter Pan collar. The only ones I can think of were on fifties swing coats.
If you want to get away from the extreme height (the military and fashion guys of this era were truly goofy – the two on the right are even worse even accounting for the artist playing fast and loose with the bodies), that’s doable.
Will you find photos/drawings of what you’re asking about?
In no way is my position “this is RONG” – I’ve done enough commissions that the clients were sure were historical but, um, not, and they can be great fun.
The trick is for everyone to be sure what the desired result is, then go for it.
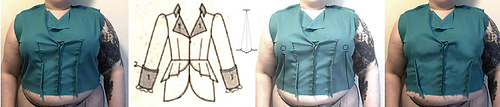
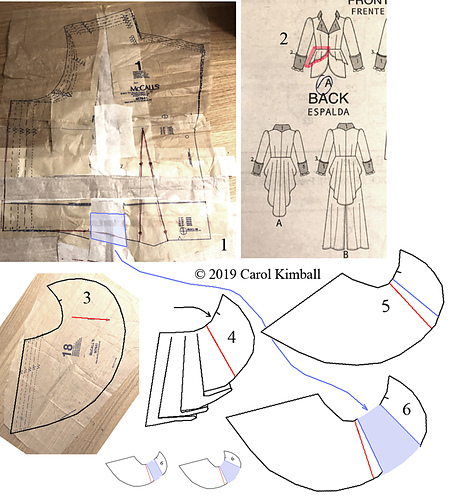
Using pin-tracking to make a convertible collar for MaxwellsDemon’s coat.
First, the drawing from the pattern envelope, a more realistic figure with the collar replaced, and collar variations.
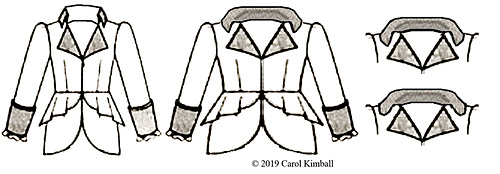
Here’s the collar pattern we’re aiming at and the bodice that it goes on. The collar can be customized later.
Unlike the pin-tracking shown earlier there are NO SEAM ALLOWANCES on these pieces. They’ll be added when we’re done with the rest.
The funny triangle sticking out of the bodice front is the lapel that flops over. The colored lines show where the collar and neckline join.
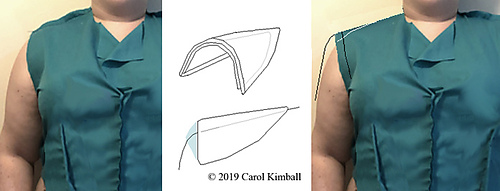
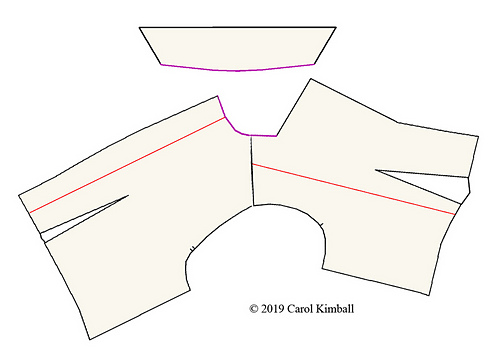
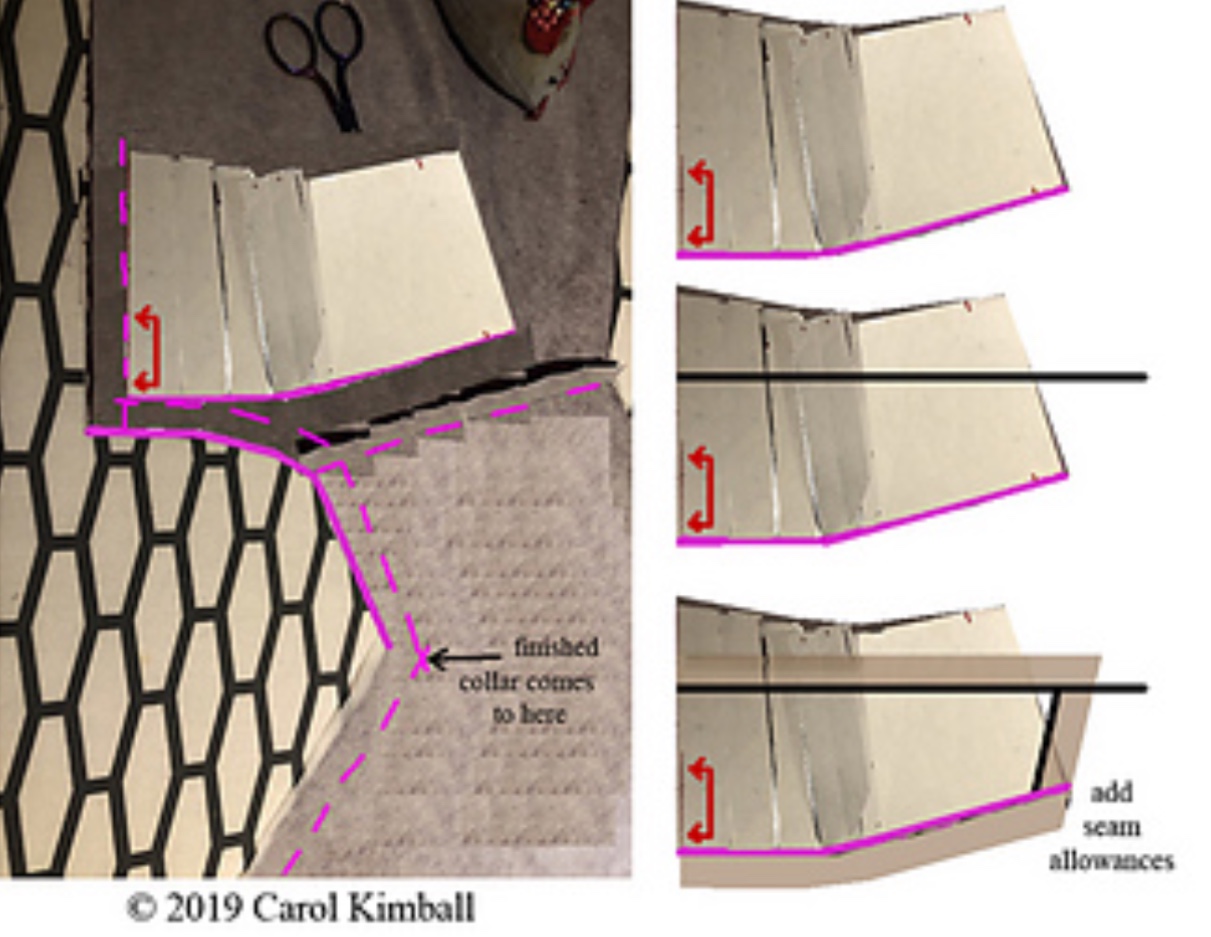
The fold of the collar will go to the center back of the bodice (remember, no seam allowances yet). As we’d have to guess at the curve of the collar’s lower edge, we’ll get the length right with a rectangle and then shape it. Our rectangle has the double-pointed red arrow to remind us that piece will be on a fold.
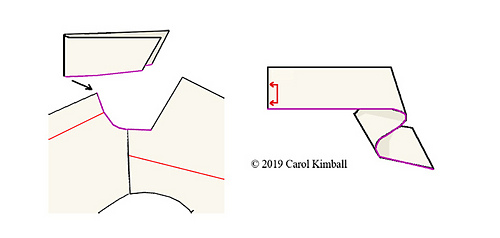
Butt the collar strip against the bodice, aligned with the center back (if you click to expand the image, you’ll see a slight gap – that was to make it easier to see).
Track over to the place where they start to not match (reference arrows) and pivot again. Continue to the front, making registration marks at the shoulder seam and front.
The curve of the bodice neckline corresponds to where the collar needs it.
- Slash the band from the upper almost to the bottom edge.
- Overlap to make a curve (a
cup or 3″ roll of tape* small plate is about right as a template). - Trace bottom and fold end to a fresh piece of pattern paper. Add marks.
- Figure how deep you want your collar and square a line across. Connect to the bottom corner at whatever angle looks good (repeat these last couple steps to change it).
- Curve the front corner if you want. Label (not shown). Cut out with seam allowances.
* this made too tight of a curve
How do we lay out and interface the collar for MaxwellsDemon to get a nice roll at the fold?
First, there are three options for laying out a pattern.
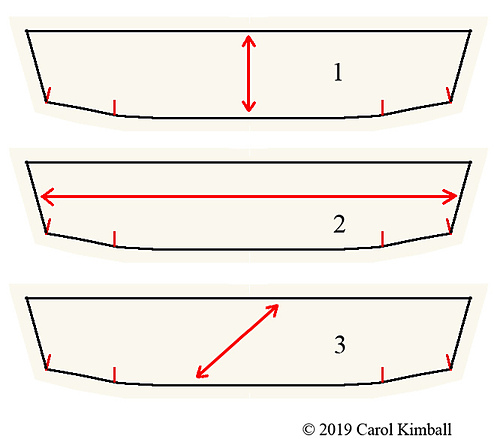
On woven fabric:
- on-grain is the most stable, with little stretch.
- cross-grain has slight stretch.
- Bias (at a 45° angle) has the most stretch.
Convertible collars are usually laid out on the bias. Stretch fabrics are weird; they’re often most stretchy cross-grain (occasionally on-). Fused interfacing will change the hand as well. What’s important is to find which direction will give the most pleasing roll.
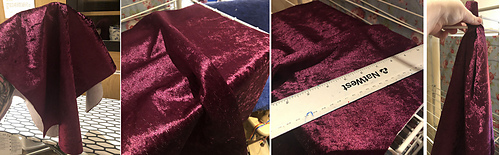
This is easy: hold a fold up and shape it into an arc – see next post. Try the other direction. Try the bias. Which works best?
Contrary to Received Wisdom, fabric and its interfacing don’t have to have the same grain.* A collar fused with weft-insertion interfacing might have both of those on the bias, and two layers of stiffer interfacing for the collar band area, one cut on-grain and the other cross-.
* This is why a traditional tailored jacket collar has the pieces cut differently. At a couture workshop, we cut a patch pocket on the bias, but stabilized it with interfacing cut on-grain.
Here’s heavy coat-weight wool folded and curved on-grain, cross-grain, and bias.
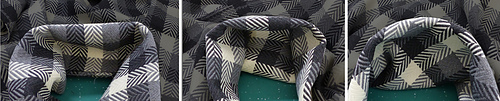
The bias is clearly the way to go if we were using this stuff. “Stuff” is an old and proper term for fabric, by the way.
We care only about results. MaxwellsDemon gets to decide* what works.
* You at home can play along: grab a coat or blanket and see what angle you like best!
Making the trial collar:
- Cut out (on identical grain) and sew the two collar pieces. It’s okay if the interfacing runs all the way to the cut edge. If you have’t fused it yet, cut it a hair inside the stitching line to reduce bulk in the seam allowances.
- Nip the seam allowance at the shoulder seams and the center back.
- Trim the corners close to the stitching: first, across, and then again at a steeper angle.
- Fold the collar around the neck to see where it wants to roll.
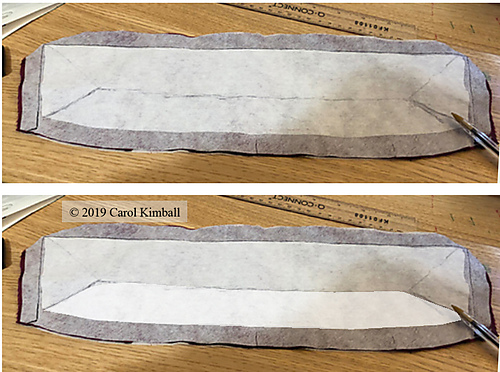
- Strongly interface the area below the roll. This is comparable to a collar stand on a two-piece collar. If the outer area of the collar isn’t stiff enough, slap another layer of lightweight interfacing* over the works.
At this stage, my client and I would confer and I’d redo the collar starting with its basic shape, from steps 3 on, up at Post 321. The second version will go like the wind.
Finish the collar: turn it right side out, carefully work out the points, understitch as far as you can (you won’t be able to get into the points), press, press, press. Set into bodice.
* such as fusible tricot. You don’t have to run out and buy a bunch of interfacings but you can start building an inventory of the ones you use often; in the meantime, use what you have, testing their layers on scraps. Save samples in your pattern envelope! Be sure each layer is thoroughly fused, taking your time. You’ve got everything out and your iron fired up anyway.
The collar curves the other way against the neckline; its more gradual curve is what makes it roll.
A paper pattern will stand up if you force it along the edge but will be too stiff to roll.
ETA: if the back of your coat has been cut with its seam allowances, then the collar’s fold will sit over at the eventual stitching line. If your red line is the CB, then it’s right, though the collar should also sit up that far from the raw edge. Any time I’m working with a piece that will go on the fold, I use that double-pointed arrow; I’ve had to go back and trim off seam allowances at CB in many of these graphics!
The reason we wait till the end to add the seam allowances is slashing as far as possible to make the overlaps.
In sewing, to stabilize fabrics and help keep them smooth. Interfacings are fused (with an iron) to collars, cuffs, front bands. They stabilize seam allowances in knits keep zipper edges from rippling. Sewing professionals have a sizable stash.
Not of general interest, but my guess is that there are people here who’d like to have some.
Non-standard uses I’ve done: lightweight tricot fused to the inside backs of coasters/mats to keep them flat after a trip through the washer! Also controls thread ends in needlework (i.e. so they don’t work their way loose).
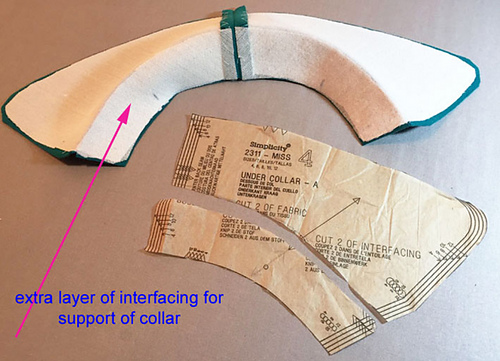
Her collar, with pen showing the curved areas at the top of the band interfacing:
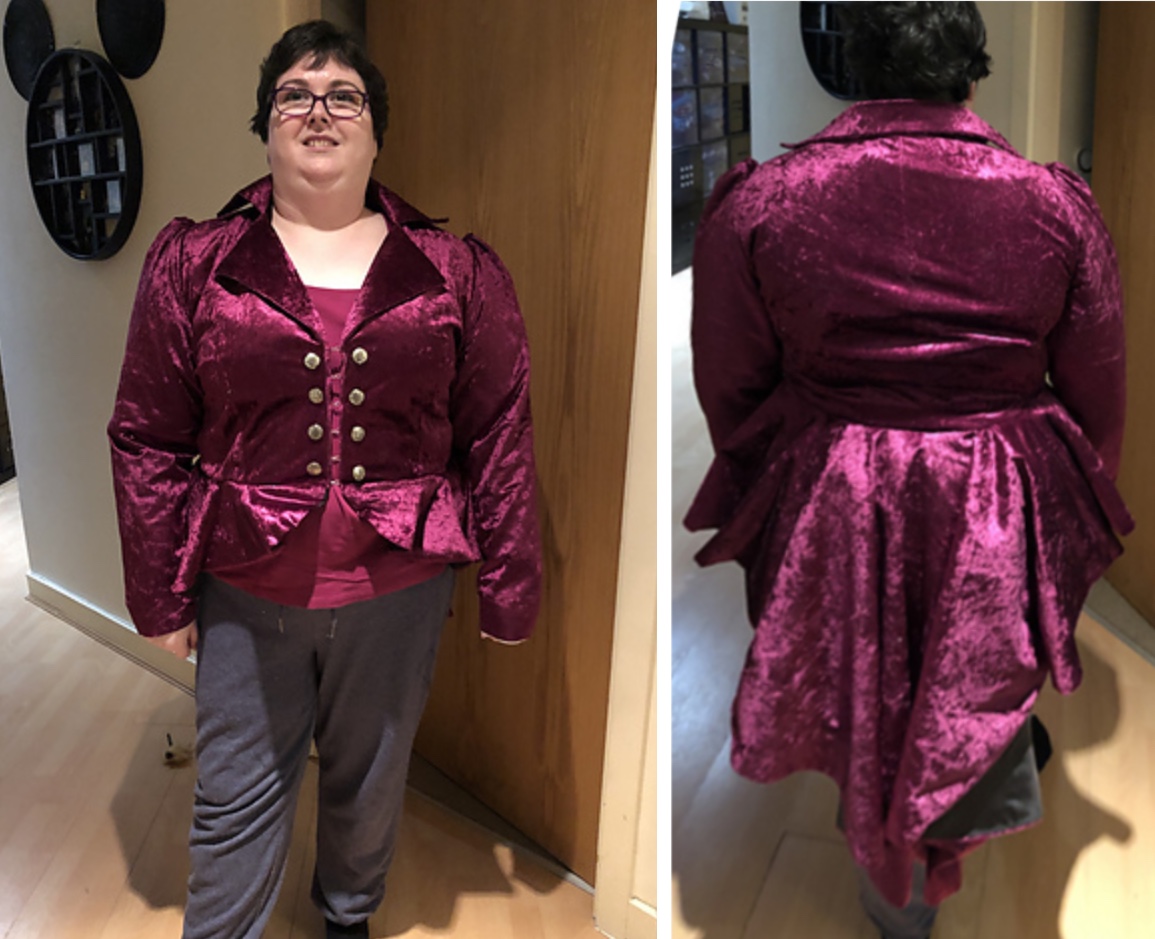
Her finished jacket:
I had no idea there were so many types of interfacing
I have over a dozen types that get used periodically, and three or four favorites. The difference it makes in sewn garments is (in a different way) comparable to the look in knitting of unblocked and then blocked lace.
Here’s a top that’s wrinkled from being jammed along a hanger rod. It would get a fast pressing before wearing, but you can see its interfaced collar and belt are fine after at least a dozen washings.

Interfacing, continued:
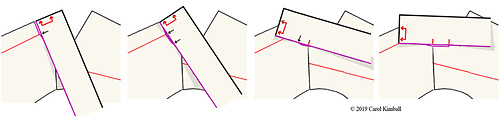
One of my first adventures sewing from handwoven was from a 100% cotton fabric brought in by a client. We discussed options and then she brought up what I’d been afraid to: that the best treatment would be to completely fuse an interfacing before cutting. It worked splendidly! It stabilized the weave (mostly kept it from stretching out) without greatly affecting the hand of her fabric.
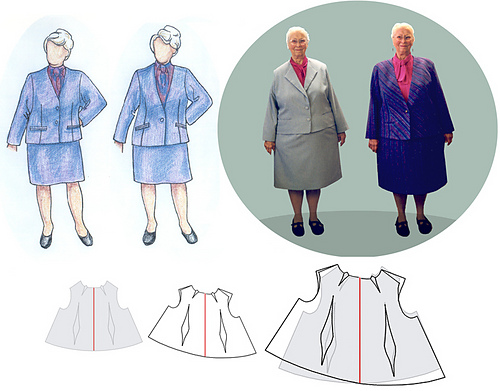
This was also the first time I did photo manipulation for a client.
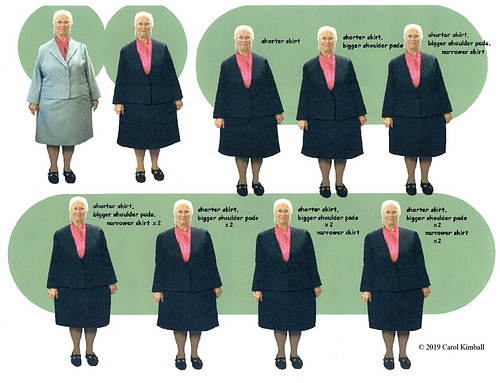
Her gray suit was what she had to use as the base. The woman who’d made it for her was no longer in the business; my client said that one had come out better than she’d dreamed possible. She emphatically did NOT want shoulder pads. She wanted her skirt longer and wider.
The second graphic showed her what she thought she wanted. It was before Photoshop came on the market; it was using the low-res CorelDraw.
She decided on the second option from the left on the bottom.
The other jacket changes she agreed to were to lose the lapels, lower the break (where the roll line ends/how much of her blouse would show), slightly longer length, and angle the pocket flaps.

She had severe scoliosis. The jacket hem was weighted so it didn’t hang up on her hips when she moved her elbows.
There was barely enough of purple asymmetric hand-loomed fabric: a handful of scraps were left. The pattern matched diagonally across the center front.
Altering a princess bodice.
Named Anni bodice, pretty good for right out of the envelope. I want to lengthen by about 1cm, also contemplating a narrow chest adjustment
What about the wrinkles in the back armscye?
Also might do a small swayback adjustment.

The chest looks fine – it’s the armscyes that need to be brought in. That should fix the wrinkles in the back armscye and possibly also the swayback.* The length isn’t addressed.
This is a Finnish pattern, so the seam allowances are 1 cm. (about 1/2”, rather the U.S. 5/8”). The first step is to take them off.

Suggested changes for the armscye (her bra strap is still covered). The side fronts and backs are pivoted so we can see where the armscye line is, then the changes made, and finally, the seam allowances put back on.
Contrary to earlier dogma, here the armscye length has been made a little longer. This will affect the top of the sleeve. (to come)
* look at the clever way she pinned in the zipper to make fitting herself easier
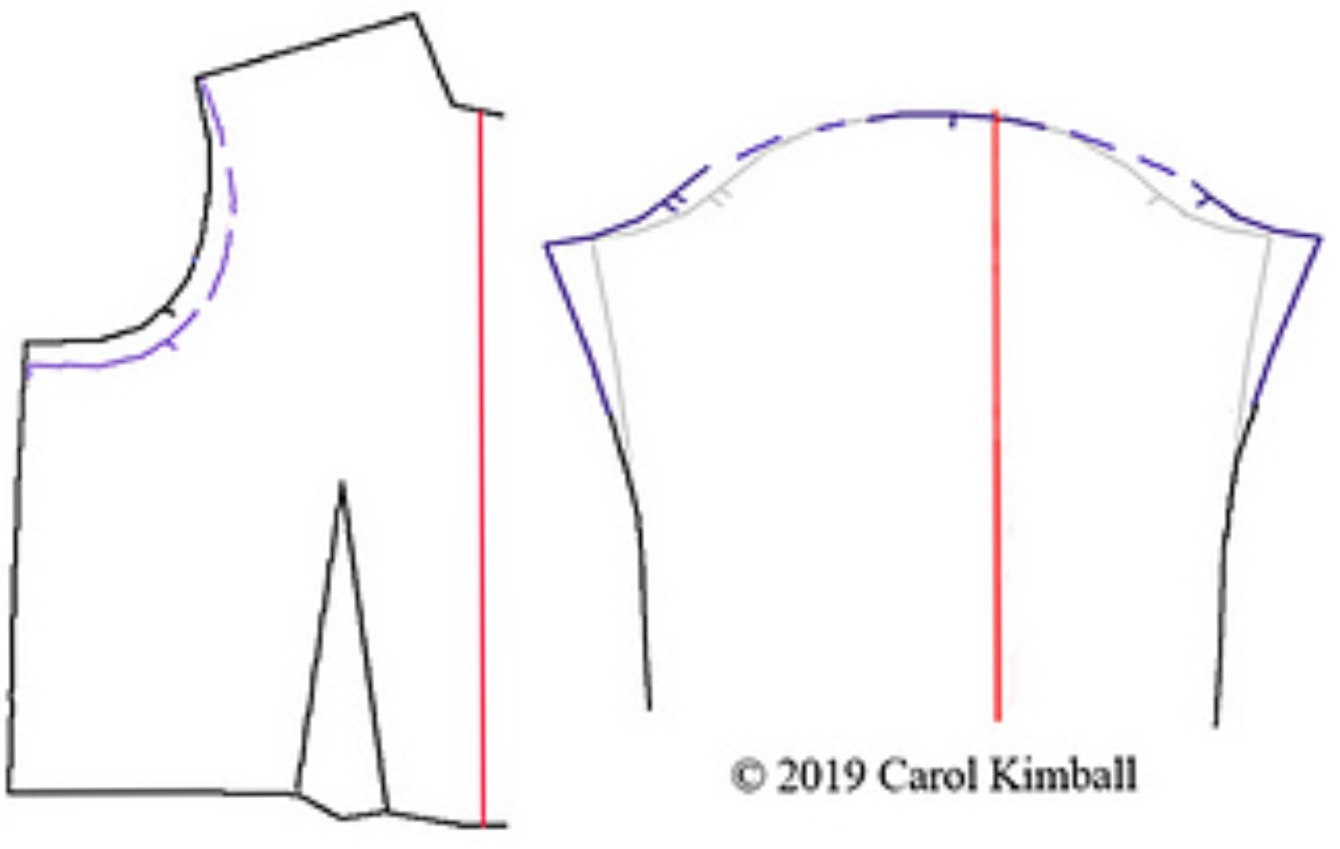
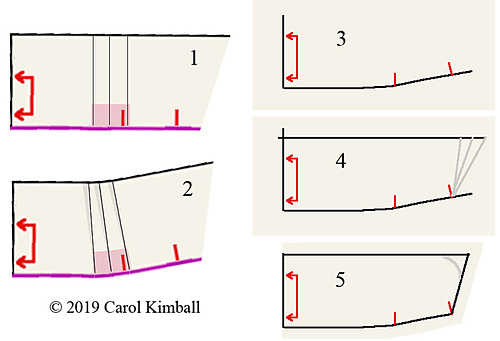
Here’s a comparison of the two methods of fixing the armscye:
- The pattern, changing the length of the armscye.
- Tipping the armscye line instead.
- Straightening the upper armscye in 2. to keep the length the same.
- Comparison.
Very similar. The advantage of using the tipping method is that the sleeve isn’t affected. She originally had planned to make this sleeveless, so the first method would have been fine.
We’ll use the tipped lines for working with her sleeve.
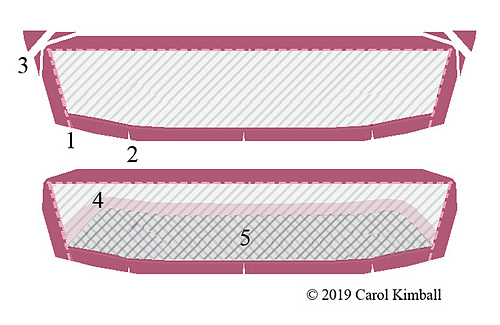
Mysteries of facings and lining (partially) revealed:
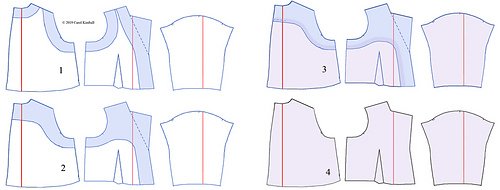
- Possible facings, skimpy.
- Better facings (alter your pattern to this version if you don’t have it).
- Traditional linings that are sewn to facings.
- Easier lining assembly, where the facings are appliquéd on top.
Facings fulfill two functions:
- They clean-finish edges, such as on the neckline and armscye of a sleeveless blouse.
- They stabilize those areas, as in addition to their own weight they are usually interfaced.
Occasionally you see the layout shown in the first set of graphics, where the manufacturer has pared down the amount of material. The trade-off is that this “savings” costs more to sew as there are more pieces to cut out and fuss with.
In 3, our lining makes its appearance. It is sewn to the facing, the seams pressed, and afterwards treated as one piece. Those reversed curves are tricky to draft and sew, and unless you press the seam allowances carefully can make a ridge that shows on the right side.
My suggestion is 4, where the lining is cut full size. I didn’t show the facings but they’re exactly as they appear in the earlier sets.
Once you’ve married your lining and facing pieces, follow your original instructions with the added lining along for the ride.
Making Sleeves Long Enough:
(complaint about elbows getting holes)
Though it looks like your sleeves are plenty long, if you’re blowing out the elbows they’re not long enough. As you’re sewing your own it’s an easy fix.
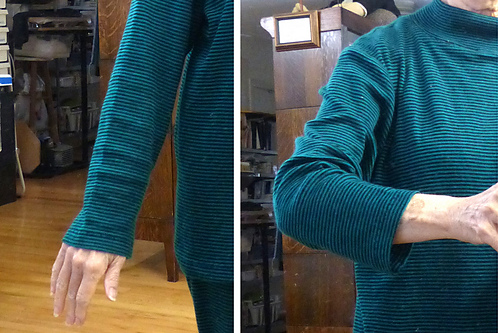
- Put on your shirt. Unbutton the cuff.
- Bend your elbow. Even in this loose knit top, this is how much it shortened.*
- The amount your sleeve pulls up is how much you need to add to the bottom of the sleeve.
That’s one of the reasons for cuffs; they keep the sleeve ease needed from dragging through the potato salad.
I’ve made this modification for almost all the men I’ve made shirts for, and many of the women.
* I promise you I did not do anything but bend my elbow and snap the shot.

xxx
Xxx
xxx
xxx
xxx
xxx
xxx
Xxx
xxx
Xxx
xxx
xxx
xxx
* the hems may or may not align. Truing them parallel to the floor is your last step.
shoulder slope.
length of shoulder seam
front shaping: dart manipulation, the Princess seam
The industrial method for an apparent cuffed hem, sewn completely by machine:
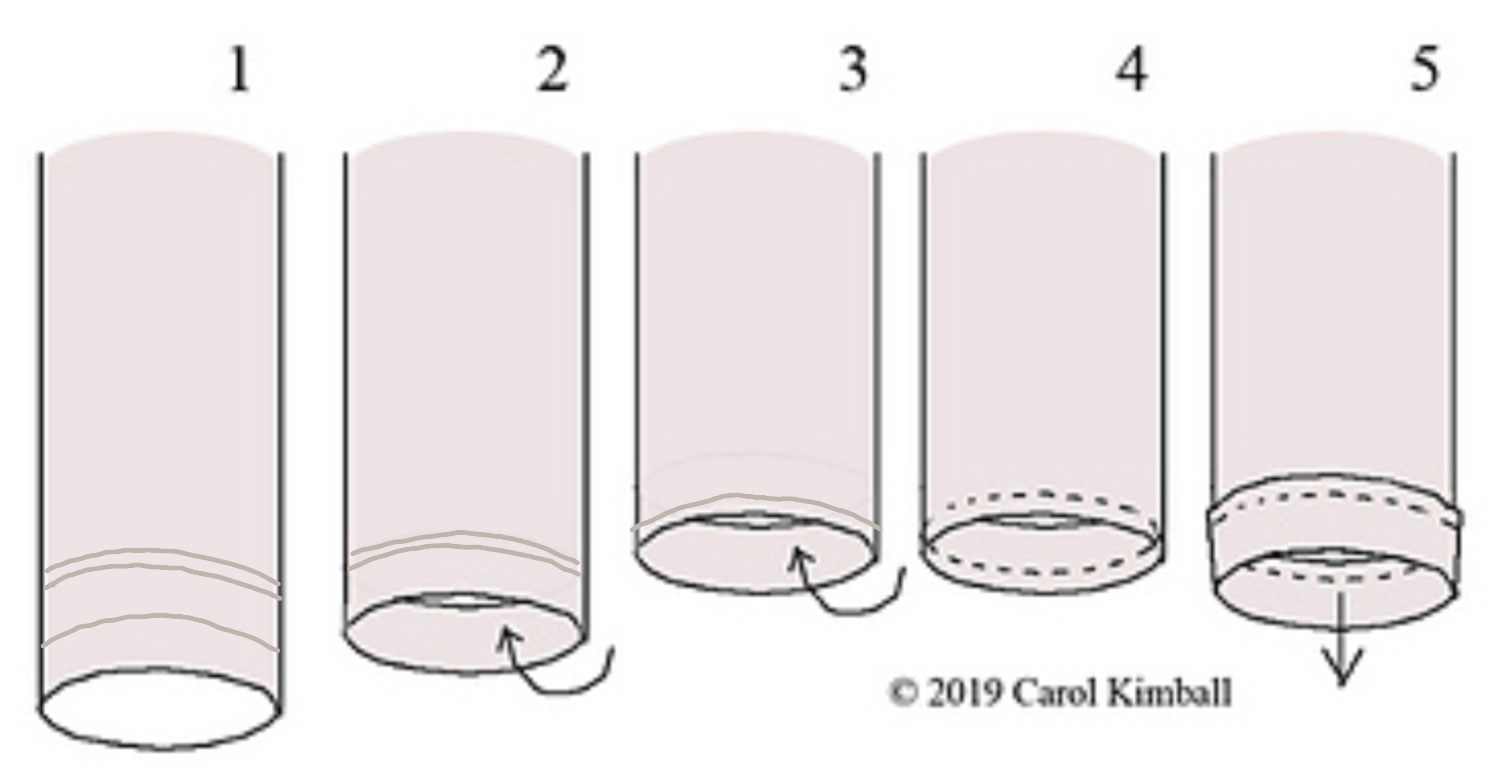
- Take a sheet of paper, make a flat version and fold it to see what length you’ll need. This will vary slightly by how deep of a cuff you want, and the TOC (turn of cloth). After this you can use it on any of your sleeve blocks, or, with adjustment for depth, a pants leg.
- Fold up to the inside. Press.*
- Fold up to the inside again, being sure that the raw edge is tightly in this fold. Press.
- Sew.
- Pull the cuff out, being sure the little flap is going up, and give a good press.
* Don’t skip the pressing! It’s critical for even stitching on the “cuff”.
Body Scans for Pattern-making:
Body-scanning to fit astronaut spacesuits was a benefit from NASA, using the kind of “x-ray” booths we now see at airport security.
Body-scanning to fit astronaut spacesuits was a benefit from NASA, using the kind of “x-ray” booths we now see at airport security.
In the 80s, the Big 3 (now 4) pattern companies looked into developing the software to generate personalized patterns from these scans. One of their vice presidents was enthused about having me consult on proportion, as it’s one thing to be able to make a suit that fits perfectly and another to have it attractive on the body (as in the drawings below). We’ve all seen (if not made) sweaters that fit okay but were a tad too long or short or didn’t have quite the right amount of ease.
Ultimately, the number of clients willing to pay for the initial body scans (originally $100; they were giving them away free at sewing expos towards the end) and then continue to buy patterns based on their personalized measurements was vanishingly small. The companies’ market for ordinary patterns was tanking due to the shift to “relaxed fit”, largely from inexpensive clothing flooding in from overseas.
CADD programs that generate commercial patterns from a set of measurements are extensively used in the industry. Software started about $20,000 some years back.